Appendix: Using Altinity.Cloud Anywhere with minikube
This guide covers setting up minikube so that you can use Altinity.Cloud Anywhere to provision ClickHouse® clusters inside minikube. Any computer or cloud instance that can run minikube and support the resource requirements of the Kubernetes cluster we describe here should work.
Note that while minikube is okay to use for development purposes, it should not be used for production. Seriously. We can’t stress that enough. It’s great for development, but don’t use it for production.
Server requirements
In the deployment you’ll do here, you’ll build a minikube cluster with seven nodes. Using the Docker runtime on a MacBook Pro M2 Max, the system provisioned 6 vCPUs and 7.7 GB of RAM per node, along with roughly 60 GB of disk space per node. It’s unlikely all of your nodes will run at capacity, but there’s no guarantee your machine will have enough resources to do whatever you want to do in your minikube cluster. (Did we mention it’s not for production use?) And, of course, the default provisioning may be different on other operating systems, hardware architectures, or virtualization engines.
You’ll also need to install minikube itself. See the minikube start page for complete instructions.
Starting minikube
If you’ve used minikube on your machine before, we recommend that you delete its existing configuration:
minikube delete
Now start a minikube cluster with seven nodes:
minikube start --nodes 7 --kubernetes-version=v1.30.0
You’ll see results like this:
😄  minikube v1.33.1 on Darwin 14.5 (arm64)
✨  Automatically selected the docker driver. Other choices: parallels, qemu2, ssh
📌  Using Docker Desktop driver with root privileges
👍  Starting "minikube" primary control-plane node in "minikube" cluster
🚜  Pulling base image v0.0.44 ...
🔥  Creating docker container (CPUs=2, Memory=3500MB) ...
🐳  Preparing Kubernetes v1.30.0 on Docker 26.1.1 ...
    ▪ Generating certificates and keys ...
    ▪ Booting up control plane ...
    ▪ Configuring RBAC rules ...
🔗  Configuring CNI (Container Networking Interface) ...
🔎  Verifying Kubernetes components...
    ▪ Using image gcr.io/k8s-minikube/storage-provisioner:v5
🌟  Enabled addons: storage-provisioner, default-storageclass

👍  Starting "minikube-m02" worker node in "minikube" cluster
🚜  Pulling base image v0.0.44 ...
🔥  Creating docker container (CPUs=2, Memory=3500MB) ...
🌐  Found network options:
    ▪ NO_PROXY=192.168.49.2
🐳  Preparing Kubernetes v1.30.0 on Docker 26.1.1 ...
    ▪ env NO_PROXY=192.168.49.2
🔎  Verifying Kubernetes components...

👍  Starting "minikube-m03" worker node in "minikube" cluster
. . .
👍  Starting "minikube-m04" worker node in "minikube" cluster
. . .
👍  Starting "minikube-m05" worker node in "minikube" cluster
. . .
👍  Starting "minikube-m06" worker node in "minikube" cluster
. . .
👍  Starting "minikube-m07" worker node in "minikube" cluster
. . .
🏄  Done! kubectl is now configured to use "minikube" cluster and "default" namespace by default
NOTE: Defining the environment variable MINIKUBE_IN_STYLE=0 disables the emojis that appear in front of every minikube message. You’re welcome.
At this point minikube is up and running. The kubectl get nodes command shows our seven nodes:
NAME           STATUS   ROLES           AGE   VERSION
minikube       Ready    control-plane   25m   v1.30.0
minikube-m02   Ready    <none>          25m   v1.30.0
minikube-m03   Ready    <none>          24m   v1.30.0
minikube-m04   Ready    <none>          24m   v1.30.0
minikube-m05   Ready    <none>          24m   v1.30.0
minikube-m06   Ready    <none>          24m   v1.30.0
minikube-m07   Ready    <none>          24m   v1.30.0
When using Altinity.Cloud Anywhere with a traditional cloud vendor, there are node types, availability zones, and storage classes. We need to label our minikube nodes to simulate those things. First, run these commands to define the node types and availability zones:
kubectl --context=minikube label nodes minikube \
  node.kubernetes.io/instance-type=minikube-node \
  topology.kubernetes.io/zone=minikube-zonea
kubectl --context=minikube label nodes minikube-m02 \
  node.kubernetes.io/instance-type=minikube-node \
  topology.kubernetes.io/zone=minikube-zonea
kubectl --context=minikube label nodes minikube-m03 \
  node.kubernetes.io/instance-type=minikube-node \
  topology.kubernetes.io/zone=minikube-zonea
kubectl --context=minikube label nodes minikube-m04 \
  node.kubernetes.io/instance-type=minikube-node \
  topology.kubernetes.io/zone=minikube-zoneb
kubectl --context=minikube label nodes minikube-m05 \
  node.kubernetes.io/instance-type=minikube-node \
  topology.kubernetes.io/zone=minikube-zoneb
kubectl --context=minikube label nodes minikube-m06 \
  node.kubernetes.io/instance-type=minikube-node \
  topology.kubernetes.io/zone=minikube-zonec
kubectl --context=minikube label nodes minikube-m07 \
  node.kubernetes.io/instance-type=minikube-node \
  topology.kubernetes.io/zone=minikube-zonec
You’ll see these results:
node/minikube labeled
node/minikube-m02 labeled
node/minikube-m03 labeled
node/minikube-m04 labeled
node/minikube-m05 labeled
node/minikube-m06 labeled
node/minikube-m07 labeled
Now all of our minikube nodes are defined to be of type minikube-node; we’ll see that node type again later. We’ve also defined availability zones named minikube-zonea, minikube-zoneb, and minikube-zonec.
On to our storage classes. We want to use the local-path storage class instead of minikube’s default standard storage class. This command defines the new storage class:
curl -sSL https://raw.githubusercontent.com/rancher/local-path-provisioner/v0.0.22/deploy/local-path-storage.yaml | \
  sed 's/\/opt\/local-path-provisioner/\/var\/opt\/local-path-provisioner/ ' | \
  kubectl --context=minikube apply -f -
The local-path storage class is created:
namespace/local-path-storage created
serviceaccount/local-path-provisioner-service-account created
clusterrole.rbac.authorization.k8s.io/local-path-provisioner-role created
clusterrolebinding.rbac.authorization.k8s.io/local-path-provisioner-bind created
deployment.apps/local-path-provisioner created
storageclass.storage.k8s.io/local-path created
configmap/local-path-config created
Now that we’ve defined the new storage class, we need to tell minikube that the local-path class is the default:
kubectl --context=minikube patch storageclass standard \
  -p '{"metadata": {"annotations":{"storageclass.kubernetes.io/is-default-class":"false"}}}'
kubectl --context=minikube patch storageclass local-path \
  -p '{"metadata": {"annotations":{"storageclass.kubernetes.io/is-default-class":"true"}}}'
The two storage classes are updated:
storageclass.storage.k8s.io/standard patched
storageclass.storage.k8s.io/local-path patched
Running kubectl get storageclasses shows the new default class:
NAME                   PROVISIONER                RECLAIMPOLICY   VOLUMEBINDINGMODE      ALLOWVOLUMEEXPANSION   AGE
local-path (default)   rancher.io/local-path      Delete          WaitForFirstConsumer   false                  89s
standard               k8s.io/minikube-hostpath   Delete          Immediate              false                  7m39s
Connecting Altinity.Cloud Anywhere to minikube
Now that we have the minikube cluster running and configured, it’s time to connect it to Altinity.Cloud Anywhere. That’s the final step for enabling Altinity to provision ClickHouse clusters in minikube. You’ll need an Altinity.Cloud Anywhere account to get started, of course.
If you DON’T have an Altinity.Cloud Anywhere account
You’ll need to sign up for an Altinity.Cloud Anywhere trial account. At the end of that process, you’ll have an email with a link to the Altinity Cloud Manager (ACM). You’ll use that link to set up the connection between minikube and Altinity. Clicking the link takes you to Figure 4 in Step 1. Setting up the tunnel.
If you DO have an Altinity.Cloud Anywhere account
You’ll need to create a new Environment inside the ACM and connect that Environment to minikube. Start by selecting the Environments tab to load the list of Environments:

At the top of the list of Environments, click the  button to get started. Click the
 ![]() down arrow to see the list of environment types:
down arrow to see the list of environment types:
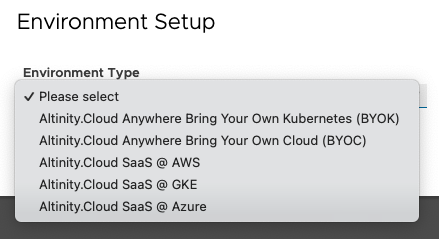
Select Altinity.Cloud Anywhere Bring Your Own Kubernetes (BYOK) and enter a name for the environment:

Clicking OK takes you to Figure 4 in Step 1. Setting up the tunnel.
Step 1. Setting up the tunnel
First we need to set up the TLS tunnel between minikube and Altinity. Whether you’re a new customer who followed an email link from your welcome email or an existing customer who clicked OK after creating a new environment, you’ll see this screen:

Make sure the “Provisioned by User” box is selected at the top of the page, and make sure you’ve installed altinitycloud-connect from the link beneath it. Copy and paste the text in the center box at the command line and run it. This doesn’t generate any output at the command line, but it does create a cloud-connect.pem file in the current directory.
Once you have the cloud-connect.pem file, run the command in the bottom text box to set up the TLS tunnel. The altinitycloud-connect kubernetes command generates YAML that has configuration information along with the keys from the .pem file. That YAML data is passed to kubectl.
You’ll see results similar to this:
namespace/altinity-cloud-system created
namespace/altinity-cloud-managed-clickhouse created
clusterrole.rbac.authorization.k8s.io/altinity-cloud:node-view created
clusterrole.rbac.authorization.k8s.io/altinity-cloud:node-metrics-view created
clusterrole.rbac.authorization.k8s.io/altinity-cloud:storage-class-view created
clusterrole.rbac.authorization.k8s.io/altinity-cloud:persistent-volume-view created
clusterrole.rbac.authorization.k8s.io/altinity-cloud:cloud-connect created
serviceaccount/cloud-connect created
clusterrolebinding.rbac.authorization.k8s.io/altinity-cloud:cloud-connect created
clusterrolebinding.rbac.authorization.k8s.io/altinity-cloud:node-view created
clusterrolebinding.rbac.authorization.k8s.io/altinity-cloud:node-metrics-view created
clusterrolebinding.rbac.authorization.k8s.io/altinity-cloud:storage-class-view created
clusterrolebinding.rbac.authorization.k8s.io/altinity-cloud:persistent-volume-view created
rolebinding.rbac.authorization.k8s.io/altinity-cloud:cloud-connect created
rolebinding.rbac.authorization.k8s.io/altinity-cloud:cloud-connect created
secret/cloud-connect created
deployment.apps/cloud-connect created
Altinity creates all ClickHouse-related assets in the altinity-cloud-system and altinity-cloud-managed-clickhouse namespaces. You should not create anything in those namespaces yourself.
Click PROCEED to go to the next step. It’s possible you’ll get an error message that the connection isn’t ready yet:

Wait a few seconds and click PROCEED again…at some point this will work. (Again, we don’t recommend this for production use.)
Step 2. Configuring your minikube resources
Next we’ll define aspects of the minikube environment to Altinity:

The specific values to use are:
- Cloud Provider: Not Specified (minikube is a special case)
- Region:
minikube-zone(we defined that with a label earlier) - Number of AZs:
3 - Storage Classes:
local-pathandstandard(we defined these earlier and madestorageclassthe default) - Node Pools: A single node pool named
minikube-nodewith a capacity of10. The PROCEED button will be disabled until the boxes for ClickHouse, Zookeeper, and System are all checked.
Click Proceed to go to the Confirmation tab.
Step 3. The Confirmation tab
This screen displays a status bar as the ACM finalizes the connection.

It’s quite likely the status bar will reach the end before everything is configured. Just keep clicking the  button until things are finished. Once everything is loaded and running, you’ll see this screen:

Notice that the Availability zones are minikube-zonea, minikube-zoneb, and minikube-zonec as we defined earlier, and the seven nodes in our minikube cluster are listed at the bottom of the screen.
The new environment has three node types defined, but their definitions are incomplete; no memory or CPU resources are defined for them. Given the limited usefulness of nodes with no memory or CPU, you’ll need to update the node type definitions. Click the NODE TYPES link at the top of the page. You’ll see a list of incompletely defined node types:

Notice that the CPU column is blank and the Memory column is pending. Click minikube_node in the Name column for each node in the node list. You’ll see this dialog:

Define three versions of minikube_node:
- A node with a scope of
clickHouse, 1024 MB of memory, and 2 CPUs - A node with a scope of
system, 1024 MB of memory, and 1 CPU - A node with a scope of
zookeeper, 1024 MB of memory, and 1 CPU
When you’re done, the list of Node Types should look like this:

Click the  back button to return to the cluster view. Click the
  button to start the Cluster Launch Wizard. (See the Launch Cluster Wizard documentation for complete instructions.) In a few minutes, you’ll have a ClickHouse cluster running inside minikube on your machine:

If you’d like to take a closer look, kubectl get pods -n altinity-cloud-managed-clickhouse shows the pods Altinity.Cloud Anywhere created:
NAME                                    READY   STATUS    RESTARTS   AGE
chi-minikube-test-minikube-test-0-0-0   2/2     Running   0          10m
chi-minikube-test-minikube-test-0-1-0   2/2     Running   0          6m42s
clickhouse-operator-69ff695d5-jrrpd     2/2     Running   0          20m
zookeeper-1997-0                        1/1     Running   0          10m
zookeeper-1997-1                        1/1     Running   0          8m40s
zookeeper-1997-2                        1/1     Running   0          6m50s
There are two pods for ClickHouse itself, a pod for the Altinity ClickHouse Operator, and three pods for Zookeeper. These pods are managed for you by Altinity.
Working with Altinity.Cloud Anywhere
Now that your environment is configured, you use the ACM to perform common user and administrative tasks. The steps and tools to manage your ClickHouse clusters are the same for Altinity.Cloud Anywhere and Altinity.Cloud.
Here are some common tasks from the ACM documentation:
The ACM documentation includes:
- A Quick Start guide,
- A User Guide, and
- An Administrator Guide.