Your go-to technical source for all things ClickHouse® and Altinity®
Altinity®, Altinity.Cloud®, and Altinity Stable® are registered trademarks of Altinity, Inc. ClickHouse® is a registered trademark of ClickHouse, Inc.; Altinity is not affiliated with or associated with ClickHouse, Inc.
Altinity.Cloud is a fully managed ClickHouse® services provider. Altinity.Cloud is the easiest way to set up a ClickHouse cluster with different configurations of shards and replicas. From one user interface you can create ClickHouse clusters, monitor their performance, run queries against them, populate them with data from S3 or other cloud stores, and other essential operations.
This documentation is divided into these sections:
Quick Start Guide - Setting up an Altinity.Cloud account and creating your own ClickHouse clusters.
User Guide - Working with your ClickHouse clusters.
Administrator Guide - In-depth technical details for administrators, including setting up environments, user accounts, and backups.
Security Guide - Keeping your ClickHouse clusters and their data safe and secure.
Altinity.Cloud lets you create, manage, and monitor ClickHouse clusters through the Altinity Cloud Manager (ACM). Here are some of the common tasks that the ACM makes easy:
Work with a database to execute SQL statements, check system performance, examine schemas, and other useful tasks.
Work with backups to define when your data should be backed up, where those backups should be stored, and restore data from a backup.
What are the different ways to run Altinity.Cloud?
There are three ways to run Altinity.Cloud. You can let us handle the infrastructure for you, so you can focus on your data and your analytics applications. If you prefer (or if you need to), you can take complete control and manage it yourself. The different ways of doing things are:
Use Altinity’s cloud account - Altinity manages all of the infrastructure for you. Think of this as ClickHouse as a Service. This is available on four cloud providers: Amazon, Google, Microsoft, and Hetzner.
Use your cloud account - You run Altinity.Cloud inside your cloud account. You give Altinity very specific access to your account, then you can use Altinity.Cloud to provision ClickHouse clusters in your account. That means all of the compute and storage resources are under your control. This is available on four cloud providers: Amazon, Google, Microsoft, and Hetzner, or you can run Altinity.Cloud in your Kubernetes environment.
As you would expect, our responsibilities are different depending on your choice here. For example, we’re responsible for managing our own cloud account, but we can’t manage yours. And we’re responsible for managing the Kubernetes environment, unless you’ve told us you’re going to manage that yourself. See the Altinity Responsibility Model for complete details.
Open-source analytic stack
Altinity.Cloud uses open-source software for the analytic stack and selected management services–the Altinity Kubernetes Operator for ClickHouse, Loki, Prometheus, and Grafana. The following diagram shows the principal components of our architecture.
Your applications work with your ClickHouse data through the Altinity.Cloud access point. Altinity.Cloud then uses the Altinity Connector inside the kubernetes cluster to work ClickHouse. The ACM makes it easy to control access to the access point via standard techniques like whitelisting, access tokens, and RBAC. See the Best Practices section of the Security Guide for the details.
Service architecture
The Altinity.Cloud service architecture consists of a management plane that makes it easy to work with resources in your Altinity.Cloud account as well as a data plane that hosts your ClickHouse clusters and other infrastructure. The dedicated Kubernetes cluster in Figure 2 below is the cluster shown in more detail in Figure 1 above.
Figure 2 - The Altinity.Cloud service architecture
Whether you’re running Altinity.Cloud in your cloud or Altinity’s, the architecture is the same.
How is Altinity.Cloud organized?
The various components of Altinity.Cloud are arranged as follows:
Organizations have one or more environments that service your company. Altinity.Cloud starts at the Organization level - that’s your company. When you and members of your team log into Altinity.Cloud, you’ll start here.
Accounts have roles and permissions that allow each user to interact with Altinity.Cloud. An Administrator account can create and modify accounts for others, but most accounts simply have access to one or more environments and ClickHouse clusters within those environments.
Environments are a group of CluckHouse clusters. Working with environments lets you control access and resources at the cluster level.
Clusters are sets of replicas that work together to replicate data and improve performance. Clusters consist of one or more Nodes.
Nodes are individual virtual machines or containers that run ClickHouse.
Shards are groups of nodes that work together to share data and improve performance and reliability.
Replicas are groups of shards that mirror data and performance so when one replica goes down, they can keep going. Shards can then be set as replicas, where groups of nodes are copied. If one replica goes down, the other replicas can keep running and copy their synced data when the replica is restored or a new replica is added.
For details, see these topics in the Security Guide:
What are Altinity’s responsibilities? What are my responsibilities?
Depending on where you run Altinity.Cloud, the division of labor between Altinity and you is different. If you’re running in your cloud account or Kubernetes environment, there are many things that are simply out of our control. On the other hand, if you’re running in our cloud, most things are on us. This figure shows the division of responsibilities for all three scenarios:
Figure 3 - The Altinity Responsibility Model
Applications
As you would expect, your applications and their data are completely under your control.
High Availability, Disaster Recovery, and Resiliency
Although Altinity provides a number of features to make HA and DR easier, it’s still up to you to make sure the way you’re using those features meets your needs. For example, the Altinity Cloud Manager makes it easy to configure backups and define where they should be stored, but it’s up to you to make sure those settings meet your needs for availability, disaster recovery, data sovereignty, and other requirements.
ClickHouse Clusters
No matter where you’re running Altinity.Cloud, we handle creating, managing, and upgrading your ClickHouse clusters. It’s easy to create ClickHouse clusters with the Launch Cluster Wizard, and the User Guide, the Administrator Guide, and the Security Guide have complete details on working with, configuring, and security your clusters.
Kubernetes Environments
If you’re running in Altinity’s cloud account or your own, we handle Kubernetes for you. Otherwise, (you’re running Altinity.Cloud in your Kubernetes environment), it’s up to you to provision, monitor, and update that environment. The section Running Altinity.Cloud in Your Kubernetes Environment(BYOK) has complete details.
VPC Layer
If you’re running Altinity.Cloud in your Kubernetes environment, it’s up to you to handle the VPC layer. Otherwise (you’re running in Altinity’s cloud account or your own), we handle the VPC layer for you.
Cloud Account
If you’re running Altinity.Cloud in our cloud, your cloud resources are billed through your Altinity.Cloud account. For Bring Your Own Cloud or Bring Your Own Kubernetes environments, those cloud resources are running in your account, so those charges are on you. As you work with your ClickHouse clusters in the Altinity Cloud Manager, the ACM will provision resources as needed.
Where can I find out more?
Altinity provides the following resources to our customers and the Open Source community:
Altinity Documentation Site - The official documentation for Altinity.Cloud, Altinity Stable® Builds, the ALtinity Kubernetes Operator for ClickHouse, and related products and open-source projects. (Spoiler alert: you’re here already.)
The Altinity Knowledge Base An open-source, community-driven place to learn about ClickHouse configurations and answers to questions.
The Altinity Home Page Learn about other resources, meetups, training, conferences, and more.
The Altinity Community Slack Channel - Work with Altinity engineers and other ClickHouse users to get answers to your problems and share your solutions.
1.2 - Quick Start Guide
The minimal steps to get Altinity.Cloud running with your first cluster.
Welcome to Altinity.Cloud, the fastest, easiest way to set up, administer, and use ClickHouse®. Your ClickHouse is fully managed, so you can focus on your data and applications.
This quick start guide gives you the minimum steps to get up and running with Altinity.Cloud. When you’re ready to dig deeper and use the full power of ClickHouse in your Altinity.Cloud environment, check out our User Guide, Administrator Guide, and Security Guide for all the details.
1.2.1 - Creating a trial account
The first step to working with Altinity.Cloud
The easiest way to get started with Altinity.Cloud is to sign up for a trial account. To get started on your Altinity.Cloud journey, sign up for a 14-day Altinity.Cloud trial account at acm.altinity.cloud/signup. You’ll see this dialog:
Figure 1 - Signing up for a trial account with an email address
There are two ways to sign up. You can enter your name and email address or sign up through Google or Okta. Choose either option and click the box to accept our Terms of Service and Privacy Policy. When you’re ready, click CONTINUE. If everything worked, you’ll be asked to check your email:
Figure 2 - “Check your email” message
Your inbox (or spam folder) should have something like this:
Figure 3 - The validation email
Click the link in the email, then set your password:
Figure 4 - Setting your password
Your password must be at least 12 characters. When your password is set, click CONFIRM. You’ll be taken to the Environment Setup dialog in the Altinity Cloud Manager (ACM):
Figure 5 - The ACM’s Environment Setup dialog
Once you choose a cloud provider in the Environment Setup dialog, you can create an Altinity.Cloud environment in our cloud account (think ClickHouse aaS) or in your cloud account (you give us very specific permissions to access your account). With the environment set up, it’s easy to create and manage ClickHouse clusters.
Contact Altinity to extend the trial by clicking the support[at]altinity.com link.
Once your trial has expired
If your trial has expired, you’ll go to the Billing page when you log in. You can then convert your trial to a paid subscription if you want.
Whether you choose to convert your trial account or not, your data is still there and your ClickHouse clusters are still running, but you won’t be able to manage your ClickHouse clusters through the ACM. You won’t be able to do a DELETE operation, but other operations (and any applications you’ve written to use the cluster) will still work. )
1.2.2 - Converting a trial account to a paid subscription
Moving to production
When you’re ready to convert your trial account to a paid subscription, there is a simple wizard to guide you through the process. Click Activate Subscription in the menu on the left to get started:
The first step in the process gives you an estimate of your monthly bill:
Figure 2 - Viewing pricing information
The estimate is based on your current usage. To get an estimate based on other workloads, click the button. You’ll see this dialog:
Figure 3 - The pricing calculator
In this case the estimate is based on 192 vCPUs, 3.1 TB of storage, and Premium support. Click CLOSE to go back to the Paid Subscription wizard. Click NEXT to continue.
Choosing a support plan
Next, choose a support plan:
Figure 4 - Choosing a support plan
There are two options: Enterprise and Premium. A high-level support of the two plans is listed here. The Support page has complete details on the two options. When you’ve chosen a support plan, click NEXT to continue.
Entering billing information
As you would expect, we’ll need some details:
Figure 5 - Entering your billing information
Once you’ve entered your address, click the button to enter your payment details:
Figure 6 - Setting up a payment method
When you’ve set up your payment method click CONFIRM to continue. You’ll see the new payment method listed at the bottom of the Billing Information tab:
Figure 7 - A payment method stored with your account
Click NEXT to continue
Confirming your choices
As a final step, you need to confirm your choices:
Figure 8 - Confirming your choices
You must agree to our Terms of Service and Privacy Policy to continue. You also must confirm you understand that your account will become billable as soon as you you check both boxes and click the button.
If all goes well, you’ll see a confirmation message:
Figure 9 - A successfully converted account
When your account becomes billable, your quotas will be increased by 10X. Your trial most likely had limits of 16 vCPUs and 1 TB of storage, so those limits will be increased to 160 vCPUs and 10 TB of storage. Users with orgadmin in your account will receive an email with documentation links and support instructions.
Next steps
You may just be getting started working with Altinity.Cloud, or you may have created a number of ClickHouse clusters as part of your trial. No matter where you are, here are some resources to help you make the most of Altinity.Cloud:
The Launch Cluster Wizard - You probably have ClickHouse clusters already, but whenever you need to create a new one, the Launch Cluster Wizard makes it easy.
User Guide - How to work with ClickHouse clusters in Altinity.Cloud.
Administrator Guide - How to work with your Altinity.Cloud account, including how to create environments, users, backups, and notification.
Security Guide - Best practices for securing your Altinity.Cloud account, your ClickHouse clusters, and your data.
1.2.3 - Running Altinity.Cloud in Our Cloud
Using Altinity’s cloud account
Welcome to Altinity.Cloud, the fastest, easiest way to set up, administer, and use ClickHouse®. Your ClickHouse database is fully managed, so you can focus on your data and applications. When you’re running in Altinity’s cloud account, all of the infrastructure you need to start working with ClickHouse clusters is provided automatically. (Getting started when you’re running Altinity.Cloud in your cloud environment or Kubernetes environment is way more complicated.)
So:
When you’re ready to start using your Altinity.Cloud environment, move on to our Introduction to the Altinity Cloud Manager (ACM). The ACM makes it easy to work with your ClickHouse clusters.
1.2.4 - Running Altinity.Cloud in Your Cloud (BYOC)
Using your cloud account
Running Altinity.Cloud in your cloud account (also known as Bring Your Own Cloud or BYOC) provides the convenient cloud management of Altinity.Cloud but lets you keep data within your own cloud VPCs and private data centers, all while running managed ClickHouse® in your own cloud account.
Benefits of Bring Your Own Cloud
At a high level, running Altinity.Cloud in your cloud involves giving Altinity very specific permissions for your cloud account. With those defined, Altinity.Cloud can create the resources it needs to create and manage ClickHouse clusters.
This approach has several important benefits:
Compliance - Retain full control of data (including backups) as well as the operating environment and impose your policies for security, privacy, and data sovereignty.
Cost - Optimize infrastructure costs by running in your accounts.
Location - Place ClickHouse clusters close to data sources and applications.
See the following pages for vendor-specific requirements for configuring your cloud account and creating an Altinity.Cloud environment:
1.2.4.1 - AWS remote provisioning
Configuring your AWS account
Altinity.Cloud can operate inside AWS’s Elastic Kubernetes Service (EKS). You need several things before you can create ClickHouse® clusters in an EKS environment in your account:
An Altinity.Cloud environment
A connection token to connect your Altinity.Cloud environment once the EKS cluster that will host ClickHouse is provisioned
Credentials that give Altinity specific permissions in your AWS account
An EKS cluster running inside an EC2 instance
A connection between your EKS cluster and your Altinity.Cloud environment.
Method 2. Use an AWS CloudFormation template - You create the Altinity.Cloud environment and token, then you use CloudFormation to create an EC2 instance and an EKS cluster inside it. With the EKS cluster created, you use the Altinity Cloud Manager (ACM) to connect your EKS cluster and your Altinity.Cloud environment.
Method 3. Do everything by hand - You create the Altinity.Cloud environment and token, then you create the credentials that give Altinity access to your AWS account. With that done, you contact Altinity support, who creates the EKS cluster and the infrastructure it requires, then finally connects the EKS cluster with your Altinity.Cloud environment.
We strongly recommend the first method. If you feel more comfortable with AWS CloudFormation templates, you can go with the second method, But we strongly discourage the third.
Method 1. Using our Terraform provider
The Altinity.Cloud Terraform provider is the easiest way to provision your AWS environment.
An Anywhere API access token from your Altinity.Cloud account
As with all Terraform components, the official documentation for the Altinity.Cloud Terraform provider is on the Terraform registry site. We’re going to keep our discussion of the Terraform scripts as high-level as possible; if you have any questions, the official documentation is always the final (and latest) word.
To authenticate with your AWS account, set the environment variables AWS_ACCESS_KEY_ID, AWS_SECRET_ACCESS_KEY, and AWS_SESSION_TOKEN. You must also ensure your AWS account has sufficient permissions for EKS and related services.
Getting an Anywhere API access token
The AWS remote provisioning process needs an Anywhere API Access token. To get the token, log in to your Altinity.Cloud account and click your account name in the upper right. Click the My Account menu item:
Figure 1 - The My Account menu
Click the Anywhere API Access tab to generate a new token:
Figure 2 - Generating an Anywhere API Access token
It’s recommended that you click the copy icon to copy the text of the token; the token is too wide to appear in the dialog. You won’t be able to see the token after you leave this panel, so be sure to store it in a secure place. See the Altinity API guide for complete details on creating and managing API tokens.
Now create the environment variable ALTINITYCLOUD_API_TOKEN:
To get started, you need to tell Terraform where to find the Altinity.Cloud provider. Create a new directory for your Terraform project and create a file named version.tf. Paste this text into it:
terraform { required_providers {altinitycloud={source="altinity/altinitycloud"# Look at https://registry.terraform.io/providers/Altinity/altinitycloud/latest/docs# to get the latest version number.version="0.6.1"}}}provider "altinitycloud"{# Set this value in the env var ALTINITYCLOUD_API_TOKEN.# api_token = “ABCDEFGHI” }
Figure 3 - Finding the latest version number for the Altinity.Cloud Terraform provider
The api_token in the version.tf file is the API token mentioned above. You can uncomment this line and put your token in the version.tf file if you want, but it’s not recommended. Use the ALTINITYCLOUD_API_TOKEN environment variable instead.
Now it’s time to put together the main Terraform script. You’ll need to choose or find the following details:
The name for your Altinity.Cloud environment. This must start with your second-level domain name. If your URL is example.com, your environment name must be something like example-myenvt. The name can’t be longer than 50 characters.
Your AWS account number
A region, such as us-east-1
One or more availability zones, such as us-east-1a, us-east-1b, and us-east-1c.
The node types you need for your Altinity.Cloud environment, such as t4g.large or m6i.large.
A CIDR block from your private IP addresses, such as 10.67.0.0/21. At least /21 is required, and the range should not overlap with any existing VPC you plan to connect to (via VPC peering or VPN).
It’s completely optional, but you can add tags to all the resources created by the Terraform script by adding the tags parameter to the altinitycloud_connect_aws module:
These tags are at the AWS level; they are not Kubernetes labels.
Permissions boundaries
The Terraform module creates IAM entities to do its work. You can use AWS IAM permissions boundaries to limit what those entities are allowed to do. A permissions boundary represents the maximum permissions an entity can have.
The IAM entities the Terraform module creates include permissions in these categories:
AmazonEC2
AmazonVPC
AmazonS3
AmazonRoute53
AWSLambda
AmazonSSMManagedInstanceCore
AmazonSQS
AmazonS3Tables
If you enable permissions boundaries, any IAM entity created by the Terraform script must include your permissions boundary in its definition. If it does not, the operation will fail and the IAM entity will not be created. See the AWS documentation on permissions boundaries for IAM entities for complete details on creating and managing permissions boundaries.
To use a permissions boundary, set the enable_permissions_boundary field to true:
From the command line, run the following commands to initialize the Terraform project and apply it:
# initialize the terraform projectterraform init
# apply module changes# btw, did you remember to authenticate with your AWS account? terraform apply
This operation will take several minutes to complete. When it completes, you’ll have a new environment in your Altinity.Cloud account. Log in to your account and click the Environments menu in the upper right. The env_name from the Terraform file should be in the list:
Figure 4 - The environment list with the new environment
If you go to that environment and provisioning is not complete on the AWS side, you’ll see this panel:
Figure 5 - Provisioning status
As provisioning progresses, you may see errors (line 8 in Figure 5 above, for example). Most of the time those messages resolve themselves as resources become available. If provisioning stalls, contact Altinity support for help.
When provisioning is done, you’ll see the ACM Environments dashboard with the details of your environment;
Figure 6 - ACM Environments dashboard
Click the button to see your ClickHouse clusters. You won’t have any, of course, so see the Creating a new Cluster page to get started.
Deleting the configuration
To delete the AWS environment, run the terraform destroy command to delete the resources created by Terraform. When the command finishes, all the resources associated with the AWS environment are deleted.
Method 2. Using an AWS CloudFormation template
Another way to create an Altinity.Cloud environment in your AWS account is to use a CloudFormation template.
Creating a new Altinity.Cloud environment
In the ACM, create a new environment. Depending on your role, you may have an Environments tab on the left side of the console; if so, click that tab.
At this point you’ll have a button to create a new environment; click it. In the Environment Setup dialog, give your environment a name, choose AWS as your cloud vendor, select a region, then choose Bring your own cloud account:
Figure 7 - Creating a new environment
Click OK to continue to the Connection Setup panel.
Creating an Altinity.Cloud connection token
The Connection Setup panel contains the token you need to connect your Altinity.Cloud environment with the EKS cluster you’ll create with the CloudFormation template. Click the icon to copy the token to the clipboard; you’ll pass this to the CloudFormation template.
Figure 8 - The connection token for your Altinity.Cloud environment
There is a PROCEED button at the bottom of the screen, but don’t click it until your CloudFormation stack is provisioned.
Creating a stack with AWS CloudFormation
Login to the AWS console, navigate to CloudFormation, click the Create Stack button, and choose With new resources (standard):
Figure 9 - Creating a new stack
Go to the altinitycloud-connect releases page and download the latest version of a Cloud Formation YAML file from the links at the bottom of the page. (The latest version as of September 2025 is 0.133.0.) There are two scripts:
The first script creates a VPC and subnets for you. If you have an existing VPC that you want to use, go with the second script. The steps you’ll take next depend on which script you’re using. Choose one of the paths from the tab bar below:
If you’re using the script that creates the VPC and subnets for you
Go to the Create stack panel and select Choose an existing template in the Prerequisite section, then select Upload a template file and select the altinitycloud-connect-x.xx.x.aws-cloudformation.yaml file you downloaded earlier as shown in Figure 10:
Figure 10 - Selecting the template file that creates a new VPC and subnets
Click Next to continue. You’ll see these fields on the Specify Stack Details page (Figure 11):
In the Stack Name field, give your stack a name.
Set the Token field to the token value you copied in the ACM earlier.
Figure 11 - AWS CloudFormation Stack details panel when the script creates the VPC for you
When the fields are filled in, click Next to continue.
Now that the stack details defined, take the defaults on the Configure stack options panel (Figure 12). At the bottom, check the box next to I acknowledge that AWS CloudFormation might create IAM resources with custom names:
Click Next to continue. Finally, on the Review and create panel, scroll to the bottom and click Submit to start provisioning the new stack:
Figure 13 - The Submit button on the Review and create panel
Click Next to continue. You’ll see the main CloudFormation panel (Figure 14), which will include your new stack. You can follow its progress in the Events list.
Figure 14 - AWS CloudFormation stack list
If you’re using the script that uses your existing VPC and subnets
Go to the Create stack panel and select Choose an existing template in the Prerequisite section, then select Upload a template file and select the altinitycloud-connect-via-existing-vpc-x.xx.x.aws-cloudformation.yaml file you downloaded earlier as shown in Figure 15.
Figure 15 - Selecting a template file
Click Next to continue. Enter the details on the Specify stack details page (Figure 16):
In the Stack Name field, give your stack a name.
Select the VPC and Subnets where the altinitycloud-connect EC2 instance(s) should be launched. At least one VPC and at least one subnet is required. In addition, the following requirements apply:
Set the Token field to the token value you copied in the ACM earlier.
Figure 16 - AWS CloudFormation Stack details panel when you’re using an existing VPC
When the fields are filled in, click Next to continue. Now simply take the defaults on the Configure stack options panel (Figure 17). At the bottom, check the box next to I acknowledge that AWS CloudFormation might create IAM resources with custom names:
Click Next to continue. Finally, on the Review and create panel, scroll to the bottom and click Submit to start provisioning the new stack:
Figure 18 - The Submit button on the Review and create panel
You’ll see the main CloudFormation panel (Figure 19), which will include your new stack. You can follow its progress in the Events list:
Figure 19 - AWS CloudFormation stack list
EC2 background processing explained
The EC2 instance is processed in the background as follows:
An EC2 instance gets started from the cloud formation template
The EC2 instance gets connected to Altinity.Cloud using altinitycloud-connect and the connection token
An EKS cluster gets provisioned
Tne EKS cluster gets connected to Altinity.Cloud using altinitycloud-connect and the connection token
Completing the connection between Altinity.Cloud and EKS
Once your new stack is created, go back to the ACM and click the PROCEED button in the connection wizard. The ACM will connect to the stack named [Accountname]-$ENV_NAME where AccountName is the name of your Altinity.Cloud account and $ENV_NAME is the name of your environment. The Cloud Provider and Region will be selected for you automatically.
In addition, you may need to define node pools as shown in Figure 20. At least one node pool must be configured for ClickHouse, at least one for Zookeeper, and at least one for System processes. In addition, the node pools defined for System processes must not have any tolerations defined. Click the down arrow to edit the tolerations for a given node pool.
Figure 20 - Ready to connect Altinity.Cloud and AWS
Once everything is configured, the button will be active; click it to start provisioning. Click VIEW LOG to see status messages as the ACM finishes configuring your environment:
Figure 21 - Connecting to the AWS BYOC environment
The connection may take a while. Once it’s complete, the ACM will switch to the Overview page for your environment. Click the button at the top of the page to see the list of your ClickHouse clusters. You won’t have any, of course, so click the button to create one. See the Creating a new Cluster page for all the details.
Method 3. Manual provisioning of the EC2 instance
It’s not recommended, but you can provision the EC2 instance yourself. The AWS EC2 instance you create should meet the following requirements:
CPU: t2.micro minimum
OS: Ubuntu Server v20.04
In addition, if you’re provisioning resources with the AWS command line interface, version 2.0 or higher of the AWS CLI is required.
Creating a Role with IAM policies
Set up a role with IAM policies to access IAM, EC2, VPC, EKS, S3 & Lambda as follows:
Next, to set this instance to have access to the EC2 metadata and Internet, set the Security group to:
deny all inbound traffic
allow all outbound traffic
Creating an Altinity.Cloud environment
In the ACM, create a new environment. Depending on your role, you may have an Environments tab on the left side of the console; if so, click that tab.
At this point, you’ll have a button to create a new environment; click it. In the Environment Setup dialog, select Altinity.Cloud Bring Your Own Cloud (BYOC) and give your environment a name:
Figure 22 - Creating a new environment
Click OK to continue to the Connection Setup panel.
Creating an Altinity.Cloud connection token
The Connection Setup panel contains the token you need to connect your Altinity.Cloud environment with the EKS cluster you’ll create with the CloudFormation template. The only piece of information you need in this panel is the token, shown in red here:
Figure 23 - The connection token for your Altinity.Cloud environment
Make sure Provisioned by User is selected as the Kubernetes setup type. Next, simply copy the value of the token from the text area in the middle. There is a PROCEED button at the bottom of the screen; you’ll click it once your EC2 instance and EKS cluster are provisioned. For now, ignore the instructions on the screen.
The altinitycloud-connect command does not have any output; it creates a cloud-connect.pem file in the current directory. The certificate in that file sets up a secure connection between your EKS cluster and your Altinity.Cloud environment. Finally, connect to Altinity.Cloud:
altinitycloud-connect --capability aws
Contacting Altinity
At this point, contact Altinity support to set up a VPC and your EKS cluster. You need to provide the following details:
The CIDR for the Kubernetes VPC (at least /21 recommended, such as 10.1.0.0/21) that does not overlap with existing VPCs
The number of Availability Zones (3 are recommended)
Your Altinity support representative will start the EKS provisioning process.
Completing the connection
When the connection is complete, the ACM will switch to the Overview page for your environment. Click the button at the top of the page to see the list of your ClickHouse clusters. You won’t have any, of course, so click the button to create one. See the Creating a new Cluster page for all the details.
Break Glass procedure
The “Break Glass” procedure allows Altinity access to EC2 instance with SSH, using AWS SSM in order to troubleshoot altinitycloud-connect that is running on this instance.
Create an AnywhereAdmin IAM role with trust policy set:
With an Altinity.Cloud account, Altinity can remotely provision Azure AKS clusters in your Azure account, then create ClickHouse® clusters inside those Kubernetes clusters.
There are two ways to set up a Bring Your Own Cloud (BYOC) environment in your Altinity.Cloud account:
Once your environment is created, you can use the ACM to create and manage ClickHouse clusters.
Method 1. Creating an environment with our Terraform module
This approach is the easiest way to set everything up. You fill in a few details (name a couple of things, tell us where things should run, etc.), and Terraform does the rest.
An Anywhere API access token from your Altinity.Cloud account
az, the Azure command-line tool. (You may not need it for this procedure, but it’s invaluable once your environment is set up.)
As with all Terraform components, the official documentation for the Altinity.Cloud Terraform provider is on the Terraform registry site. We’re going to keep our discussion of the Terraform scripts as high-level as possible; if you have any questions, the official documentation is always the final (and latest) word.
Getting an Anywhere API access token
The Azure remote provisioning process needs an Anywhere API Access token. To get the token, log in to your Altinity.Cloud account and click your account name in the upper right. Click the My Account menu item:
Figure 1 - The My Account menu
Click the Anywhere API Access tab to generate a new token:
Figure 2 - Generating an Anywhere API Access token
It’s recommended that you click the copy icon to copy the text of the token; the token is too wide to appear in the dialog. You won’t be able to see the token after you leave this panel, so be sure to store it in a secure place. See the Altinity API guide for complete details on creating and managing API tokens.
Now create the environment variable ALTINITYCLOUD_API_TOKEN:
To get started, you need to tell Terraform where to find the Altinity.Cloud provider. Create a new directory for your Terraform project and create a file named version.tf. Paste this text into it:
terraform { required_providers {altinitycloud={source="altinity/altinitycloud"# Look at https://registry.terraform.io/providers/Altinity/altinitycloud/latest/docs# to get the latest version number.version="0.6.1"}}}provider "altinitycloud"{# Set this value in the env var ALTINITYCLOUD_API_TOKEN.# api_token = “ABCDEFGHI” }
Figure 3 - Finding the latest version number for the Altinity.Cloud Terraform provider
The api_token is the Altinity API token mentioned above. You can uncomment this line and put your token in the version.tf file if you want, but it’s not recommended. Use the ALTINITYCLOUD_API_TOKEN environment variable instead.
Using the Terraform script to provision the environment
Now it’s time to put together the main Terraform script. You’ll need to choose or find the following details:
The tenant id and subscription id for your Azure account.
The name for your Altinity.Cloud environment. This must start with your second-level domain name. If your URL is example.com, your environment name must be something like example-myenvt. The name can’t be longer than 50 characters.
A CIDR block from your private IP addresses, such as 10.136.0.0/21. At least /21 is required, and the range should not overlap with any existing VPC you plan to connect to (via VPC peering or VPN).
A region, such as eastus.
One or more availability zones, such as eastus-1 and eastus-2.
The node types you need for your Altinity.Cloud environment, such as Standard_B2s_v2 or Standard_B4s_v2.
Here’s where you add the values specific to your Altinity.Cloud environment.
First of all, fill in your tenant_id and subscription_id:
locals {# Replace these values with your own Azure tenant and subscription IDstenant_id="12345678-90ab-cdef-1234-567890abcdef"subscription_id="12345678-90ab-cdef-1234-567890abcdef"}
The client_id in azuread_service_principal is owned by Altinity; do not change this value.
data "azuread_service_principal""altinity_cloud"{# Do not change this client_idclient_id="8ce5881c-ff0f-47f7-b391-931fbac6cd4b"}
Now you need the name of your Altinity.Cloud environment, CIDR block, region, and availability zones. Again, your environment name must start with your second-level domain name as discussed above.
If you don’t have the appropriate permissions, you’ll get the error message Could not create service principal. If that happens, see your Azure account administrator.
Applying the configuration
Open the terminal and navigate to the directory you created. Run the following commands to initialize the Terraform project and apply it:
This will take a while. Once terraform apply is done, log in to your account and click the Environments menu in the upper right. The env_name from the Terraform file should be in the list:
Figure 4 - The environment list with the new environment
If you go to that environment and provisioning is not complete on the Azure side, you’ll see this panel:
Figure 5 - Provisioning status
As provisioning progresses, you may see errors (line 8 in Figure 5 above, for example). Most of the time those messages resolve themselves as resources become available. If provisioning stalls, contact Altinity support for help.
When provisioning is done, you’ll see the ACM Environments dashboard with the details of your environment;
Figure 6 - The ACM Environments dashboard
Click the button to see your ClickHouse clusters. You won’t have any, of course, so see the Creating a new Cluster page to get started.
Deleting the configuration
To delete the configuration, run the terraform destroy command to delete the resources created by Terraform. When the command finishes, all the resources associated with the environment are deleted.
Method 2. Creating an Environment in the ACM
BEFORE YOU START...
Your Azure account needs a service principal that gives Altinity.Cloud permission to create resources for you. If the service principal doesn’t exist and you have User Access Administrator or Role Based Access Control Administrator permissions or higher, you can create a service principal with this command:
(
  set -eu
  SUBSCRIPTION_ID=00000000-0000-0000-0000-000000000000
  APPLICATION_ID=8ce5881c-ff0f-47f7-b391-931fbac6cd4b
  SP_ID=$(az ad sp create --id "$APPLICATION_ID" --query id -o tsv)
  az role assignment create --scope "/subscriptions/$SUBSCRIPTION_ID" --assignee-object-id "$SP_ID" --role Owner
)
The Application ID is unique to Altinity; you can’t change it. See your Azure account administrator if you don’t have that level of access.
Go to the Altinity Cloud Manager and open the Environments tab. Click the button at the top of the screen. In the Environment Setup dialog, give your environment a name, choose Azure as your cloud provider, select a region, then click Bring your own cloud account:
Figure 7 - Creating a BYOC environment on Azure
Click OK to continue.
Configuring your Environment
Now you need to connect your Altinity.Cloud environment to the Resource Group in your Azure account.
Setting up your connection
The first tab of the Environment Setup wizard is the Connection Setup tab:
Figure 8 - Link to the Azure remote provisioning docs
You can click the link in the panel to go to the Altinity documentation. (Spoiler alert: you’ll be taken to the page you’re reading now.) Click PROCEED to continue.
Defining your environment’s properties
Next you’ll see the Resources Configuration tab:
Figure 9 - The Resources Configuration tab
Field Details
Cloud Provider
Azure is selected automatically.
Region
Click the down arrow icon and select the appropriate region from the list of Azure regions.
Availability Zones
Click the + CUSTOM link to add availability zones for your Kubernetes clusters. We recommend that you define at least two AZs.
Tenant ID
You can find this in the Azure web console for your account.
Subscription ID
You can find this in the Azure web console as well.
CIDR Block
Enter the CIDR block for your environment. We recommend at least /21 to ensure you have enough addresses for your cluster.
Node Pools
Define as many node pools as you need. At least one pool must be selected for ClickHouse clusters, at least one for Zookeeper nodes, and at least one for System nodes. You can click the button to add new node pools, or click the button to restore the original settings. NOTE: You can add more node pools later if you need them.
Click PROCEED to start the configuration process. You’ll see the status of the configuration:
Figure 10 - Provisioning status
As provisioning progresses, you may see errors (line 8 in Figure 10 above, for example). Most of the time those messages resolve themselves as resources become available. If provisioning stalls, contact Altinity support for help.
When provisioning is done, you’ll see the ACM Environments dashboard with the details of your environment;
Figure 11 - The ACM Environments dashboard
Click the button to see your ClickHouse clusters. You won’t have any, of course, so see the Creating a new Cluster page to get started.
1.2.4.3 - GCP remote provisioning
Configuring your GCP account
Altinity.Cloud can operate inside your GCP account. You need two things before you can create ClickHouse® clusters in a Kubernetes (GKE) cluster in your account:
A Project in your GCP account. This can be an existing project, or you can have Terraform create a new one.
Permissions that let the Altinity service account do very specific things in the selected (or created) Project
Once those things are set, you need to create a new Altinity.Cloud environment, connect that environment to your GCP project, then create the GKE cluster.
Method 2. Do everything by hand. You create all the resources yourself and connect them together. Perfect for those who enjoy typing.
We strongly recommend Method 1.
Method 1. Using our Terraform module
This approach is the easiest way to set everything up. You fill in a few details (name a couple of things, tell us where things should run, etc.), and Terraform does the rest.
Before Terraform can do anything on your behalf, you’ll need to log in to your GCP account:
gcloud auth login
Your GCP account must have permissions to use existing projects (or have the ability to create new ones), GKE clusters, and the other things you’ll need. (If it doesn’t, that’ll be obvious pretty quickly.)
Getting an Anywhere API access token
The GCP remote provisioning process needs an Anywhere API Access token. To get the token, log in to your Altinity.Cloud account and click your account name in the upper right. Click the My Account menu item:
Figure 1 - The My Account menu
Click the Anywhere API Access tab to generate a new token:
Figure 2 - Generating an Anywhere API Access token
It’s recommended that you click the copy icon to copy the text of the token; the token is too wide to appear in the dialog. You won’t be able to see the token after you leave this panel, so be sure to store it in a secure place. See the Altinity API guide for complete details on creating and managing API tokens.
Now create the environment variable ALTINITYCLOUD_API_TOKEN:
To get started, you need to tell Terraform where to find the Altinity.Cloud provider. Create a new directory for your Terraform project and create a file named version.tf. Paste this text into it:
terraform { required_providers {altinitycloud={source="altinity/altinitycloud"# Look at https://registry.terraform.io/providers/Altinity/altinitycloud/latest/docs# to get the latest version number.version="0.6.1"}}}provider "altinitycloud"{# Set this value in the env var ALTINITYCLOUD_API_TOKEN.# api_token = “ABCDEFGHI” }
Figure 3 - Finding the latest version number for the Altinity.Cloud Terraform provider
The api_token here is the Altinity API Access token mentioned above. You can uncomment this line and put your token in the version.tf file if you want, but it’s not recommended. Use the ALTINITYCLOUD_API_TOKEN environment variable instead.
Using the Terraform script to provision the environment
Now it’s time to put together the main Terraform script. You’ll need to choose or find the following details:
The project ID and project name for the project you want to use. If the project doesn’t exist already, the Terraform provider will create it.
The name for your Altinity.Cloud environment. This must start with your second-level domain name. If your URL is example.com, your environment name must be something like example-myenvt. The name can’t be longer than 50 characters.
A region, such as us-east1.
One or more availability zones, such as us-east1-a and us-east1-b.
A CIDR block from your private IP addresses, such as 10.136.0.0/21. At least /21 is required, and the range should not overlap with any existing VPC you plan to connect to (via VPC peering or VPN).
The node types you need for your Altinity.Cloud environment, such as n2d-standard-2 or e2-standard-2.
Here’s where you add the values specific to your Altinity.Cloud environment:
First of all, if you want to create a new GCP project, use this block. Enter project ID and name for the new GCP project. If you want to use an existing GCP project, comment this section out.
resource "google_project""this"{project_id="tfproject"name="tfproject"auto_create_network=false# Might be required, depending on your account settings: # billing_account = "ABCDEF-ABCDEF-ABCDEF"}
Part of provisioning a Google Bring Your Own Cloud environment is giving very specific permissions to an Altinity account. Do not change the member field here; if you do, your environment will not be provisioned. In addition, you need the name of your GCP project here, and the way you specify that name depends on whether you’re using a new or an existing project:
If you’re creating a new GCP project, leave this as is. The value google_project.this.id retrieves the project ID from the block above.
If you’re using an existing GCP project, the previous section is commented out, so replace google_project.this.id with the name of your project. ("tfproject", for example.)
resource "google_project_iam_member""this"{for_each= toset([# A list of permissions appears here])project= google_project.this.id
role= each.key
member="group:anywhere-admin@altinity.com"}
Now you need the name of your Altinity.Cloud environment (altinity-byoc-gcp-tf), the region and availability zones for your environment, and the CIDR range. As with the previous section, if you’re using an existing GCP project, replace google_project.this.project_id with the name of your GCP project.
In the example above, Terraform will use (or create) a GCP project named tfproject. Its ID will be tfproject as well. Once a GKE cluster is provisioned inside the project, Terraform will create a new Altinity.Cloud environment named altinity-byoc-gcp-tf. All ClickHouse clusters defined in this environment will run in the us-east1 region.
Applying the configuration
In the directory you created, run the following commands to initialize the Terraform project and apply it:
# initialize the terraform projectterraform init
# apply module changes, passing along names for your# Altinity.Cloud environment and your GCP projectterraform apply
This operation will take a while to complete. When Terraform is done you’ll a reassuring message like this:
But things are still happening in GKE. Terraform has created the GCP project and created the GKE cluster, but it almost certainly won’t be done yet. Take a look in the GCP console, open your new project, and you’ll see the progress of provisioning:
Figure 4 - GKE cluster being created
Depending on various factors, this may take a while. When GKE provisioning is done, log in to your Altinity.Cloud account and click the Environments menu in the upper right. Your new environment will be in the list:
Figure 4 - The environment list with the new environment
If things still aren’t finished in the background, you’ll see this panel:
Figure 5 - GCP project and Altinity.Cloud environment not yet fully provisioned
Once everything is connected, you’ll see the Environment View for your new environment:
Figure 6 - Your new Altinity.Cloud environment, ready for action
Click the button to see your ClickHouse clusters. You won’t have any, of course, so see the Creating a new Cluster page to create new ClickHouse clusters.
Deleting the configuration
To delete the configuration, run the terraform destroy command to delete the resources created by Terraform. When the command finishes, all the resources associated with the environment are deleted.
Method 2. Doing everything by hand
Creating a project
Creating a separate project makes it easy to isolate resources and do cost management, not to mention security. You can create a project from the command line or in the GCP web UI.
You can use the gcloud projects create command to create a new project:
You also need to assign a billing account to the project. Currently the gcloud command looks like this:
# Assign a billing account to 'maddie-byoc-gcp'gcloud beta billing projects link maddie-byoc-gcp \
--billing-account ABCDEF-ABCDEF-ABCDEF
You can also create a project from the GCP web UI:
Figure 7 - The GCP New Project dialog
Granting permissions
For Altinity to be able to create Kubernetes and ClickHouse clusters in your cloud account, you need to grant the following permissions to anywhere-admin@altinity.com inside the project you just created:
roles/compute.admin
roles/container.admin
roles/dns.admin
roles/storage.admin
roles/storage.hmacKeyAdmin
roles/iam.serviceAccountAdmin
roles/iam.serviceAccountKeyAdmin
roles/iam.serviceAccountTokenCreator
roles/iam.serviceAccountUser
roles/iam.workloadIdentityPoolAdmin
roles/iam.roleAdmin
roles/serviceusage.serviceUsageAdmin
roles/resourcemanager.projectIamAdmin
roles/iap.tunnelResourceAccessor
You can use the gcloud command for each role:
# Add a role for a member of a group associated with # project 'maddie-byoc-gcp'gcloud projects add-iam-policy-binding maddie-byoc-gcp \
--member='group:anywhere-admin@altinity.com'\
--role='roles/compute.admin'
Alternately, you can use the GCP web UI:
Figure 8 - Granting permissions in the GCP web UI
However you grant permissions, you can view them in the web UI:
Figure 9 - User permissions displayed in the GCP web UI
Creating the Kubernetes environment
With the project created and the appropriate permissions granted to the Altinity.Cloud admin account, Altinity can create Kubernetes clusters and ClickHouse clusters inside them. The following sections demonstrate how to create the Kubernetes environment.
Set up the environment
In Altinity Cloud Manager, go to the Environments tab. Click the button at the top of the screen.
In the Environment Setup dialog, give your environment a name, choose GCP ac your cloud provider, select a region, and click Bring your own cloud account:
Figure 10 - Choosing a BYOC / GCP environment
Click OK to continue.
Connecting your GCP project to Altinity.Cloud
Next, you need to connect your GCP project to Altinity.Cloud. You’ve already created the project, so click PROCEED to continue.
Figure 11 - The Connection Setup tab
Define your Kubernetes cluster’s resources
The Resources Configuration tab looks like this:
Figure 12 - The Resources Configuration tab for connecting altinity-maddie-byoc-gcp to Altinity.Cloud
Field details
Cloud Provider - GCP is selected automatically.
Region - Click the down arrow to see a list of available regions. Be sure your project is authorized to create resources in the region you select.
Number of AZs - The number of availability zones for your cluster. NOTE: It is highly recommended that you use at least two availability zones. You can click the button to define additional AZs.
Project ID - Enter the name of your GCP project. This is how Altinity.Cloud ties everything together; you’ve created this project and given Altinity the permissions it needs to deploy and manage ClickHouse. (In this example the names of the Altinity.Cloud environment and the GCP project are similar, but they can be completely different.)
CIDR Block - The address range allocated to your cluster. NOTE: Be sure you define enough addresses. We recommend /21 at a minimum.
If you run out of addresses, this setting is difficult to change.
Storage Classes - Enter the storage classes your cluster will use. You can delete the entries that appear; you can also click the button to add other storage classes.
Node Pools - Define the node pools that your cluster will use. At least one node pool must be defined for ClickHouse, at least one for Zookeeper, and at least one for System nodes. In this example, one node pool will host Zookeeper and the System utilities Altinity.Cloud uses; four other node pools will host ClickHouse itself. When a user creates a new ClickHouse cluster, they can choose which node size they want to use. You can click the button to add more node pools as needed now, and you can also add more later.
Click PROCEED to continue. The Altinity Cloud Manager connects to your GCP project and creates resources inside it. You can click VIEW LOG to see the system’s progress:
Figure 13 - The ACM display as it creates resources in the GCP project altinity-maddie-byoc-gcp
It will take a few minutes for all the resources to be provisioned. While you wait, you can also go to the GCP web UI to see the resources being created.
Connection completed
Once the connection is fully set up, the ACM Environments dashboard will display your new environment:
Figure 14 - The details of your new Environment
Click the button at the top of the page to go to the Clusters page. You don’t have any ClickHouse clusters yet, of course, but the ACM makes it easy to create one. See the Creating a new Cluster page for all the details.
1.2.4.4 - Hetzner remote provisioning
Configuring your Hetzner account
Altinity.Cloud can operate inside your Hetzner account. We’ll go through the steps required to create a BYOC environment here. The steps are:
Create a new project in your Hetzner Cloud account.
Create an API key with read/write privileges in your Hetzner account.
Log in to your Altinity.Cloud account. If you don’t have one already, sign up for a trial account. (We’ll wait here.)
Create a new Altinity.Cloud BYOC environment, whether with the Altinity.Cloud Terraform provider or through the Altinity Cloud Manager.
Enter your Hetzner API key and other parameters, then click PROCEED.
After a few minutes, your Hetzner BYOC environment will be up and running. We’ll cover these steps in detail now.
Create a project in your Hetzner Cloud account
From the Hetzner Cloud Console, go to your list of projects and click the + New Project link at the bottom of the list:
Figure 1 - Creating a new project
Give your new project a new name and click Add project:
Figure 2 - The Add a new project dialog
In a few seconds, you’ll see your new project in the console:
Figure 3 - The new project in the project list
Click the name of your new project to go to the project page.
Create an API key with read/write privileges in your Hetzner account
With your server created, you need to create a read/write API key. Click the Security link in the left navigation panel of the project page, then API tokens and Generate API token.
In the Generate API token dialog, give your token a name, click the Read & Write radio button, then click the Generate API token button:
Figure 4 - The Generate API token dialog
Your new token will be created shortly. Click the Click to show link in the text box to see the token. Be sure to make a copy of it somewhere; you won’t be able to see it again in the console.
Figure 5 - The new API token
Your new token will show up in the list of tokens. The Prefix column here is the first few characters of the token; once you close the Generate API token dialog, you can never see the entire token again.
Figure 6 - The list of API tokens
With your Hetzner environment set up, you’re almost ready to create a BYOC environment. But first, you’ll need to check the limits of your Hetzner account.
Check the Hetzner Cloud Limits
Hetzner Cloud has quite restrictive Resource Limits. The project dedicated to Altinity.Cloud has enough resources to provision servers, load balancers, etc., but your account may not.
For system-related workloads, here are the minimum resources needed:
2 servers
4 VCPUs
1 IP
2 LoadBalancers
65GB Volume space available
For ClickHouse servers, it depends on the number of nodes in the cluster and their size. As an example, for one ClickHouse server, the minimum requirements are:
We recommend using CPX31/CAX21 cloud servers for the system nodes and CCX family servers for ClickHouse. Please check availability or get in touch with Hetzner Customer Support for servers in a needed region in advance. Please choose a region with available resources to avoid issues with provisioning.
To request a limit increase, go to you account menu in the upper right-hand corner of the Hetzner console and click the Limits menu item:
Figure 7 - The Hetzner Limits menu item
Click the Request change button and select the Limit increase menu item:
Figure 8 - The Hetzner Limit increase menu item
In the Request limit increase dialog, enter your requested limits and a description, then click Request limit increase.
Figure 9 - The Hetzner Request limit increase dialog
Someone at Hetzner will review your request and get back to you.
Create a new Altinity.Cloud BYOC environment
With all these things in place, it’s time to create a new environment. There are two ways to do this:
The Hetzner API token with read/write privileges you created above
An Anywhere API access token from your Altinity.Cloud account
As with all Terraform components, the official documentation for the Altinity.Cloud Terraform provider is on the Terraform registry site. We’re going to keep our discussion of the Terraform scripts as high-level as possible; if you have any questions, the official documentation is always the final (and latest) word.
Setting your Hetzner API token
Store the value of your Hetzner API token in the environment variable TF_VAR_hcloud_token. The Terraform provider will encrypt it and then use it to create resources in your Hetzner project. The encrypted version is stored in the control plane.
Getting an Anywhere API access token
The Hetzner remote provisioning process needs an Anywhere API Access token. To get the token, log in to your Altinity.Cloud account and click your account name in the upper right. Click the My Account menu item:
Figure 10 - The My Account menu
Click the Anywhere API Access tab to generate a new token:
Figure 11 - Generating an Anywhere API Access token
It’s recommended that you click the copy icon to copy the text of the token; the token is too wide to appear in the dialog. You won’t be able to see the token after you leave this panel, so be sure to store it in a secure place. See the Altinity API guide for complete details on creating and managing API tokens.
Now create the environment variable ALTINITYCLOUD_API_TOKEN:
To get started, you need to tell Terraform where to find the Altinity.Cloud provider. Create a new directory for your Terraform project and create a file named version.tf. Paste this text into it:
terraform { required_providers {altinitycloud={source="altinity/altinitycloud"# Look at https://registry.terraform.io/providers/Altinity/altinitycloud/latest/docs# to get the latest version number.version="0.6.1"}}}provider "altinitycloud"{# Set this value in the env var ALTINITYCLOUD_API_TOKEN.# api_token = “ABCDEFGHI” }
Figure 12 - Finding the latest version number for the Altinity.Cloud Terraform provider
The api_token here is the Altinity API Access token mentioned above, not the Hetzner API token. You can uncomment this line and put your token in the version.tf file if you want, but it’s not recommended. Use the ALTINITYCLOUD_API_TOKEN environment variable instead.
Now it’s time to put together the main Terraform script. You’ll need to choose or find the following details:
The name for your Altinity.Cloud environment. This must start with your second-level domain name. If your URL is example.com, your environment name must be something like example-myenvt. The name can’t be longer than 50 characters.
A network zone, such as us-west
One or more locations, such as ["hil"]
A CIDR block from your private IP addresses, such as 10.136.0.0/21. At least /21 is required, and the range should not overlap with any existing VPC you plan to connect to (via VPC peering or VPN).
The node types you need for your Altinity.Cloud environment, such as cpx11 or ccx23.
This operation will take several minutes to complete. When it completes, you’ll have a new environment in your Altinity.Cloud account. You’ll also have an automatically created cloudconnect instance. You may see that instance when you look at the resources in your Kubernetes cluster. Worry not, it’s managed for you automatically.
To get started with the new environment in Altinity.Cloud, log in to your account and click the Environments menu in the upper right. The env_name from the Terraform file should be in the list:
Figure 13 - The environment list with the new environment
If you go to that environment and provisioning is not complete on the Hetzner side, you’ll see this panel:
Figure 14 - Provisioning status
As provisioning progresses, you may see errors (line 8 in Figure 14 above, for example). Most of the time those messages resolve themselves as resources become available. If provisioning stalls, contact Altinity support for help.
When provisioning is done, you’ll see the ACM Environments dashboard with the details of your environment;
Figure 15 - ACM Environments dashboard
Click the button to see your ClickHouse clusters. You won’t have any, of course, so see the Creating a new Cluster page to get started.
Deleting the configuration
To delete the configuration, run the terraform destroy command to delete the resources created by Terraform. When the command finishes, all the resources associated with the environment are deleted.
Method 2. Use the Altinity Cloud Manager
Once your Hetzner account has the correct resource limits, log in to your Altinity.Cloud account and go to the Environments tab in the left navigation. Click the button to create a new Environment. In the Environment Setup dialog, give your environment a name, select Hetzner, choose a region and location, then Bring your own cloud account:
Clicking the documentation link takes you to this page. (If you clicked it, welcome back!). Click PROCEED to continue to the Resources Configuration tab.
The Resources Configuration tab
Things get more interesting here:
Figure 18 - The Hetzner BYOC Resources Configuration tab
Most of the entries here are straightforward. Select a region and availability zone, then enter your Hetzner API token and a CIDR block.
Node pools are a bit more complicated. Click the button to create a new node pool. Select an instance type, then select ClickHouse and Zookeeper. Don’t check System; by default the first node pool you create is defined with the toleration dedicated=clickhouse:NoSchedule, and that doesn’t work for System nodes. (In Figure 18 above, we’ve clicked the down arrow to display the tolerations for the first node pool.)
Next, click the button again to create another node pool. Select an instance type and click System only.
Once you’ve selected a node pool for all three types of nodes, the PROCEED button will become active. Click it to start provisioning your BYOC environment.
The Status tab
As your Hetzner BYOC environment is being provisioned, you can watch the log to see how things are progressing. Click the VIEW LOG link to see system messages:
Figure 19 - Provisioning status
As provisioning progresses, you may see errors (line 8 in Figure 19 above, for example). Most of the time those messages resolve themselves as resources become available. If provisioning stalls, contact Altinity support for help.
The Environments dashboard
When provisioning is done, you’ll see the ACM Environments dashboard with the details of your environment;
Figure 20 - ACM Environments dashboard
Click the button to see your ClickHouse clusters. You won’t have any, of course, so see the Creating a new Cluster page to get started.
1.2.5 - Running Altinity.Cloud in Your Kubernetes environment (BYOK)
Using your Kubernetes infrastructure
Running Altinity.Cloud in your Kubernetes environment (also known as Bring Your Own Kubernetes or BYOK) provides the convenient cloud management of Altinity.Cloud but lets you keep data within your own cloud VPCs and private data centers, all while running managed ClickHouse® in your own Kubernetes clusters.
Benefits of Bring Your Own Kubernetes
Each Altinity.Cloud environment is a dedicated Kubernetes cluster. This approach has several important benefits:
Compliance - Retain full control of data (including backups) as well as the operating environment and impose your policies for security, privacy, and data sovereignty.
Cost - Optimize infrastructure costs by running in your accounts.
Location - Place ClickHouse clusters close to data sources and applications.
To run Altinity.Cloud in your Kubernetes environment, you need to create your Kubernetes cluster and then use the Altinity Connector to establish a management from your Kubernetes cluster to Altinity.Cloud. The Altinity Connector establishes an outbound HTTPS connection to a management endpoint secured by certificates. This allows management commands and monitoring data to move securely between locations.
Configuring your BYOK environment is straightforward, and each step is covered in the pages of this section. The steps are:
Make sure your Kubernetes cluster is configured properly. Configuration varies slightly from one cloud provider to another; the Kubernetes Requirements page has all the details.
Connect Altinity.Cloud to your Kubernetes cluster. The Altinity Cloud Manager generates a one-time-use token that you use with the altinitycloud-connect utility. The Kubernetes environment connection page has all the details.
Use the Environment Setup wizard to configure details such as availability zones, node types, and storage classes. All of those choices and options are explained on the connections page as well.
When the Environment Setup wizard is finished, you’re ready to create ClickHouse clusters inside your Kubernetes environment. Details of all those tasks as well as housekeeping tasks like configuring logging and configuring backups are all explained in the following pages:
1.2.5.1 - Kubernetes requirements
Configuring your Kubernetes environment
When running Altinity.Cloud inside your Kubernetes environment, that environment has to be configured a certain way. In this section we’ll cover the general requirements for your Kubernetes environment.
BUT FIRST...
If you’re on AWS, we strongly recommend you take a look at our Terraform module for setting up an Elastic Kubernetes Service (EKS) instance in your AWS account. If the EKS cluster and other resources created by the Terraform module meet your needs, it’s much easier and faster than going through the detailed instructions here. Even if it doesn’t meet all of your needs, it’s a great way to get started.
That being said, here are the requirements for your Kubernetes environment:
Kubernetes version 1.26 or higher in EKS (AWS), GKE (GCP), or AKS (Azure)
Every Node should have the following labels:
node.kubernetes.io/instance-type
kubernetes.io/arch
topology.kubernetes.io/zone
altinity.cloud/use=anywhere
It is recommended to taint nodes to separate Altinity.Cloud workloads:
set taint altinity.cloud/use=anywhere:NoSchedule only for nodes that are dedicated exclusively to Altinity pods. If Kubernetes cluster is used exclusively for Altinity.Cloud taint is not needed
set taint dedicated=clickhouse:NoSchedule additionally for nodes dedicated to ClickHouse
A StorageClass with dynamic provisioning is required
LoadBalancer services must be supported
To get the most from Altinity.Cloud in your Kubernetes environment:
Each StorageClass should preferably allow volume expansion
Multiple zones are preferable for high availability
Autoscaling is preferable for easier vertical scaling
For platform-specific requirements, see the following sections:
If you plan on sharing your Kubernetes cluster with other workloads, it’s recommended you label Kubernetes Nodes dedicated exclusively to Altinity.Cloud with altinity.cloud/use=anywhere and taint them with altinity.cloud/use=anywhere:NoSchedule. Please make sure there are still nodes available to run kube-system pods after applying the Altinity.Cloud taints.
Instance types
For Zookeeper infrastructure nodes
t3.large or t4g.large*
t4g instances are AWS Graviton2-based (ARM).
For ClickHouse nodes
ClickHouse works the best in AWS when using nodes from ’m’ instance type families, the best ones are:
m6i
m7i
m7a
m7g*
m8g*
m7g and m8g instances are AWS Graviton-based (ARM).
For RAM-intensive scenarios, r6,r7,r8 instance type families may be used.
For CPU-intensive scenarios, c6,c7,c8 instance type families may be used.
Instance sizes from large (2 vCPUs) to 8xlarge (32 vCPUs) are typical.
Storage classes
gp2*
gp3-encrypted*
We recommend using gp3 storage classes that provide more flexibility and performance over gp2. The gp3 storage classes require the Amazon EBS CSI driver; that driver is not automatically installed. See the AWS CSI driver documentation for details on how to install the driver.
Storage class can be installed with the following manifest:
The default throughput for gp3 is 125MB/s for any volume size. It can be increased in AWS console or using storage class parameters. Here is an example:
Alternatively, you recommend installing the Altinity EBS parameters controller. That allows you to manage EBS volume throughput dynamically through annotations. This is also integrated to Altinity.Cloud UI (ACM).
To authenticate with your AWS account, set the environment variables AWS_ACCESS_KEY_ID, AWS_SECRET_ACCESS_KEY, and AWS_SESSION_TOKEN. You must also ensure your AWS account has sufficient permissions for EKS and related services.
Terraform module for BYOK on EKS
The module makes it easy to spin up an AWS EKS cluster optimized for working with Altinity.Cloud. This configuration is tailored for the best performance of ClickHouse®, following Altinity’s best practices and recommended specs for AWS:
Instance Types
Node Labels
EBS Controller with custom Storage Class (gp3-encrypted)
Cluster Autoscaler with multi-zones High Availability
Figure 1 - Working with the latest version of the eks-clickhouse Terraform provider
Scroll down to the Usage section of the page for the sample script. Copy and paste the code into a file named main.tf in the directory you created earlier. Modify the code for your needs:
At a minimum you’ll need to change the eks_cluster_name. It must be unique across your AWS account.
The region for the availability zones. See the note below for important details on how availability zone names are created
install_clickhouse_cluster - create a ClickHouse cluster in addition to installing the ClickHouse operator. The default to true.
clickhouse_cluster_enable_loadbalancer - create a public LoadBalancer. The default is false.
NOTE: The Terraform script generates availability zone names for you. If the value of region is us-east-1, the availability zone names will be us-east-1a, us-east-1b, and us-east-1c. Be aware this may not work for every region. For example, as of this writing, the availability zones for ca-central-1 are ca-central-1a, ca-central-1b, and ca-central-1d. Specifying an availability zone of ca-central-1c is a fatal error. Check the AWS regions and availability zones documentation to see the correct values for your region. If needed, modify the script in both the eks_availability_zones section and the zones spec in the eks_node_pools section.
Again, remember to authenticate with your AWS account before going forward.
Applying the configuration
Open the terminal, navigate into the created directory and run these commands to initialize the Terraform project and apply it:
# initialize the terraform projectterraform init
# apply module changes# btw, did you remember to authenticate with your AWS account? terraform apply
This operation will take several minutes to complete. When it completes, you’ll have a running AWS EKS cluster with high availability and other features.
Verifying your EKS cluster
First, update your kubeconfig with the new AWS EKS cluster data using the following command (with your region and cluster name, of course):
Your AWS EKS cluster is now ready. Remember that the given configuration is just a starting point. Before using this in production, you should review the module documentation and ensure it fits your security needs.
Connecting your new environment to Altinity.Cloud
The final step is to connect your new EKS cluster to the Altinity Cloud Manager (ACM). In a nutshell, you need to create an Altinity.Cloud environment and connect it to your new Kubernetes cluster. See the section Connecting Your Kubernetes Environment to Altinity.Cloud for all the details. (Note: The example used in this link connects to an Azure AKS instance, but the procedure is the same for AWS.)
Deleting the configuration
When you no longer need your EKS cluster, the ClickHouse clusters it hosts, and the Altinity.Cloud environment that manages them, there are two straightforward steps:
Delete all of your ClickHouse clusters and your Altinity.Cloud environment. Simply delete the environment and select the “Delete clusters” option.
Run terraform destroy to clean up the EKS cluster and all of its resources. When this command finishes, all of the resources associated with your EKS environment are gone.
1.2.5.3 - Connecting Your Kubernetes Environment to Altinity.Cloud
Tying everything together
This tutorial explains how to use Altinity.Cloud to deploy ClickHouse® clusters using your choice of a third-party Kubernetes cloud provider, or using your own hardware or private company cloud. The Altinity.Cloud Manager (ACM) is used to manage your ClickHouse clusters.
Before you start: Altinity provides two Terraform modules to automate the steps we cover here. We strongly recommend you use Terraform if those modules do what you need.
The first time you log in, you’ll see the Environment Setup dialog. If you’ve used the ACM before, go to the Environments tab and click the button. Either approach gets you to the Environment Setup dialog. Give your environment a name and choose Kubernetes as your cloud provider:
Figure 1 - Naming the Environment
Click OK to continue.
Connection setup
Next you’ll be taken to the Environment Connection screen:
Figure 2 - The Connection Setup tab
NOTE: Depending on how you created your Kubernetes cluster, provisioning may not be complete yet. If you get a connection error, wait a few minutes and try again.
For Kubernetes Setup, be sure to check Provisioned by User.
Highlighted in red in Figure 3 are the three steps to complete before you select the PROCEED button. NOTE: Be sure kubectl is configured for your Kubernetes cluster.
Copy and paste the contents of the text area at the command line. This initiates a TLS handshake that creates a certificate file named cloud-connect.pem on your machine. There is no output at the command line.
Copy and paste the command at the bottom of the panel at the command line. The altinitycloud-connect kubernetes command generates YAML that includes the .pem file generated in the previous step. This step may take several minutes to complete.
The response will be something like this:
    namespace/altinity-cloud-system created
    namespace/altinity-cloud-managed-clickhouse created
    clusterrole.rbac.authorization.k8s.io/altinity-cloud:node-view unchanged
    clusterrole.rbac.authorization.k8s.io/altinity-cloud:node-metrics-view unchanged
    clusterrole.rbac.authorization.k8s.io/altinity-cloud:storage-class-view unchanged
    clusterrole.rbac.authorization.k8s.io/altinity-cloud:persistent-volume-view unchanged
    clusterrole.rbac.authorization.k8s.io/altinity-cloud:cloud-connect unchanged
    serviceaccount/cloud-connect created
    clusterrolebinding.rbac.authorization.k8s.io/altinity-cloud:cloud-connect unchanged
    clusterrolebinding.rbac.authorization.k8s.io/altinity-cloud:node-view unchanged
    clusterrolebinding.rbac.authorization.k8s.io/altinity-cloud:node-metrics-view unchanged
    clusterrolebinding.rbac.authorization.k8s.io/altinity-cloud:storage-class-view unchanged
    clusterrolebinding.rbac.authorization.k8s.io/altinity-cloud:persistent-volume-view unchanged
    rolebinding.rbac.authorization.k8s.io/altinity-cloud:cloud-connect created
    rolebinding.rbac.authorization.k8s.io/altinity-cloud:cloud-connect created
    secret/cloud-connect created
    deployment.apps/cloud-connect created
Notice the altinity-cloud-system and altinity-cloud-managed-clickhouse namespaces above. All the resources Altinity.Cloud creates are in those namespaces; you should not create anything in those namespaces yourself.
When the command is finished, go back to the ACM and click PROCEED to continue.
Configuring resources
When you click PROCEED on the Connection Setup tab, the ACM connects to the Kubernetes environment you just set up at the command line. You’ll see the Resources Configuration tab:
Figure 3 - The Resources Configuration setup page for connecting an environment to Altinity.Cloud
Field details
Cloud Provider
The correct cloud provider should be selected for you. Be sure it’s correct.
Region
The region your Kubernetes cluster is running in should be selected for you.
Number of AZs
The number of availability zones for your ClickHouse cluster.
Storage Classes
One or more storage classes will be defined for you. You can click the trash can icon to delete a storage class, or click the + ADD STORAGE CLASSbutton to create a new one.
Node Pools
One or more node pools from your underlying Kubernetes cluster will be defined for you. You can click the trash can icon to delete a node pool, or click the +ADD NODE POOL button to create a new one.
In the Used For section, ClickHouse, Zookeeper, and System must be selected at least once in at least one of the node pools. Selecting multiple node pools for ClickHouse nodes is highly recommended.
Be aware that you can add node pools later if needed.
Figure 4 above shows the settings for a Kubernetes cluster hosted in the Azure Kubernetes Service.
Configuring resources - an alternate path
In some cases the ACM can define storage classes and node types if a Cloud Provider is selected. However, in many cases the ACM has no way of knowing what resources your environment has. That means you have to define your own storage classes and node types. Here’s an example:
Figure 4 - No storage classes or node pools defined
Even though Azure is selected as the cloud provider, the ACM has no storage classes or node types defined. See the BYOK Kubernetes requirements documentation for details about the storage classes and node types the ACM needs for AWS, Azure, and GCP.
Click the button to create a new storage class. An empty entry field will appear; click the down arrow icon to see a list of choices. If the storage class you need does not appear, click Custom at the bottom of the list and type in the name of the class.
With your storage classes defined, click the button. As with the storage class, you’ll have an entry field with the icon. Clicking it will show a very long list of compute nodes available for the provider you selected. If the node type you need is not in the list, click Custom at the bottom and type in the name of the node type. As mentioned above, at least one node type must be defined for ClickHouse, Zookeeper, and System nodes.
For the GCP example in Figure 5 above, defining the necessary resources looks like this:
Figure 5 - Storage classes and node pools are defined
Configuring resources - wrapping things up
Whatever path you took to get to this point, when you’ve defined everything you need, click PROCEED. The Altinity Cloud Manager connects to your Kubernetes cluster and creates resources inside it. You can click VIEW LOG to see the system’s progress:
Figure 6 - Connecting the new environment
It will take a few minutes for all the resources to be provisioned.
Connection completed
Once the connection is fully set up, the ACM Environments dashboard will display your new environment:
Figure 7 - Environment dashboard tab showing your running cluster
If you have any problems, see the Troubleshooting section below.
NOTE
Altinity.Cloud BYOK environments run all services in two namespaces:
The altinity-cloud-system namespace contains system services including the Altinity Connector.
The altinity-cloud-managed-clickhouse namespace contains ClickHouse and Zookeeper. (Or ClickHouse Keeper instead of Zookeeper.) You can run services in other namespaces as long as you don’t make changes to the Altinity-managed namespaces.
You should not create any resources in either of the Altinity namespaces.
Administering Altinity.Cloud
Once your environment is configured, you use the Altinity Cloud Manager (ACM) to perform common user and administrative tasks:
The first thing you’ll want to do in the ACM is create a ClickHouse cluster in your environment; the Launch Cluster Wizard makes it easy.
The User Guide covers all of the user-level tasks for working with ClickHouse clusters.
The Administrator Guide has the details of managing your Altinity.Cloud environment, creating users, working with backups, and other advanced tasks.
Finally, the Security Guide discusses bast practices to keep your clusters and your data safe.
Troubleshooting
Q-1. Altinity.Cloud endpoint not reachable
Problem
By default, the altinitycloud-connect command connects to host anywhere.altinity.cloud on port 443. If this host is not reachable, the following error message appears.
altinitycloud-connect login --token=<token>
Error: Post "https://anywhere.altinity.cloud/sign":
   dial tcp: lookup anywhere.altinity.cloud on 127.0.0.53:53: no such host
Solution
Make sure the name is available in DNS and that the resolved IP address is reachable on port 443 (UDP and TCP), then try again. The altinitycloud-connect command has a --url option if you need to specify a different URL.
Q-2. Insufficient Kubernetes privileges
Problem
Your Kubernetes account has insufficient permissions.
Solution
Look at the output from the altinitycloud-connect kubernetes | kubectl apply -f - command to see what actions failed, then adjust the permissions for your Kubernetes account accordingly. At a minimum, set the following permissions:
cluster-admin for initial provisioning only (it can be revoked afterward)
Give full access to the altinity-cloud-system and altinity-cloud-managed-clickhouse namespaces
A few optional read-only cluster-level permissions (for observability only)
Q-3. Help! I messed up the resource configuration
Problem
The resource configuration settings are not correct.
Solution
From the Environment tab, in the Environment Name column, select the link to your environment.
Select the menu function ACTIONS 》Reconfigure Anywhere.
Rerun the Environment 》Connection Setup and enter the correct values.
Q-4 One of my pods won’t spin up
When you reboot your machine, the Altinity.Cloud cluster in your ACM has not started.
Problem
One of the pods won’t start. In the listing below, pod edge-proxy-66d44f7465-lxjjn in the altinity-cloud-system namespace has not started:
Delete the pod using the kubectl delete pod command and it will regenerate.
kubectl -n altinity-cloud-system delete pod edge-proxy-66d44f7465-lxjjn
1.2.5.4 - Setting up logging
Configuring storage for logging
In order for Altinity.Cloud to gather/store/query logs from your ClickHouse® clusters, you need to configure access to an S3 or GCS bucket. Logs are scraped only from Kubernetes nodes that have the label altinity.cloud/use=anywhere.
Create a policy that gives access to the bucket and allows s3:* in the Action section.
Create a role and attach the policy to it.
Modify the role’s trust relationships to include the ARN of Altinity’s ClickHouseBackupAdmin role by adding this to the trust policy’s Statement array:
You can disconnect your ClickHouse® cluster from Altinity.Cloud. Your ClickHouse cluster continues to run as always, you just can’t see or control it through the Altinity Cloud Manager.
Disconnecting your ClickHouse cluster from Altinity.Cloud is as simple as this:
1.2.5.7 - Deleting Managed ClickHouse® Environments in Kubernetes
Deleting your ClickHouse® cluster
You can simply disconnect your ClickHouse® cluster from Altinity.Cloud without disturbing your ClickHouse cluster or its data. If that’s what you want to do, see the cluster disconnection instructions.
There’s a second option: you can delete the Altinity.Cloud environment, not the ClickHouse cluster. That takes away Altinity’s access without disturbing your ClickHouse cluster or its data. (See the topic Delete the environment, but leave your ClickHouse clusters undisturbed for complete details.)
But you can also delete your ClickHouse cluster.
WARNING
When we say “delete your ClickHouse cluster,” we mean “delete your ClickHouse cluster.” Seriously. The technique we describe here is irreversible; your ClickHouse cluster will be gone.
If you’ve thought it through and you really want to delete the ClickHouse clusters in your environment, enter these two commands in this order:
The first command deletes every ClickHouse installation (chi) that Altinity.Cloud Anywhere created. Those are in the altinity-cloud-managed-clickhouse namespace. With the ClickHouse clusters deleted, the second command deletes the two Altinity namespaces and any remaining resources they contain.
WARNING: If you delete the namespaces before deleting the ClickHouse installations (chi), the operation will hang due to missing finalizers on chi resources. Should this occur, use the kubectl edit command on each ClickHouse installation and remove the finalizer manually from the resource specification. Here is an example:
You can now delete the finalizer from the resource:
# Please edit the object below. Lines beginning with a '#' will be ignored,# and an empty file will abort the edit. If an error occurs while saving this file will be# reopened with the relevant failures.#apiVersion: clickhouse.altinity.com/v1
kind: ClickHouseInstallation
metadata:
creationTimestamp: "2023-08-29T17:03:58Z" finalizers:
- finalizer.clickhouseinstallation.altinity.com
generation: 3 name: maddie-ch
. . .
1.2.5.8 - Appendix: Using Altinity.Cloud with minikube
For testing and development use only
This guide covers setting up minikube so that you can use Altinity.Cloud to provision ClickHouse® clusters inside minikube. Any computer or cloud instance that can run minikube and support the resource requirements of the Kubernetes cluster we describe here should work.
Note that while minikube is okay to use for development purposes, it should not be used for production. Seriously. We can’t stress that enough. It’s great for development, but don’t use it for production.
Server requirements
In the deployment you’ll do here, you’ll build a minikube cluster with seven nodes. Using the Docker runtime on a MacBook Pro M2 Max, the system provisioned 6 vCPUs and 7.7 GB of RAM per node, along with roughly 60 GB of disk space per node. It’s unlikely all of your nodes will run at capacity, but there’s no guarantee your machine will have enough resources to do whatever you want to do in your minikube cluster. (Did we mention it’s not for production use?) And, of course, the default provisioning may be different on other operating systems, hardware architectures, or virtualization engines.
You’ll also need to install minikube itself. See the minikube start page for complete instructions.
Starting minikube
If you’ve used minikube on your machine before, we recommend that you delete its existing configuration:
😄 minikube v1.38.0 on Darwin 26.2 (arm64)✨ Automatically selected the docker driver. Other choices: qemu2, parallels, ssh
📌 Using Docker Desktop driver with root privileges
👍 Starting "minikube" primary control-plane node in "minikube" cluster
🚜 Pulling base image v0.0.49 ...
🔥 Creating docker container (CPUs=2, Memory=3500MB) ...
🐳 Preparing Kubernetes v1.30.0 on Docker 29.2.0 ...
🔗 Configuring CNI (Container Networking Interface) ...
🔎 Verifying Kubernetes components...
▪ Using image gcr.io/k8s-minikube/storage-provisioner:v5
🌟 Enabled addons: storage-provisioner, default-storageclass
👍 Starting "minikube-m02" worker node in "minikube" cluster
🚜 Pulling base image v0.0.49 ...
🔥 Creating docker container (CPUs=2, Memory=3500MB) ...
🌐 Found network options:
▪ NO_PROXY=192.168.49.2
🐳 Preparing Kubernetes v1.30.0 on Docker 29.2.0 ...
▪ env NO_PROXY=192.168.49.2
🔎 Verifying Kubernetes components...
👍 Starting "minikube-m03" worker node in "minikube" cluster
. . .
👍 Starting "minikube-m04" worker node in "minikube" cluster
. . .
👍 Starting "minikube-m05" worker node in "minikube" cluster
. . .
👍 Starting "minikube-m06" worker node in "minikube" cluster
. . .
👍 Starting "minikube-m07" worker node in "minikube" cluster
. . .
🏄 Done! kubectl is now configured to use "minikube" cluster and "default" namespace by default
NOTE: If you find emojis annoying, defining the environment variable MINIKUBE_IN_STYLE=0 removes them from every minikube message. You’re welcome.
At this point minikube is up and running. The kubectl get nodes command shows our seven nodes:
NAME           STATUS   ROLES           AGE   VERSION
minikube       Ready    control-plane   25m   v1.30.0
minikube-m02   Ready    <none>          25m   v1.30.0
minikube-m03   Ready    <none>          24m   v1.30.0
minikube-m04   Ready    <none>          24m   v1.30.0
minikube-m05   Ready    <none>          24m   v1.30.0
minikube-m06   Ready    <none>          24m   v1.30.0
minikube-m07   Ready    <none>          24m   v1.30.0
When using Altinity.Cloud with a traditional cloud vendor, there are node types, availability zones, and storage classes. We need to label our minikube nodes to simulate those things. First, run these commands to define the node types and availability zones:
Now all of our minikube nodes are defined to be of type minikube-node; we’ll see that node type again later. We’ve also defined availability zones named minikube-zonea, minikube-zoneb, and minikube-zonec.
On to our storage classes. We want to use the local-path storage class instead of minikube’s default standard storage class. This command defines the new storage class:
namespace/local-path-storage created
serviceaccount/local-path-provisioner-service-account created
clusterrole.rbac.authorization.k8s.io/local-path-provisioner-role created
clusterrolebinding.rbac.authorization.k8s.io/local-path-provisioner-bind created
deployment.apps/local-path-provisioner created
storageclass.storage.k8s.io/local-path created
configmap/local-path-config created
Now that we’ve defined the new storage class, we need to tell minikube that the local-path class is the default:
Running kubectl get storageclasses shows the new default class:
NAME                   PROVISIONER                RECLAIMPOLICY   VOLUMEBINDINGMODE      ALLOWVOLUMEEXPANSION   AGE
local-path (default)   rancher.io/local-path      Delete          WaitForFirstConsumer   false                  89s
standard               k8s.io/minikube-hostpath   Delete          Immediate              false                  7m39s
Connecting Altinity.Cloud to minikube
Now that we have the minikube cluster running and configured, it’s time to connect it to Altinity.Cloud Anywhere. That’s the final step for enabling Altinity to provision ClickHouse clusters in minikube. You’ll need an Altinity.Cloud Anywhere account to get started, of course.
If you DON’T have an Altinity.Cloud account
You’ll need to sign up for an Altinity.Cloud trial account. At the end of that process, you’ll have an email with a link to the Altinity Cloud Manager (ACM). You’ll use that link to set up the connection between minikube and Altinity. Clicking the link takes you to Figure 3 in Step 1. Setting up the tunnel.
If you DO have an Altinity.Cloud account
You’ll need to create a new Environment inside the ACM and connect that Environment to minikube. Start by selecting the Environments tab to load the list of Environments:
Figure 1 - The Environments tab
At the top of the list of Environments, click the button, give your environment a name and select the Kubernetes icon:
Figure 2 - Choosing an Environment Type
(When you select Kubernetes as your environment type, the other controls in the dialog become inactive.) Click OK to continue.
Step 1. Setting up the tunnel
First we need to set up the TLS tunnel between minikube and Altinity. Whether you’re a new customer who followed an email link from your welcome email or an existing customer who clicked OK after creating a new environment, you’ll see this screen:
Figure 3 - The Connection Setup screen
Install altinitycloud-connect from the link in section 1. Click the copy icon to copy the text in the center box, then paste it in at the command line and run it. This creates a cloud-connect.pem file in the current directory.
Once you have the cloud-connect.pem file, run the command in the bottom text box to set up the TLS tunnel. The altinitycloud-connect kubernetes command generates YAML that has configuration information along with the keys from the .pem file. That YAML data is passed to kubectl.
You’ll see results similar to this:
namespace/altinity-cloud-system created
namespace/altinity-cloud-managed-clickhouse created
clusterrole.rbac.authorization.k8s.io/altinity-cloud:node-view created
clusterrole.rbac.authorization.k8s.io/altinity-cloud:node-metrics-view created
clusterrole.rbac.authorization.k8s.io/altinity-cloud:storage-class-view created
clusterrole.rbac.authorization.k8s.io/altinity-cloud:persistent-volume-view created
clusterrole.rbac.authorization.k8s.io/altinity-cloud:cloud-connect created
serviceaccount/cloud-connect created
clusterrolebinding.rbac.authorization.k8s.io/altinity-cloud:cloud-connect created
clusterrolebinding.rbac.authorization.k8s.io/altinity-cloud:node-view created
clusterrolebinding.rbac.authorization.k8s.io/altinity-cloud:node-metrics-view created
clusterrolebinding.rbac.authorization.k8s.io/altinity-cloud:storage-class-view created
clusterrolebinding.rbac.authorization.k8s.io/altinity-cloud:persistent-volume-view created
rolebinding.rbac.authorization.k8s.io/altinity-cloud:cloud-connect created
rolebinding.rbac.authorization.k8s.io/altinity-cloud:cloud-connect created
secret/cloud-connect created
deployment.apps/cloud-connect created
As you work with Altinity.Cloud, Altinity creates all ClickHouse-related assets in the altinity-cloud-system and altinity-cloud-managed-clickhouse namespaces. You should not create anything in those namespaces yourself.
Click PROCEED to go to the next step.
It’s possible you’ll get an error message that the connection isn’t ready yet. Wait a few seconds and click PROCEED again…at some point the connection will be ready. (Again, we don’t recommend this for production use.)
Step 2. Configuring your minikube resources
Next we’ll define aspects of the minikube environment to Altinity:
Figure 4 - The Resources Configuration screen
The specific values to use are:
Cloud Provider: Select Not Specified (minikube isn’t AWS, GCP, Azure, or HCloud)
Region: Enter minikube-zone (we used kubectl to define that region earlier)
Availability Zones: Click the + MORE link. That displays an entry field that lets you type in the name of an availability zone. Create AZs minikube-zonea, minikube-zoneb, and minikube-zonec. (We used kubectl to create the three zones as well.) When you click the + NODE link, the AZ you defined will appear next to a checkbox. You may have to click + MORE after you create minikube-zonec as shown here.
Storage Classes: local-path and standard (we defined these earlier and made storageclass the default)
Node Pools: A single node pool named minikube-node with a capacity of 10. The PROCEED button will be disabled until the boxes for ClickHouse, Zookeeper, and System are all checked.
Once you’ve defined the region, availability zones, and assigned node types tio ClickHouse, Zookeeper, and System, click Proceed to start the connection.
Step 3. Making the connection
This screen displays a status bar as the ACM finalizes the connection. Click VIEW LOG to see status messages as the ACM sets up your new environment:
Figure 5 - The Connection screen
NOTE
You may see a number of error messages as your new environment is set up. Some resources may not be ready when first necessary, so you’ll see an error message until the ACM attempts the operation again.
Be of good cheer! It may take 5-8 minutes, but eventually everything will work. Almost certainly. (We’ll avoid repeating the whole “not for production use” bit.)
When the connection is finished and Altinity has created its resources in your Kubernetes cluster, you’ll see this screen:
Figure 6 - Your new Altinity.Cloud environment
Notice that the Availability zones are minikube-zonea, minikube-zoneb, and minikube-zonec as we defined earlier, and the seven nodes in our minikube cluster are listed at the bottom of the screen.
Before you create your first ClickHouse cluster, you need to make sure the node types defined for your ClickHouse, Zookeeper, and System nodes are configured correctly. Click the the Node Types tab as shown in Figure 6. You’ll see the node types available in your environment:
Figure 7 - The list of incomplete Node Types for this environment
The new environment has three node types defined, but the ACM doesn’t know their capabilities. (If this were an n2d-standard-4 node on GCP, for example, the ACM would know what that type of node can do.) For now, these node types don’t have any CPU or RAM. Although nodes with no CPU or RAM will have very little impact on your system resources, they’re unlikely to be useful. We need to give these node types some resources.
Click minikube_node in the Name column for each node in the node list. You’ll see this dialog:
Figure 8 - Setting a Node Type’s properties
Define three versions of minikube_node:
A node with a scope of ClickHouse, 1024 MB of memory, and 2 CPUs
A node with a scope of system, 1024 MB of memory, and 1 CPU
A node with a scope of zookeeper, 1024 MB of memory, and 1 CPU
As shown in Figure 8 above, the dialog also has a Kubernetes Options tab, but you can ignore it and use the defaults.
Click SAVE to set the properties for each node type. When you’re done, the list of node types should look like this:
Figure 9 - The list of correctly configured Node Types for this environment
Now you can create a ClickHouse cluster. Click the button to go to the Clusters view:
Figure 10 - Navigating to the Clusters view
Since this is a brand new environment, you won’t have any clusters, so click the button to start the Cluster Launch Wizard. (See the Creating a new Cluster page for complete instructions.) In a few minutes, you’ll have a tile in the UI that shows your new ClickHouse cluster running inside minikube:
Figure 11 - A running ClickHouse cluster in the minikube-hosted environment
If you’d like to take a closer look, kubectl get pods -n altinity-cloud-managed-clickhouse shows the pods Altinity.Cloud created:
There are two pods for ClickHouse itself, a pod for the Altinity ClickHouse Operator, and three pods for Zookeeper. These pods are managed for you by Altinity.
Working with Altinity.Cloud
Now that your environment is configured, you can use the ACM to perform common user and administrative tasks. The steps and tools to manage your ClickHouse clusters are the same whether you’re running Altinity.Cloud in your Kubernetes environment, in your cloud account, or in Altinity’s cloud account.
Here are some specific tasks from the ACM documentation:
At a higher level, there are several sections you’ll rely on:
The User Guide covers all of the user-level tasks for working with ClickHouse clusters.
The Administrator Guide has the details of managing your Altinity.Cloud environment, creating users, working with backups, and other advanced tasks.
Finally, the Security Guide discusses bast practices to keep your clusters and your data safe.
1.2.6 - Altinity.Cloud in the AWS Marketplace
Subscribing to Altinity.Cloud on AWS
AWS users can use Altinity.Cloud for ClickHouse® from the AWS Marketplace to simplify software licensing, procurement, control, and governance. This lets you run Altinity.Cloud in your cloud account.
Figure 2 – The Altinity.Cloud for ClickHouse entry in the AWS Marketplace
You’ll be redirected to the Subscribe page. Click the Subscribe button to purchase Altinity.Cloud for ClickHouse:
Figure 3 – The Subscribe page for Altinity.Cloud for ClickHouse
On the top of the Subscribe page, click the Set up your account button to start the Altinity.Cloud registration process.
Figure 4 - The Set up your account button
You’ll be redirected to altinity.com. Click the CONTINUE button to continue:
Figure 5 - The welcome screen at altinity.com
Fill out the registration form and click SUBMIT:
Figure 6 - The Altinity.Cloud for ClickHouse registration page
Once you verify your email, you’ll get an email from the Altinity.Cloud team (support@altinity.com). In that email, click the “Get Started” link. You’ll be asked to create a password for your new account.
With your new password defined, you’ll be taken to the ACM login screen:
Figure 7 - The Altinity.Cloud Manager (ACM) login screen
You can log in with your email and password, or click the Auth0 link at the bottom to login through Google. The email address you use with Auth0 must be the same one you used when you signed up for your AWS subscription.
Once you’re logged in, you’re ready to get started!
NOTE: Please use the same browser session to log in to the Altinity.Cloud (ACM) you used to sign up from Marketplace. Connection between ACM and AWS Marketplace is done through secure cookies.
Go to your AWS Marketplace account and click the Manage your software subscriptions link in the Your Software section:
Figure 11 - Managing your account in the AWS Marketplace Console
Select Altinity.Cloud for ClickHouse in your subscription list and click the Manage button:
Figure 12 - The Manage button
Select the Actions button and select Cancel subscription in the menu:
Figure 13 - The Cancel Subscription menu item
You are now unsubscribed from Altinity.Cloud.
1.2.7 - Altinity.Cloud in the GCP Marketplace
Subscribing to Altinity.Cloud on GCP
GCP users can use Altinity.Cloud for ClickHouse from the GCP Marketplace to simplify software licensing, procurement, control, and governance. You can subscribe to the Altinity.Cloud through the GCP Marketplace and get billed through the GCP billing system for the Altinity.Cloud services. We cover how to:
Figure 1 – The Altinity.Cloud for ClickHouse entry in the GCP Marketplace
You’ll be redirected to the Subscribe page. Choose Purchase details, agree on Terms and click the Subscribe button to purchase Altinity.Cloud for ClickHouse:
Figure 2 – The Subscribe page for Altinity.Cloud for ClickHouse
Order request has been sent to the Altinity Inc. to confirm subscription, click the SIGN UP WITH ALTINITY INC. button to start the Altinity.Cloud registration process.
Figure 3 - The SIGN UP button
Fill out the registration form and click SUBMIT:
Figure 4 - The Altinity.Cloud for ClickHouse registration page
Once you verify your email, you’ll get an email from the Altinity.Cloud team (support@altinity.com). In that email, click the “Get Started” link. You’ll be asked to create a password for your new account.
With your new password defined, you’ll be taken to the ACM login screen:
Figure 5 - The Altinity.Cloud Manager (ACM) login screen
You can log in with your email and password, or click the Auth0 link at the bottom to login through Google. The email address you use with Auth0 must be the same one you used when you signed up for your GCP subscription.
Once you’re logged in, you’re ready to get started!
Figure 8 - Cancel your Altinity.Cloud subscription
You are now unsubscribed from Altinity.Cloud.
1.2.8 - Altinity Cloud Manager Introduction
Using the Altinity Cloud Manager (ACM) to manage your ClickHouse® clusters
This section introduces the Altinity Cloud Manager for managing ClickHouse® clusters. The Altinity Cloud Manager (ACM) is where your existing clusters are shown. The ACM has features for managing environments, accounts, billing, and other useful things, but we’ll just focus on the Clusters tab here.
The Clusters (plural) view
You’ll spend most of your time in the Clusters view:
Figure 1 – The Altinity Cloud Manager (ACM) home screen with no clusters running
In this image, altinity-maddie-byok is the name of the environment you’re in, Doug Tidwell is your username, and currently there aren’t any clusters running in this environment.
The Launch Cluster button makes it easy to create a new ClickHouse cluster, If you want to create a ClickHouse cluster now and skip the rest of the tour, you can go directly to our coverage of the Launch Cluster wizard.
Here’s what the Clusters view looks like when you have at least one ClickHouse cluster. Our clusters are named cluster2 and maddie-byok. By default, they appear in the Panel view:
Figure 2 – The Panel view of two clusters
Notice that in Figure 2 the Panel view icon is selected in the upper right. Click the List view icon to switch to the more compact List view:
Figure 3 – The List view of two clusters
Whether you’re in Panel view or List view, clicking on the name of a cluster takes you to the Cluster details view.
The Cluster (singular) view
The Cluster details view looks like this:
Figure 4 – Cluster details for the maddie-byok cluster
It also has dropdown menus for ACTIONS (things like stopping or starting or deleting the cluster) and CONFIGURE (things like backup schedules and uptime settings). We cover those in the sections Cluster actions and Configuring a cluster, respectively.
Connection details
The cluster details view includes a link to the Connection Details for this cluster; that contains all the details you need to connect to the cluster from your application code, a monitoring tool, or the command line.
Clicking the Connection Details link in Figure 4 gives you a panel with all the details you need to work with your ClickHouse cluster:
From the Cluster Details view, selecting the View in Grafana link shows the Grafana menu:
Figure 6 - The Grafana menu
Selecting the Cluster Metrics menu displays this Grafana dashboard:
Figure 7 – The Grafana dashboard for the ClickHouse cluster maddie_byok in the environment altinity-maddie-byok
Scrolling down the dashboard displays roughly a dozen other visualizations of data for the maddie-byok cluster. As you would expect, you can see data for individual clusters or all clusters combined.
The other Grafana dashboards let you see system metrics, a history of your queries and their performance, and all the messages from your logs. See the Grafana dashboards documentation for complete details.
The Cluster Explorer
While viewing your cluster, selecting the button displays the Query tab in the Cluster Explorer. This lets you run SQL queries against the data in your ClickHouse cluster.
Figure 8 – The Cluster Explorer Query tab
The explorer has additional tabs for Schema, Workload, DBA Tools, and API Endpoints at the top of the screen. You can also import a sample dataset into your ClickHouse cluster. We cover all of these features in detail in the Cluster Explorer Guide.
1.2.9 - Creating a new Cluster
Creating a ClickHouse® cluster in a few easy steps
The Launch Cluster wizard is a straightforward way to create new ClickHouse® clusters. The Clusters view displays the ClickHouse clusters running in your environment. If you don’t have any clusters, you’ll see something like Figure 1 below. Whether you have clusters or not, the and buttons are at the top of the Clusters view:
Figure 1 – The Clusters view, featuring the LAUNCH CLUSTER and LAUNCH SWARM buttons
Creating a cluster
The Launch Cluster Wizard gives you two options for creating a regular ClickHouse cluster: a Quick Path that uses default settings for almost everything, and the Advanced Setup view, which gives you many configuration options to customize your ClickHouse clusters. You can also launch Swarm clusters with a simple dialog. Here are the details:
Many times you’ll just want to set up a quick cluster. That’s why we’ve created a quick setup panel that lets you launch a new ClickHouse cluster as quickly as possible. When you click the button, you’ll see this simple panel:
Figure 2 – The quick version of the Launch Cluster wizard
NOTE: If you click the Advanced Setup link, you won’t be able to come back to the Quick Path.
You can simply give your cluster a name, take the defaults for everything else, and click the button. You can change any configuration values later except the cluster name and the availability zones your cluster uses.
Field details
Here are the details of the options in the panel.
Purpose
Lets you classify this as a Development cluster or a Production cluster. You can change this setting later if you need to. Your choice affects how the cluster is created:
A Development cluster is created with one replica, and it is configured to stop after 24 hours of inactivity.
A Production cluster is created with two replicas, and it is configured to run continuously.
Takes you to the Advanced Setup dialog described in the section below. The advanced version of the wizard gives you all the configuration options. Again, if you click Advanced Setup you won’t be able to come back to the quick version of the wizard.
Name
The name of your ClickHouse cluster. It can only contain lowercase letters, digits, and hyphens. As mentioned above, this can’t be changed later. If you use a reserved name for your cluster (iceberg-catalog, for example), you’ll get this error:
Figure 3 – Error message for a reserved cluster name
ClickHouse Version
Lets you choose the version of ClickHouse you want your new cluster to run. There are two options: Altinity Builds, which are stable builds supported for three years by Altinity. The other option, Upstream Builds, lets you choose newer versions from the ClickHouse community. You can change the version later, but it may degrade performance while the Altinity Cloud Manager migrates your cluster from one version to another. The wizard also contains a link to the release notes for the version you select.
Node Type
Lets you choose the node type for your new cluster. Make a choice from the drop-down list. We recommend you choose the smallest node type that can probably handle the workload of your cluster. You can change this later if you need to.
Node Storage (GiB)
The storage, in gigabytes, that each ClickHouse node will have.
As you make choices, the cost estimate at the bottom of the panel will change to reflect the resources you’re requesting When you’re ready, click the button to provision your ClickHouse cluster. That’s all you need to do!
While your cluster is being provisioned, you’ll see a dialog that gives you the password for the admin user:
Figure 4 – Getting the admin password
Be sure to click the icon to copy the password; you won’t be able to see it again. (You can change it later, but you can’t change it now.)
Advanced Setup
Obviously there are times when you want to configure your new cluster beyond the basics. If you click Advanced Setup in the quick launch dialog, you’ll be taken to the full Launch Cluster Wizard. It takes you through seven pages that let you set advanced options like backup schedules, shards, replicas, custom endpoints, and other useful things.
NOTE: After your ClickHouse cluster has been created, you can change any settings except the cluster name and the availability zones your cluster will use.
We’ll cover all the details here, explaining every option along the way and discussing why you might need or want to use them. If you’re looking for help on a particular section of the wizard, you can skip ahead to any of the tabs:
The first tab in the wizard is the ClickHouse Setup tab.
Figure 5 – The ClickHouse Setup tab
Field details
Name
Enter a name for your new cluster. The name will become part of a URL once the cluster is deployed, so it must follow these rules:
It must begin with a lowercase letter [a-z]
It can only contain lowercase letters [a-z], numbers [0-9], and hyphens
It must end with either a letter or a number
It can’t be more than 15 characters long.
NOTE: Once you create your ClickHouse cluster, its name cannot be changed.
Cluster Role
Set this to either Development or Production. These are simply labels applied to your ClickHouse clusters; they can make it easier to manage your clusters. You can change the label later if you want.
NOTE: If you classify this as a Development cluster, it will be configured to stop after 24 hours of inactivity. See Configuring Activity Schedules for more information.
ClickHouse Version
Select the version of ClickHouse you want your cluster to use. Click the down arrow to see a list of available versions. ALTINITY BUILDS is selected by default; that lets you choose which Altinity Stable Build you want to use. You can also click UPSTREAM BUILDS to see other versions of ClickHouse.
Beneath the ClickHouse version is a link to the release notes for the build you’ve selected. The release notes have extensive details of what is new and changed and fixed in each release. Click the link to open the release notes in a new browser tab.
ClickHouse User Name
Currently this is admin and can’t be changed.
ClickHouse User Password
Enter and confirm a password at least 12 characters long. The NEXT button is disabled until the password is at least 12 characters long and the two passwords match.
Click NEXT to continue.
2. Resources Configuration tab
With the basics of your ClickHouse cluster defined, it’s time to give it some CPUs and storage.
Figure 6 – The Resources Configuration tab
Field details
Node Type
Click the down arrow to see what machine types are available. Each item in the list will tell you how many CPUs and how much RAM that machine type has.
Node Storage
The amount of storage in GB that each ClickHouse host will have. If the environment doesn’t have enough resources to meet your requirements, the graphs of CPU and Storage usage will turn red. You can reduce the amount of storage each ClickHouse node will have. If that’s not an option, contact Altinity Support.
Number of Volumes
The number of volumes used by your cluster. Increasing the number of volumes can improve performance and increase storage throughput.
Volume Type
Click the down arrow to see what classes of storage are available for your ClickHouse clusters.
Number of Shards
Enter the number of shards you want for your ClickHouse cluster. The graphs of CPU and Storage usage will be updated as you change the number of shards.
NOTE: sharding is only recommended if you have more than 5 TB of data.
Estimated maximum node throughput
This displays the disk throughput performance you’re likely to see. This is based on disk size, number of vCPUs, and other factors.
If you’re running on AWS, you’ll be able to select the throughput you need:
Figure 7 – Selecting throughput on AWS
Mousing over the graphs or values for CPU, Storage, and Shards displays more specifics:
Figure 8 – More details on CPU, Storage, and Shards
Click NEXT to continue.
3. High Availability Configuration tab
This tab covers server redundancy and failover.
Figure 9 – The High Availability Configuration tab
Field details
Number of Replicas
Select 1, 2, or 3. The CPU and Storage graphs will update as you change the number of replicas.
As with the values for CPU, Storage, and Shards, mousing over Replicas displays more specifics:
Figure 10 – More details on Replicas
Availability Zones
Select which availability zones you want to use. It is highly recommended that you use at least two availability zones.
NOTE: Once your ClickHouse cluster is created, the availability zones cannot be changed.
Zookeeper Configuration
You can use a dedicated Zookeeper cluster to manage replication or choose an existing cluster.
Zookeeper Node Type
The type of node that Zookeeper should run on.
Backup Schedule
You can create a schedule to create backups automatically at certain times of the day, week, or month. You define a backup schedule with these controls:
Figure 11 - Backup Schedule details
There are five options to define the Period when backups should occur:
Monthly - Define the day of the month
Weekly - Define the day of the week
Daily - Define the time of day
Every 6 hours - Backups occur every six hours
Every hour - Backups occur every hour.
NOTE: All times are expressed in GMT and are displayed in 12- or 24-hour format depending on your machine’s settings.
In addition to defining the period, you can also define the number of Backups to Keep. The default is six.
The button lets you define multiple schedules. For example, if you only want backups to occur on Friday and Saturday, create two Weekly schedules, one for Friday and one for Saturday. You can define up to three schedules.
The replica you prefer to use for backups. If that replica is available, it will be used.
Click NEXT to continue.
4. Connection Configuration tab
Next you need to define your ClickHouse cluster’s connections to the outside world.
Figure 12 – The Connection Configuration tab
Field details
Endpoint
This is the endpoint of your cluster. Notice that the value here is the cluster name you defined in the first tab combined with an Altinity domain.
Protocols
Port 9440 enables the ClickHouse binary protocol, port 8443 enables HTTP connections, and port 9004 enables MySQL connections. Note: MySQL connections are for BYOC environments only.
Alternate Endpoints
You can define alternate endpoints for your cluster. The name of the alternate endpoint can contain lowercase letters, numbers, and hyphens. It must start with a letter, and it cannot end with a hyphen.
Figure 13 – Defining an Alternate Endpoint
For example, you might want an endpoint that uses your organization’s domain, such as cluster.environment.example.com instead ofcluster.environment.altinity.cloud. You might also want to create an alternate endpoint and use it as the ClickHouse access point in your applications. With that approach, pointing the alternate endpoint to another cluster lets you switch the cluster your applications are using without changing the applications at all.
Clicking the yellow triangle icon displays the Create DNS records panel, which lists the required and optional DNS records you’ll need to create:
The default value is Altinity Edge Ingress. Depending on how your Environment is configured, other options may be available. Contact Altinity support if the load balancer you need to use is not available.
IP restrictions
This is enabled by default. It is initially filled in with your current IP address. That means only ClickHouse applications or clients coming from your current IP address are allowed to connect to the cluster. You can add other addresses to the list, including ranges of IP addresses in CIDR format.
Disabling IP restrictions means that any ClickHouse application or client can connect to your ClickHouse cluster from any IP address.
NOTE: This restriction only applies to ClickHouse applications or clients. Anyone with the proper credentials can access the Altinity Cloud Manager from any IP address.
Datadog Integration
In Figure 9 above, Datadog integration is disabled. To use Datadog to monitor a ClickHouse cluster, you first need to enable Datadog at the Environment level. Once Datadog is enabled for your environment, the Datadog integration buttons are enabled as well:
Figure 15 – Datadog integration controls for the cluster are enabled when the environment is enabled for Datadog
The three options above allow you to send logs, metrics on the ClickHouse cluster, and/or table-level metrics in your ClickHouse cluster. See the section Enabling Datadog at the environment level for the details. Be aware that you must have the appropriate privileges to edit an environment’s settings, so you may need to contact your administrator.
Click NEXT to continue.
5. Activity Schedule tab
The next configuration option is to determine when your ClickHouse cluster should run.
Figure 16 – The Activity Schedule tab
There are five options:
ALWAYS ON - Self-explanatory; your cluster is always on.
STOP WHEN INACTIVE - Lets you define how many hours your ClickHouse cluster can be idle before it is stopped.
STOP ON SCHEDULE - Lets you define specific times when your cluster is on.
RESCALE ON SCHEDULE - Your cluster is always on, but this option also lets you define times when your cluster should run on larger, more powerful nodes and when it should scale back to run on smaller, cheaper nodes.
RESCALE WHEN INACTIVE - Rescales the nodes in the cluster after the cluster has been inactive for some period of time.
This tab lets you define any Kubernetes Annotations you may need:
Figure 17 – The Annotations tab
NOTE: Annotations are only available for Bring Your Own Cloud (BYOC) and Bring Your Own Kubernetes (BYOK) clusters.
As you would expect, clicking the button creates a new annotation, and clicking the trash can icon deletes one. NOTE: Annotations are only available in Bring Your Own Kubernetes (BYOK) deployments. The Annotations are added to the chi instance that hosts your ClickHouse clusters. (A chi is a ClickHouse Installation, a Kubernetes custom resource.)
Click NEXT to continue.
7. Review & Launch tab
Finally, you have a chance to review your options before you provision and deploy the ClickHouse cluster. You can’t change anything on this screen, but you can use the BACK button to make changes on earlier tabs.
Figure 18 – The Review & Launch tab
If everything looks good, click LAUNCH to launch your new ClickHouse cluster. The cluster should be active in a few minutes.
Creating a Swarm Cluster
You can also create Swarm clusters, ephemeral ClickHouse clusters that are scalable pools of self-registering, stateless servers. (The Altinity blog has a discussion of swarms if you’d like to know more.)
Swarm support is currently disabled by default, but please contact us and we can enable swarms for your environment.
If swarms are enabled, the button will be enabled as well. Clicking it takes you to this straightforward dialog:
Figure 19 - The Launch a Swarm dialog
Give your swarm cluster a name, select a node type, set the number of nodes, and click the button. Your swarm cluster will be ready shortly. While it’s being provisioned, you’ll see a dialog that gives you the password for the admin user:
Figure 20 - Getting the admin password for your swarm cluster
Working with your new cluster
Congratulations! You now have a new ClickHouse cluster. When everything is deployed and running, your clusters will be displayed like this:
Figure 21 – A regular cluster and a swarm cluster
In the display, we’ve created a regular cluster named maddie-byok and a swarm cluster named maddie-swarm. To go further, the User Guide has several sections on working with clusters, including:
What we have to do, what you have to do, and what we do together to keep you secure
The following diagram describes Altinity’s responsibilities and your responsibilities. Security is a team sport, after all, and it’s important to be clear exactly what each of us must do.
With Altinity.Cloud Anywhere, you assume some of the responsibilities that Altinity.Cloud would handle for you. Exactly what you need to do depends on whether you’re provisioning Kubernetes yourself (Bring Your Own Kubernetes) or providing a cloud environment and giving Altinity permission to provision Kubernetes inside it (Bring Your Own Cloud). This figure shows the division of responsibilities for all three scenarios:
Note that even though the base Kubernetes environment used by Altinity.Cloud Anywhere is technically managed by the user, in many cases Altinity.Cloud Anywhere can provision Kubernetes resources in your cluster for you.
1.4 - User Guide
Instructions on general use of Altinity.Cloud
Altinity.Cloud is made to be both convenient and powerful for ClickHouse® users. Whether you’re a ClickHouse administrator or a developer, these are the concepts and procedures common to both.
1.4.1 - Working with your account
Creating and configuring your Altinity.Cloud account
This section covers the basics of working with your Altinity Cloud Manager account.
The tasks we cover for your Altinity.Cloud account are:
You can also click the Auth0 link to log in through a third-party authentication provider. The address you use with Auth0 must be the same one you used to create your account.
The My Account menu
The rest of the tasks we’ll cover are in the My Account menu. To access it, click your username in the upper right corner:
Figure 2 - The My Account menu
NOTE: Depending on your role, some of these menu items may not appear.
Accessing basic account settings
To access basic settings for your account, click the My Account menu item. This displays the My Account panel:
Figure 3 - The four tabs of the My Account panel
The panel has four tabs, which we’ll cover next.
The Common Information tab
The Common Information tab displays basic information, lets you update your password, and lets you switch between light theme and dark theme.
Figure 4 - The Common Information tab
The Email/Login and Role fields are read-only.
To update your account password, type the new password and confirm it. Click SAVE to update the password.
NOTE: The SAVE button is disabled until both passwords are at least 12 characters long and both passwords match.
The API Access and and Anywhere API Access tabs
These tabs let you configure access keys and tokens for your account. Details of API configuration are in the Altinity API Guide.
The Access Rights tab
The Access Rights tab displays the permissions your account has. You need administrator privileges to modify them.
Figure 5 - The Access Rights tab
The permissions are listed in three columns:
Section: The area of access within Altinity.Cloud, such as Accounts, Environments, and Console. A value of* means the user has access to all areas.
Action: What actions the access right rule allows within the section. Actions marked as * include all actions within the section.
Rule: Whether the action is allowed (marked with a check mark), or denied (marked with an X).
The user account in Figure 5 has complete access to everything. A user with a different role and different privileges will see a comprehensive list of what they can do:
Figure 6 - The Access Rights tab for a user with fewer privileges
In this excerpt (there are dozens of sections and actions), the user cannot access the Console or Billing sections, although they can display and edit settings for their account. The global permission for everything (sections and actions * *) is disallowed as well. Finally, note that the Anywhere API Access tab does not exist for this user.
Viewing notifications
The Notifications menu item lets you view any notifications you have received:
Figure 7 - The Notification History dialog
Here the history shows a single message. The text of the message, its severity (Info, News, Warning, or Danger), and the time the message was received and acknowledged are displayed. The meanings of the message severities are:
: Updates for general information
: Notifications of general news and updates in Altinity.Cloud
: Notifications of possible issues that are less than critical
: Critical notifications that can effect your clusters or account
Working with billing information
If you have orgadmin access, you’ll see the Billing menu item. See the Billing page in the Administrator Guide for more information.
Checking system status
The System Status menu item lets you check the status of the Altinity.Cloud service and your ClickHouse® clusters. This gives a quick glance to help devops staff determine where issues might be when communicating with their ClickHouse clusters.
The System Status page displays the status of the Altinity.Cloud services. To send a message to Altinity.Cloud support, select Get in touch at the top of the page:
Figure 8 - The Get in touch button
The rest of the page displays the status of the system:
Figure 9 - Status of your clusters and ACM
The three graphs show the status for the last 90 days. The first two lines here refer to the ClickHouse clusters in your environment. In this example, the clusters were defined just over a month ago, so there isn’t as much data to display. The bottom line is the status of the Altinity.Cloud management console,
Hovering over any bar (red or green) displays more details for that day:
Figure 10 - Details of an entry in the status bar
To subscribe to email updates about any system outages, enter your email and click Subscribe at the bottom of the page.
Selecting this menu item shows you the version of ACM you’re using:
Figure 11 - The Altinity.Cloud Manager version
Here you’re using ACM Version 25.1.50. This can be useful when diagnosing a problem.
Logging out
To log out, click your username in the upper right corner, then click Log out.
Your session will be ended, and you will have to authenticate again to log back into Altinity.Cloud.
NOTE: Your session will automatically be logged out after 60 minutes of inactivity.
1.4.2 - Viewing clusters in the ACM
Details of the ACM user interface
You’ll spend most of your time in the Altinity Cloud Manager working with ClickHouse® clusters. In this section we’ll look at the parts of the ACM user interface that make that easy. Along the way we’ll include links to more details about how to use each set of features.
The Clusters (plural) view
The Clusters view displays your ClickHouse clusters:
Figure 1 - The Clusters (plural) view, featuring two clusters
Key items in Figure 1 above include:
The button, which makes it easy to create a new ClickHouse cluster. If you’d like to exit the tour and create a new cluster now, see the Launch Cluster Wizard documentation.
The Environment menu. Clicking on the current environment name (altinity-maddie-byok) displays a list of environments you can access.
The My Account menu. Clicking on your username (Doug Tidwell) displays a list of options for managing your account. See the My Account menu documentation for all the details of managing your account.
The clusters in this environment. In this view there are two ClickHouse clusters, cluster2 and maddie-byok. Your clusters are displayed in panel view (shown) or the more compact list view. The panel view shows details about the cluster such as its resources and configuration, the version of ClickHouse it’s running, and whether backups are set up.
Clicking on a cluster name takes you to the Cluster view for that cluster. And speaking of the Cluster view….
Cluster tabs
The Clusters view in Figure 1 displays a tile for each cluster. The panels include indicators of the status of each cluster:
- TLS is enabled.
- IP restrictions are enabled, so only certain IP addresses can access the cluster directly. If IP restrictions are not enabled, you’ll see the red triangle icon. Mousing over either icon displays a message:
- Indicates that no backups are scheduled for this environment. Mousing over the flag explains the situation:
Figure 4 - No backups are configured for this environment
Clicking on the message takes you to the Environment Configuration dialog. See the Configuring Backups documentation for all the details. Note: You must have administrator privileges to change an environment’s configuration.
- Indicates that the Altinity Shield is enabled. Altinity Shield support (currently in beta) uses Altinity’s CHGuard as a sidecar proxy to protect your cluster endpoint from DDoS and password enumeration attacks. You can also bypass it temporarily, which case you’ll see the bypassed shield icon. Mousing over the flags explains the situation:
Figure 5 - Altinity shield status
Clicking on the icon takes you to the Configuring Connections page in the Configuring a Cluster section of the User Guide for complete details.
The Cluster (singular) view
Here’s the Cluster view for the maddie-byok cluster:
Figure 6 - The Cluster (singular) view for the maddie-byok cluster
The buttons and menus across the top of the panel are:
CONFIGURE - A menu of configuration options. See Configuring a Cluster for complete details.
EXPLORE - Takes you to the Cluster Explorer, a panel that lets you work with data in the cluster, import data, view database schemas, and other useful things. See the Cluster Explorer guide for complete details.
ALERTS - Lets you define alerts that should be triggered in response to certain events. See the Cluster alerts documentation for complete details.
LOGS - Takes you to the Logs view, which contains a number of different logs to give you insight into your cluster. See the Cluster logs documentation for complete details.
ALTINITY ACCESS - Lets you define the access privileges Altinity support personnel should have into your ClickHouse clusters. See the Altinity Access to ClickHouse documentation for complete details.
- The refresh button. Refreshes the display, as you would expect.
The rest of the view shows statistics and configuration information for the cluster. Most of that data is read-only. You can, however, change the name of the cluster owner (Doug Tidwell in Figure 1) or the Cluster Role (Development) by clicking the current value. You’ll get a simple dialog that lets you set a new value.
The Connection Details link highlighted in Figure 6 shows you the hostname, ports, and other details you’ll need to connect to your ClickHouse cluster from an application, a monitoring tool, or the clickhouse-client tool:
Clicking the Nodes tab highlighted below the cluster name at the top of Figure 6 above shows you the list of nodes in this cluster:
Figure 8 - The Nodes (plural) view for a cluster - panel view
This is the panel view of the nodes. If you like, you can choose the list view to see more details:
Figure 9 - The Nodes (plural) view for a cluster - list view
Clicking the button (in the panel view) or the name of the node (in the list view) takes you to the view of a single node.
The Node (singular) view
When you open the node view, you’ll be on the Overview tab:
Figure 10 - The Overview tab of the Node (singular) view
The buttons across the top of the panel are:
- Takes you to the previous view
RESTART - Restarts the node
EXCLUDE FROM LB - Excludes this node from the
load balancer, as you would expect. Selecting this item means that the node will not get any traffic from the load balancer. (You can still access the node directly if you have its connection information as shown in Figure 12 below.)
When you click this button, you’ll be asked to confirm your decision:
Figure 11 - Confirm removing this node from the load balancer
When a node is removed from the load balancer, the text of the button becomes INCLUDE IN LB; clicking that item returns the node to the load balancer. The value of LB Status in the display is Included or Excluded as appropriate.
EXPLORE - Takes you to the Cluster Explorer for this node. This is the same Cluster Explorer available from the Cluster view, but it is scoped to work with the current node only. See the Cluster Explorer guide for complete details.
- The refresh button. Refreshes the display, as you would expect.
Clicking the Connection Details link highlighted in Figure 6 above shows the information you need to connect directly to this node:
Figure 12 - The Connection Details for a particular node
This dialog is similar to Figure 7 above, the difference being that the host is the URL for this node, not the entire cluster. Again, see the Cluster Connection Details page in the Connecting to Altinity.Cloud section.
The Node Metrics tab
The Metrics tab displays a long list of metrics for this node:
Figure 13 - The Metrics tab of the Node (singular) view
This is an excerpt of the display; the actual panel shows hundreds of metrics for the node.
The Node Logs tab
Finally, the Logs tab displays log messages from ClickHouse or the ClickHouse backup utility.
Figure 14 - The Logs tab of the Node (singular) view
You can enter a filter phrase to see only certain messages, and you can change how many messages are displayed at a time.
1.4.3 - The Cluster Explorer
Working directly with a ClickHouse® cluster
The Altinity Cloud Manager UI provides the Cluster Explorer, a panel that lets you run queries against your ClickHouse® databases, work with database schemas, look at processes running inside the cluster, and use a number of useful DBA tools.
The top of the page looks like this:
The functions of the buttons and menus are:
- The back button. Takes you back to the cluster view for this cluster.
CLUSTER menu - Clicking this menu displays a dropdown list of all of the clusters in this environment. Whatever you do in the Cluster Explorer will be done on the selected cluster.
NODE menu - Lets you select the scope of anything you do in the Cluster Explorer. For the sample-cluster cluster, the menu looks like this:
Selecting Any means everything you do will be executed on a single node selected by the load balancer. All executes everything on every node. Beyond those two choices, you can select a node from the list of all nodes in this cluster.
- lets you import a sample dataset into your ClickHouse cluster. The Importing a Dataset page has complete details.
- The refresh button. Refreshes the display, as you would expect.
See the following pages for details:
1.4.3.1 - The Query tab
Execute SQL statements in your ClickHouse® cluster
When you open the Cluster Explorer, you’ll be on the Query tab:
Figure 1 - The Query tab
The text area at the top of the panel lets you run SQL statements by clicking the EXECUTE button. (You can also keep your hands on the keyboard by typing Ctrl or CMD + Enter.)
Beneath the text area are helpful notes with links to ClickHouse® documentation and a couple of example queries.
When you execute a query, the results appear under the text area:
Figure 2 - Query results
Other Controls
There are several other controls above the text area. First is the Run DDLs ON CLUSTER slider:
Figure 3 - The Run DDLs on cluster slider
When active, this runs all DDL statements in cluster mode, as if you added ON CLUSTER to your statements.
There are other controls as well:
Figure 4 - Other controls on the Query tab
The left and right arrows let you move through the queries you’ve executed.
The button brings up the Select User dialog:
Figure 5 - Changing the user to access the cluster
This lets you select the user (and their associated permissions) to run the query. The down arrow lets you choose from the users defined for this cluster. If your account has the necessary permissions, you can also click the link in “Manage ClickHouse users here” to go directly to the user management panel.
If your cluster is enabled to use swarms and you have one or more swarm clusters, you can click the down arrow to select a swarm to speed up your queries. In Figure 3 above, ClickHouse will use the swarm cluster maddie-swarm.
Finally, the Timeout field lets you define how many seconds ClickHouse should wait for an operation to complete. If you’re working with very large datasets or complex queries, you may need to set this value higher. The default value is 30 seconds.
1.4.3.2 - The Schema tab
View the databases and tables in your ClickHouse® cluster
The Schema tab lets you view the databases and tables in your ClickHouse® cluster. You can then select a table and see its details.
Figure 1 - The Schema tab
You can click the Show system tables checkbox to see the system tables as well. All of the table names are links. You can also click the filter icon to show only the tables that match a particular value. This example filters the display to show only tables from the mindsdb database:
Figure 2 - Filtering to tables from a single database
You can create as many filters as you want; you could add a filter to the display in Figure 6 to show only tables in the mindsdb database with a MaterializedView engine.
When you’re ready to see more details on a particular table, click on a table name to see the Table Details dialog, which has four subtabs:
The Table Description tab - Lists dozens of properties of the table, including its engine, size, number of rows, partition key, and sorting key.
The Table Schema tab - Displays the table schema via the CREATE statement that created it.
The Table Description tab has a table of the table’s properties. There are dozens of them, some of which are shown here:
Figure 3 - The Table Description tab
The Table Schema tab
The Table Schema tab displays the table’s schema via the CREATE statement that created it:
Figure 4 - The Table Schema tab
Click the Copy to Clipboard link to put the schema on the clipboard.
The Sample Rows tab
The Sample Rows tab shows randomly selected rows from the table:
Figure 5 - The Sample Rows tab
Be aware that some kinds of tables won’t have any sample records.
The Column Compression tab
Finally, the Column Compression tab shows the details of the columns in the table and how much they have been compressed:
Figure 6 - The Column Compression tab
The key_flags data indicates whether a given column is the partition key, the primary key, the sorting key, and/or the sampling key. In the example in Figure 6, .xx. means this column is in the primary key and the sorting key.
1.4.3.3 - The Workload tab
See what’s happening in your ClickHouse® cluster
The Workload tab shows you what’s happening in your ClickHouse® cluster now:
The Query Stats tab gives you insight on how your queries are performing:
Figure 3 - The Query Stats tab
Statistics include the average run time for a query, the maximum run time for a query, the average memory used, and how many bytes were read or written for a query. You can see statistics for queries across different time frames (an hour, a day, a week, or a month).
Clicking on an individual query displays a long list of details for that query, such as its status, when it was run, how long it took to execute, and how many bytes and rows were read and written. Here are a few of those details:
Figure 4 - Details of a query
The Replication Queue tab
The Replication Queue tab displays any replications that are in progress:
Figure 5 - The Replication Queue tab
Statistics include the database and table involved for each replication, details about exceptions, postponed replications, and the number of times a replication was tried.
The Mutations tab
The Mutations tab displays information about mutations (ALTER TABLE commands), with the option to display details for any completed mutations:
Figure 6 - The Mutations tab
For each mutation, the display includes information about the host, database, and table being mutated, the command used, and any failures, along with other useful data.
Selecting one or more mutations activates the button.
The Kafka tab displays information about the tables connected to Kafka servers and metrics about those tables.
Figure 7 - The Kafka tab
When you visit this tab, you must select a node or all nodes to view the data. The Kafka tab has two subtabs: Tables, which lists the tables connected to Kafka servers, and Metrics, which displays metrics for those tables as they ingest data from Kafka.
The Tables subtab looks ike this:
Figure 8 - The Kafka tables subtab
The table shows the databases and tables that are subscribed to a particular Kafka topic. It includes details such as the total number of messages consumed by those tables and how many times they committed data to a ClickHouse table.
The Metrics subtab looks like this:
Figure 9 - The Kafka metrics subtab
The table shows a variety of statistics for the Kafka-connected tables on this node. Only non-zero values are displayed; you can click the Show empty values slider to see every metric if you want.
1.4.3.4 - The DBA Tools tab
Use system-level tools to investigate your ClickHouse® cluster
The DBA Tools panel lets you use system-level tools to investigate errors, check for schema consistency errors, rebalance storage across your cluster’s disks, look at detached parts, drop unused tables, and other useful tasks in your ClickHouse® cluster.
Figure 1 - The DBA Tools tab
It has eight subtabs:
The Errors tab - Displays details for errors that have occurred.
The System Tables tab - Lets you examine and modify tables in ClickHouse’s system database.
The Errors tab
The Errors tab, as you would expect, displays any errors that have occurred:
Figure 2 - The Errors tab
Details include the last time an error occurred, how many times it has occurred, and the error message.
The Schema Consistency tab
The Schema Consistency tab displays any schema consistency issues. Hopefully you have no issues and see this:
Figure 3 - The Schema Consistency tab
The Disks Balance tab
The Disks Balance tab has two tabs itself: The Distribution tab, which shows all of the disks in your ClickHouse cluster and how much free space is available on each, and the Rebalance tab, which lets you rebalance your data among your cluster’s disks.
The Distribution tab displays a graph of your disks and how much free space is available on each:
Figure 4 - The Rebalance subtab of the Disks Balance tab
The Rebalance tab lets you, well, rebalance your data:
Figure 5 - The Rebalance subtab of the Disks Balance tab
Clicking the button rebalances the cluster’s disks. You should only rebalance your disks if you’ve gotten an alert that one of your disks is nearly full and you have at least one disk with plenty of space. Note that the ACM will not rebalance your disks if none of them have significant free space, and it will not rebalance the disks unless a significant amount of storage is involved.
The Detached Parts tab
The Detached Parts tab displays any detached parts in your ClickHouse cluster.
The Crashes tab displays the details of any crash that may have occurred:
Figure 7 - The Crashes tab
[ClickHouse rarely crashes, so we don’t have an example to show here.]
The Audit Report tab
The Audit Report tab lets you create new audit reports and lists any reports previously created:
Figure 8 - The Audit Report tab
Clicking the button creates a new report. Clicking the button downloads an HTML file to your machine. The report format is straightforward:
Figure 9 - A sample Audit Report
If you’re inclined to print the report, be aware that it may be hundreds of pages long.
The Unused Tables tab
The Unused Tables tab gives you a list of tables that have not been queried in some time:
Figure 10 - The Unused Tables tab
By default the table shows unused tables over the last 14 days, although you can enter a different number of days in the Not queried since (days) field to change the criteria. Deleting unused tables is a great way to save on storage costs.
Selecting one or more tables activates the button.
The System Tables tab
The System Tables tab lets you work with, well, system tables:
Figure 11 - The System Tables tab
Tables listed in red are old system tables; you can click the button to delete them.
The Actions column on the right lets you perform certain operations on the table:
Figure 12 - Actions available for system tables
The actions available to you vary according to your role and the properties of the table. Here are the details for the complete list:
Disable - The table will not be deleted, but it will not be available for queries, and no new data will be written to the table. Disabling a system table will cause a rolling restart on the cluster. You’ll see this confirmation dialog:
Figure 13 - Confirmation dialog for disabling a system table
Drop - The table will be deleted. You’ll see this confirmation dialog:
Figure 14 - Confirmation dialog for dropping a system table
Truncate - The table will be truncated. You’ll see this confirmation dialog:
Figure 15 - Confirmation dialog for truncating a system table
Set/Modify TTL - You can set or change the TTL (time to live) setting for data in this table. You’ll see this dialog:
Figure 16 - The Set/Modify TTL dialog for system tables
You can set the number of days data should be kept, or you can disable TTL altogether. See the ClickHouse TTL documentation for complete details on TTL.
1.4.3.5 - The API Endpoints tab (beta)
Creating REST endpoints from saved queries
The API Endpoints tab (currently in beta) lets you create ClickHouse® Query API Endpoints that let you invoke queries via REST. Those endpoints allow authorized applications to run a ClickHouse query without writing any SQL statements. (And without knowing anything about the structure of your database.)
NOTE
As a public service, we strongly recommend that you don’t develop your endpoints on a production system. Create and test your endpoints on a staging or development system, then use the import and export features to export your endpoint definitions and then import them into your production system.
When you first see this tab, you won’t have any API endpoints:
Figure 1 - The API Endpoints tab
You have two choices here: you can click the button to create your own endpoints, or you can use the button to import a JSON file of endpoint definitions.
Defining an endpoint
Click the button to create an API endpoint. You’ll see this dialog:
Figure 2 - Defining an endpoint
In Figure 2, we’ve defined a new endpoint named /ride-count that includes a parameter named location. The query returns the number of taxi rides whose PULocationID matches that parameter. Parameters are defined with the syntax {name:Type}.
Click the button to save the endpoint. You’ll be taken back to the main API Endpoints panel:
Figure 3 - The API Endpoints tab with a single endpoint defined
It may take 30 seconds until your ClickHouse cluster’s configuration is updated to support the new endpoint. You’ll see a message to that effect:
Figure 4 - Cluster configuration is being updated
Once the configuration is up-to-date, you can fill in a value for the location parameter and click the button to run the query and see the results:
Figure 5 - Testing an endpoint with the RUN button
If you click the button before the configuration is updated, you’ll potentially see a confusing message like this:
Figure 6 - Cluster configuration not updated yet
If you see something like this, wait a few seconds and try again. It’s possible, of course, that the error in Figure 6 happened because there’s an actual error here. Look at the Errors subtab on the DBA Tools tab if waiting a few seconds doesn’t fix the problem.
When this endpoint is working, an application can invoke the endpoint https://[your endpoint]/ride-count?location=132 to see how many taxi rides started at location 132.
Of course, if you’re creating API Endpoints for applications, you may want to add FORMAT JSON (or whatever ClickHouse format your application needs) to your SQL statements:
Figure 7 - JSON data returned by the endpoint
Modifying an endpoint
To modify an endpoint, click the pencil icon next to the endpoint name to edit the query. (See Figure 3 above.)
Deleting an endpoint
To delete an endpoint, click the pencil icon next to any endpoint name, select the endpoint you want to delete in the list on the left-hand side of the dialog, then click the trash can icon to delete it. Click SAVE ALL to save your changes. Your changes aren’t saved until you click SAVE ALL, so you can always click CANCEL to leave your API endpoints as they were.
Invoking an endpoint from outside the ACM
This is all well and good, but the point of defining API endpoints is to let applications run ClickHouse queries without building those queries themselves. As an example, we’ll get our cluster’s connection information from the Cluster Connection Details dialog, then use curl to invoke our simple query above:
The GET verb is what you’ll probably use for your endpoints, but you can use the Method dropdown to select POST and DELETE as well. (See Figure 2 above.) As an example, say you have an IoT device that posts the current temperature in a warehouse every five seconds. An API endpoint that uses POST could let that device store time-series data into your database. Obviously POST and DELETE actually make changes to your data, so you’ll want to be especially careful about deploying endpoints that use those verbs.
It’s great that you’ve given applications the ability to run ClickHouse queries through a REST endpoint, but you’ll obviously want to control who can access that endpoint. There are a couple of things you can do:
Use the Allowed IPs list
The most straightforward way to control access is with the Allowed IPs list. This lets you define addresses or ranges of IP addresses that are allowed to access your endpoint. See the documentation on configuring connections for all the details.
Create a user with limited access
Another thing you’ll likely want to do is create a user with limited access. A user with read-only access is recommended, although any endpoint that uses POST or DELETE will have to have write access. In addition, you can specify particular databases that the user is allowed to access. See the documentation on managing cluster users for more information.
When you’ve created a user with limited access, you can use the button to test that user’s access:
Figure 8 - The Select User dialog
By selecting another user, you can test your API endpoints to make sure that user’s permissions are working as you intended.
Importing and exporting endpoints
You can import and export a set of endpoints. The endpoints are defined in a JSON file, making it easy to reuse a set of endpoints across ClickHouse clusters. This feature is particularly useful when you’re creating a set of endpoints. Define and test them in a dev or staging environment, then export the endpoints and import them into your production environment when they’re ready.
Be aware that importing a file of endpoints deletes all of your currently defined endpoints.
Clicking the Import Endpoints button brings up this dialog:
Figure 9 - The Import API Endpoints dialog
You can drag and drop a JSON file onto this dialog, click the button to upload a file, or even paste JSON into the text area. Once you’ve set up the endpoints you want to import, click the button to import the endpoints.
Clicking the Export Endpoints button downloads a file named api-endpoints.json to your machine. Once you have the JSON definition of your endpoints, you can import them into another ClickHouse cluster.
1.4.3.6 - Importing a Dataset
Loading sample data into your ClickHouse® cluster
The Cluster Explorer makes it easy to import a sample dataset into your ClickHouse® cluster. The IMPORT DATASET button is at the top of the page:
When you click it, you’ll see this dialog:
Figure 1 - The Import Dataset wizard
Select the dataset you want and click NEXT. Next you’ll be asked about the database schema:
Figure 2 - The Schema tab of the Import Dataset wizard
In this example, three tables will be created when you click the button: central_park_weather_observations, taxi_zones, and tripdata. You can expand each of the entries to look at the CREATE statement and change the engine parameters if you want. Clicking the button restores the original schema.
Click to import the data:
Figure 3 - Tracking dataset import progress
Clicking the link in Figure 3 takes you to the Running Queries tab.
1.4.4 - Configuring a Cluster
How to configure ClickHouse® clusters
In this section we’ll look at all the configuration settings you can change or modify for a ClickHouse® cluster through the Altinity Cloud Manager (ACM), expanding on the basics we covered in the ACM introduction. The items we’ll go through are the menus in the Cluster (singular) view:
You can also do these tasks from the menu in the Clusters (plural) view:
Each menu is covered in the following pages:
1.4.4.1 - Cluster Overview
A summary view of your cluster’s resources
The Overview panel gives you a single view of your cluster and its resources. Clicking the Overview menu displays this dialog:
Figure 1 - The Overview dialog for a cluster
The dialog is mostly informational, but there are a few actions you can take:
Getting Connection Details
In the leftmost column, clicking the Connection Details link next to the Endpoint item gives you the details of this cluster’s URL and how to connect to it. See the Cluster Connection Details page for complete details.
Accessing Grafana dashboards
The ACM provides several Grafana dashboards to help you monitor your ClickHouse clusters. Click the View in Grafana link in the middle column to see the following menu:
In the rightmost column you can click the icon next to the Controlled by item to change the cluster’s owner. You’ll see this dialog:
Figure 3 - The Change Cluster Owner dialog
Click the icon to see a list of users. Select a user and click CONFIRM to change the cluster’s owner.
Changing a cluster’s role
In the rightmost column you can also click the icon next to the Cluster Role item to change the way the cluster is categorized. You’ll see this dialog:
Figure 4 - The Change Cluster Role dialog
Click the icon to see a list of roles. Currently the roles are Production, Development, and Not set.
NOTE: Changing the role of an existing cluster does not change its number of replicas or its activity schedule. See the Rescaling your cluster page to change the number of replicas or the Configuring Activity Schedules page to configure how your cluster is stopped or rescaled automatically.
Select a role and click CONFIRM to change the cluster’s role.
1.4.4.2 - Rescaling your cluster
Configuring the compute resources your ClickHouse® cluster will use
You may need to change the size and structure of your ClickHouse® cluster at some point. (There are slightly different options for rescaling a swarm cluster; those are discussed below.) Clicking the Compute menu displays this dialog:
Figure 1 - The Rescale Compute dialog for a standard cluster
The current properties of your cluster are shown when you open the dialog. You can change the node type for your cluster, the number of shards, and the number of replicas. You can only specify availability zones if you create new replicas. In Figure 1, we increased the number of replicas from 2 to 4; otherwise the Availability Zones checkboxes would be disabled.
At the top of the display is an estimate of the monthly cost of your rescaled cluster, including the difference between your current configuration and the new one. Click the button to rescale the cluster with the new values. As you would expect, the rescaling time varies with the size of the cluster, as each node is rescaled individually.
The rescaling operation takes place one node at a time, so the impact of rescaling should have a minimal impact on the performance of your applications. (Assuming your cluster has more than one replica, of course.)
You’ll get a confirmation message. If your cluster is using the RESCALE ON SCHEDULE or RESCALE WHEN INACTIVE activity schedule, the message will include a warning that you’re resetting your activity schedule:
Figure 2 - The Rescale Confirmation dialog
Rescaling a swarm cluster
If you’re rescaling a swarm cluster, you can only change the node type and the number of nodes:
Figure 3 - Rescaling a swarm cluster
At the top of the display is an estimate of the monthly cost of your rescaled swarm cluster, including the difference between your current configuration and the new one. Click the button to scale the swarm cluster to the new values.
1.4.4.3 - Configuring Storage
Setting up storage for your ClickHouse® cluster
Clicking the Storage menu item displays the list of volumes for your ClickHouse® cluster:
Figure 1 - The Volumes view
The shaded rows in Figure 1 show unmanaged object storage created manually. Clicking the icon shows this message:
Figure 2 - Manually created volume message
There are several buttons at the top of the display:
MODIFY VOLUME - Lets you make changes to the selected volume.
ADD VOLUME - Lets you add another volume to your cluster.
CORDON VOLUME - Changes the selected volume’s status to cordoned. A cordoned volume will not receive any new data; cordoning a volume is the first step towards removing it.
FREE VOLUME - Moves all data from the selected volume to non-cordoned volumes in the cluster.
REMOVE VOLUME - Removes the selected volume from the cluster.
We’ll cover these options next.
Modifying a volume
Selecting a volume and clicking the button lets you change the properties of the selected volume. At a minimum, this allows you to change the type of disk and its size:
Figure 3 - The Modify Volume dialog
Clicking the down arrow icon displays a menu of available disk types based on the cloud provider hosting your ClickHouse cluster. You can also change the size of the volume. An estimate of the monthly cost of this volume appears at the bottom of the dialog.
Be aware that you cannot make a volume smaller:
Figure 4 - Cannot reduce the size of a volume
Contact Altinity support for guidance if you need a smaller volume. The strategy for using less storage varies depending on your requirements.
The dialog may have other options based on your cloud provider. For example, if your ClickHouse cluster is hosted on AWS, you can change the throughput of the volume:
Figure 5 - Setting throughput for an AWS volume
Click SAVE to save your changes.
Adding a volume
Clicking the button lets you add another volume to your cluster:
Figure 6 - The Add New Volume dialog
Be aware that the size of each volume must be at least 350 GB to use multiple volumes. As with modifying a volume, additional options may be available based on your cloud provider, and your estimated cost is displayed at the bottom of the dialog.
Click SAVE to add the new volume. It will appear in the list of volumes.
Adding object storage
Figure 7 - Contact Altinity support to add object storage
Selecting a volume and clicking the button cordons the volume, which means no new data will be written to that volume. Clicking the button changes its text to UNCORDON VOLUME, which reverses the operation. A cordoned volume can be freed, which moves all data from the volume to non-cordoned volumes in the cluster.
Freeing a volume
Selecting a volume and clicking the button moves all data from the selected volume to non-cordoned volumes in the cluster. You must first cordon the volume for the FREE VOLUME button to be enabled. You’ll be asked to confirm that you want to free the volume:
Figure 8 - The Free Volume dialog
When all data is moved off of this volume, the REMOVE VOLUME button will become active.
Removing a volume
If the selected volume has no data, the button will be active. To remove a volume, you must cordon it, which means no new data will be written to it, then free the volume, which moves any data on the volume to non-cordoned volumes. As you would expect, clicking the button gives you a confirmation message:
Figure 9 - The Remove Volume dialog
Click OK to remove the volume.
1.4.4.4 - Configuring Endpoint Connections
Defining how the world talks to your ClickHouse® cluster
The Endpoint Connections Configuration dialog makes it easy to configure your ClickHouse cluster’s connections to the world:
Figure 1 - The Endpoint Connections Configuration dialog
Here are the details of these fields:
Endpoints
This are the endpoints of your cluster. The public endpoint is enabled by default, but you can also have a private endpoint and a VPC endpoint. Contact Altinity support to configure a private or VPC endpoint.
Protocols
Port 9440 enables the ClickHouse binary protocol and port 8443 enables HTTP connections. Clicking the icon displays a message with the requirements for opening a port for MySQL connections:
Figure 2 - Requirements for opening a port for MySQL connections
If MySQL connections are available, the checkbox will be active. Selecting it gives you a dropdown list of available ports:
Figure 3 - Activating a MySQL connection and selecting a port
NOTE: Within your environment, you must use a different port for each cluster with a MySQL connection. The dropdown list of ports will only show the unused (aka available) ports.
Alternate Endpoints
You can define alternate endpoints for your cluster. Click the button to add a new endpoint. The name of the alternate endpoint can contain lowercase letters, numbers, and hyphens. It must start with a letter, and it cannot end with a hyphen.
Figure 4 – Defining an Alternate Endpoint
For example, you might want an endpoint that uses your organization’s domain, such as cluster.environment.example.com instead ofcluster.environment.altinity.cloud. You might also want to create an alternate endpoint and use it as the ClickHouse access point in your applications. With that approach, pointing the alternate endpoint to another cluster lets you switch the cluster your applications are using without changing the applications at all.
Clicking the yellow triangle icon displays the Create DNS records panel, which lists the required and optional DNS records you’ll need to create:
When Zone Awareness is enabled, Altinity.Cloud keeps traffic between client connections and your ClickHouse cluster in a single availability zone whenever possible. This allows you to avoid cross-zone hops.
However, if all of your client connections come from a single zone, this feature will route all requests to a single ClickHouse node. In that case, turning Zone Awareness off will ensure that your load balancer will distribute requests across all the nodes in the cluster.
Allowed IPs
If enabled, only ClickHouse applications or clients coming from addresses in the IP restrictions text box can connect to your cluster. You can specify individual IP address or ranges of addresses in CIDR format. Separate each entry with commas or newlines. You can also define your list of allowed IPs by clicking the button to upload a text or CSV file, or you can drag and drop a .txt or .csv file onto the dialog.
Disabling IP restrictions means any application can connect to your ClickHouse cluster from any IP address. This is not recommended.
NOTE: The Allowed IPs restriction only applies to ClickHouse applications or clients. Anyone with the proper credentials can access the Altinity Cloud Manager UI from any IP address.
Altinity Shield (Beta)
If enabled, uses Altinity’s CHGuard as a sidecar proxy to protect your cluster endpoint from DDoS and password enumeration attacks. You can disable it temporarily with the Temporary Bypass slider; that disables the shield without uninstalling it. Clicking the button lets you configure Altinity Shield:
Figure 6 - The Altinity Shield Advanced Settings dialog
The dialog lets you set a limit on the number of concurrent connections. Changing this value requires a restart.
The remaining options let you define rate limits in two categories: Default rate limits, and rate limits for connections that failed authentication. Within each category, you can define rate limits for a given IP address, for the combination of an IP address and user, and for a given user.
Datadog Integration
You can use Datadog to monitor your ClickHouse cluster. The Datadog options are only enabled if your cluster’s environment is enabled for Datadog support. See the section Enabling Datadog at the environment level for the details. Be aware that you must have the appropriate privileges to edit an environment’s settings, so you may need to contact your administrator.
1.4.4.5 - Configuring Kafka Connections
Connecting your ClickHouse® cluster to a Kafka® server
The ACM makes it easy to work with data lakes in ClickHouse®. Clicking the Data Lake Connections menu item lets you create a data lake in Altinity.Cloud or connect to an AWS Glue data lake.
Defining a database with an IcebergS3 database engine
The first time you try to create a data lake, you’ll need to set the allow_experimental_database_iceberg property:
Figure 1 - Iceberg database support not enabled
Clicking the button enables the property, although it may take a short while:
Figure 2 - Iceberg database support being enabled
You can click the button until support is enabled. Then you’ll see this dialog:
Figure 3 - Creating a database with a IcebergS3 engine
In this example, we’re creating a new database named maddie with a IcebergS3 engine. The text area at the bottom of the dialog changes to reflect your choices. Click the button to create your new database. After the connection is created, you’ll get a message listing the data the ACM found in your data lake catalog:
Figure 4 - Catalog is connected, and data from the catalog is now available
(If there isn’t any data in the catalog, you’ll get the message “No tables found in catalog so far.”)
Figure 5 - The database table created from our data lake
We created a database named maddie in Figure 3 above; here we can see the table in that database.
Connecting to an AWS Glue data lake
The first time you try to work with an AWS Glue data lake, you’ll need to set the allow_experimental_database_glue_catalog property:
Figure 6 - Glue catalog support not enabled
Clicking the button enables the property, although it may take a short while:
Figure 7 - Glue catalog support being enabled
You can click the button until support is enabled. Then you’ll see this dialog:
Figure 8 - Connecting to an AWS Glue data lake
In Figure 8, we’re connecting to an AWS Glue data lake and creating a database named sales that will give us access to the Glue catalog. In addition to the ClickHouse database name, select an AWS region and enter your access key and secret key. The text area at the bottom of the dialog changes to reflect your choices.
Click the button to create the connection and database. The ACM will use the metadata in the Glue catalog to create new tables; querying the ClickHouse tables will bring results from the Glue catalog. When the connection is complete, you’ll see a success message and a list of tables in your database:
Figure 9 - The tables created from the connection to the Glue catalog
Figure 10 - Tables available through the Glue catalog
1.4.4.7 - Configuring Settings
Setting properties and environment variables for your ClickHouse® clusters
Every cluster has a number of settings. The Settings view has a Server Settings tab that lets you view, add, edit, or delete the server’s current settings, or restore the settings to their defaults. There is also an Environment Variables tab that lets you work with environment variables. In addition to configuring settings and environment variables themselves, there are also a couple of global settings that control how the cluster starts when you apply your changes.
WARNING: FOR ADVANCED USERS ONLY. Many ClickHouse settings can be configured through the Altinity Cloud Manager UI. For example, the Accounts Page lets you work with user accounts in a modern UI instead of editing XML files by hand. We strongly recommend using the UI wherever possible; it protects you from syntax errors and other common mistakes.
ANOTHER WARNING: CHANGING YOUR SERVER’S CONFIGURATION MAY RESTART CLICKHOUSE. It’s not always true, but changes to server settings (config.xml and config.d) usually require a restart, while changes to user settings (user.xml and users.d) usually don’t. The Altinity Knowledge Base has an article on server configuration settings that do and don't require a restart. If you’re not sure, check that article before making changes.
Finally, an important point before we go on: By default, the environment that contains your cluster is configured so that any changes to settings and environment variables are automatically published to your cluster. However, if automatic publishing is turned off for your cluster, you’ll need to use the Publish Configuration feature to make your changes permanent. See Publishing a cluster's configuration for more information.
Working with server settings
The Settings View looks like this:
Figure 1 - The Server Settings tab in the Settings View
Settings with a lock icon next to their names can’t be changed through the Settings View. For any other setting, click the vertical dots icon next to the setting name, then click Edit or Delete.
Adding a setting
Clicking the button at the top of the panel lets you add a setting. There are three types of settings:
Attribute - A value in the config.xml file
config.d file - A value in a file stored in the config.d directory
users.d file - A value in a file stored in the users.d directory
Setting an attribute in the config.xml file
The most straightforward kind of setting is an attribute:
Figure 2 - The dialog for setting an attribute
The Value field and Value From fields are mutually exclusive. Value defines the value of the attribute. Value From, on the other hand, refers to a key inside a Kubernetes secret. The format for Value From is secret-name/secret-key. For example, if the underlying environment contains a Kubernetes secret named clickhouse-data and the secret contains a key named clickhouse_data_s3_access_key, clickhouse-data/clickhouse_data_s3_access_key will use the value of that key as the value of the attribute.
The attribute is added to the config.xml file. The Name is the name of the XML element that contains the value. Note that if the XML element is contained in other elements, you need to specify the element’s entire path below the root <clickhouse> element. In the example above, the name logger/level stores the value in config.xml like this:
Setting a value in a file in the config.d directory
The ACM UI makes it easy to create a file with configuration data in the config.d directory. The values defined in that file become part of the ClickHouse system configuration. To set a value, enter a filename and its contents:
Figure 3 - Setting a value in the config.d directory
This example writes the XML in the text box to the file config.d/query_log.xml. When applied to the ClickHouse cluster, logging settings for the query_log table in the system database are updated. Specifically, the retention period for the table is now 90 days (the default is 30).
The value of the Filename field must include an extension. If the contents of the text box are XML, it must be well-formed, and the root element must be either <yandex> or <clickhouse>. If not, you’ll see an error message when you try to save your changes:
Figure 4 - An error message for incorrect XML
(The XML starts with a <clickhouse> tag and ends with a </yandex> tag.)
Setting a value in a file in the users.d directory
Similar to the config.d directory, the ACM UI makes it easy to create a file with configuration data in the users.d directory. The values defined in that file become part of the ClickHouse system configuration. To set a value, enter a filename and its contents:
Figure 5 - Setting a value in the users.d directory
This example contains an XML document that defines new users. If you wanted to define multiple users for your ClickHouse cluster, you could go through the ACM UI and create each one individually. However, it might be simpler and faster to define all the users in XML and use this dialog to create the file users.d/myusers.xml. When the new setting is applied to the ClickHouse cluster, there will be new users based on the data in the XML file.
The value of the Filename field must include an extension. As with config.d values, if the contents are XML, it must be well-formed, and the root element must be either <yandex> or <clickhouse>.
Editing a setting
When you click the vertical dots icon next to a setting name, you can click the Edit menu to, well, edit that setting. The dialogs to edit a setting are exactly the same as the dialogs in Figures 2, 3, and 5 above.
Deleting a setting
Clicking the Delete button in the menu next to a setting name brings up the Delete Setting confirmation dialog:
Figure 6 - Delete Setting configuration dialog
Click OK to delete the setting.
Example: Configuring protobuf schema
As an example, we’ll look at how to use protobuf in your ClickHouse cluster. You need to add two settings:
The attribute format_schema_path
The file events.proto in users.d
To get started, click the button, then create the format_schema_pathattribute and set its value to /etc/clickhouse-server/users.d/:
Figure 7 - Adding the format_schema_path attribute
Click OK to create the attribute. Next, click the button again and create a file in users.d named events.proto with the contents syntax = "proto3":
Figure 8 - Defining the events.proto file
Click OK to create the setting.
Working with environment variables
To work with environment variables, click the Environment Variables tab in the Settings View:
Figure 9 - The Environment Variables tab in the Settings View
We’ll look at the three environment variables listed in Figure 6 as an example.AWS_ACCESS_KEY_ID and AWS_SECRET_ACCESS_KEY define the credentials used to access resources. S3_OBJECT_DISK_PATH is a simple string.
Adding an environment variable
Clicking the button at the top of the view opens the Environment Variable Details dialog:
Figure 10 - Using Value in the Environment Variable Details dialog
Field details
The fields in the dialog are:
Name
The name of the environment variable. The name can contain only letters [a-zA-Z], numbers [0-9], underscores [_], dots [.], and dashes [-], it can’t start with a digit, and it can’t be more than 50 characters long.
Value
The value of the variable. This field is mutually exclusive with the Value From field.
Value From
The name of a key inside a Kubernetes secret whose value should be used as the value for this environment variable. This field is mutually exclusive with the Value field.
In Figure 10 above, we’re using the Value field to define the string object_disks/demo/github as the value of the S3_OBJECT_DISK_PATH variable. Using the Value From field is slightly more complicated:
Figure 11 - Using Value From in the Environment Variable Details dialog
The format for Value From is secret-name/secret-key. In the example above, the value clickhouse-data/clickhouse_data_s3_access_key refers to the first key in this secret:
Continuing our example, when using S3 for data storage in ClickHouse, the configuration data must include the<access_key_id> and <secret_access_key> elements. With the contents of the keys inside the Kubernetes secret defined as environment variables, they can be used in ClickHouse configuration files via the from_env attribute:
With this technique, anyone with access to the cluster can use the values from the Kubernetes secret, but no one can get the actual values.
Editing an environment variable
To edit an environment variable, click the vertical dots icon next to the variable name and select Edit from the menu. That takes you to the Environment Variables Details dialog seen in Figures 10 and 11 above.
Deleting an environment variable
Clicking the vertical dots icon next to the variable name and selecting Delete takes you to the Delete Environment Setting dialog:
Figure 12 - The Delete Environment Setting dialog
Starting in Troubleshooting mode
The Startup in Troubleshooting Mode slider lets you change the startup mode:
Figure 13 - The Troubleshooting Mode slider
By default, if something goes wrong during startup, the ACM will retry the startup several times before giving up. In troubleshooting mode, on the other hand, if something goes wrong during startup, the ACM will not try to restart it if it fails. This is useful for debugging any problems with your cluster’s updated configuration. If you turn troubleshooting mode on, you’ll be asked to confirm your decision:
Figure 14 - Confirming troubleshooting mode
Setting the Startup Time
Depending on the number of tables and the amount of data in your ClickHouse cluster, it may take longer than normal to start. That means it’s possible that the Kubernetes cluster hosting your ClickHouse cluster will delete and restart the pods needed to run ClickHouse before ClickHouse can start. For that reason, you can define a startup time, which is the number of seconds the Kubernetes cluster should wait for your ClickHouse cluster to start.
Figure 15 - The startup time parameter
If your ClickHouse cluster fails to start, you can check the ClickHouse Logs tab in your cluster’s Logs view for details. See the Cluster logs documentation for more information.
Click the button to set the startup time parameter. Note: this button only, uh, applies to the startup time parameter. It does not apply any changes you’ve made to settings or environment variables.
Resetting everything
The button restores all the standard settings to their default values. Any additional settings you have configured are deleted.
1.4.4.8 - Configuring Profiles
Setting up profiles for groups of ClickHouse® users
Profiles allow you to give a name to a group of user settings, then easily apply those settings to users of your ClickHouse® cluster. Click the Profiles menu to get started:
Figure 1 - The Profiles dialog
Creating or editing a profile’s name and description
Clicking the button takes you to the Profile Details dialog:
Figure 2 - The Profile Details dialog
Give the new profile a name and description, then click OK to create the new profile.
From the profile list shown in Figure 1 you can also click the icon next to a profile name, then select Edit to change its name and description:
Figure 3 - The Edit Profile menu
This takes you to the dialog shown in Figure 2 above.
Editing a profile’s settings
To edit the actual settings in the profile, click the Edit Settings link in the right side of the list of profiles shown in Figure 1. You’ll see a list of everything in this profile:
Figure 4 - The list of profile settings
There are currently more than 1500 settings. You can click the filter icon to enter a search term:
Figure 5 - Filtering the list of settings
Here we’re filtering the list of settings to only those with experimental in their names. You can also click the Name title to list parameters in ascending or descending order.
Clicking the button takes you to the Profile Setting Details dialog:
Figure 6 - The Profile Setting Details dialog
Clicking the down arrow displays a drop-down menu that lists all the settings. You can also start typing the name of a setting to avoid scrolling through the entire list. Selecting any setting in the list updates the dialog with a hint for that setting.
To change an existing setting, click the icon, then select Edit from the menu:
Figure 7 - Editing an existing setting
This takes you to the dialog shown in Figure 6 above.
Selecting which profile to edit
You can switch to another profile while in edit mode. Clicking the button displays a dropdown list of all your profiles:
Figure 8 - Selecting a profile to edit
Other editing tasks
You can also click the slider to see only the settings you’ve changed or click the button to reset all settings to their defaults. If you click that, you’ll be asked to confirm your choice:
Figure 9 - Configuring profile reset
Deleting a profile
From the profiles list you can also click the icon and select Delete from the menu:
You’ll be asked to confirm:
Figure 10 - The Delete Profile dialog
1.4.4.9 - Managing Users
Controlling user accounts in your ClickHouse® cluster
Depending on your account’s privileges, you may be able to add, edit, or delete users in your ClickHouse® cluster. Click the Users menu to see all the users, their access, where their accounts are defined, and their profiles:
Figure 1 - The Users View
In the display here, the lock icon next to the altinity user account means that its access and privileges can’t be changed. Clicking the icon next to a username lets you edit or delete that user.
Adding or editing a user
Clicking the button or clicking the icon and selecting Edit from the menu takes you to the User Details dialog:
Figure 2 - The User Details dialog
Here are the details of these fields:
Login | Password
The username and password. The passwords have to be at least 12 characters long, and they have to match. The OK button is disabled until the password fields are correct.
Databases
A comma-separated list of databases this user is allowed to access. If left blank, the user has access to all databases. Keep in mind this is a list of databases, not tables.
If selected, this user will be able to create, delete, and modify user accounts via SQL statements. This is useful for users who may not have access to the ACM UI.
Deleting a user
Clicking the icon and selecting the Delete menu item deletes a user:
Figure 3 - The Delete User dialog
Click OK to delete the user.
If you’re deleting a user with admin privileges, the confirmation message will include a warning:
Figure 4 - Deleting a user with admin privileges
1.4.4.10 - Viewing Cluster logs
See what’s going on inside the system
Clicking the Logs menu lets you look at various system logs:
Figure 1 - The Logs panel
To the left above the logs themselves there are entry fields that let you enter a search phrase and set the number of messages to display. There is also a button that lets you download the log.
Here are the details for the different kinds of logs:
The Audit Log in Figure 1 above lists the high-level operations that have taken place. The second entry is from the Resume a cluster operation. You can click the button to get more details:
Figure 2 - The Operational log for a Resume Cluster operation
The ClickHouse Logs and Backup Logs initially display all the messages from all the nodes in the cluster. You can also choose a single node:
Figure 3 - The ClickHouse and Backup logs can focus on a single host
Finally, the ACM Logs display two sets of messages: The System Log, which contains messages generated by system events, and the API Log, which logs events for calls to the ACM's API.
Figure 4 - The ACM Logs panel
1.4.4.11 - Configuring Activity Schedules
Setting schedules for your ClickHouse® cluster to stop, start, or rescale
The Activity Schedule settings let you control when a ClickHouse® cluster will run as well as the kinds of nodes the ClickHouse cluster will use. Altinity.Cloud does not bill you for compute resources or support for non-running clusters, so you can cut your costs by stopping ClickHouse clusters that don’t need to run constantly. (Note that these cost savings do not apply to storage and backups.) You can also cut your costs by scaling your ClickHouse clusters down to smaller, cheaper nodes during non-peak hours or after your cluster has been inactive for a period of time. Finally, you can schedule certain actions, such as a cluster restart.
Initially the dialog is set to ALWAYS ON:
Figure 1 – The initial activity schedule
There are two sections: Uptime and Rescale and Actions. We’ll start with the five uptime and rescale options:
ALWAYS ON - the cluster is always running. This is the default.
STOP WHEN INACTIVE - the cluster stops running after some number of hours of inactivity.
STOP ON SCHEDULE - the cluster runs only on certain days of the week or at certain times of the day.
RESCALE ON SCHEDULE - the cluster is always running, but it scales up or down to different node types on certain days of the week or at certain times of the day.
RESCALE WHEN INACTIVE - the cluster scales to a different node type after some number of hours of inactivity.
We’ll also look at the Actions you can schedule for your cluster.
ALWAYS ON
Used for mission-critical ClickHouse clusters that must run 24/7, shown in Figure 1 above. Click ALWAYS ON, then click SAVE SCHEDULE to save. Note that with this setting, Altinity.Cloud will not trigger any Stop or Resume operations automatically. If you stop the cluster, you’ll have to resume or restart it yourself; setting the schedule to ALWAYS ON will not automatically resume or restart it.
STOP WHEN INACTIVE
Used to stop ClickHouse clusters after a set number of hours of inactivity. For non-running clusters, Altinity.Cloud does not bill you for compute resources or support, although charges for storage and backups continue.
Figure 2 – The STOP WHEN INACTIVE Activity Schedule setting
Click STOP WHEN INACTIVE, then select the number of hours by typing in a value or by using the up and down arrows. Click SAVE SCHEDULE to save. A clock icon will appear next to the cluster name in the Clusters Dashboard.
NOTE: If your cluster is defined as a Development cluster, by default it is set to stop after 24 hours of inactivity.
ANOTHER NOTE: The ACM may give you a warning message if your cluster has been inactive for a while:
Figure 3 - Unused cluster warning message
STOP ON SCHEDULE
Sets the days of the week your ClickHouse clusters will run, with the option of defining From and To times that your clusters will run for each day.
The schedule below defines the following settings:
On Tuesday and Thursday, the cluster runs from 08:00 to 17:00 GMT, and is stopped the rest of the day.
On Monday, Wednesday, and Friday, the cluster runs all day.
On Saturday and Sunday, the cluster is stopped.
Figure 4 - The STOP ON SCHEDULE Activity Schedule setting
By default, times are expressed in GMT and are displayed in 12- or 24-hour format depending on your machine’s settings. Clicking on the text GMT +00:00 takes you to the Time zone Update dialog:
Figure 5 - The Time zone Update dialog
Select a time zone and click the CONFIRM button to change the time zone.
In the Activity Schedules dialog, click SAVE SCHEDULE to save. A clock icon will appear next to the cluster name in the Clusters Dashboard.
Be aware that manually rescaling a cluster will reset the Activity Schedule to ALWAYS ON. Rescaling the cluster changes the node type it’s running on, so if you want to use the STOP ON SCHEDULE schedule you need to redefine the times the cluster should be stopped. You’ll be asked to acknowledge this before rescaling the cluster:
Figure 6 - Acknowledging the consequences of rescaling a cluster
Also be aware that manually stopping the cluster will reset your activity schedule to ALWAYS ON. You’ll be asked to acknowledge this before stopping the cluster:
Figure 7 - Acknowledging the consequences of stopping a cluster
You can click the check settings link in the dialog to see the cluster’s current activity schedule.
RESCALE ON SCHEDULE
With this option your ClickHouse cluster is always running, but you can define the days of the week your cluster will run on larger, more powerful nodes, with the cluster rescaling to smaller, cheaper nodes the rest of the time. You also have the option of defining From and To times when your clusters will use the larger nodes. By default the cluster runs on the larger nodes all the time.
NOTE: These settings do not start, resume, or restart the cluster, they merely define peak days or hours (Active state) when the cluster should run on larger nodes. When the cluster is in Inactive state, it’s still running, just on smaller nodes.
In the example here, the Active node type is m7g.large, and the Inactive Node Type is m5.large. The Active node type is set when you create the ClickHouse cluster. To change the Inactive node type, click the down arrow icon to see the list of available node types.
The schedule below defines the following settings:
On Monday, the cluster starts the day in Inactive state (running on node type m5.large), scaling up to Active state (running on node type m7g.large) at 08:00 GMT and continuing through the rest of the day.
On Tuesday, Wednesday, and Thursday, the cluster is in Active state (running on node type m7g.large) all day.
On Friday, the cluster starts the day at midnight in Active state (running on node type m7g.large), scaling down to Inactive state (running on node type m5.large) at 17:00 GMT and continuing through the rest of the day.
On Saturday, the cluster is in Active state (running on node type m7g.large) from 09:00 GMT to 17:00 GMT, and is in Inactive state (running on node type m5.large) all other times of the day.
On Sunday, the cluster is in Inactive state (running on node type m5.large) all day.
Figure 8 – The RESCALE ON SCHEDULE Activity Schedule setting
By default, times are expressed in GMT and are displayed in 12- or 24-hour format depending on your machine’s settings. Clicking on the text GMT +00:00 takes you to the Time zone Update dialog shown above in Figure 5.
In addition, activity schedules for swarm clusters can also specify the number of nodes the cluster should have when inactive:
Figure 9 - Setting the number of nodes for an inactive swarm cluster
Be aware that manually rescaling a cluster will reset the Activity Schedule to ALWAYS ON. Rescaling the cluster changes the node type it’s running on, so if you want to use the RESCALE ON SCHEDULE schedule you need to redefine the Active and Inactive node types and the times they should be used. You’ll be asked to acknowledge this before rescaling the cluster:
Figure 10 - Acknowledging the consequences of rescaling a cluster
Also note that manually stopping the cluster will reset your activity schedule to ALWAYS ON as well. You’ll be asked to acknowledge this before stopping the cluster:
Figure 11 - Acknowledging the consequences of stopping a cluster
You can click the check settings link in the dialog to see the cluster’s current activity schedule.
RESCALE WHEN INACTIVE
Used to rescale ClickHouse clusters to a different node type after a set number of hours of inactivity. The cluster keeps running, but it’s on a different node type.
Figure 12 – The RESCALE WHEN INACTIVE Activity Schedule setting
In Figure 12, the node type for an active cluster is m7g.8xlarge. After a certain period of inactivity, the cluster’s nodes will scale down to m7g.large.
NOTE: This setting does not start, resume, or restart the cluster. Once the cluster has been inactive for the length of time you specify, it will be scaled to run on a different node type. When the cluster has some activity, it will be scaled back to the active node type. The cluster never stops, it just runs on smaller nodes when it’s not active.
In addition, activity schedules for swarm clusters can also specify the number of nodes the cluster should have when inactive:
Figure 13 - Setting the number of nodes for an inactive swarm cluster
Click RESCALE WHEN INACTIVE, select the number of hours by typing in a value or by using the up and down arrows, and choose a new node type from the drop-down list. If this is a swarm cluster, you can change the number of nodes when this cluster is inactive. Click SAVE SCHEDULE to save. A clock icon will appear next to the cluster name in the Clusters Dashboard.
Actions
In addition to uptime and rescaling settings, you can also schedule actions that your cluster should take. Click the Actions tab and you can create one or more actions:
Figure 14 - The Actions dialog
In Figure 14 above, the cluster will be restarted every Sunday night at midnight GMT. (As with the other settings here, all times are in GMT by default, but you can click on the text GMT +00:00 to go to the Time zone Update dialog shown above in Figure 5.)
Clicking the button creates a new action, a clicking the icon deletes one. Clicking the button takes you to a dialog that lets you enter details for the action:
Figure 15 - Settings dialog for a action
In Figure 15, you can enter YAML settings for the action. Clicking the link above the text area takes you to the documentation for this cluster action.
1.4.4.12 - Configuring Backup Settings
Defining how, when, and where your data is backed up
You can define a schedule for creating backups of an individual cluster. Click the Backup Settings menu to get started:
The Backup Settings dialog lists the current settings:
Figure 1 - The Backup Settings dialog for an individual cluster
The fields in the dialog are discussed below.
Enable Scheduled Backups for the Cluster
This slider lets you enable or disable backups for a single cluster. For example, if you have a development cluster that doesn’t have any important data, you can disable backups for that cluster without disturbing any other cluster’s backup settings.
Be aware, however, that cluster backups are only done if backups are enabled for the environment that contains them. If backups are currently disabled for the environment, you’ll see a red triangle icon. Clicking on the icon explains the situation:
Figure 2 - Backups must be enabled at the environment level
See the Environment backup configuration documentation to see how to enable backups at the environment level. Be aware that you must have administrator privileges to change the environment-level setting.
Bucket
The read-only name of the bucket where backups are stored.
Backup Schedule
There are five options to define the Period when backups should occur:
Monthly - Define the day of the month
Weekly - Define the day of the week
Daily - Define the time of day
Every 6 hours - Backups occur every six hours
Every hour - Backups occur every hour.
NOTE: All times are expressed in GMT and are displayed in 12- or 24-hour format depending on your machine’s settings.
In addition to defining the period, you can also define the number of backups to keep. The default is seven.
The button lets you define multiple schedules. For example, if you only want backups to occur on Friday and Saturday, create two Weekly schedules, one for Friday and one for Saturday. You can define up to three schedules.
Preferred Backup Replica
This setting lets you select the preferred replica for backups. That replica will be used if it is active.
Extra Parameters
This entry field lets you enter extra parameters for the clickhouse-backup create_backup command of the Altinity Backup for ClickHouse utility. Whatever you enter in this field is inserted directly into the command without escaping. As an example, to back up a portion of your data, you can use the --tables option to specify the tables that should be backed up.
Clicking this button takes you to the read-only Advanced Backup Settings dialog:
Figure 3 - The Advanced Backup Settings dialog
These settings can only be changed by Altinity support; contact us if you need any changes.
1.4.4.13 - Configuring Annotations
Annotating nodes in your ClickHouse® cluster
You can define any number of Kubernetes annotations to add metadata to your ClickHouse clusters. Click the Annotations menu to get started:
NOTE: Annotations are only available for Bring Your Own Cloud (BYOC) and Bring Your Own Kubernetes (BYOK) clusters.
The dialog is straightforward:
Figure 1 - The Annotations dialog
You can edit the key or value of any annotation in the list. Clicking the button adds a new annotation, and clicking the trash can icon deletes one. The Annotations are added to the chi instance that hosts your ClickHouse clusters. (A chi is a ClickHouse Installation, a Kubernetes custom resource.)
An administrator can add an annotation to the list of cost allocation tags with the syntax $(annotation:annotation_name). In the example above, the value of a cost allocation tag created with $(annotation:Team) would be engineering. See the documentation for Cost Allocation Tags for more information.
Click SAVE CHANGES to save your changes.
1.4.4.14 - Cluster alerts
Defining alerts and the events that trigger them
You can configure alerts that will be issued when certain events occur. Click the Alert Settings menu to get started:
You’ll see this dialog:
Figure 1 - The Alert Settings dialog
Enter one or more comma-separated email addresses of the user(s) who should be alerted when particular events occur. For each event, you can send them a popup message in the Altinity Cloud Manager UI and/or send an email.
Types of cluster alerts
The different types of alerts are:
System Alerts: Triggered by a significant system event such as a network outage. See the table below for details of all the system alerts.
ClickHouse Version Upgrade: Triggered by an update to the version of ClickHouse installed in the cluster.
Cluster Rescale: Triggered when the cluster is rescaled.
Cluster Stop: Triggered when some event has caused the cluster to stop running. This could be some event that caused a problem, a user stopping the cluster, or a stop caused by your cluster's activity schedule.
Cluster Resume: Triggered when a previously stopped cluster is restarted.
A popup alert appears at the top of the ACM UI:
Figure 2 - A popup alert for a resumed cluster
System alerts sent via email look like this:
Figure 3 - An email alert
System alerts
Here’s the complete list of system alerts:
Alert
Severity
Description
ClickHouse Disk Threshold Crossed
Critical
The free space on a particular disk in a particular ClickHouse cluster has fallen below a certain threshold.
ClickHouse Server Down
Critical
The ClickHouse server is down.
ClickHouse Distributed Files To Insert Continuously Growing
Critical
The number of distributed files to insert into MergeTree tables that use the Distributed table engine has been growing continuously for four hours. Keep an eye on that.
ClickHouse Rejected Insert
Critical
The ClickHouse cluster rejected a number of INSERT statements due to a high number of active data parts for a partition in a MergeTree. You should decrease the frequency of INSERTs. For more information see the documentation for the system.part_log and system.merge_tree_settings tables.
ClickHouse Memory Resident Utilization High
Critical
ClickHouse’s resident memory utilization has been 80% or more for longer than 10 minutes.
Kube Inodes Persistent Volume Usage
High
A PersistentVolumeClaim is using more than 85% of its iNode’s capacity.
ClickHouse Disk Usage High
High
The amount of free space on a particular disk in a particular cluster will run out in the next 24 hours.
ClickHouse Too Many Mutations
High
The ClickHouse cluster has too many active mutations. This likely means something is wrong with ALTER TABLE DELETE / UPDATE queries. For more information, run clickhouse-client \-q "SELECT \* FROM system.mutations WHERE is\_done=0 FORMAT Vertical and look for mutation errors. Also see the documentation for the KILL MUTATION statement.
ClickHouse Disk Usage
High
The free space on a particular disk in a particular ClickHouse cluster will run out in the next 24 hours. To avoid switching to a read-only state, you should rescale the storage available in the cluster. The Kubernetes CSI supports resizing Persistent Volumes; you can also add another volume to a Pod and then restart that Pod.
Fetches pool utilized high The number of threads used for fetching data parts from another replica for MergeTree engine tables is high. See the ClickHouse documentation on the global server settings for background_fetches_pool_size and background_pool_size for more information.
ClickHouse Move Pool Utilization High
High
Move pool utilized high The number of threads used for moving data parts in the background to another disk or volume for MergeTree engine tables is high. See the ClickHouse documentation on the global server settings for background_move_pool_size and background_pool_size for more information.
ClickHouse Common Pool Utilization High
High
Common move pool utilized high The number of threads used for moving data parts in the background to another disk or volume for MergeTree engine tables is high. See the ClickHouse documentation on the global server settings for background_pool_size for more information.
ClickHouse Background Pool Merges And Mutations High
High
Merges and mutations pool utilized high The ratio between the number of threads and the number of background merges and mutations that can be executed concurrently. See the ClickHouse documentation on the global server settings for background_merges_mutations_concurrency_ratio and background_pool_size for more information.
ClickHouse Distributed Files To Insert High
Warning
ClickHouse has too many files to insert to MergeTree tables via the Distributed table engine. When you insert data into a Distributed table, data is written to target MergeTree tables asynchronously. When inserted into the table, the data block is just written to the local file system. The data is sent to the remote servers in the background as soon as possible.
The period for sending data is managed by the distributed_directory_monitor_sleep_time_ms and distributed_directory_monitor_max_sleep_time_ms settings. The Distributed engine sends each file with inserted data separately, but you can enable batch sending of files with the distributed_directory_monitor_batch_insert setting. Finally, see the ClickHouse documentation for more information on managing distributed tables.
ClickHouse Max Part Count For Partition
Warning
The ClickHouse server has too many parts in a partition. The Clickhouse MergeTree table engine splits each INSERT query to partitions (PARTITION BY expressions) and adds one or more PARTS per INSERT inside each partition. After that the background merge process runs, and when there any too many unmerged parts inside the partition, SELECT queries performance can significantly degrade, so clickhouse tries to delay or reject the INSERT.
ClickHouse Too Many Running Queries
Warning
The ClickHouse server has too many running queries. Please analyze your workload. Each concurrent SELECT query uses memory in JOINs and uses CPU to run aggregation functions. It can also read lots of data from disk when scan parts in partitions and utilize disk I/O. Each concurrent INSERT query allocates around 1MB per column in an inserted table and utilizes disk I/O.
For more information, see the following ClickHouse documentation:
The ClickHouse server has a replication lag. When a replica has too much lag, it can be skipped from distributed SELECT queries without errors, leading to inaccurate query results. Check the system.replicas table, the system.replication_queue table, free disk space, the network connection between the ClickHouse pod and Zookeeper on monitored clickhouse-server pods. Also see the ClickHouse documentation on system.replicas and the system.replication queue.
ClickHouse Delayed Insert Throttling
Info
The ClickHouse server has throttled INSERTs due to a high number of active data parts for a MergeTree partition. Please decrease the INSERT frequency. See the MergeTree documentation for more information.
The ClickHouse server has a number of queries that are stopped and waiting due to the priority setting. See the ClickHouse documentation on processes. Also try the command clickhouse-client \-q "SELECT \* FROM system.processes FORMAT Vertical.
1.4.5 - Monitoring a Cluster
How to monitor and manager your ClickHouse® clusters’ performance
As with any critical system, it’s vital to keep track of how your ClickHouse® clusters are performing. Monitoring is a great way to identify potential problems and to set up automated alerts when things happen. Or when they’re about to happen.
There are several ways to monitor your ClickHouse clusters:
1.4.5.1 - Grafana dashboards
Monitoring your ClickHouse® cluster with the ACM’s built-in Grafana dashboards
Altinity.Cloud uses Grafana as its default monitoring tool. You can access Grafana from the Monitoring section of a cluster panel:
Figure 1 - The Monitoring section of the cluster panel
Clicking the View in Grafana link displays the following menu:
Figure 2 - The Grafana monitoring menu
We’ll go through those menu items next. If you’d like to jump to a particular Grafana view, click any of these links:
Selecting Cluster Metrics opens this Grafana dashboard in another browser tab:
Figure 3 - The Cluster Metrics dashboard
Cluster metrics include things like the number of bytes and rows inserted into databases in the ClickHouse cluster, merges, queries, connections, and memory / CPU usage.
The System Metrics view
Selecting System Metrics opens this Grafana dashboard in another browser tab:
Figure 4 - The System Metrics dashboard
System metrics include things like CPU load, OS threads and processes, network traffic for each network connection, and activity on storage devices.
The Queries view
Selecting Queries opens this Grafana dashboard in another browser tab:
Figure 5 - The Queries dashboard
The Queries dashboard includes information about your most common queries, slow queries, failed queries, and the queries that used the most memory.
The Logs view
Selecting Logs opens this Grafana dashboard in another browser tab:
Figure 6 - The Logs dashboard
The Logs dashboard shows all of the log messages as well as the frequency of messages over time. You can add a query to the Logs visualization to filter the view for particular messages.
1.4.5.2 - Health checks
Using the ACM’s automated health checks
You can check the health of a cluster or node from the ACM. For clusters, there are two basic checks: the health of the nodes in the cluster and the health of the cluster itself. The health checks for a node are whether the node is online and, as you would expect, the health of the node itself.
Cluster health checks
Cluster health checks appear near the top of a Cluster view. For example, here is the panel view of a cluster with the two health checks:
Figure 1 - A cluster panel with its two health checks
The health check at the top of the panel indicates that 2 of the 2 nodes in the cluster are online:
Clicking on this green bar takes you to the detailed view of the cluster. From there you can see the individual nodes and their status.
The second health check indicates that 6 of the 6 cluster health checks passed:
Clicking on this green bar shows you the health check dialog:
Figure 2 - The Health Checks dialog
The cluster health checks are based on six SELECT statements executed against the cluster and its infrastructure. The six statements look at the following cluster properties:
Access point availability
Distributed query availability
Zookeeper availability
Zookeeper contents
Readonly replicas
Delayed inserts
Clicking any of the checks shows the SQL statement used in the check along with its results:
Figure 3 - Details of a particular cluster health check
Depending on the cluster’s status, you may see other indicators:
Health check
Meaning
The cluster or node is rescaling
The cluster or node is being terminated
The cluster or node is stopped
Node health checks
The basic “Node is online” check appears next to the node name in the Nodes view of the cluster:
Figure 4 - Health checks in the Nodes view of a cluster
Opening the Node view shows more details:
Figure 5 - The health checks for a single node in the cluster
The first health check indicates that the node is online:
The second health check indicates that all the node health checks passed:
Clicking on this green bar takes you to a more detailed view of the health checks and their results, similar to Figure 2 above.
1.4.5.3 - Notifications
Getting information from system-level messages in the ACM
You can see your notifications by clicking on your username in the upper right corner of Altinity Cloud Manager:
The Notifications menu item lets you view any notifications you have received:
Figure 1 - The Notification History dialog
Here the history shows a single message. The text of the message, its severity (Info, News, Warning, or Danger), and the time the message was received and acknowledged are displayed. The meanings of the message severities are:
- Updates for general information
- Notifications of general news and updates in Altinity.Cloud
- Notifications of possible issues that are less than critical
- Critical notifications that can effect your clusters or account
1.4.6 - Cluster Actions
Common cluster management tasks
Most of the tasks you’ll do in the Altinity Cloud Manager are working with ClickHouse® clusters.
Your first task is creating a new cluster. Launching a new cluster is incredibly easy, and only takes a few minutes. See the Launch Cluster wizard documentation for complete details on the options for creating and configuring a new cluster.
Once your cluster is up and running, most of the cluster management tasks you’ll want to do are provided by buttons at the top of the Cluster (singular) view and in the MORE menu:
The MORE menu on the left is for an regular cluster, while the one on the right is for a Swarm cluster. Swarm clusters are ephemeral, so many options that make sense for a regular cluster don’t apply.
In addition, the Tools menu at the top of the Clusters (plural) view includes the option to copy data between clusters:
Also, in the Clusters (plural) view, these actions are available by clicking the button:
All the details of these actions are in the following pages:
1.4.6.1 - Upgrading a Cluster
How to upgrade an existing ClickHouse® cluster
Clusters can be upgraded to newer versions of ClickHouse®. Before you upgrade a production cluster, we strongly encourage you to open a support ticket with normal priority and label the ticket “Upgrade.”
Select the ClickHouse version to update to. You can select from Altinity Stable Builds or Community Builds. As you choose which type of build you want to use, the dropdown menu below changes to include the latest builds of that type. There is also a Release notes link beneath the menu; clicking that link takes you to the release notes for that release. We also strongly recommend reading the release notes for the version you’re upgrading to.
Figure 1 - The Upgrade Cluster dialog
Be sure to read any warning messages carefully. If the version you’ve selected will downgrade your cluster by at least one major version, you’re required to acknowledge that before the process will start:
Figure 2 - Confirming a ClickHouse downgrade
You’ll also be asked to confirm the decision to upgrade from an Antalya build to a non-Antalya build:
Figure 3 - Confirming an upgrade from an Antalya build to a non-Antalya build
In addition to the versions listed by default, you can select Custom Version and enter the name and tag of a Docker image:
Figure 4 - Selecting a custom ClickHouse image
The upgrade process time varies with the size of the cluster, as each server is upgraded individually. This may cause downtime while the cluster is upgraded.
1.4.6.2 - Rescaling a Cluster
How to rescale an existing ClickHouse® cluster
You may need to change the size and structure of your ClickHouse® cluster at some point. Clicking the Rescale menu item displays this dialog:
Figure 1 - The Rescale Cluster dialog
The current properties of your cluster are shown on the left side; you can enter new values or select a new node type on the right. In Figure 4 above, the number of replicas has increased from 2 to 4, so the dialog gives you the option of selecting availability zones for the new replicas. In addition, the text under the Desired Node Size section includes a Storage link that takes you to the ACM panel to edit the storage policy. (See Configuring Storage for the details.)
At the bottom of the dialog is an estimate of the monthly cost of your rescaled cluster, including the difference between your current configuration and the new one.
Click OK to rescale the cluster with the new values. As you would expect, the rescaling time varies with the size of the cluster, as each node is rescaled individually.
The rescaling operation takes place one node at a time, so the impact of rescaling should have a minimal impact on the performance of your applications. (Assuming your cluster has more than one replica, of course.)
Be aware that if your cluster’s activity schedule is set to STOP ON SCHEDULE or RESCALE ON SCHEDULE, rescaling it resets its activity schedule to ALWAYS ON. You’ll be asked to acknowledge the consequences of rescaling the cluster:
Figure 2 - Acknowledging the consequences of rescaling a cluster
1.4.6.3 - Stopping, resuming, or restarting a cluster
How to stop or start an existing ClickHouse® cluster
You can stop, resume, or restart a ClickHouse® cluster by clicking the appropriate button at the top of the Cluster (singular) view. As you would expect, the text of the first button is Stop if the cluster is running and Resume if the cluster is stopped. Depending on the size of your cluster, it may take a few minutes until it is fully stopped, resumed, or restarted.
You’ll see this confirmation dialog when you stop a cluster:
Figure 1 - The Stop Cluster confirmation dialog
Be aware that if your cluster’s activity schedule is set to STOP ON SCHEDULE or RESCALE ON SCHEDULE, stopping it resets its activity schedule to ALWAYS ON. You’ll be asked to acknowledge the consequences of stopping the cluster:
Figure 2 - Acknowledging the consequences of stopping a cluster
See the page Configuring Activity Schedules for all the details, or click the check settings link in the dialog to see the cluster’s current activity schedule.
If you are resuming a cluster, you can change the node type used in the cluster:
Figure 3 - The Resume Cluster confirmation dialog
As with stopping a cluster, if the cluster’s activity schedule is set to STOP ON SCHEDULE or RESCALE ON SCHEDULE, resuming it resets its activity schedule to ALWAYS ON. You’ll be asked to acknowledge the consequences of stopping the cluster as shown here.
When resuming a swarm cluster, you have the additional option of specifying the number of nodes in the cluster:
Figure 4 - The Resume Cluster confirmation dialog for a swarm cluster
If you are restarting a cluster, you have three options:
A Rolling restart, which restarts nodes in your ClickHouse cluster one at a time
A SYSTEM SHUTDOWN that restarts all ClickHouse processes
A Hard restart that restarts all ClickHouse nodes
Figure 5 - The Cluster Restart confirmation dialog
Finally, be aware that a cluster may be stopped, resumed, or rescaled automatically based on any activity schedules you may have configured.
1.4.6.4 - Exporting a Cluster's settings
How to export a ClickHouse® cluster’s settings
The structure of an Altinity.Cloud ClickHouse® cluster can be exported in ACM format (JSON) or CHOP format (YAML):
Figure 1 - Exporting a cluster’s configuration
Choosing a file format and clicking OK creates a JSON or YAML file that is downloaded to your machine. As an example, if your cluster is named maddie-byok, the file will be named either maddie-byok.json or maddie-byok.yaml.
Note that you can also export the configuration of an entire environment; see Exporting an Environment for the details. Spoiler alert: you can export an environment in JSON or as a Terraform script.
1.4.6.5 - Publishing a Cluster's Configuration
Pushing changes to your ClickHouse® cluster
The Publish Configuration menu item applies any configuration changes you have made to your ClickHouse® cluster. This gives you more control over how changes are applied.
Figure 1 - The Automatic Publish environment setting
Automatic publishing is enabled by default. That means any changes to the configuration of any cluster in the environment are automatically applied as they are made in the ACM. However, you (or your administrator) may want more control over how changes are applied. Publish Configuration lets you decide when changes should be applied. (You must have administrator-level access to change an environment’s Automatic Publish option setting.)
If you have configuration changes that haven’t been published yet, you’ll see the PUBLISH button at the top of the cluster view:
Figure 2 - The Publish button
Clicking the button displays the Pending Cluster Updates dialog:
Figure 3 - The Pending Cluster Updates dialog
You can click the arrow icon to see the details of any particular change. Be aware that you can’t modify your changes from this dialog. If you need to modify something, click CANCEL, edit your settings and environment variables as needed, then come back to the Publish Configuration function to continue.
Click CONFIRM to publish the changes.
1.4.6.6 - Working with a Cluster's History
Working with changes made to a ClickHouse® cluster
The Cluster Update History view lets you rollback changes that have been made to a ClickHouse® cluster:
Figure 1 - The Cluster Update History view
In this example, several cluster settings have been modified. You can click the arrow icon to expand an item and see its details. The highlighted change added the logger/level attribute to the cluster’s configuration.
NOTE: Rolling back an action also rolls back every other action made since the one you’re rolling back. The text for the two actions above the highlighted one are crossed out as a visual reminder.
1.4.6.7 - Launching a Replica Cluster
How to create a replica of a ClickHouse® cluster
WARNING: FOR ADVANCED USERS ONLY.
ClickHouse® clusters can be replicated easily. A replica can include the same database schema as the original cluster, or it can be launched without the schema.
NOTE: Be aware this a true replica, not a one-time copy. Any changes made to the replica’s data will be replicated back to the source cluster.
This menu item starts a slightly modified version of the Launch Cluster Wizard. The only difference is on the ClickHouse Setup panel:
Figure 1 - The modified ClickHouse Setup panel
You have the option to replicate the schema of the existing cluster. With that exception, this version of the Launch Cluster Wizard is identical to the one covered in the Launch Cluster Wizard documentation.
Once you click Launch on the Review & Launch tab at the end of the wizard, the replica cluster will be available within a few minutes.
1.4.6.8 - Cloning a Cluster
How to clone a ClickHouse® cluster
Cloning a ClickHouse® cluster is straightforward: simply give the clone a name and click the CLONE button:
Figure 1 - The Clone a Cluster dialog
You’ll see a progress dialog as provisioning for your new cluster continues.
Creating a backup of a ClickHouse® cluster is straightforward: simply click the Create Backup item on the ACTIONS menu. You’ll see an informative message like this:
Figure 1 - The Cluster Backup confirmation dialog
As the dialog points out, backups are stored separately from the cluster, so you can restore your cluster from a backup even if you delete the cluster. Click OK to create the backup. You can also set a schedule for automatic backups. See Configuring Backup Settings for all the details.
1.4.6.11 - Enabling Swarms
Enabling swarms in a ClickHouse® cluster
This menu item lets you enable Swarm clusters, ephemeral ClickHouse® clusters that are scalable pools of self-registering, stateless servers. (The Altinity blog has a discussion of swarms if you’d like to know more.)
Be aware that you enable swarms on a cluster-by-cluster basis. If you create a new cluster with the Launch Cluster wizard, you won’t be able to use swarms on the new cluster until you use this menu item. Also be aware that enabling swarms will cause a restart of your cluster.
This menu item is currently disabled by default, but please contact us and we can enable swarms for your environment.
When enabling swarms for your cluster, clicking this menu item asks you to confirm your choice:
Figure 1 - Enabling swarms for a particular cluster
When swarms are enabled, you’ll get the good news:
Figure 2 - Swarms are enabled for this cluster
Now you can create swarms using the Launch Cluster Wizard. Simply click the button, go through a simple wizard, and you’ll have a swarm cluster. See the Launch Cluster Wizard documentation for all the details.
If swarms are already enabled, you’ll see this dialog instead:
Figure 3 - Swarms are already enabled for this cluster
1.4.6.12 - Destroying a Cluster
How to destroy a ClickHouse® cluster
When you no longer need a ClickHouse® cluster, the entire cluster and all of its data can be destroyed. Enter the name of the cluster and click OK to delete it:
Figure 1 - The Cluster Delete Confirmation dialog
Altinity.Cloud will delete the cluster’s resources unless you click the slider. You’ll also get a warning if there are no backups of this cluster, as shown here. If you’re sure you want to delete the cluster, type the name of the cluster and click the DELETE button.
(Under normal circumstances you should always let the ACM de-provision the cluster’s resources. It’s only useful if the cluster is disconnected from the ACM.)
You can restore the cluster from a backup if one exists; otherwise, you’ll need to recreate the cluster manually.
1.4.6.13 - Copying data between Clusters
Copying data from one ClickHouse® cluster to another
The Copy Data Wizard is on the TOOLS menu in the Clusters view:
The wizard makes it easy to copy data from one ClickHouse® cluster to another. To get started, select the location of the cluster (local or external) and the name of your Altinity.Cloud environment. With those two values selected, the Cluster drop-down menu will be populated with the names of the clusters in that environment. As you would expect, you also have to enter your username and password to access the cluster.
Here’s how things look when the data source is a local cluster:
Figure 1 - Copying data from a local cluster
If you’re copying from an external ClickHouse server, you’ll need to enter the server’s URL:
Figure 2 - Copying data from an external cluster
The second step of the wizard is selecting the data’s destination. Here’s how things look for a local destination:
Figure 3 - Copying data to a local cluster
As you’d expect, you can copy to an external cluster as well:
Figure 4 - Copying data to an external cluster
With your source and destination clusters selected, you have the option of selecting which tables will be copied. The default is All tables, but you can also choose to Select specific tables:
Figure 5 - Selecting specific tables to copy
Click the button to start copying data.
1.4.6.14 - Locking a Cluster
How to lock a ClickHouse® cluster
If you’re looking at a particular ClickHouse® cluster, there is a lock button at the top of the panel that allows you to prevent any changes to the cluster. Operations that don’t change the cluster, such as creating a backup or exporting the cluster's configuration, are still allowed.
Be aware that anyone with appropriate access can lock or unlock the cluster at any time.
To lock or unlock the cluster, simply click the lock button:
Figure 1 - The Lock Cluster button
The button turns gold when locked and returns to transparent when unlocked.
1.5 - Administrator Guide
How to manage Altinity.Cloud.
Altinity.Cloud allows administrators to manage clusters, users, and keep control of their ClickHouse® environments with a few clicks. Monitoring tools are provided so you can keep track of everything in your environment to keep on top of your business.
1.5.1 - Working with Environments
Creating an Environment for your ClickHouse® clusters
An Environment is a way of grouping ClickHouse® clusters together in your account. There are several things you’ll want to do with your environments; we’ve broken the details into several sections:
1.5.1.1 - Viewing your Environments
Displaying all the Environments in your Altinity.Cloud account
In working with Environments, you’ll always start by selecting the Environments tab to load the list of Environments:
Figure 1 - The Environments tab
The Environment list view
Here’s the Environment list view. Clicking any environment name in the list takes you to the environment summary view:
Figure 2 - The list of Altinity.Cloud Environments in your account
There are three buttons above the list of environments:
The environment list also shows the organization you’re in (ALTINITY DEV in Figure 2). If your company has more than one organization, clicking the icon shows you all of your organizations.
Status - The status of the cluster. is what we’re looking for here.
Deployment - The kind of deployment, either Anywhere (BYOK), Anywhere (BYOC), or Anywhere (SaaS).
Provider - Either AWS, GCP, Azure, or HCLOUD (Hetzner).
Region - The region where the environment is running.
Created - When the Environment was created.
Owner - The ID of the Environment’s administrator.
Organization - The Organization that owns this Environment.
The link - Clicking this takes you to the Clusters (plural) view of the ClickHouse® clusters in this environment.
The Environment summary view
When you click the name of an environment, you’ll be taken to its summary view:
Figure 3 - The Environment summary view
Figure 3 is a summary of an Altinity.Cloud environment named altinity-maddie-saas that is running in Altinity’s Cloud (SaaS). It has two ClickHouse clusters, one swarm cluster, and an Iceberg catalog has been defined.
Action buttons
There are four buttons at the top of the Environment summary view:
- lets you export your environment to a file that can be imported later. For more information about exporting an environment, including what data formats are available, see the Exporting an Environment page.
- synchronizes the view with its current state in the ACM. It’s unlikely that you’ll ever need this button, fwiw.
- deletes the environment. There are a number of considerations for deleting (or disconnecting) an environment; see the Deleting an Environment page for more information.
You can also click the link to go to the Clusters (plural) view of the ClickHouse clusters in this environment.
The Environment name and status
Beneath the buttons is the name of the environment (altinity-maddie-saas) and its status. is the status we’re looking for. The calendar icon means that a maintenance window has been defined for this environment. See the Defining Maintenance Windows page for details.
Information panels and configuration dialogs
Next are tabs for various information panels and configuration dialogs:
Figure 4 - Tabs on the Environment view panel
Clicking the icon displays the drop-down for four additional tabs as shown in Figure 4.
The Overview panel in Figure 3 gives you a, well, overview of your environment’s details. You can skip ahead to the discussion of the Overview panel below if you like. The other nine tabs let you configure your environment. They’re covered in the following sections:
Most of the information at the top of the panel is self-explanatory. In Figure 1, this is a SaaS environment hosted on AWS. It has two ClickHouse clusters and one swarm cluster; clicking the 2 or 1 next to those headings takes you to the Clusters (plural) view of the ClickHouse clusters in this environment.
This environment has one or more Iceberg catalogs enabled. Clicking the Enabled link next to “Iceberg Catalogs” takes you to the Catalogs tab of the Environment view page, where you can see the details of your Iceberg catalogs. The Enabling Iceberg Catalogs page has all the details.
The Monitoring section has links to three monitoring tools:
Figure 2 - Available monitoring tools
Clicking the Prometheus, Grafana, or Datadog links takes you to the corresponding monitoring tool. There are default views for all three tools; for the first two, take a look at the documentation for integrating Prometheus and integrating Grafana.
The Datadog link (disabled in the figure above) lets you configure a connection to your Datadog account. Clicking the link (whether enabled or disabled) takes you to the Metrics tab of the Environment configuration panel.
You can integrate Datadog at the environment level; if your environment is enabled for Datadog, you can then enable it at the cluster level. The Integrating Datadog page has all the details for configuring Datadog.
1.5.1.2 - Creating an Environment
Getting started with a new Environment
The first step in setting up an environment is clicking the button. In the Environment Setup dialog, give your environment a name, choose a cloud provider, select one of that provider’s regions, then choose whether to use Altinity’s account or your own:
Figure 1 - The Environment Setup dialog
Your choices are:
Use Altinity’s cloud account - ClickHouse as a service, hosted and managed by Altinity. Choose your cloud provider and region:
Figure 2 - SaaS environment - Choose a cloud provider and region
If your SaaS provider is Hetzner, you’ll need to specify a region and a location:
Figure 3 - SaaS environment - Choose a region and location for Hetzner
Currently SaaS on Azure is not supported. If you select Azure as your cloud provider, Bring your own cloud will be selected for you:
Figure 4 - SaaS on Azure is not supported
Bring your own cloud account - Altinity.Cloud provisions Kubernetes clusters in your cloud account, then it provisions ClickHouse clusters inside those Kubernetes clusters. Choose your cloud provider and a region:
Bring your own cloud account - Kubernetes option - If you select Kubernetes as your cloud provider, that means you’re using your own Kubernetes cluster to host your ClickHouse clusters. When you choose this option, the other options are disabled:
Figure 6 - Using your own Kubernetes environment
You’ll see a message explaining that you’ll have to create much of the infrastructure yourself:
Figure 7 - Responsibilities of using your own Kubernetes environment
Configuration tasks are divided between two menus. One takes you to the Environment Configuration dialog and its seven tabs; the other menu has more granular choices, each of which takes you to a single dialog. Use the screen captures below to find the configuration task you want to do.
For the Environment Configuration dialog, go to the Environments view and click the vertical dots icon next to the environment name. Select Edit from the menu:
Figure 1 - The Edit Environment menu
The Edit Environment menu in Figure 1 takes you to the Environment Configuration dialog. It has seven tabs:
Figure 2 - The tabs of the Environment Configuration dialog
If you’re on the Overview tab of an Environment view, you’ll see several tabs at the top of the panel:
Figure 3 - Tabs on the Environment summary view
Clicking the icon shows the four additional tabs shown in Figure 3.
The Overview tab is explained on the Viewing your Environments page. All of the other tabs are explained in the pages below, with the tabs of the Environment Configuration dialog first, followed by the tabs on the Environment summary view. The exact text of each tab is in the navigation bar on the left.
1.5.1.3.1 - General Environment Configuration
High-level settings for your Environment
The most high-level settings are on the General tab:
Figure 1 - The General tab
Here are the details of these fields:
Name
The name of the Environment.
Deployment Type
This field is read-only for most users. Under normal circumstances, the only values that will appear here are Kubernetes or Anywhere.
Availability Zones
The availability zones defined for your environment. A green check mark appears next to availability zones currently in use:
Figure 2 - An availability zone in use
Be aware that in Bring Your Own Kubernetes (BYOK) environments you can specify additional availability zones:
Figure 3 - Specifying additional availability zones
You can click the button to create a new availability zone.
Use External DNS
The names of the endpoints of ClickHouse resources used by ACM are based on a naming convention that includes the cluster name and altinity.cloud. Checking this box means the ACM will access those resources through endpoints resolved through an external DNS. Contact Altinity support for help in setting this up.
Domain
You can define a custom domain; contact Altinity support to set this up. The default domain uses a combination of your ACM environment name and altinity.cloud.
Database Login | Database Password
The username and password for the ClickHouse cluster. The ACM uses these values to retrieve information about schemas, users, and other high-level information from the ClickHouse cluster. These values are set for you by default.
If you change the username to default and leave the password blank, the ACM will attempt to retrieve the password from the ClickHouse operator’s configuration.
Monitoring
Monitoring is turned on and the button is disabled. This control is a legacy item that will disappear in future versions of the ACM.
Automatic Publish
If selected, any changes made to the Environment’s configuration are automatically published when you make them. Turning this off lets you decide when a change is published, giving you more control over the configuration. For example, you might want to make a number of configuration changes and publish them at one time.
HIPAA Compliant
Select this to indicate that the environment contains data subject to HIPAA regulations.
1.5.1.3.2 - Configuring Kubernetes
Working with your Kubernetes infrastructure
The Kubernetes tab, as you would expect, lets you configure Kubernetes settings:
Figure 1 - The Kubernetes tab
Here are the details of these fields:
Master API URL
Under normal circumstances this value should not be changed. It can be useful in a Bring Your Own Kubernetes environment when defining connections between the ACM and Kubernetes. Contact Altinity support for help setting this up.
Auth Options - TLS Handshake + Token
This authentication scheme is the most common:
Figure 2 - Using the TLS Handshake and Token authentication scheme
The Client Key and Client Cert are defined for you. Under normal circumstances, you won’t need to change these values at all.
Auth Options - No Auth (Proxy)
This approach is used for development purposes only. It should never be used in production.
Figure 3 - Using the No Auth authentication scheme
Auth Options - Access Token
This is a legacy technique that is no longer used. It will be removed in a future version of the ACM.
Figure 4 - Using the Access Token authentication scheme
Namespace
The namespace used for the ClickHouse clusters deployed by Altinity. The default value is altinity-cloud-managed-clickhouse. Once the ClickHouse cluster is created, the namespace cannot be changed.
Manage Namespace
If this switch is turned on, namespaces will be managed by the ACM.
Certificate ARN
The ARN (Amazon Resource Name) for the certificate used by this environment. This is managed for you in Altinity.Cloud environments, and is typically not needed in an Altinity.Cloud Anywhere environment.
Node Scope Label
Defines a label that will be added to nodes created by the ACM. This is useful for Kubernetes clusters that have user-created nodes. With a node scope label, the ACM will only deploy pods to nodes with that label.
Node Zone Key
Defines a zone key for this environment. For example, specifying us-east-1c generates the label topology.kubernetes.io/zone: "us-east-1c". See the Kubernetes documentation for more information.
K8S Dashboard URL
You have the option of installing a Kubernetes monitoring tool inside the Kubernetes cluster that hosts your ClickHouse clusters. If you do, enter the URL of the monitoring tool here. Most customers use tools that run outside the Kubernetes cluster (k9s, for example), so this option is rarely used.
Server Startup Time
Depending on the number of tables and the amount of data in your ClickHouse cluster, it may take longer than normal to start. That means it’s possible that the Kubernetes cluster hosting your ClickHouse cluster will delete and restart the pods needed to run ClickHouse before ClickHouse can start. For that reason, you can define a startup time, which is the number of seconds the Kubernetes cluster should wait for your ClickHouse cluster to start.
Use Operator Managed PVs
If selected, the persistent volumes used by your ClickHouse clusters will be managed by the Altinity Kubernetes Operator. This is the default; only legacy Altinity.Cloud environments should disable this option.
Use CH Keeper
If selected, this environment will use ClickHouse Keeper instead of Zookeeper by default.
1.5.1.3.3 - Configuring Node Defaults
Defining node properties
This tab lets you define the default ClickHouse version, default node types for ClickHouse and Zookeeper nodes, and storage settings. In addition, you can define the URL of a private image registry if you want your Kubernetes cluster to use a custom registry.
Figure 1 - The Node Defaults tab
Here are the details of these fields:
ClickHouse Version
Click the down arrow icon to see a list of available ClickHouse versions.
ClickHouse Node Type
Click the down arrow icon to see a list of available node types.
ClickHouse Storage Multiplier
Defines the amount of storage that will be allocated to your ClickHouse cluster. The ACM takes the amount of RAM allocated to the cluster (in GB), multiplies it by the storage multiplier, then rounds up to the nearest 100GB. For the mathematically inclined, the formula’s notation is , where x is the RAM in GB and y is the storage multiplier.
Here are a couple of examples:
With 8GB of RAM and a storage multiplier of 10, the amount of storage is 100GB (8 * 10 is 80, rounded up to 100).
With 16GB of RAM and a storage multiplier of 10, the amount of storage is 200GB (16 * 10 is 160, rounded up to 200).
All that being said, it’s unlikely you’ll ever need to change the default value of 10.
Zookeeper Node Type
Click the down arrow icon to see a list of available node types.
Zookeeper Storage (GB)
Defines the storage that should be allocated for each Zookeeper node.
Private Image Registry
Enter the URL of your private image registry in the format https://username:password@imageurl.com. If a private registry is defined, the ACM will pull container images for the ClickHouse server, Zookeeper, and the ClickHouse Backup tool from the private registry.
1.5.1.3.4 - Defining Resource Limits
Setting things up
This tab lets you define the limits for the resources allocated to your environment.
Figure 1 - The Resource Limits tab
Here are the details of these fields:
Shards per Cluster
Enter the maximum number of shards per cluster.
Replicas per Cluster
Enter the maximum number of replicas per cluster.
Total Storage, GiB
Enter, in gigabytes, the total amount of storage used by the ClickHouse cluster.
Total CPU Cores
Enter the maximum number of cores across all CPUs.
Volume Rescale Percent
Enter the minimum percentage of space that must be used on a given disk before it can be rescaled.
Minimum Volume Size, GiB
Enter, in gigabytes, the minimum volume size for a multi-volume configuration.
Minimum st1 Volume Size, GiB
Enter, in gigabytes, the minimum volume size for EBS st1 volumes. If your cloud provider is not AWS, this field is disabled.
Total Nodes
Enter the maximum number of nodes for your ClickHouse cluster. A value of 0 means there is no limit.
1.5.1.3.5 - Configuring Backups
Automating backups of your data
The Backups tab lets you define how the data in your ClickHouse® clusters is backed up.
Figure 1 - The Backups tab
Here are the details of these fields:
Turn On Backups
Select this to, um, turn on backups.
If backups are not enabled for a cluster, the Clusters View will show a red flag for that cluster:
Figure 2 - Warning message - No backups configured
Clicking on the flag icon takes you to the dialog in Figure 1.
Backup Schedule
Allows you to define a schedule of backups. The UI is straightforward, but see Configuring Backup Settings in the User Guide if you want more details.
Preferred Backup Replica
Allows you to choose which of your replicas should be used as the preferred replica for backups. If your preferred replica is active, it will be used.
Backup Tool Image
The name and tag of the container image used to create and manage backups. If left blank, the default is altinity/clickhouse-backup:stable.
Compression Format
The default is tar; other options are gzip and zstd. Be aware that creating a tar file has the lowest impact on the CPU, but it creates the largest file because a tar file isn’t compressed. On the other hand, the other compression formats take more CPU cycles to create but have smaller file sizes. Choose accordingly.
Enable Objects Labeling
If selected, everything in a backup is labeled with the name of the cluster. This can be useful if you’re working directly with the bucket where the backups are stored.
Backup Storage Provider
This lets you select the cloud provider that the ACM should use to store your backups. The details are different depending on the cloud provider you select. In addition, S3-Compatible may not be an option depending on how and where your Altinity.Cloud environment is hosted.
NOTE: You can, in fact, choose to store your backups with a different cloud provider than the provider that hosts your ClickHouse clusters. That will likely incur massive data transfer charges, but you can do it. To be safe, you’ll be asked to confirm that decision:
Figure 3 - Confirming that you want to store backups on a different cloud
If your backup storage provider is AWS, you’ll see these fields:
Figure 4 - Using AWS as the backup storage provider
Bucket
The name of the S3 bucket.
Region
The region where the bucket is hosted.
Access Key | Secret Key
The access key and secret key credentials for your AWS account. These fields are ignored if you have a value in the Assume ARN field below.
Assume ARN
The ARN (Amazon Resource Name) for the bucket. If you have a value in this field, ACM ignores any values in the Access Key and Secret Key fields above. If you’re in a BYOK environment, the instructions for setting up backups in EKS environments have the details on setting up AWS policies and roles.
Path (optional)
The path inside the bucket where the backups should be stored. The default value is altinity-cloud-managed-clickhouse.
TEST CONNECTION
If you change the Secret Key or ARN, the TEST CONNECTION button becomes active. If the connection works, you’ll see this message:
Figure 5 - A successful connection test
Otherwise you’ll see a message that tells you what went wrong:
Figure 6 - An unsuccessful connection test
Backup Storage Provider - GCP
If your backup storage provider is GCP, you’ll see these fields:
Figure 7 - Using GCP as the backup storage provider
Bucket
The name of the bucket.
Credentials JSON
JSON data that contains credentials associated with a GCP service account. That service account can have access to your entire GCP project, or it may be restricted to a single bucket or even a single folder within a single bucket. See the Google Cloud documentation for details:
The path to the directory inside the bucket where your data is stored. The default value is altinity-cloud-managed-clickhouse.
TEST CONNECTION
When you’ve defined a complete set of credentials, the TEST CONNECTION button at the bottom of the dialog will become active. Clicking the button will return one of these messages:
Figure 8 - A successful connection test
Figure 9 - An unsuccessful connection test
You’ll of course need to correct any errors before you can continue.
Note that when you return to this panel, the value of the Credentials JSON field will be hidden and the TEST CONNECTION button will be disabled. You’ll need to enter your Credentials JSON again if you want to re-test the connection.
Backup Storage Provider - Azure
If your backup storage provider is Azure, you’ll see these fields:
Figure 10 - Using Azure as the backup storage provider
Container
The name of the container.
Account Name
The organization name for your Azure account.
Account Key
The key for your Azure account.
Path (optional)
The path inside the container where the backups should be stored. The default value is altinity-cloud-managed-clickhouse.
TEST CONNECTION
When you’ve defined a complete set of credentials, the TEST CONNECTION button at the bottom of the dialog will become active. Clicking the button will return one of these messages:
Figure 11 - Successful and unsuccessful connection test messages
You’ll of course need to correct any errors before you can continue.
Note that when you return to this panel, the value of the Account Key field will be hidden and the TEST CONNECTION button will be disabled. You’ll need to enter your Account Key again if you want to re-test the connection.
Backup Storage Provider - S3-Compatible vendor
If you’re using another backup storage provider with an S3-compatible API, you’ll see these fields:
Figure 12 - Using an S3-compatible vendor as the backup storage provider
NOTE: S3-compatible storage may not be an option based on your environment. For example, if you’re in a SaaS environment hosted on AWS, S3-compatible will not appear in the dialog.
Endpoint
The URL of your S3-compatible storage provider account.
Bucket
The name of the S3-compatible bucket you’re using.
Region
The region where the bucket is stored.
Access Key | Secret key
The access key and secret credentials for your storage provider account.
Assume ARN
Leave this field blank for a S3-compatible storage provider.
TEST CONNECTION
The TEST CONNECTION button will become active when you enter values in the Access Key and Secret Key fields.
Whatever type of credentials you’re using, clicking the button returns one of these messages:
Figure 13 - Testing the connection to an S3-Compatible storage provider
You’ll of course need to correct any errors before you can continue. Click OK when you’re done.
Note that when you return to this panel, the value of the Secret Key field will be hidden and the TEST CONNECTION button will be disabled. You’ll need to enter your credentials again if you want to re-test the connection.
These buttons allow you to send logs, metrics on the ClickHouse cluster, and/or table-level metrics in your ClickHouse cluster.
External Prometheus configuration options
Remote URL
The URL of your remote Prometheus server. In Figure 1 above, the remote write endpoint is https://logs-prod-006.grafana.net.
Auth User | Auth Password or Auth Token
The credentials for your remote Prometheus server. For greater security, you can also use a bearer token instead of the userid and password.
Metric Storage configuration option
Retention Period, Days
The number of days backups should be kept. The default value for Altinity.Cloud Anywhere environments is 30. For all other environments, this value is 180 and cannot be changed.
1.5.1.3.7 - Configuring Logging
Setting up logging
Figure 1 - The Logs tab
Here are the details of these fields:
Loki Logs Storage Configuration
Logs Bucket | Logs Region
The name of the bucket where your Loki logs should be stored and the region where the bucket is hosted. The bucket is used internally by the ACM; it’s not accessible by users. In addition, this setting is only used for Bring Your Own Kubernetes (BYOK) environments. For Bring Your Own Cloud (BYOC) environments, the bucket is configured automatically and these fields are not editable.
Send Logs to an External Loki service
External Loki URL
The URL of your external Loki server in the format https://username:password@lokiserver.com/api/prom/push. For complete details on integrating your Altinity.Cloud environment with an external Loki server, see the Administrator Guide section on Integrating Loki.
Sending Logs to an S3 bucket in a BYOK environment
If you have a BYOK environment on AWS, you can create an S3 bucket for logs. The recommended way is to use IRSA.
Once the secret and bucket are created, you can enter the name of the bucket and its region in the Logging tab of the Environment configuration dialog in Figure 1 above.
1.5.1.3.8 - Configuring Network Access
Defining network connections for your environment
The Network tab lets you define network connections for your cluster:
Here are the details of these fields:
Subnets CIDR
This is used in Bring Your Own Cloud (BYOC) environments. You define subnets in your cloud account, then reference them when you use the ACM to create a Kubernetes cluster in your cloud account. The subnets you provided when you defined the environment appear here.
Load Balancer Type
The default value (and likely the only value available) is Altinity Edge Ingress. If your cloud provider is AWS, AWS NLB may be an option as well. In some cases, you’ll see checkboxes that let you enable the load balancer for public and/or private traffic. If you need to use a different load balancer, contact Altinity support.
NOTE: If you choose a Private load balancer, changes to your ClickHouse® configurations will not be automatically updated:
This option is only available for environments that are running on AWS and have a private load balancer enabled.
LB Proxy Protocol
Enabling this item disables the MySQL protocol.
SNI Proxy
In an Altinity.Cloud Anywhere environment, the endpoints the ACM needs to access may not be publicly accessible. This field lets you define an SNI proxy to route requests from the ACM to the correct endpoint inside your Altinity.Cloud Anywhere environment. (Server Name Indication is an extension to TLS that allows multiple hostnames to be served over a single HTTP endpoint.)
Use SNI Proxy to access ClickHouse
Turns the SNI proxy on or off.
Use SNI Proxy to access ClickHouse
In an Altinity.Cloud Anywhere environment, the endpoints the ACM needs to access may not be publicly accessible. This field lets you define an SNI proxy to route requests from the ACM to the correct endpoint inside your Altinity.Cloud Anywhere environment.
Encrypt traffic inside the cluster
Encrypts traffic inside ClickHouse clusters in this environment.
1.5.1.3.9 - Defining Custom Node Types
Setting up resources for your ClickHouse® clusters
When you create a ClickHouse® cluster in your environment, the ACM automatically includes a number of node types. The names and capabilities of those node types are based on the cloud provider associated with your environment.
The Node Types tab on the Environment summary page shows you the list of node types defined in your environment:
Figure 1 - The list of node types
The list of node types includes check marks if a node type is in use or if it is enabled to use spot instances. (More on spot instances below.)
How (or if) you define custom node types depends on your environment:
If you’re running Altinity.Cloud in our cloud (SaaS), the node types are managed for you by Altinity.Cloud. If you need to add or edit node types, contact Altinity support.
If you’re running Altinity.Cloud in your cloud (BYOC), Altinity defines a number of node types for you. It’s highly unlikely you’ll need to edit or create node types, but if you do, you can.
If you’re running Altinity.Cloud in your Kubernetes environment (BYOK), the ACM has no way of knowing what kinds of nodes you have in your environment. If you configure autoscaling with Karpenter (AWS), the AKS cluster autoscaler (Azure), or the GKE Autopilot (GCP), you can use the ACM to refer to those node types.
To work with node types, click the button to add a new node type.
It’s not common, but you can also click the vertical dots icon next to a node type in the list and select Edit to edit an existing node type:
Figure 2 - The edit node type menu
General Node Type Details
You’ll see the General tab of the Node Type Details dialog:
Figure 3 - The General tab of the Node Type Details dialog
Field details
Here are the details of these fields:
Name
The name of the node type. The node name and the instance type are typically the same, although that’s not a requirement.
Scope
Either ClickHouse, Zookeeper, or System. The scope allows you to define which node types you want to use with each component of the system.
Instance Type
Clicking the down arrow displays a list of dozens of cloud-provider-specific instance types. The example here is from a ClickHouse environment hosted on AWS, so c5.xlarge is an option. Similarly, n2-standard-4 would be an option for GCP and Standard_D2s_v5 would be an option for Azure.
Enable Spots
If selected, this node type will be provisioned as a spot instance. Spot instances can lower your cloud computing bell. They are recommended for Swarm clusters, although Swarms can run on regular nodes.
CPU
The number of CPUs assigned to this node type.
Memory, MB
The amount of memory assigned to this node type. A value of at least 4096 is recommended.
Kubernetes Options
Figure 4 - The Kubernetes Options tab of the Node Type Details dialog
These options are typically used in BYOK environments only. In many cases, the underlying BYOK infrastructure hosts workloads other than ClickHouse. That means you’ll want to make sure the right nodes are used for the ClickHouse, Zookeeper, and System nodes, as well as all of the other nodes in your environment. Defining Kubernetes tolerations or nodeSelectors gives you control over how nodes are allocated and managed in your environment. (In some cases BYOC environments are shared with other workloads; if that’s true, BYOC users may need Tolerations or NodeSelectors as well.)
Field details
Capacity
Tolerations
One or more Kubernetes tolerations associated with this node type. Multiple tolerations should be separated by semicolons (;). Nodes with a Scope of ClickHouse should have the tolerations dedicated=clickhouse:NoSchedule and altinity.cloud/use=anywhere:NoSchedule:
Figure 4 - Tolerations for ClickHouse nodes
Node Selector
One or more Kubernetes nodeSelectors associated with this node type. Multiple nodeSelectors should be separated by commas.
Storage Class
Leave this field as is. It will be removed in a future version of the ACM.
1.5.1.3.10 - Enabling Iceberg Catalogs
Connecting to Iceberg catalogs
An Iceberg catalog is a registry of Parquet files and metadata that makes it easy to work with datasets stored in object storage. The ACM makes it easy to work with an Iceberg catalog inside SaaS and Bring Your Own Cloud (BYOC) environments.
For Bring Your Own Kubernetes (BYOK) environments, Altinity doesn’t have access to create S3 buckets in your account, so this feature is disabled inside the ACM:
Figure 1 - Working with catalogs in the ACM is disabled for BYOK environments
When you enable Iceberg catalogs, the ACM creates a default catalog for you. You can create other catalogs by clicking the button. You’ll see this dialog:
Figure 5 - Creating a new Iceberg catalog
There are two options for the storage of your catalog: an AWS S3 bucket or an AWS S3 table bucket. In addition, you can create the catalog in Altinity-managed storage or in your own AWS account.
Creating an Iceberg catalog in Altinity-managed storage
Using Altinity-managed storage is the simplest way to create a new catalog. As shown in Figure 5 above, simply give your new catalog a name and choose whether it should use an S3 bucket or an S3 table bucket. Click CONFIRM and your bucket will be created. Simple as that.
Creating an Iceberg catalog in an S3 bucket in your AWS account
As you would imagine, things are a little more complicated if you want to use storage in your own account. The first step is to create an S3 bucket in the AWS console:
Figure 6 - Creating a new S3 bucket
Give your bucket a name (it’s s3-test in Figure 6 above) and click the Create Bucket button at the bottom of the page. Now click on the name of the bucket you just created in the list of buckets, then click the Create Folder button:
Figure 7 - The Create Folder button
Give the folder a name and click Create Folder at the bottom of the panel:
Figure 8 - Creating the folder
We created a folder named btc. (You can create several levels of folder if you want.) Now go back to the ACM and click the button, give your catalog a name, then choose a Warehouse Type of S3 and a Warehouse Location of Custom:
Figure 9 - Create an Iceberg catalog in an S3 bucket in your AWS account
Enter the name of your S3 bucket and the folder you created inside the bucket. Click the icon to copy the Altinity ARN. While the ACM is creating the Iceberg catalog, we’ll go back to the AWS console and use the Altinity ARN so ClickHouse can write data to your bucket.
Be sure to copy the Altinity ARN before you go on.
Click CONFIRM to create the new catalog. It will take a short while for that to finish, so head back to the AWS console for your S3 bucket. Go to the Permissions tab for your bucket, then click the Edit button to create a new bucket policy:
Figure 10 - The Edit policy button
Create the following bucket policy, setting the Principal to be the ARN you copied from the ACM:
In the Resource section, replace {BucketName} with the name of your S3 bucket. Be sure you have two entries as shown above: the ARN of the bucket as well as the ARN appended with /*, which gives Altinity access to everything the bucket contains.
Your screen should look like this:
Figure 11 - The new bucket policy
Click Save to add the permissions Altinity needs to read data from your S3 bucket.
Creating an Iceberg catalog in an S3 Table bucket in your AWS account
Creating an Iceberg catalog in an S3 Table bucket is similar to using an S3 bucket, so we’ll just cover the differences here. To start, we’ll need the ARN of our S3 Table bucket. Go to the Table buckets list and click the icon to copy the ARN:
Figure 12 - The list of S3 table buckets
Now click the button to add a new catalog. Give your new catalog a name, then select S3_TABLE and Custom. Paste the ARN of your S3 table into the dialog:
Figure 13 - An S3 table catalog in your AWS account
Once you’ve pasted in the ARN of your S3 Table bucket, click the icon to copy the Altinity ARN. Now go to the AWS console and create the following permissions document for your S3 table:
In the Resource section, replace {Region} with the region where your S3 Table bucket is located, {Account} with your 12-digit AWS account number, and {TableBucketName} with the name of your S3 Table bucket. Be sure you have two entries as shown above: the ARN of the table bucket as well as the ARN appended with /*, which gives Altinity access to everything the table bucket contains.
The policy should look like this:
Figure 14 - The table bucket policy for an S3 table
Getting a catalog’s connection details
Click on the Catalogs menu to see a complete list of catalogs:
Figure 15 - The list of Iceberg catalogs in the environment
Catalogs with the icon are managed by Altinity, while catalogs with the icon are in your AWS account. You can click the Connection Details link to see how to connect to a catalog:
Figure 16 - Iceberg catalog details
The three pieces of information in Figure 16 are what you need to know to work with your Iceberg catalog. They are:
The catalog URL. This is created for you.
The bearer token for the authentication process. This is created for you.
The address of your catalog. If you’re using an S3 bucket (Altinity-managed or in your AWS account), this is an s3:// URL as shown in Figure 16 above. The URL is created for you.
On the other hand, if you’re using an S3 table (Altinity-managed or in your AWS account), the address is the ARN of the S3 table you created, as shown in Figure 17:
Figure 17 - The address for an S3 Table catalog is an ARN
We’ll use those values when we use the ice utility to insert Parquet data into our S3 bucket or S3 table. We’ll also use those values when we create a database with the DataLakeCatalog engine. That engine lets us query an Iceberg catalog as if it were any other ClickHouse database.
Using ice to insert Parquet data into your catalog
The values for uri and bearerToken come from Figure 16 (or 17, if you’re using an S3 Table bucket) above.
Now we’ll run ice insert to add a Parquet file to the Iceberg catalog. Make sure your AWS credentials are set; you won’t be able to update the AWS resources if they aren’t. We’ll use a publicly available Parquet file. Here’s the syntax:
This command takes the Parquet file and adds it as a table named transactions in the btc namespace. If you look in the AWS console for the container, you’ll see the details:
Figure 18 - The namespace for the transactions table
Our Parquet data is in the Iceberg catalog; now we need to create a database from it.
Creating a database from the Parquet data in your catalog
To work with the data in the Iceberg catalog, we’ll create a database with the DataLakeCatalog engine. This lets us query the Iceberg catalog just like any other ClickHouse database. Here’s the syntax:
The DataLakeCatalog engine looks through the Iceberg catalog to find existing tables. In our case, we’ve created the btc.transactions table. Once the database is created, we can query the table. Here’s a simple example:
Congratulations! If you’ve come this far, you’ve got an Iceberg catalog with Parquet data, and you can query that data just like any other ClickHouse data source.
Deleting a catalog
You can delete a catalog by clicking the icon. You’ll be asked to confirm your choice. If this is a catalog managed by Altinity, your data will be deleted along with the catalog:
Figure 19 - Confirming catalog deletion for an Altinity-managed catalog
On the other hand, if the catalog is stored in your AWS account, the data will still be there. You just won’t be able to access it from ClickHouse:
Figure 20 - Confirming catalog deletion for an unmanaged catalog
Enabling Iceberg catalogs for BYOK environments
NOTE: Currently we only support BYOK Iceberg catalogs in AWS environments.
Altinity doesn’t have permissions to create S3 buckets within your Kubernetes environment, so you’ll need to set those up and give us the details. Fortunately, we provide a Terraform script that you can use with your AWS credentials. Save the following text in a file named main.tf:
Define your AWS credentials in the environment variables AWS_ACCESS_KEY_ID, AWS_SECRET_ACCESS_KEY, and AWS_SESSION_TOKEN.
Terraform will create the S3 buckets in your default AWS region. Define the variables AWS_DEFAULT_REGION and AWS_REGION with the correct region (us-east-1, for example) to make sure your buckets are created where you want them.
Run terraform init to download the dependencies for your Terraform script.
Run terraform apply -var eks_cluster_name=my-cluster to specify the name of your EKS cluster and create the S3 resources you’ll use for your Iceberg catalog.
When the Terraform script is done, it will output five variables:
Now you’ll need to contact Altinity support with the S3 bucket name. They’ll complete the setup for you. When that’s done, you can go to the Catalogs menu as shown in Figure 2 above.
1.5.1.3.11 - Configuring Zookeepers
Deploying, scaling, and managing Zookeepers
NOTE: With the exception of Rescaling a Zookeeper, it’s highly unlikely you’ll ever need or want to use any of the functions described here.
You can see the Zookeeper nodes in your cluster from the Zookeepers tab at the top of the Environment summary view:
Figure 1 - The Zookeepers menu
In Figure 1, there is a Zookeeper for the mono cluster; that Zookeeper is currently stopped (as is the mono cluster). The icons indicate that these Zookeepers cannot be changed. There are also running Zookeepers for both the maddie-annot and new-swarm clusters.
Rescaling a Zookeeper
To rescale a Zookeeper, click the icon next to a Zookeeper’s name to see the Zookeeper configuration menu:
Figure 2 - The Zookeeper configuration menu
Clicking the Rescale menu item lets you change the node type and cluster size for a Zookeeper cluster:
Figure 3 - Rescaling a Zookeeper
The name of the Zookeeper cluster here is swarm-registry. To rescale it, choose a node type and a cluster size, then click CONFIRM to rescale the Zookeeper. The list of available node types contains all the node types with a scope of Zookeeper. See the Defining Custom Node Types page if you need to define additional node types for Zookeeper nodes.
Advanced features
As mentioned above, it’s unlikely you’ll ever need or want to use these features. But here we go…
Adding a Zookeeper
The button lets you add an existing Zookeeper node to a Zookeeper cluster. You’ll see this dialog when you click it:
Figure 4 - Adding a Zookeeper
The Cluster Tag is the name of a Zookeeper cluster. In Figure 1 above, the cluster tags are Dedicated ZK for 'maddie-annot', Dedicated ZK for 'mono', and swarm-registry. The Hosts section contains pairs of hostnames and port numbers. You can manage the list with the button and the icon. Click OK to add the Zookeeper.
Launching a Zookeeper
The button lets you launch a new Zookeeper cluster. You’ll see this dialog:
Figure 5 - Launching a new Zookeeper
Give the new Zookeeper cluster a tag, then select a node type and cluster size. The list of available node types contains all of the node types with a scope of Zookeeper. See the Defining Custom Node Types page if you need to define additional node types for Zookeeper nodes. Click LAUNCH to launch the new cluster.
Publishing a Zookeeper’s configuration
Publishing a Zookeeper’s configuration ensures that any changes you’ve made in the ACM are reflected in the underlying infrastructure. Be aware that this will result in a short period of downtime. If you click the Publish Configuration menu item in Figure 2 above, you’ll see this message:
Figure 6 - Publishing the configuration causes downtime
1.5.1.3.12 - Viewing Environment Audit Logs
Getting details if something goes wrong
There are two ways to view an environment’s audit logs. You can go to the list of environments, click the vertical dots icon next to your environment name and select Audit Logs from the menu:
Figure 1 - The Audit Logs Environment menu
You can also get to the Audit Logs dialog by clicking the Audit tab on the Environment summary view:
Figure 2 - Accessing the Audit Logs dialog from the Environment summary view
Figure 2 shows the ACM Logs tab, which lists all the things that have happened in the ACM, such as configuration changes, cluster stop / resume actions, or SQL statements that create or drop a table or database. You can click the arrow to expand any item in the log to get more details:
Figure 3 - Additional details for an event in the audit log
Clicking the button gives you even more information about a particular event.
The Anywhere Logs tab shows similar information for your Altinity.Cloud Anywhere environment.
1.5.1.3.13 - Configuring the Altinity Kubernetes Operator for ClickHouse®
Click the icon and select Operator Configuration from the dropdown menu. You’ll see a list of ConfigMaps:
Figure 1 - The list of Operator ConfigMaps
Clicking on any item in the list takes you to a dialog where you can configure the operator by making changes to the configuration files in that ConfigMap:
Figure 2 - A sample ConfigMap
In this case, the tabs across the dialog let you edit the four files in the etc-clickhouse-operator-templatesd-files ConfigMap. Make your changes, then click the SAVE button. (BTW, many of the files specifically warn you against modifying them, as they are generated and any changes you make may be overwritten.)
ClickHouseOperatorConfigurations
The dialog also has a tab for ClickHouseOperatorConfigurations:
Figure 3 - The list of ClickHouseOperatorConfigurations
As with ConfigMaps, clicking the name of a configuration opens a dialog that lets you edit it. Make your changes and click SAVE. In addition, you can click the button to create a new configuration. Finally, you can delete a configuration by clicking the icon and selecting Delete from the popup menu.
When you’re done, click the button to save your changes.
1.5.1.3.14 - Environment Configuration Templates
Creating repeatable environment deployments
Environment Configuration Templates let you define repeatable environments. To work with them, click the icon and select Configuration Templates from the dropdown menu. You’ll see a list of templates:
Figure 1 - The list of configuration templates
(The list in Figure 1 is intentionally left blank.)
Select a template and click the button to apply the template.
1.5.1.3.15 - Defining Maintenance Windows
Making sure maintenance happens when you want it to
You can define maintenance windows that tell Altinity when certain components of your environment can be updated. That can mean configuring node pools or environment connectivity as well as an update of the ACM itself.
To work with them, click the icon and select Maintenance Window from the dropdown menu. You’ll see a list of maintenance windows:
Figure 1 - The Maintenance Window dialog with a maintenance window defined
Click the button to add a new schedule. Each schedule must include at least two days. In the figure above, there is a single maintenance window that runs on Saturday and Sunday starting at 23:00 UTC for four hours. Note that all starting times are in UTC.
Once your environment has a maintenance schedule defined, a calendar icon will appear next to the environment name in the Environment summary view:
Figure 2 - An environment with a maintenance schedule defined
1.5.1.3.16 - Cost Allocation Tags
Labeling resources for tracking costs and chargebacks
For Bring Your Own Cloud (BYOC) environments, you can assign tags (name/value pairs) to storage and compute assets created through the ACM. That gives you more flexibility in tracking costs and in doing chargebacks.
To work with them, click the icon on the Environment summary view and select Cost Allocation Tags from the dropdown menu. You’ll see a list of key / value pairs:
Figure 1 - The Cost Allocation Tags list
Working with tags is straightforward; the button creates a new tag, and the trash can icon deletes one. Be aware that if you’re running Altinity.Cloud in our cloud (you have a SaaS environment), you can’t define cost allocation tags:
Figure 2 - Cost allocation tags not available in Altinity-hosted environments
You can use the macro $(label:clickhouse.altinity.com/chi) to insert the name of the current ClickHouse® cluster. In Figure 1, the value of the altinity:cloud/chi and altinity_cloud_chi tags will be the name of a ClickHouse cluster inside the altinity-maddie-saas environment.
1.5.1.4 - Common Actions
Things you’re likely to do with your Environment
If you’re on the Environments tab and looking at the Environment summary view, you’ll see the ACTIONS menu at the top of the panel:
Figure 1 - The ACTIONS menu on the Environments tab
The AUDIT LOGS button is available here as well.
Details of all these tasks are on the following pages:
1.5.1.4.1 - Editing an Environment
Making changes
The Edit menu item is an alternate way to get to the Environment Configuration dialog. See the Configuring your Environment section for all the details.
1.5.1.4.2 - Exporting an Environment
Saving a copy of your Environment’s state
The Export menu item lets you export the configuration of your environment. Clicking the menu item displays the Export Environment dialog:
Figure 1 - The Export Environment dialog
All environments can be exported into ACM format, a JSON file that describes the configuration of your environment. If your cluster is named altinity-maddie, the file altinity-maddie.json will be downloaded to your machine. (The Terraform Format option shown in Figure 1 only appears for BYOC and BYOK environments.)
In addition, BYOC and BYOK environments can be exported as a Terraform script that will let you recreate the resources in your environment. This can be useful in three scenarios:
You used a Terraform script to deploy a BYOC environment, then you made changes to the environment in the ACM. Exporting the environment as a Terraform script makes it possible to update your original script with the changes you made in the ACM. Then you can use your updated terraform script to provision new environments without making changes via the ACM.
You deployed a BYOC environment, and now you want to switch to a BYOK environment so you can manage the underlying resources yourself while still using the ACM to manage ClickHouse.
You created an environment through the ACM, and you want to create a Terraform script to automate creating similar environments in the future.
Users with intermediate level Terraform expertise can use the exported scripts with the Altinity Terraform registry to automate environment provisioning.
Different scenarios for using Terraform for provisioning is covered elsewhere in the documentation; those can be useful examples for working with Altinity Terraform modules. Here are some sample Terraform scripts that provision various kinds of resources:
Reconfiguring an Altinity.Cloud Anywhere environment completely resets the environment, detaching your BYOC or BYOK resources from the Altinity Cloud Manager. As you would expect, we ask if you’re sure that’s what you want to do:
Figure 1 - Confirming that you want to reconfigure your Altinity.Cloud Anywhere environment
If you click OK, you’ll be taken back to the starting dialog to reconfigure your environment. For example, for an environment running in your GCP account, you’ll see something like this:
Figure 2 - Starting all over with environment configuration
1.5.1.4.4 - Deleting an environment
Deleting your environment (and possibly your ClickHouse® clusters and data, too)
It’s much easier to simply disconnect your ClickHouse® clusters from Altinity.Cloud. (It’s also easy to reconnect them later.) If you use kubectl to scale the cloud-connect pods in the altinity-cloud-system namespace to zero, the ACM won’t be able to connect to your ClickHouse cluster. Your ClickHouse cluster and the applications that use it will be unaffected; they’ll simply be disconnected from Altinity.
To start, we’ll look at the ACM Environment view:
Figure 1 - A connected environment
The indicator appears next to the environment name, letting us know our environment is connected to Altinity.Cloud. At the bottom of the display we can see the nodes in the environment, the types of those nodes, their zones, etc.
Now we’ll go to the command line and look at the deployments in the altinity-cloud-system namespace:
> kubectl get deployments -n altinity-cloud-system
NAME READY UP-TO-DATE AVAILABLE AGE
cloud-connect 1/1 11 8h
crtd 1/1 11 8h
edge-proxy 2/2 22 8h
event-exporter 1/1 11 8h
grafana 1/1 11 8h
kube-state-metrics 1/1 11 8h
statuscheck 1/1 11 8h
Shortly after rescaling the deployment, the environment will be reconnected. This technique makes it easy to disconnect and reconnect your environment without disturbing your ClickHouse clusters and the applications that use them.
1.5.1.5.2 - Keeping Your Clusters and Data
Deleting Altinity’s access to your environment without disturbing your clusters and data
Altinity takes the phrase “No vendor lock-in” seriously. You can permanently delete Altinity’s access to your ClickHouse® clusters without deleting your ClickHouse clusters and their data. In other words, you can delete the Altinity.Cloud environment entirely but keep your ClickHouse clusters running. No downtime, no moving your data; everything is in your under your control, whether it’s in your cloud (BYOC) or your Kubernetes environment (BYOK).
As you would expect, there are some things that need to happen to make sure everything goes smoothly.
For example, when you delete an Altinity.Cloud environment, the DNS records Altinity.Cloud created for you are deleted. Your ClickHouse clusters will still be running, but you (and your applications) won’t have access to them via those DNS records anymore. You’ll need to define an alternate endpoint before deleting the Altinity.Cloud environment so that you can still access your undisturbed ClickHouse clusters. There are other complications such as configuring certificate authorities and load balancers; those are covered in this section as well.
Your ClickHouse clusters and data stay in your cloud account or Kubernetes environment. Contact Altinity support as you go through the process and we’ll make sure that everything goes smoothly.
1.5.1.5.2.1 - Prerequisites
Things to do and things you need before you get started
Before you can delete an environment and all of its clusters and data, there are several things you’ll need to do and get. We’ll cover those here.
Custom Domain Configuration
CRITICAL PREREQUISITE: Before beginning the disconnection process, you MUST have a custom domain configured for your ClickHouse cluster.
Custom Domain Configured: Your cluster uses your own domain (e.g., clickhouse.yourdomain.com)
DNS Control: You control the hosted zone for this domain
Current DNS Chain: Your domain currently points to Altinity DNS typically via CNAME (e.g., subdomain.yourdomain.com → env.altinity.cloud → Altinity load balancers)
Why this is required:
If you do not have a custom DNS setup, you will lose access to your cluster after disconnection because Altinity’s DNS records and edge-proxy components are removed. Your domain must already be in a zone you control so you can publish replacement records that point directly to your infrastructure.
When you set up custom domain with Altinity, you provided ACME credentials (typically for Let’s Encrypt). These are stored as a Kubernetes Secret and used by crtd (Altinity’s proprietary certificate manager) to automatically request and renew TLS certificates.
IMPORTANT: crtd is Altinity-specific and will be replaced with open-source cert-manager during disconnection.
**Migrate secrets to formats compatible with open-source components
**Request new certificates using cert-manager for Contour
**Run Altinity and open-source setup together during transition/testing phase
**Remove Altinity components after the new setup is proven to work
After disconnection, your environment will:
✅ Use your ACME credentials to request certificates from Let’s Encrypt
✅ Automatically renew certificates ~30 days before expiration
✅ Support the DNS-01 or HTTP-01 challenges
✅ Work with ClusterIssuer configuration patterns
Do NOT delete before disconnection:
Existing TLS certificate secrets
Existing Altinity Components and their relevant configurations
ClusterIssuer/Issuer configurations (will be recreated for cert-manager)
How to verify you have a custom domain:
dig subdomain.yourdomain.com +short
# If you see *.altinity.cloud → you have custom domain configured ✓# If you see *.elb.amazonaws.com only → contact Altinity Support first ✗
You may need to work with Altinity support to set up a custom domain
If you haven’t configured a custom domain yet:
STOP - Do not proceed with disconnection
Contact Altinity Support to set up custom domain with ACME
Update your applications to use the custom domain
Verify DNS chain includes .altinity.cloud
Verify TLS certificates are working
Then return to this guide
AWS Access
AWS Account Access: Administrative access to your AWS account (not Altinity’s)
AWS CLI Installed: Version 2.0+ or 1.16.156+
AWS Credentials Configured: Valid IAM user or role credentials
IAM Permissions: At minimum, you need:
eks:DescribeCluster
eks:ListClusters
eks:UpdateClusterConfig (if you need to enable public API access)
kubectl Installed: Version matching your EKS cluster version (±1 minor version)
Cluster Admin Access: You need system:masters equivalent permissions
Network Access: One of the following:
VPN connection to your VPC
Bastion/jump host in the VPC
AWS Cloud9 environment in the VPC
Public API endpoint access enabled on EKS cluster
ClickHouse Access
clickhouse-client Installed: For testing native protocol connections
ClickHouse Credentials: Admin username and password
Understanding of Your Schema: Knowledge of your databases, tables, and replication setup
Required Tools
# Verify AWS CLIaws --version
# Required: >= 2.0.0 or >= 1.16.156# Verify kubectlkubectl version --client
# Should match your cluster version ±1 minor version# Verify clickhouse-client (optional but recommended)clickhouse-client --version
# Verify jq (for JSON parsing)jq --version
# Verify envsubst (for template substitution)envsubst --version
Pre-Disconnection Verification
Verify Current State
# Set your environment variables (save to a file for reuse)cat > ~/.clickhouse-disconnect-env <<'EOF'
export CLUSTER_NAME="your-eks-cluster-name"
export AWS_REGION="us-east-1"
export CH_NAMESPACE="altinity-cloud-managed-clickhouse"
export SYS_NAMESPACE="altinity-cloud-system"
EOF# Load the variables into your shellsource ~/.clickhouse-disconnect-env
# Verify cluster existsaws eks describe-cluster --name $CLUSTER_NAME --region $AWS_REGION# Check cluster version (for compatibility)aws eks describe-cluster --name $CLUSTER_NAME --region $AWS_REGION\\ --query 'cluster.version' --output text
# List ClickHouse installations (if you have access)kubectl get chi -n $CH_NAMESPACE 2>/dev/null ||echo"No kubectl access yet"# Check current backups (example - adjust to your setup)aws s3 ls s3://your-backup-bucket/clickhouse-backups/ --region $AWS_REGION 2>/dev/null ||echo"Need to verify backup location"
Verify kubectl access (custom domain checks)
Run these checks after confirming kubectl connectivity.
# Check if ACME secret existskubectl get secrets -n $SYS_NAMESPACE| grep -i acme
# Common secret names:# - acme-credentials# - letsencrypt-secret# - cloudflare-api-token (if using Cloudflare DNS-01 challenge)# - route53-credentials (if using Route53 DNS-01 challenge)# View secret details (without revealing credentials)kubectl describe secret <acme-secret-name> -n $SYS_NAMESPACE# Check crtd is running (Altinity's certificate manager)kubectl get pods -n $SYS_NAMESPACE| grep crtd
# Check ClusterIssuers/Issuers (crtd configuration)kubectl get clusterissuer
kubectl get issuer -A
# Check existing certificateskubectl get certificate -A
Risk Assessment
High Risk Items
Data Loss: If backups are not configured properly
Mitigation: Test backup and restore BEFORE disconnecting
Service Outage: If application migrations fail
Mitigation: Maintain both endpoints during transition period
Security Exposure: If enabling public API access
Mitigation: Use security groups to restrict access by IP
Medium Risk Items
Performance Degradation: If Contour is not configured optimally
Mitigation: Load test Contour before migration
Certificate Expiration: Edge-proxy certificates expire in 3 months
Mitigation: Complete disconnection within 6-8 weeks
Low Risk Items
Learning Curve: Team needs to learn new operational procedures
If you are in CONFIG_MAP mode and lack kubectl access
Option A: Assume an existing cluster admin role
If the cluster is CONFIG_MAP only, aws eks list-access-entries will fail. Use IAM to search for likely admin roles instead (same approach as in 01-verify-aws-access.md).
Search for a role
# Search for roles with cluster name in themaws iam list-roles --region $AWS_REGION\
| jq -r --arg CLUSTER "$CLUSTER_NAME"'.Roles[] | select(.RoleName | contains($CLUSTER)) | {RoleName, Arn}'# Common Altinity BYOC role patterns to look for:# - <environment>-<cluster-id>-eks-admin# - altinity-<id>-eks-admin# - <cluster-name>-admin# Example search for Altinity patternsaws iam list-roles --region $AWS_REGION\
| jq -r '.Roles[] | select(.RoleName | test(".*eks-admin|eks.*admin")) | {RoleName, Arn}'
# Ensure you're copying the ARN and NOT the RoleNameexportEKS_ADMIN_ROLE_ARN="arn:aws:iam::123456789012:role/your-eks-admin"aws eks update-kubeconfig --region $AWS_REGION --name $CLUSTER_NAME\
--role-arn $EKS_ADMIN_ROLE_ARNkubectl get nodes
If assume-role is denied and you have IAM permissions, update the role trust policy to allow your IAM principal:
# Get your current IAM principal ARNexportIAM_ARN=$(aws sts get-caller-identity --query Arn --output text)# If you are using AWS SSO, your caller identity is an assumed-role ARN.# Convert it to the IAM role ARN for trust policies.# Example input:# arn:aws:sts::123456789012:assumed-role/AWSReservedSSO_AdministratorAccess_09dece98e690653b/user@example.com# Example output:# arn:aws:iam::123456789012:role/AWSReservedSSO_AdministratorAccess_09dece98e690653bifecho"$IAM_ARN"| grep -q ':assumed-role/';thenIAM_ARN=$(echo"$IAM_ARN"| sed 's|arn:aws:sts::|arn:aws:iam::|'| sed 's|:assumed-role/|:role/|'| cut -d'/' -f1-2)fi# Update the role trust policy to allow your principal to assume itcat > /tmp/assume-role-policy.json <<EOF
{
"Version": "2012-10-17",
"Statement": [{
"Effect": "Allow",
"Principal": {"AWS": "${IAM_ARN}"},
"Action": "sts:AssumeRole"
}]
}
EOFaws iam update-assume-role-policy \
--role-name $(basename $EKS_ADMIN_ROLE_ARN)\
--policy-document file:///tmp/assume-role-policy.json
# Try kube access after the upgradeaws eks update-kubeconfig --region $AWS_REGION --name $CLUSTER_NAME\
--role-arn $EKS_ADMIN_ROLE_ARN
If you still get AccessDenied after updating the trust policy, you also need IAM permission to call sts:AssumeRole for that role (ask your AWS admin to grant it or use a role that already trusts your SSO role).
Option D: Ask the cluster creator or Altinity Support
Contact Altinity support if you cannot access the cluster at all.
Confirm Kubectl access
Test Basic Cluster Access
# Get cluster informationkubectl cluster-info
# Expected output:# Kubernetes control plane is running at <https://XXXXX.gr7.us-east-1.eks.amazonaws.com># CoreDNS is running at <https://XXXXX.gr7.us-east-1.eks.amazonaws.com/api/v1/namespaces/kube-system/services/kube-dns:dns/proxy># List cluster nodeskubectl get nodes
# Expected output: List of worker nodes with STATUS "Ready"# NAME STATUS ROLES AGE VERSION# ip-10-0-1-123.ec2.internal Ready <none> 30d v1.28.5-eks-abc123
Verify Your Kubernetes Identity
# Check what identity Kubernetes sees you askubectl auth whoami
# Example output:# ATTRIBUTE VALUE# Username admin# Groups [system:masters system:authenticated]
Verify Admin Permissions
# Check if you have full cluster admin permissionskubectl auth can-i '*''*' --all-namespaces
# MUST return: yes# Test specific permissionskubectl auth can-i create pods
kubectl auth can-i delete nodes
kubectl auth can-i get secrets --all-namespaces
# All should return: yes
We’ll need to deploy the Contour (Envoy-based) ingress controller to replace Altinity’s edge-proxy functionality. Edge-proxy dynamically discovers services by watching Service annotations. We’ll replicate this behavior with Contour.
Understanding Edge-Proxy Service Discovery
Edge-proxy watches for Services with these annotations:
# Load environment variablessource ~/.clickhouse-disconnect-env
exportCUSTOM_DOMAIN="clickhouse.yourdomain.com"exportROOT_DOMAIN=$(echo$CUSTOM_DOMAIN| awk -F. '{print $(NF-1)"."$NF}')# Get Route53 hosted zone ID for $CUSTOM_DOMAINexportHOSTED_ZONE_ID=$(aws route53 list-hosted-zones \\ --query "HostedZones[?Name=='${ROOT_DOMAIN}.'].Id"\\ --output text | cut -d/ -f3)# Verify current DNS chaindig $CUSTOM_DOMAIN +short
# Should show: chi-name.env.altinity.cloud → then altinity ELBecho"export CUSTOM_DOMAIN='$CUSTOM_DOMAIN'" >> ~/.clickhouse-disconnect-env
echo"export ROOT_DOMAIN='$ROOT_DOMAIN'" >> ~/.clickhouse-disconnect-env
echo"export HOSTED_ZONE_ID='$HOSTED_ZONE_ID'" >> ~/.clickhouse-disconnect-env
Strategy
Find all Services with edge-proxy annotations (ClickHouse, Prometheus, Grafana)
Install Contour Gateway Provisioner and Gateway API CRDs; create GatewayClass
Install cert-manager; pre-flight: switch custom domain CNAMEs to edge-proxy’s LB with TTL=60; issue new TLS certificate
Create Gateway with HTTPS (port 8443) and TLS (port 9440) listeners; create HTTPRoute (HTTP interface) and TLSRoute (native protocol) — both using the same FQDN on different listeners
Test Contour via its own LB before cutting over traffic
LB cutover: update CNAMEs from edge-proxy’s LB to Contour’s LB (~60s propagation due to low TTL)
Verify production endpoints
Monitor for 48 hours
Step 1: Discover All Services with Edge-Proxy Annotations
# Full summary: all services with edge-proxy annotations, grouped by connection typekubectl get svc -A -o json | jq -r '
.items[] | select(.metadata.annotations["edge-proxy.altinity.com/port-mapping"] != null) | {
namespace: .metadata.namespace,
name: .metadata.name,
port_mapping: .metadata.annotations["edge-proxy.altinity.com/port-mapping"],
whitelist: (.metadata.annotations["edge-proxy.altinity.com/whitelist"] // ""),
zone_routed: (.metadata.annotations["edge-proxy.altinity.com/zone-routed-tls-server-name"] // ""),
zone: (.metadata.annotations["edge-proxy.altinity.com/zone"] // "")
}'# ClickHouse services (used in scripts below)kubectl get svc -n $CH_NAMESPACE\\ -o json | jq -r '.items[] | select(.metadata.annotations["edge-proxy.altinity.com/port-mapping"] != null) | .metadata.name'\\ > /tmp/clickhouse-services.txt
echo"=== ClickHouse services ==="cat /tmp/clickhouse-services.txt
# Flag features that need extra handling — read these output sections carefullyecho""echo"=== tls-passthrough services (need Passthrough listener in Gateway) ==="kubectl get svc -A -o json | jq -r '
.items[] | select(.metadata.annotations["edge-proxy.altinity.com/port-mapping"] |
select(. != null) | test("tls-passthrough")) |
.metadata.namespace + "/" + .metadata.name + ": " +
.metadata.annotations["edge-proxy.altinity.com/port-mapping"]'\\| tee /tmp/tls-passthrough-services.txt
[ -s /tmp/tls-passthrough-services.txt ]&&echo"ACTION REQUIRED: see 'Handle tls-passthrough' in Step 4"||echo"(none)"echo""echo"=== tls-to-tls / tls-to-tls-insecure services (upstream TLS — extra config needed) ==="kubectl get svc -A -o json | jq -r '
.items[] | select(.metadata.annotations["edge-proxy.altinity.com/port-mapping"] |
select(. != null) | test("tls-to-tls")) |
.metadata.namespace + "/" + .metadata.name + ": " +
.metadata.annotations["edge-proxy.altinity.com/port-mapping"]'\\| tee /tmp/tls-to-tls-services.txt
[ -s /tmp/tls-to-tls-services.txt ]&&echo"ACTION REQUIRED: see 'Handle Upstream TLS' in Step 4"||echo"(none)"echo""echo"=== Services with IP whitelists ==="kubectl get svc -A -o json | jq -r '
.items[] | select(.metadata.annotations["edge-proxy.altinity.com/whitelist"] |
select(. != null) | length > 0) |
.metadata.namespace + "/" + .metadata.name + ": " +
.metadata.annotations["edge-proxy.altinity.com/whitelist"]'\\| tee /tmp/whitelist-services.txt
[ -s /tmp/whitelist-services.txt ]&&echo"ACTION REQUIRED: see 'Handle IP Whitelisting' in Step 4"||echo"(none)"echo""echo"=== Zone-routed services (cross-AZ traffic may increase — review topology hints) ==="kubectl get svc -A -o json | jq -r '
.items[] | select(.metadata.annotations["edge-proxy.altinity.com/zone-routed-tls-server-name"] |
select(. != null) | length > 0) |
.metadata.namespace + "/" + .metadata.name +
" (zone: " + (.metadata.annotations["edge-proxy.altinity.com/zone"] // "unset") + ")"'\\| tee /tmp/zone-services.txt
[ -s /tmp/zone-services.txt ]&&echo"ACTION REQUIRED: see 'Handle Zone-Aware Routing' in Step 4"||echo"(none)"
Step 2: Install Contour
Contour’s Envoy is provisioned by the Gateway Provisioner, which creates its own AWS load balancer ($CONTOUR_LB). This LB is used only for pre-cutover testing in Step 5. Live traffic continues through edge-proxy’s LB until the explicit cutover in Step 6. The Gateway resource (which tells Contour which ports to expose) is created in Step 4, after the TLS certificate is ready.
# Install Gateway API CRDs — experimental channel is required for TLSRoute supportkubectl apply -f <https://github.com/kubernetes-sigs/gateway-api/releases/download/v1.2.1/experimental-install.yaml>
# Install Contour Gateway Provisionerkubectl apply -f <https://projectcontour.io/quickstart/contour-gateway-provisioner.yaml>
# Wait for provisioner to be readykubectl wait --for=condition=ready pod \\ -l control-plane=contour-gateway-provisioner \\ -n projectcontour \\ --timeout=300s
# Create GatewayClass — tells Contour to manage Gateway resourceskubectl apply -f - <<'EOF'
apiVersion: gateway.networking.k8s.io/v1
kind: GatewayClass
metadata:
name: contour
spec:
controllerName: projectcontour.io/gateway-controller
EOF
Step 3: Install cert-manager to Replace crtd
Altinity’s crtd is proprietary and will be removed during the last step. We need to install the open-source cert-manager as a replacement.
Install cert-manager
# Install cert-manager using official manifestskubectl apply -f <https://github.com/cert-manager/cert-manager/releases/download/v1.14.1/cert-manager.yaml>
# Wait for cert-manager pods to be readykubectl wait --for=condition=ready pod \\ -l app.kubernetes.io/instance=cert-manager \\ -n cert-manager \\ --timeout=300s
# Verify installationkubectl get pods -n cert-manager
# Expected pods:# cert-manager-<hash># cert-manager-cainjector-<hash># cert-manager-webhook-<hash>
Understand How crtd Manages Certificates
crtd does not store ACME credentials as Kubernetes Secrets. It authenticates to Altinity’s CA (ca.altinity.cloud) via a short-lived JWT token. Altinity’s CA internally uses ACME (ZeroSSL primary, Let’s Encrypt fallback) with Altinity’s own DNS credentials to solve DNS-01 challenges — so there is nothing for you to migrate.
How the CA issues certificates:
crtd generates a CSR (containing all your DNS SANs) and POSTs it to ca.altinity.cloud/sign with a JWT Bearer token
Altinity’s CA validates the JWT (audience = Altinity domain, subject = your environment name)
The CA then runs an ACME DNS-01 challenge against your domain using Altinity’s Route53/GCP DNS access to prove ownership
Once the ACME provider (ZeroSSL or Let’s Encrypt) issues the cert, it’s returned to crtd and written into Kubernetes Secrets
Result: Production certs are publicly trusted (chaining to ZeroSSL or Let’s Encrypt). Dev environments (dev.altinity.cloud) use a self-signed local CA instead.
crtd’s certificate storage layout:
Resource
Kind
Namespace
Content
crtd
Secret
$SYS_NAMESPACE
ca.token — JWT for Altinity’s CA signing endpoint
crtd
ConfigMap
$SYS_NAMESPACE
crtd.conf — issuer/cert config
edge-proxy-default-tls-secret
Secret
$SYS_NAMESPACE
Live TLS cert+key for edge-proxy
clickhouse-default-tls-secret
Secret
ClickHouse namespace
Live TLS cert+key for ClickHouse
# Verify crtd is runningkubectl get pods -n $SYS_NAMESPACE| grep crtd
# Inspect crtd configuration — shows issuer type and DNS names being managedkubectl get configmap crtd -n $SYS_NAMESPACE -o jsonpath='{.data.crtd\\.conf}'# Check the issuer of the live cert (production: ZeroSSL/Let's Encrypt; dev: CN=ca self-signed)kubectl get secret edge-proxy-default-tls-secret -n $SYS_NAMESPACE\\ -o jsonpath='{.data.tls\\.crt}'| base64 -d |\\ openssl x509 -noout -issuer -dates
# Extract the DNS SANs to replicate in cert-managerkubectl get secret edge-proxy-default-tls-secret -n $SYS_NAMESPACE\\ -o jsonpath='{.data.tls\\.crt}'| base64 -d |\\ openssl x509 -noout -text | grep -A3 "Subject Alternative Name"
Important: Altinity’s ACME account keys and DNS credentials are proprietary — there is nothing to migrate. You will set up cert-manager with your own ACME account and DNS credentials from scratch. For custom domains, Altinity’s CA was solving the DNS-01 challenge via a delegated CNAME from _acme-challenge.yourcustom.domain to Altinity’s DNS — you will now own that challenge directly.
Configure DNS-01 Provider and Create ClusterIssuer
cert-manager supports many DNS providers for automated DNS-01 challenges. For the full provider list and configuration examples (Route53, Cloudflare, Google Cloud DNS, AzureDNS, and more), see:
Required — ClusterIssuer looks for referenced Secrets only in the cert-manager namespace
Certificate
$CH_NAMESPACE
The TLS Secret is created in the same namespace as the Certificate
TLS Secret (output)
$CH_NAMESPACE
Contour reads it from projectcontour, so it gets copied there
Create any DNS provider credential Secret in the cert-manager namespace before applying the ClusterIssuer:
# Example — replace with your provider's secret structure (see cert-manager docs)kubectl create secret generic dns-provider-credentials \\ --from-literal=key=<value> \\ -n cert-manager # <-- must be cert-manager namespace for ClusterIssuer
Then create the ClusterIssuer, filling in the dns01 solver block for your provider:
cat > /tmp/cert-manager-issuer.yaml <<EOFISSUER
apiVersion: cert-manager.io/v1
kind: ClusterIssuer
metadata:
name: letsencrypt-prod
# ClusterIssuer is cluster-scoped — no namespace field
spec:
acme:
server: <https://acme-v02.api.letsencrypt.org/directory>
email: your-email@example.com
privateKeySecretRef:
name: letsencrypt-prod-private-key # created automatically in cert-manager namespace
solvers:
- dns01:
# Paste your provider-specific solver block here from the cert-manager docs
# e.g. route53: {}, cloudflare: {}, azureDNS: {}, etc.
# Any secretRef here resolves to the cert-manager namespace
selector:
dnsZones:
- "${CUSTOM_DOMAIN}"
EOFISSUER# Edit /tmp/cert-manager-issuer.yaml to fill in the dns01 solver block before applyingkubectl apply -f /tmp/cert-manager-issuer.yaml
Verify ClusterIssuer is Ready
# Check ClusterIssuer statuskubectl get clusterissuer letsencrypt-prod
# Should show READY=True# NAME READY AGE# letsencrypt-prod True 30s# If not ready, check logskubectl logs -n cert-manager deployment/cert-manager | grep -i error
Switch Custom Domain CNAMEs to Edge-Proxy’s LB
Currently your custom domain CNAMEs route through Altinity’s DNS (env.altinity.cloud) before reaching edge-proxy’s load balancer. Before issuing the certificate you must:
Point all custom domain CNAMEs directly at edge-proxy’s LB with TTL=60 (cutting out the Altinity DNS hop). In Step 8 you will switch these CNAMEs one final time to Contour’s LB — the low TTL means that cutover propagates in ~60 seconds.
Remove any _acme-challenge CNAME delegations Altinity set up for your domain. cert-manager writes TXT records into your DNS zone directly; if a CNAME delegation to Altinity’s nameservers still exists, Let’s Encrypt will follow it and not find cert-manager’s TXT record.
# Get edge-proxy's underlying LB hostname (resolves through Altinity's DNS)exportEDGE_PROXY_LB=$(dig $CUSTOM_DOMAIN +short | tail -1)# Or look it up directly from the cluster:# export EDGE_PROXY_LB=$(kubectl get svc -n $SYS_NAMESPACE -l app=edge-proxy \\# -o jsonpath='{.items[0].status.loadBalancer.ingress[0].hostname}')echo"Edge-proxy LB: $EDGE_PROXY_LB"echo"export EDGE_PROXY_LB='$EDGE_PROXY_LB'" >> ~/.clickhouse-disconnect-env
# Update CNAMEs to point directly at edge-proxy's LB (example using Route53)for SUBDOMAIN in "${CUSTOM_DOMAIN}""internal.${CUSTOM_DOMAIN}""vpce.${CUSTOM_DOMAIN}";do aws route53 change-resource-record-sets \\ --hosted-zone-id $HOSTED_ZONE_ID\\ --change-batch "{
\\"Changes\\": [{
\\"Action\\": \\"UPSERT\\",
\\"ResourceRecordSet\\": {
\\"Name\\": \\"*.${SUBDOMAIN}\\",
\\"Type\\": \\"CNAME\\",
\\"TTL\\": 60,
\\"ResourceRecords\\": [{\\"Value\\": \\"${EDGE_PROXY_LB}\\"}]
}
}]
}"&&echo"Updated *.${SUBDOMAIN}"||echo"Skipped *.${SUBDOMAIN} (not in use)"done# Remove _acme-challenge CNAME delegations to Altinity's DNS# Check which exist:for SUBDOMAIN in "${CUSTOM_DOMAIN}""internal.${CUSTOM_DOMAIN}""vpce.${CUSTOM_DOMAIN}";doRESULT=$(dig "_acme-challenge.${SUBDOMAIN}" CNAME +short)if[ -n "$RESULT"];thenecho"_acme-challenge.${SUBDOMAIN} → $RESULT (DELETE THIS)"fidone# Delete any returned CNAMEs in your DNS provider before proceeding.# Verify the custom domain now resolves directly to edge-proxy's LBdig "*.${CUSTOM_DOMAIN}" +short
Request Certificate for Contour
The Certificate resource is created in the projectcontour namespace so cert-manager issues and renews the TLS Secret there directly — the Gateway references it in that same namespace. HTTPRoutes and TLSRoutes in $CH_NAMESPACE do not reference the secret; only the Gateway does.
# Create Certificate resource# dnsNames mirrors what crtd managed: always *.CUSTOM_DOMAIN,# plus *.internal and *.vpce if those sub-zones are in use.cat > /tmp/contour-certificate.yaml <<EOFCERT
apiVersion: cert-manager.io/v1
kind: Certificate
metadata:
name: contour-tls
namespace: projectcontour
spec:
secretName: contour-tls
issuerRef:
name: letsencrypt-prod
kind: ClusterIssuer
dnsNames:
- "*.${CUSTOM_DOMAIN}"
# Uncomment if internal sub-zone is in use:
# - "*.internal.${CUSTOM_DOMAIN}"
# Uncomment if AWS PrivateLink (vpce) sub-zone is in use:
# - "*.vpce.${CUSTOM_DOMAIN}"
EOFCERTkubectl apply -f /tmp/contour-certificate.yaml
# Watch certificate issuance (takes 30-120 seconds for DNS-01, faster for HTTP-01)kubectl get certificate contour-tls -n projectcontour --watch
# Wait for Ready=Truekubectl wait --for=condition=Ready certificate/contour-tls \\ -n projectcontour \\ --timeout=300s
# Check certificate detailskubectl describe certificate contour-tls -n projectcontour
# Verify TLS secret was createdkubectl get secret contour-tls -n projectcontour
# Save secret nameexportTLS_SECRET_NAME="contour-tls"echo"export TLS_SECRET_NAME='$TLS_SECRET_NAME'" >> ~/.clickhouse-disconnect-env
Verify Certificate
# Check certificate SANs (Subject Alternative Names)kubectl get secret contour-tls -n projectcontour \\ -o jsonpath='{.data.tls\\.crt}'| base64 -d |\\ openssl x509 -noout -text | grep -A3 "Subject Alternative Name"# Should show:# DNS:*.clickhouse.yourdomain.com# Check issuer (should be Let's Encrypt)kubectl get secret contour-tls -n projectcontour \\ -o jsonpath='{.data.tls\\.crt}'| base64 -d |\\ openssl x509 -noout -issuer
# Check expiration (90 days for Let's Encrypt)kubectl get secret contour-tls -n projectcontour \\ -o jsonpath='{.data.tls\\.crt}'| base64 -d |\\ openssl x509 -noout -enddate
Important: cert-manager and crtd will now run in parallel. The old crtd certificates will continue to work with edge-proxy, while new cert-manager certificates work with Contour. In Phase 3, we’ll remove crtd.
Certificate Renewal
cert-manager automatically renews certificates ~30 days before expiration:
Step 4: Configure Gateway and Create Proxy Resources
Create Gateway
Create a Gateway with three listeners. The Gateway Provisioner provisions an Envoy deployment and AWS load balancer that expose exactly the ports defined here — no manual service patching required.
Port 8080 (http): plain HTTP, redirected to HTTPS by Envoy
Port 8443 (https, HTTPS protocol): TLS terminated by Envoy; HTTPRoute resources attach here for HTTP interface routing
Port 9440 (clickhouse-native, TLS protocol + Terminate mode): TLS terminated by Envoy; TLSRoute resources attach here for native protocol routing
Both the HTTPS and TLS listeners share the same wildcard TLS certificate from Step 3. The same FQDN (e.g., test-byoc-0-0.clickhouse.yourdomain.com) can appear on both listeners because they are on different ports — this is what allows a single hostname to serve HTTP on port 8443 and native protocol on port 9440, exactly as edge-proxy does.
# Create the Gateway — references the TLS cert issued directly into projectcontour namespace in Step 3cat > /tmp/contour-gateway.yaml <<EOFGW
apiVersion: gateway.networking.k8s.io/v1
kind: Gateway
metadata:
name: contour
namespace: projectcontour
spec:
gatewayClassName: contour
listeners:
- name: http
protocol: HTTP
port: 8080
allowedRoutes:
namespaces:
from: All
- name: https
protocol: HTTPS
port: 8443
tls:
mode: Terminate
certificateRefs:
- name: ${TLS_SECRET_NAME}
allowedRoutes:
namespaces:
from: All
- name: clickhouse-native
protocol: TLS
port: 9440
tls:
mode: Terminate
certificateRefs:
- name: ${TLS_SECRET_NAME}
allowedRoutes:
namespaces:
from: All
EOFGWkubectl apply -f /tmp/contour-gateway.yaml
# Wait for Gateway to be accepted and programmed by the provisionerkubectl wait --for=condition=Accepted gateway/contour -n projectcontour --timeout=300s
kubectl wait --for=condition=Programmed gateway/contour -n projectcontour --timeout=300s
# Wait for the provisioned Envoy LoadBalancer (takes 2-3 minutes)echo"Waiting for LoadBalancer..."sleep 120exportCONTOUR_LB=$(kubectl get gateway contour -n projectcontour \\ -o jsonpath='{.status.addresses[0].value}')echo"Contour LoadBalancer: $CONTOUR_LB"echo"export CONTOUR_LB='$CONTOUR_LB'" >> ~/.clickhouse-disconnect-env
Create HTTPRoute for ClickHouse HTTP Interface
For the HTTP interface (backend port 8123), edge-proxy uses tls-to-tcp — it terminates TLS and forwards plain HTTP. We replicate this with HTTPRoute resources attached to the HTTPS listener (port 8443). Envoy terminates TLS and routes by hostname to the correct ClickHouse service.
# Create HTTPRoute for each ClickHouse servicecat > /tmp/create-ch-httproutes.sh <<'EOFSCRIPT'
#!/bin/bash
# ClickHouse operator creates two kinds of services with edge-proxy annotations:
# chi-<name>-<cluster>-<shard>-<replica> — per-replica, has shard/replica labels
# clickhouse-<name> — cluster-level load balancer, no shard/replica labels
# Per-replica services get individual HTTPRoute resources.
# The cluster-level service backs the cluster-wide HTTPRoute at $CUSTOM_DOMAIN.
CLUSTER_SVC=""
CLUSTER_HTTP_PORT=""
while IFS= read -r service; do
SVC_JSON=$(kubectl get svc "$service" -n "$CH_NAMESPACE" -o json 2>/dev/null)
if [ -z "$SVC_JSON" ]; then
echo "Warning: service $service not found in $CH_NAMESPACE, skipping"
continue
fi
PORT_MAPPING=$(echo "$SVC_JSON" | jq -r '.metadata.annotations["edge-proxy.altinity.com/port-mapping"] // empty')
HTTP_PORT=$(echo "$PORT_MAPPING" | grep -oP '\\d+:tls-to-tcp:\\K\\d+' | head -1)
CHI=$(echo "$SVC_JSON" | jq -r '.metadata.labels["clickhouse.altinity.com/chi"] // empty')
SHARD=$(echo "$SVC_JSON" | jq -r '.metadata.labels["clickhouse.altinity.com/shard"] // empty')
REPLICA=$(echo "$SVC_JSON" | jq -r '.metadata.labels["clickhouse.altinity.com/replica"] // empty')
# Services without shard/replica labels are cluster-level — defer to cluster-wide HTTPRoute
if [ -z "$SHARD" ] || [ -z "$REPLICA" ]; then
echo "Deferring $service (cluster-level service, used for cluster-wide HTTPRoute)"
CLUSTER_SVC="$service"
CLUSTER_HTTP_PORT="$HTTP_PORT"
continue
fi
if [ -z "$HTTP_PORT" ]; then
echo "Skipping $service (no tls-to-tcp port mapping)"
continue
fi
SUBDOMAIN="${CHI}-${SHARD}-${REPLICA}.${CUSTOM_DOMAIN}"
echo "Creating HTTPRoute: $service → $SUBDOMAIN:$HTTP_PORT"
cat <<EOFROUTE | kubectl apply -f -
apiVersion: gateway.networking.k8s.io/v1
kind: HTTPRoute
metadata:
name: ${service}-http
namespace: ${CH_NAMESPACE}
spec:
parentRefs:
- name: contour
namespace: projectcontour
sectionName: https
hostnames:
- "${SUBDOMAIN}"
rules:
- timeouts:
request: 3600s
backendRequest: 3600s
backendRefs:
- name: ${service}
port: ${HTTP_PORT}
EOFROUTE
echo " ✓ Created"
done < /tmp/clickhouse-services.txt
# Cluster-wide HTTPRoute at $CUSTOM_DOMAIN, backed by the cluster-level service
if [ -n "$CLUSTER_SVC" ] && [ -n "$CLUSTER_HTTP_PORT" ]; then
echo "Creating cluster-wide HTTPRoute: $CUSTOM_DOMAIN → $CLUSTER_SVC:$CLUSTER_HTTP_PORT"
cat <<EOFCLUSTER | kubectl apply -f -
apiVersion: gateway.networking.k8s.io/v1
kind: HTTPRoute
metadata:
name: clickhouse-cluster
namespace: ${CH_NAMESPACE}
spec:
parentRefs:
- name: contour
namespace: projectcontour
sectionName: https
hostnames:
- "${CUSTOM_DOMAIN}"
rules:
- timeouts:
request: 3600s
backendRequest: 3600s
backendRefs:
- name: ${CLUSTER_SVC}
port: ${CLUSTER_HTTP_PORT}
EOFCLUSTER
echo " ✓ Created cluster-wide HTTPRoute"
else
echo "No cluster-level service found; skipping cluster-wide HTTPRoute"
fi
echo "✓ All HTTPRoute resources created"
EOFSCRIPTchmod +x /tmp/create-ch-httproutes.sh
bash /tmp/create-ch-httproutes.sh
# Verifykubectl get httproute -n $CH_NAMESPACE
Create TLSRoute for ClickHouse Native Protocol
For the native protocol (backend port 9000), edge-proxy uses tls-to-tcp — it terminates TLS and forwards plain TCP. We replicate this with TLSRoute resources attached to the clickhouse-native TLS listener (port 9440). Envoy terminates TLS, reads the SNI hostname to select the correct replica, and forwards plain TCP to ClickHouse port 9000.
Each TLSRoute uses the same FQDN as the corresponding HTTPRoute (e.g., test-byoc-0-0.clickhouse.yourdomain.com) — this works because they attach to different listeners (port 8443 vs port 9440). Clients connecting to hostname:8443 get HTTP; clients connecting to hostname:9440 get native protocol. No FQDN change, no client reconfiguration needed.
cat > /tmp/create-ch-tlsroutes.sh <<'EOFSCRIPT'
#!/bin/bash
CLUSTER_SVC=""
CLUSTER_NATIVE_PORT=""
while IFS= read -r service; do
SVC_JSON=$(kubectl get svc "$service" -n "$CH_NAMESPACE" -o json 2>/dev/null)
if [ -z "$SVC_JSON" ]; then
echo "Warning: service $service not found in $CH_NAMESPACE, skipping"
continue
fi
PORT_MAPPING=$(echo "$SVC_JSON" | jq -r '.metadata.annotations["edge-proxy.altinity.com/port-mapping"] // empty')
# HTTP port: first tls-to-tcp entry (e.g. 8443:tls-to-tcp:8123 → 8123)
HTTP_PORT=$(echo "$PORT_MAPPING" | grep -oP '\\d+:tls-to-tcp:\\K\\d+' | head -1)
# Native port: last tls-to-tcp entry (e.g. 9440:tls-to-tcp:9000 → 9000)
NATIVE_PORT=$(echo "$PORT_MAPPING" | grep -oP '\\d+:tls-to-tcp:\\K\\d+' | tail -1)
CHI=$(echo "$SVC_JSON" | jq -r '.metadata.labels["clickhouse.altinity.com/chi"] // empty')
SHARD=$(echo "$SVC_JSON" | jq -r '.metadata.labels["clickhouse.altinity.com/shard"] // empty')
REPLICA=$(echo "$SVC_JSON" | jq -r '.metadata.labels["clickhouse.altinity.com/replica"] // empty')
if [ -z "$SHARD" ] || [ -z "$REPLICA" ]; then
echo "Deferring $service (cluster-level service, used for cluster-wide TLSRoute)"
CLUSTER_SVC="$service"
CLUSTER_NATIVE_PORT="$NATIVE_PORT"
continue
fi
# Only create TLSRoute if there are two distinct tls-to-tcp entries (HTTP and native)
if [ -z "$NATIVE_PORT" ] || [ "$HTTP_PORT" = "$NATIVE_PORT" ]; then
echo "Skipping $service (no separate native protocol port mapping)"
continue
fi
FQDN="${CHI}-${SHARD}-${REPLICA}.${CUSTOM_DOMAIN}"
echo "Creating TLSRoute: $service → $FQDN (native port $NATIVE_PORT via port 9440 listener)"
cat <<EOFTLS | kubectl apply -f -
apiVersion: gateway.networking.k8s.io/v1alpha2
kind: TLSRoute
metadata:
name: ${service}-native
namespace: ${CH_NAMESPACE}
spec:
parentRefs:
- name: contour
namespace: projectcontour
sectionName: clickhouse-native
hostnames:
- "${FQDN}"
rules:
- backendRefs:
- name: ${service}
port: ${NATIVE_PORT}
EOFTLS
echo " ✓ Created"
done < /tmp/clickhouse-services.txt
# Cluster-wide TLSRoute at $CUSTOM_DOMAIN, backed by the cluster-level service
if [ -n "$CLUSTER_SVC" ] && [ -n "$CLUSTER_NATIVE_PORT" ]; then
CLUSTER_HTTP_PORT=$(kubectl get svc "$CLUSTER_SVC" -n "$CH_NAMESPACE" -o json | \\
jq -r '.metadata.annotations["edge-proxy.altinity.com/port-mapping"] // empty' | \\
grep -oP '\\d+:tls-to-tcp:\\K\\d+' | head -1)
if [ "$CLUSTER_HTTP_PORT" != "$CLUSTER_NATIVE_PORT" ]; then
echo "Creating cluster-wide TLSRoute: $CUSTOM_DOMAIN → $CLUSTER_SVC:$CLUSTER_NATIVE_PORT"
cat <<EOFCLUSTER | kubectl apply -f -
apiVersion: gateway.networking.k8s.io/v1alpha2
kind: TLSRoute
metadata:
name: clickhouse-cluster-native
namespace: ${CH_NAMESPACE}
spec:
parentRefs:
- name: contour
namespace: projectcontour
sectionName: clickhouse-native
hostnames:
- "${CUSTOM_DOMAIN}"
rules:
- backendRefs:
- name: ${CLUSTER_SVC}
port: ${CLUSTER_NATIVE_PORT}
EOFCLUSTER
echo " ✓ Created cluster-wide TLSRoute"
else
echo "No separate native protocol port for cluster-level service; skipping cluster-wide TLSRoute"
fi
fi
echo "✓ All TLSRoute resources created"
EOFSCRIPTchmod +x /tmp/create-ch-tlsroutes.sh
bash /tmp/create-ch-tlsroutes.sh
# Verifykubectl get httproute,tlsroute -n $CH_NAMESPACE
Create HTTPRoute for Monitoring Services (Prometheus, Grafana)
This is an optional step to expose monitoring services
Edge-proxy routes monitoring traffic as tcp-passthrough on specific ports (e.g. 9090:tcp-passthrough:9090). Because monitoring services use plain TCP with no TLS, there is no SNI for Contour to route on. Instead, expose monitoring services as named HTTPS subdomains: Contour terminates TLS and forwards plain HTTP to the backend.
This changes the access URL from CUSTOM_DOMAIN:9090 to https://prometheus.CUSTOM_DOMAIN (or similar). Update any dashboards or alert configurations accordingly.
if[ -s /tmp/monitoring-services.txt ];then cat > /tmp/create-monitoring-routes.sh <<'EOFSCRIPT'
#!/bin/bash
while IFS= read -r service; do
SVC_JSON=$(kubectl get svc "$service" -n "$SYS_NAMESPACE" -o json 2>/dev/null)
if [ -z "$SVC_JSON" ]; then
echo "Warning: service $service not found in $SYS_NAMESPACE, skipping"
continue
fi
PORT_MAPPING=$(echo "$SVC_JSON" | jq -r '.metadata.annotations["edge-proxy.altinity.com/port-mapping"] // empty')
INTERNAL_PORT=$(echo "$PORT_MAPPING" | grep -oP ':\\K\\d+$')
APP=$(echo "$SVC_JSON" | jq -r '.metadata.labels.app // empty')
if [ -z "$INTERNAL_PORT" ] || [ -z "$APP" ]; then
echo "Skipping $service (could not determine port or app label)"
continue
fi
FQDN="${APP}.${CUSTOM_DOMAIN}"
echo "Creating HTTPRoute: $service → <https://$FQDN> (port $INTERNAL_PORT)"
cat <<EOFROUTE | kubectl apply -f -
apiVersion: gateway.networking.k8s.io/v1
kind: HTTPRoute
metadata:
name: ${service}-monitoring
namespace: ${SYS_NAMESPACE}
spec:
parentRefs:
- name: contour
namespace: projectcontour
sectionName: https
hostnames:
- "${FQDN}"
rules:
- backendRefs:
- name: ${service}
port: ${INTERNAL_PORT}
EOFROUTE
echo " ✓ Created — access at <https://$FQDN>"
done < /tmp/monitoring-services.txt
echo "✓ Monitoring HTTPRoute resources created"
EOFSCRIPT chmod +x /tmp/create-monitoring-routes.sh
bash /tmp/create-monitoring-routes.sh
elseecho"No monitoring services found, skipping..."fi
Handle tls-passthrough Services
If Step 1 found services using tls-passthrough, those services handle TLS termination themselves (e.g., ClickHouse with TLS enabled on the native port). Contour needs a separate TLS/Passthrough listener for each external port used with tls-passthrough — this is a different listener mode from the TLS/Terminate listener used for tls-to-tcp services.
If tls-passthrough services use the same external port as tls-to-tcp services (both on port 9440), the Gateway cannot serve both modes on a single listener — move the passthrough service to a different external port or contact Altinity for guidance.
if[ -s /tmp/tls-passthrough-services.txt ];then# Find the unique external ports used by tls-passthrough servicesPASSTHROUGH_PORTS=$(cat /tmp/tls-passthrough-services.txt |\\ grep -oP '\\d+:tls-passthrough'| cut -d: -f1 | sort -u)echo"Adding TLS/Passthrough listeners for ports: $PASSTHROUGH_PORTS"for PORT in $PASSTHROUGH_PORTS;do# Check for conflict with existing listeners (port 8443 and 9440 are already defined)if kubectl get gateway contour -n projectcontour -o json |\\ jq -e ".spec.listeners[] | select(.port == ${PORT})" > /dev/null 2>&1;thenecho"ERROR: Port $PORT already has a listener — tls-passthrough and tls-to-tcp cannot share a port."echo" Move one to a different external port before proceeding."continuefiecho"Adding Passthrough listener on port $PORT" kubectl patch gateway contour -n projectcontour --type='json' -p="[{
\\"op\\": \\"add\\",
\\"path\\": \\"/spec/listeners/-\\",
\\"value\\": {
\\"name\\": \\"tls-passthrough-${PORT}\\",
\\"protocol\\": \\"TLS\\",
\\"port\\": ${PORT},
\\"tls\\": {\\"mode\\": \\"Passthrough\\"},
\\"allowedRoutes\\": {\\"namespaces\\": {\\"from\\": \\"All\\"}}
}
}]"done# Create TLSRoute for each tls-passthrough service cat > /tmp/create-ch-passthrough-tlsroutes.sh <<'EOFSCRIPT'
#!/bin/bash
while IFS= read -r svc_line; do
# Parse: "namespace/name: mapping"
NS=$(echo "$svc_line" | cut -d/ -f1)
REST=$(echo "$svc_line" | cut -d/ -f2-)
SVC=$(echo "$REST" | cut -d: -f1)
MAPPING=$(echo "$REST" | cut -d' ' -f2-)
SVC_JSON=$(kubectl get svc "$SVC" -n "$NS" -o json 2>/dev/null)
if [ -z "$SVC_JSON" ]; then
echo "Warning: service $SVC not found in $NS, skipping"
continue
fi
CHI=$(echo "$SVC_JSON" | jq -r '.metadata.labels["clickhouse.altinity.com/chi"] // empty')
SHARD=$(echo "$SVC_JSON" | jq -r '.metadata.labels["clickhouse.altinity.com/shard"] // empty')
REPLICA=$(echo "$SVC_JSON" | jq -r '.metadata.labels["clickhouse.altinity.com/replica"] // empty')
if [ -z "$SHARD" ] || [ -z "$REPLICA" ]; then
echo "Skipping $SVC (cluster-level service; passthrough routing is per-replica only)"
continue
fi
FQDN="${CHI}-${SHARD}-${REPLICA}.${CUSTOM_DOMAIN}"
# Each passthrough mapping: "extport:tls-passthrough:backendport"
echo "$MAPPING" | tr ',' '\\n' | grep 'tls-passthrough' | while IFS=: read -r EXT_PORT MODE BACKEND_PORT; do
echo "Creating TLSRoute (passthrough): $SVC → $FQDN ext=$EXT_PORT backend=$BACKEND_PORT"
cat <<EOFTLS | kubectl apply -f -
apiVersion: gateway.networking.k8s.io/v1alpha2
kind: TLSRoute
metadata:
name: ${SVC}-passthrough-${EXT_PORT}
namespace: ${NS}
spec:
parentRefs:
- name: contour
namespace: projectcontour
sectionName: tls-passthrough-${EXT_PORT}
hostnames:
- "${FQDN}"
rules:
- backendRefs:
- name: ${SVC}
port: ${BACKEND_PORT}
EOFTLS
echo " ✓ Created"
done
done < /tmp/tls-passthrough-services.txt
echo "✓ Passthrough TLSRoute resources created"
EOFSCRIPT chmod +x /tmp/create-ch-passthrough-tlsroutes.sh
bash /tmp/create-ch-passthrough-tlsroutes.sh
kubectl get tlsroute -A | grep passthrough
elseecho"No tls-passthrough services found, skipping."fi
Handle IP Whitelisting
The edge-proxy.altinity.com/whitelist annotation restricts which source IPs can connect. In Contour Gateway API mode, per-route IP filtering is not available as a standard feature. The recommended approach is to enforce IP restrictions at the AWS NLB security group — this blocks disallowed traffic before it reaches Envoy and is the most reliable option.
if[ -s /tmp/whitelist-services.txt ];thenecho"=== Whitelist CIDRs found ==="# Collect all unique CIDRs across all whitelisted servicesALL_CIDRS=$(cat /tmp/whitelist-services.txt |\\ grep -oP '[\\d./]+'| sort -u | tr '\\n'',')echo"CIDRs to allow: $ALL_CIDRS"# Get the security group attached to Contour's Envoy NLBCONTOUR_SG=$(aws ec2 describe-security-groups \\ --filters "Name=tag:kubernetes.io/service-name,Values=projectcontour/envoy"\\ --query 'SecurityGroups[0].GroupId' --output text 2>/dev/null)if[ -n "$CONTOUR_SG"]&&["$CONTOUR_SG" !="None"];thenecho"Contour NLB security group: $CONTOUR_SG"echo""echo"Add inbound rules to $CONTOUR_SG for the following CIDRs on ports 8443 and 9440:"echo"$ALL_CIDRS"| tr ',''\\n'| grep -v '^$'|whileread -r CIDR;doecho" aws ec2 authorize-security-group-ingress --group-id $CONTOUR_SG \\\\"echo" --protocol tcp --port 8443 --cidr $CIDR"echo" aws ec2 authorize-security-group-ingress --group-id $CONTOUR_SG \\\\"echo" --protocol tcp --port 9440 --cidr $CIDR"doneecho""echo"Review per-service whitelists in /tmp/whitelist-services.txt."echo"If different services have different CIDRs, use separate NLB listeners or"echo"implement a Kubernetes NetworkPolicy on the ClickHouse pods for finer-grained control."elseecho"Could not auto-detect Contour NLB security group. Find it manually:"echo" AWS Console → EC2 → Load Balancers → find the Contour NLB → Security tab"echo"Then add inbound rules for the CIDRs listed above."fifi
If Step 1 found services using tls-to-tls or tls-to-tls-insecure, edge-proxy was terminating the client TLS and then opening a new TLS connection to the upstream (ClickHouse with TLS on the pod). In Contour Gateway API, upstream TLS is configured via the experimental BackendTLSPolicy resource.
if[ -s /tmp/tls-to-tls-services.txt ];thenecho"Services requiring upstream TLS:" cat /tmp/tls-to-tls-services.txt
echo""echo"For each service, create a BackendTLSPolicy. Example for service chi-NAME-0-0:" cat <<'EOFEXAMPLE'
apiVersion: gateway.networking.k8s.io/v1alpha3
kind: BackendTLSPolicy
metadata:
name: chi-NAME-0-0-upstream-tls
namespace: $CH_NAMESPACE
spec:
targetRefs:
- group: ""
kind: Service
name: chi-NAME-0-0 # must match the service name in the HTTPRoute backendRef
validation:
# For tls-to-tls: specify the CA cert that signed the upstream cert
# Create a ConfigMap with the CA cert first, then reference it here:
caCertificateRefs:
- group: ""
kind: ConfigMap
name: clickhouse-upstream-ca
hostname: chi-NAME-0-0.internal.clickhouse.svc # upstream TLS server name
# For tls-to-tls-insecure: use wellKnownCACertificates instead and set
# hostname to match the upstream cert's CN/SAN. Or for fully insecure,
# this feature is not yet supported in Gateway API — use Contour HTTPProxy
# with spec.routes[].services[].protocol: tls instead.
EOFEXAMPLEecho""echo"See: <https://gateway-api.sigs.k8s.io/api-types/backendtlspolicy/>"echo"Note: BackendTLSPolicy requires Gateway API experimental channel (already installed in Step 2)."fi
Handle Zone-Aware Routing
Edge-proxy supports AZ-local routing: each edge-proxy instance routes requests to services tagged with a matching edge-proxy.altinity.com/zone annotation. This prevents cross-AZ traffic between the proxy and ClickHouse pods.
With Contour, this per-AZ routing is not replicated. A single Contour LB accepts all traffic and routes to pods in any AZ based on the FQDN. Cross-AZ traffic between Envoy and ClickHouse pods may increase, which can raise AWS data transfer costs.
if[ -s /tmp/zone-services.txt ];thenecho"Zone-annotated services:" cat /tmp/zone-services.txt
echo""echo"Mitigations:"echo""echo"1. Enable topology-aware routing on ClickHouse services (Kubernetes 1.27+)."echo" This tells kube-proxy to prefer endpoints in the same AZ as the Envoy pod:"whileIFS=read -r line;doSVC=$(echo"$line"| awk '{print $1}'| tr -d '(zone:')NS=$(echo"$SVC"| cut -d/ -f1)NAME=$(echo"$SVC"| cut -d/ -f2)[ -n "$NAME"]&&echo" kubectl annotate svc $NAME -n $NS service.kubernetes.io/topology-mode=Auto"done < /tmp/zone-services.txt
echo""echo"2. Use per-replica FQDNs (e.g. test-byoc-0-0.custom.domain) instead of the"echo" cluster-level FQDN to ensure clients connect to a specific replica."echo" Per-replica routing is already configured in the HTTPRoute/TLSRoute scripts above."fi
Step 5: Test Contour (Before DNS Change)
HTTP interface tests use --connect-to to direct traffic to the Contour LB while using the real service FQDN in the URL. This sets both the TLS SNI (required for the Gateway to match the cert) and the HTTP Host header (required for HTTPRoute matching). --insecure skips cert hostname validation since the cert is for *.${CUSTOM_DOMAIN}, not the LB hostname. (--resolve looks similar but requires an IP; --connect-to accepts ELB DNS names directly.)
Native protocol (port 9440) cannot be tested pre-DNS: clickhouse-client uses --host as both the TCP destination and the TLS SNI with no way to override them independently. Native protocol is verified in Step 7 immediately after the 60-second DNS cutover.
# Pick the first per-replica ClickHouse service (cluster-level services have no shard/replica labels)SUBDOMAIN=""whileIFS=read -r service;doSVC_JSON=$(kubectl get svc "$service" -n "$CH_NAMESPACE" -o json 2>/dev/null)CHI=$(echo"$SVC_JSON"| jq -r '.metadata.labels["clickhouse.altinity.com/chi"] // empty')SHARD=$(echo"$SVC_JSON"| jq -r '.metadata.labels["clickhouse.altinity.com/shard"] // empty')REPLICA=$(echo"$SVC_JSON"| jq -r '.metadata.labels["clickhouse.altinity.com/replica"] // empty')if[ -n "$SHARD"]&&[ -n "$REPLICA"];thenSUBDOMAIN="${CHI}-${SHARD}-${REPLICA}.${CUSTOM_DOMAIN}"breakfidone < /tmp/clickhouse-services.txt
if[ -z "$SUBDOMAIN"];thenecho"ERROR: no per-replica service found in /tmp/clickhouse-services.txt";exit 1;fi# --connect-to HOST:PORT:CONNECT-HOST:CONNECT-PORT routes TCP to $CONTOUR_LB while# keeping $SUBDOMAIN as the URL hostname → curl sets SNI=$SUBDOMAIN and Host: $SUBDOMAIN.echo"Test 1: ClickHouse HTTP via Contour (unauthenticated)"curl --insecure \\ --connect-to "${SUBDOMAIN}:8443:${CONTOUR_LB}:8443"\\"<https://$>{SUBDOMAIN}:8443/?query=SELECT%20version()"echo"Test 2: HTTP with authentication"curl --insecure \\ --connect-to "${SUBDOMAIN}:8443:${CONTOUR_LB}:8443"\\"<https://$>{SUBDOMAIN}:8443/?query=SELECT%20hostName()"\\ --user $CH_USER:$CH_PASSWORD# Note: native protocol (port 9440) cannot be reliably tested before DNS cutover.# clickhouse-client uses --host as both the TCP destination and the TLS SNI — there is# no separate SNI override. Connecting by IP sends no SNI, and /etc/hosts is not# consistently honoured by the client. Since TTL is already 60 s, verify native# protocol immediately after the DNS cutover in Step 6 instead.echo"Skipping native protocol pre-DNS test — will verify in Step 7 after DNS cutover."# Test 4: Monitoring services (if exist)if[ -s /tmp/monitoring-services.txt ];thenecho"Test 4: Prometheus" curl --insecure \\ --connect-to "prometheus.${CUSTOM_DOMAIN}:8443:${CONTOUR_LB}:8443"\\"<https://prometheus.$>{CUSTOM_DOMAIN}/-/healthy"||truefiecho"✓ Pre-DNS tests complete"
Step 6: Switch Traffic to Contour (LB Cutover)
DNS currently points to edge-proxy’s LB ($EDGE_PROXY_LB) with TTL=60, set during the pre-flight step. Update the CNAMEs to $CONTOUR_LB to cut live traffic over to Contour. Because TTL is already 60 seconds, propagation takes approximately one minute with no extended downtime window.
# Confirm current DNS is pointing at edge-proxy's LB and TTL is lowdig $CUSTOM_DOMAIN# Switch all custom domain CNAMEs from edge-proxy's LB to Contour's LBfor SUBDOMAIN in "${CUSTOM_DOMAIN}""internal.${CUSTOM_DOMAIN}""vpce.${CUSTOM_DOMAIN}";do aws route53 change-resource-record-sets \\ --hosted-zone-id $HOSTED_ZONE_ID\\ --change-batch "{
\\"Changes\\": [{
\\"Action\\": \\"UPSERT\\",
\\"ResourceRecordSet\\": {
\\"Name\\": \\"*.${SUBDOMAIN}\\",
\\"Type\\": \\"CNAME\\",
\\"TTL\\": 300,
\\"ResourceRecords\\": [{\\"Value\\": \\"${CONTOUR_LB}\\"}]
}
}]
}"&&echo"Switched *.${SUBDOMAIN} → $CONTOUR_LB"||echo"Skipped *.${SUBDOMAIN} (not in use)"doneecho"Waiting 60s for DNS propagation..."sleep 60# Verify all zones now resolve to Contour's LBdig "*.${CUSTOM_DOMAIN}" +short
dig "*.internal.${CUSTOM_DOMAIN}" +short
dig "*.vpce.${CUSTOM_DOMAIN}" +short
Step 7: Test Production Endpoints
# Test each ClickHouse service by its individual FQDN (routes exist per-service, not on $CUSTOM_DOMAIN)whileIFS=read -r service;doSVC_JSON=$(kubectl get svc "$service" -n "$CH_NAMESPACE" -o json 2>/dev/null)if[ -z "$SVC_JSON"];thencontinue;fiCHI=$(echo"$SVC_JSON"| jq -r '.metadata.labels["clickhouse.altinity.com/chi"] // empty')SHARD=$(echo"$SVC_JSON"| jq -r '.metadata.labels["clickhouse.altinity.com/shard"] // empty')REPLICA=$(echo"$SVC_JSON"| jq -r '.metadata.labels["clickhouse.altinity.com/replica"] // empty')# Skip cluster-level services (no shard/replica labels) — they have no individual routeif[ -z "$SHARD"]||[ -z "$REPLICA"];thenecho"Skipping $service (cluster-level, no per-replica route)"continuefiSUBDOMAIN="${CHI}-${SHARD}-${REPLICA}.${CUSTOM_DOMAIN}"echo"Test HTTP: $SUBDOMAIN" curl "<https://$>{SUBDOMAIN}:8443/?query=SELECT%20hostName()"\\ --user $CH_USER:$CH_PASSWORDecho"Test native: $SUBDOMAIN port 9440" clickhouse-client --host="$SUBDOMAIN" --port=9440 --secure \\ --user="$CH_USER" --password="$CH_PASSWORD"\\ --query "SELECT version(), hostName()"done < /tmp/clickhouse-services.txt
# Test monitoring (now served as HTTPS subdomains)if[ -s /tmp/monitoring-services.txt ];thenecho"Test: Prometheus" curl "<https://prometheus.$>{CUSTOM_DOMAIN}/-/healthy"echo"Test: Grafana" curl "<https://grafana.$>{CUSTOM_DOMAIN}/api/health"fiecho"✓ All production endpoints working"
Step 8: Monitor for 48 Hours
# Application healthkubectl logs -f deployment/your-app -n your-app-namespace | grep -i clickhouse
# Contour healthkubectl get pods -n projectcontour
kubectl get gateway -n projectcontour
kubectl get httproute,tlsroute -n $CH_NAMESPACE# ClickHouse healthclickhouse-client --host $CUSTOM_DOMAIN --port 9440 --secure \\ --user $CH_USER --password $CH_PASSWORD\\ --query "SELECT event_time, user, exception
FROM system.query_log
WHERE type = 'ExceptionWhileProcessing'
AND event_time > now() - INTERVAL 1 HOUR
ORDER BY event_time DESC LIMIT 20"# Check query performanceclickhouse-client --host $CUSTOM_DOMAIN --port 9440 --secure \\ --user $CH_USER --password $CH_PASSWORD\\ --query "SELECT
quantile(0.5)(query_duration_ms) as p50_ms,
quantile(0.95)(query_duration_ms) as p95_ms,
quantile(0.99)(query_duration_ms) as p99_ms
FROM system.query_log
WHERE event_time > now() - INTERVAL 1 HOUR
AND type = 'QueryFinish'"
Rollback Procedure
Roll back by pointing CNAMEs back to edge-proxy’s LB. edge-proxy remains running until the last step so we can seamlessly switch traffic over.
for SUBDOMAIN in "${CUSTOM_DOMAIN}""internal.${CUSTOM_DOMAIN}""vpce.${CUSTOM_DOMAIN}";do aws route53 change-resource-record-sets \\ --hosted-zone-id $HOSTED_ZONE_ID\\ --change-batch "{
\\"Changes\\": [{
\\"Action\\": \\"UPSERT\\",
\\"ResourceRecordSet\\": {
\\"Name\\": \\"*.${SUBDOMAIN}\\",
\\"Type\\": \\"CNAME\\",
\\"TTL\\": 60,
\\"ResourceRecords\\": [{\\"Value\\": \\"${EDGE_PROXY_LB}\\"}]
}
}]
}"&&echo"Rolled back *.${SUBDOMAIN} → $EDGE_PROXY_LB"doneecho"✓ DNS rolled back to edge-proxy"
kubectl describe httproute -n $CH_NAMESPACEkubectl describe tlsroute -n $CH_NAMESPACE# Common issues:# - Gateway sectionName mismatch (must match listener name: 'https' or 'clickhouse-native')# - Service not found in the same namespace as the route# - Port mismatch between route backendRef and service port
Monitoring Services Not Accessible
# Check HTTPRoute status for monitoringkubectl describe httproute -n $SYS_NAMESPACE# Test from within clusterkubectl run -it --rm debug --image=curlimages/curl --restart=Never -- \\ curl http://prometheus-service.$SYS_NAMESPACE.svc.cluster.local:9090/-/healthy
Verification Checklist
□ All services with edge-proxy annotations discovered
□ Gateway API CRDs and Contour Gateway Provisioner installed; GatewayClass created
□ cert-manager installed; ClusterIssuer ready
□ Custom domain CNAMEs pointed at $EDGE_PROXY_LB with TTL=60
□ _acme-challenge CNAME delegations to Altinity’s DNS removed
□ TLS certificate issued by Let’s Encrypt in projectcontour namespace; SANs correct
□ Gateway created with https (port 8443) and clickhouse-native (port 9440) listeners; $CONTOUR_LB saved
□ HTTPRoute created for each ClickHouse service (HTTP interface, port 8443)
□ TLSRoute created for each ClickHouse service (native protocol, port 9440, same FQDN as HTTPRoute)
□ HTTPRoute configured for monitoring services (if applicable)
□ (if applicable)tls-passthrough services: Passthrough listener(s) added to Gateway and TLSRoutes created
□ (if applicable) IP whitelisting: AWS NLB security group rules applied for all whitelist CIDRs
□ (if applicable) Upstream TLS (tls-to-tls): BackendTLSPolicy configured for each affected service
1.5.1.5.3 - Deleting Clusters, Data, and Everything
Deleting everything, including ClickHouse® clusters and data
BEFORE YOU DELETE EVERYTHING...
Keep in mind that you can delete your environment without disturbing your ClickHouse clusters and the data they contain. See the Keeping Your Clusters and Data documentation for all the details. If you’re sure you want to delete everything, read on…
Deleting an environment created with Terraform
If you created your environment with a Terraform script, you need to delete the environment with terraform destroy. See the Altinity.Cloud Terraform documentation for complete information.
Deleting your environment and its clusters and data
If you’re sure you’re ready to delete your Altinity.Cloud environment and its clusters data, go to the list of environments, click the vertical dots icon next to your environment name and select Delete from the menu:
Figure 1 - The Delete Environment menu
This option includes any Kubernetes or cloud resources Altinity.Cloud might have created. The simplest case is an environment that doesn’t have any ClickHouse clusters:
Figure 2 - Deleting an Altinity.Cloud environment with no ClickHouse clusters
The “Do not de-provision cloud resources” slider only appears if you’re running Altinity.Cloud in your environment (BYOC).
Typing in the name of your environment and clicking DELETE deletes the Altinity.Cloud environment and its associated Kubernetes or cloud resources. The two sliders feel like a double negative (“No, don’t not delete my resources”), but the choices in Figure 5 delete your environment’s underlying resources.
If your environment has ClickHouse clusters, you should delete them from the Clusters View in the ACM before deleting your Altinity.Cloud environment. However, you can click the Delete Clusters slider and have the ACM delete your ClickHouse clusters along with the resources that host them. These choices delete everything:
Figure 3 - Deleting an Altinity.Cloud environment and its ClickHouse clusters
You’ll see a progress dialog that shows how various resources are being deprovisioned and deleted:
Figure 4 - The environment deletion progress dialog
1.5.1.5.4 - Deleting an Environment Altinity Can't Connect To
Housekeeping for an unreachable environment
If Altinity.Cloud can no longer connect to your environment, you need to tell the ACM that you’ll take the responsibility of deleting any Kubernetes or cloud resources that Altinity.Cloud created:
Figure 1 - Deleting an Altinity.Cloud environment, deleting resources by hand
The “Do not de-provision cloud resources” slider only appears if you’re running Altinity.Cloud in your environment (BYOC).
If this is what you want to do, type the name of your environment and click DELETE. The ACM deletes the Altinity.Cloud environment, but you’ll have to delete its resources by hand.
1.5.2 - Working with User Accounts
Managing users and their roles and permissions
One of an Administrator’s most important tasks is managing access to the resources in your Altinity.Cloud environment. Fortunately, the Altinity Cloud Manager (ACM) makes it easy to work with user accounts.
Account management is vital to keeping your data and applications secure. We cover two specific topics here:
Beyond these specifics, the Altinity.Cloud Security Guide has a more generate discussion of security topics and best practices. We encourage you ta take a look; there’s some great material there.
For now, if you’ve got orgadmin access, read on….
Creating a User Account
Users with orgadmin access can manage accounts through the Altinity Cloud Manager. Click the Accounts tab on the left to see the Accounts page:
Figure 1 - The accounts page
From the Accounts page, click the button. You’ll see the Account Details dialog, which has three tabs (or maybe four):
Basic information about the new account is on the Common Information tab.
Figure 2 - The Common Information tab
Field details
Name
The name of the new account.
Email
The email for the account.
Password
The password for this account. It must be at least 12 characters long, and the two passwords must match. The SAVE button will be disabled until the passwords match and are long enough.
If selected, this account is suspended and no logins will be accepted.
The Environment Access tab
This straightforward tab lets you define which environments are accessible to this account.
Figure 3 - The Environment Access tab
Click the checkboxes for all the environments that should be accessible to this account. The account role determines what actions this account can take with Environments and Clusters.
The Cluster Access tab
This tab only appears if this account has envuser access. This similarly straightforward tab lets you define which clusters are accessible to this account. The only clusters listed here are clusters in the environments you selected on the Environment Access tab.
Figure 4 - The Cluster Access tab
Click the checkboxes for all the clusters that should be accessible to this account. The account will have read, edit, and delete access to the selected clusters.
The API Access tab
Figure 5 - The API Access tab
This tab lets you define the API keys available for this account and the domains allowed to use those keys. Be aware that the API Keys section shown in Figure 5 may not appear for some user roles. For complete details, see the discussion of the API Access tab on the Altinity API Guide page.
Defining Login settings for your organization
You can define login settings for your entire organization. We’ll look at more general settings first, then we’ll look at how to configure an identity provider to manage users.
General login settings
Click the button in Figure 1 to set login properties for all accounts in your organization. You’ll see this dialog, opened to the General tab:
Figure 6 - The General tab of the Login Settings dialog
If selected, user registration can be performed through your identity provider if the new user is from the domain registered with your Altinity.Cloud account. In other words, if your domain is example.com, the ACM will automatically create an account for a previously unknown example.com user authenticated through the identity provider. If not selected, this environment is closed and every new user must be created by an Administrator.
Default User Role
The default role that should be assigned to a new user.
Block password logins
If selected, only Auth0 logins will be accepted; a user cannot log in directly with a username and password.
Block API access
If selected, all API access to your Altinity.Cloud account will be blocked.
Allow password for admins
Note: We strongly advise that you not use this option. This allows admins to log in with a password, which fails to stop the exposure of passwords. We recommend that you require Auth0 logins for all users, including admins. If for some reason your identity provider is not available, contact Altinity support so we can restore access for an admin account. (After authenticating whoever is contacting us, of course.)
Enable 2FA for password logins
This option is enabled if anyone is allowed to log in with a password. (In Figure 2 above, no one is allowed to use passwords, so the option is disabled.) Turning on 2FA sends an email to users every time they ask to log in. First of all, the user will see this dialog in the ACM:
Figure 7 - The 2FA login message in the ACM
The user will receive an email with a login link, something like this:
Figure 8 - The 2FA login email
Clicking the link in the email logs the user in. As you would expect, this link can only be used once.
Synchronizing users with an identity provider
If you use an identity provider, you can set up your Altinity.Cloud account to create a new Altinity.Cloud account for a previously unknown user who authenticated through your identity provider. If you’re an Okta customer, read on; otherwise you’ll need to contact Altinity support to configure Altinity.Cloud for your provider. If you’re curious about the technical details, see the Auth0 integration page.
Okta customers can automatically create users authenticated by Okta. Click the button as shown in Figure 1 above, then go to the User Sync tab in the dialog:
Figure 9 - The User Sync tab of the Login Settings dialog with no options selected
Initially no options are selected in the dialog as shown in Figure 9. If you select Deny access if not in Okta and/or Enable Okta role sync, the dialog will look like this:
Figure 10 - The User Sync tab of the Login Settings dialog
The options are:
Deny access if not in Okta
If enabled, only users authenticated by Okta are allowed to access your Altinity.Cloud account.
Enable Okta user sync
This option lets you map user roles in Okta to user roles in your Altinity.Cloud account. You define those mappings at the bottom of the panel.
Okta Domain
The domain for your Okta account. Do not include https:// in front of this value, and don’t include .okta.com at the end.
The area at the bottom of the dialog lets you define pairs of roles, one from Okta roles and one from Altinity.Cloud. Depending on the new user’s role, you can also define which Altinity.Cloud environments they can access.
In Figure 10 above, there are two role pairs: admin is paired with orgadmin, and average_joe is paired with envuser. if a new Altinity.Cloud user is created from an Okta user with the admin role in Okta, they will have the orgadmin role in Altinity.Cloud and will have access to every environment in the account.
The second role pair above creates a new user with the envuser role. Selecting envuser as the paired role displays a list of all the environments in your Altinity.Cloud account. You can select which environments the new user can access. If Figure 10, all new envuser accounts can access the altinity-maddie-tf and altinity-minikube-monday environments.
As you would expect, clicking the button lets you add a new role pair, and clicking the icon deletes one.
1.5.3 - Connecting other tools to Altinity.Cloud
Integrating useful tools with Altinity.Cloud
There are a number of tools that make it easier for you to manage and monitor your ClickHouse® clusters. Details of how to connect Altinity.Cloud to those tools are in the following pages:
1.5.3.1 - Integrating Datadog
Connecting Datadog to your Altinity.Cloud environment
Datadog is a popular observability platform for monitoring applications and infrastructure. Datadog’s access to Altinity.Cloud is controlled at two levels:
The Cluster level - Once Datadog is enabled at the environment level, you can enable Datadog monitoring for individual clusters.
Enabling Datadog at the environment level
You can check the status of Datadog integration in the Environment dashboard:
Figure 1 - Datadog status on the Environment dashboard
In Figure 1 above, Datadog is disabled. Clicking on the grayed-out word “Datadog” takes you to the Environment Configuration dialog shown in Figure 4 below.
You can also start from the Environments list. Click the Environments tab on the left. You’ll see the list of environments in your account:
Figure 2 - Environment list
Click the vertical dots icon next to the environment you want to enable, then select Edit from the menu.
Figure 3 - The Edit Environment menu
In the Environment Details panel, click the Logs tab. Click the Turn On Datadog slider to turn Datadog on or off. When Datadog is turned on, you need to enter the API key from your Datadog account. (The Datadog API and Application Keys page has complete details on how to create and manage API keys.) Click the down arrow to select your nearest Datadog region.
Figure 4 - Turning on Datadog
Once Datadog is turned on, the three options below the region allow you to send logs, metrics on the ClickHouse® cluster, and/or table-level metrics in your ClickHouse cluster.
If you’re creating a new ClickHouse cluster and your environment is enabled for Datadog, the Datadog integration options are enabled on the Connection Configuration tab of the Launch Cluster Wizard. Simply click the checkboxes to send logs and/or metrics to Datadog. (If the environment isn’t enabled for Datadog, the Datadog section of the Connection Configuration tab is disabled.)
If your ClickHouse cluster has already been created, you can use the Cluster Settings dialog to enable Datadog. From the Clusters tab of the ACM, click the Configure button, then choose Connections from the menu:
Figure 5 - Editing a cluster’s connections
In the Connection Configuration dialog, select the checkboxes in the Datadog integration section:
Figure 6 - Enabling Datadog at the cluster level
The three options here allow you to send logs, metrics on the ClickHouse cluster, and/or table-level metrics in your ClickHouse cluster.
Click CONFIRM to save your changes.
1.5.3.2 - Integrating Grafana Cloud
Connecting Grafana Cloud to your Altinity.Cloud environment
Grafana is a popular open-source observability platform for monitoring applications and infrastructure. We’ll look at connecting Altinity.Cloud to Grafana Cloud, although connecting to any Grafana instance works basically the same, including self-hosted Grafana. And of course we’ll use the Altinity Grafana plugin for ClickHouse®. With over 16 million downloads, it’s the most popular ClickHouse plugin in the world.
Getting the connection details for your cluster
First of all, to connect your ClickHouse cluster to Grafana, you’ll need the connection details for your cluster. In the Clusters view, click the Connection Details link:
Figure 1 - A cluster panel
In addition to your username and password, you’ll need the host name and the HTTP port:
Figure 2 - Connection details for the ClickHouse cluster
Creating a new connection and installing the Altinity ClickHouse plugin
With those details, go ahead and log in to your Grafana Cloud account. Click the Grafana menu in the upper left corner, then select the Add new connection item in the Connections section:
Figure 3 - The Add new connection menu
Type altinity in the search box. You’ll see the tile for the Altinity plugin:
Figure 4 - Selecting the Altinity Grafana plugin for ClickHouse
Click on the plugin’s tile to go to the plugin’s overview page. If you haven’t used the Altinity plugin before, you’ll see something like this:
Figure 5 - The overview page for the Altinity Grafana plugin for ClickHouse
Make sure the version number is 3.1.0 or higher and click Install.
On the other hand, if you have used the Altinity plugin before, you’ll see a different set of buttons:
Figure 6 - Another version of the overview page for the Altinity Grafana plugin for ClickHouse
Make sure the version number is 3.1.0 or higher. If not, click Update to get the latest version of the plugin.
Creating a new data source
Once you’ve got the latest version of the plugin installed, click the Add new data source button. You’ll see this panel:
Figure 7 - Creating a new data source
At the top of the panel, give your new data source a name. In the URL field, enter the complete URL of your ClickHouse cluster, including https:// and the port number. Next click the Basic auth button; you’ll access ClickHouse with a username and password. Enter those in the Basic Auth Details section below.
NOTE: The user ID and password are the ID and password of your ClickHouse cluster, which are probably not the same as the ID and password of your Altinity.Cloud account. (admin is the default user ID.)
To complete the connection, scroll to the bottom of the page and click the Save & test button. You’ll see something like this:
Figure 8 - The Save & Test button with a successful connection
If anything goes wrong, you’ll get an error message:
Figure 9 - An unsuccessfully created data source
Exploring the plugin with your data source
Once you get the Data source is working message, you can click either the building a dashboard or the Explore view link. We’ll look at the Explore view now. When you create a dashboard later, you’ll add a visualization that goes through the same steps we’ll cover here.
The Explore view starts with an empty query:
Figure 10 - The initial data source explorer view
The data source you just created is displayed at the top of the panel. Click the –database– field to see the list of databases available in your ClickHouse cluster. Select one, then click the –table– field to see the list of all the tables in the database you selected. In Figure 11 we’ve selected the github_events table in the default database. Also, this is time-series data, so we need a timestamp column to order our data. We selected the merged_at column, which is of type DateTime:
Figure 11 - Selecting a database, table, and timestamp column
By the way, the database we’re using here is from the GH Archive project, containing details of more than 7.7 billion events from public GitHub projects.
The Altinity Grafana plugin lets you edit queries directly. Click the SQL Editor button and paste in this query:
We’re graphing the number of PRs merged per hour, so we use the toStartOfHour function to convert every timestamp to the start of that hour (08:37 becomes 08:00, 08:04 becomes 08:00, etc.) then count those PRs. In the WHERE clause we use the Grafana macro $timeFilter. This scopes the range of data returned by the query to the time range selected in the visualizer. (More on time ranges in a minute.)
The plugin will look like this:
Figure 12 - The query, ready to execute
Click the Run Query button. You’ll see a graph of the data. Click the Stacked Lines button above the graph and you’ll see something like this:
Figure 13 - A graph of PRs merged per hour over the last seven days
You can change the look of the graph by clicking the Lines, Bars, Points, and other buttons above the graph. Notice that below the graph is a table that lists the data behind the graph. (We truncated the table; you can scroll down and see all the data represented in the graph if you want.)
You can also change the range of data you’re visualizing. Click the Clock icon above the query and select Last 30 days from the list:
Figure 14 - Set the time range to “Last 30 days”
Thanks to the $timeFilter macro, the plugin reruns the query and updates the graph:
Figure 15 - A graph of PRs merged per hour over the last 30 days
This is a great example of the kinds of visualizations you can create with the Altinity Grafana plugin for ClickHouse. You can now use the plugin in your Grafana dashboards.
1.5.3.3 - Integrating Prometheus
Connecting Prometheus to your Altinity.Cloud environment
Prometheus is a popular open-source library used for event
monitoring and alerting. We’ll look at how to connect your Altinity.Cloud environment to a Prometheus server. There are two ways to do this:
As an example, we’ll look at setting up an external Prometheus server with Grafana Cloud. What we’ll do here can be done with a free Grafana Cloud account, although you can upgrade to a paid account easily.
Creating an external Prometheus server at Grafana Cloud
Log in to your Grafana Cloud account (if you don’t have one already, create a free one). Click the Grafana menu in the upper left corner, then select the Connections menu:
Figure 1 - The Connections menu
On the Add new connection page, enter hosted prometheus as the connection type. You’ll see the tile for Hosted Prometheus metrics:
Figure 2 - Select Hosted Prometheus metrics
Click the Hosted Prometheus metrics tile. On the Hosted Prometheus metrics page, select From my local Prometheus server in section 1:
Figure 3 - Choose a method for forwarding metrics
In section 2, select Send metrics from a single Prometheus instance:
Figure 4 - Send metrics from a single Prometheus instance
Next, create a token for the Prometheus server in section 3. First give your token a name; this example uses ch-to-prometheus-at-grafana:
Figure 5 - Defining a token name for the hosted Prometheus server
With the token name defined, click the button. You’ll see something like this:
Figure 6 - Creating a token for the hosted Prometheus server
Grafana Cloud generates YAML that should go into the Prometheus configuration. Fortunately for us, the Altinity Cloud Manager (ACM) makes it easy to configure the connection between our Altinity.Cloud environment and the external Prometheus server. As you probably guessed, we need three values from the YAML snippet above: The url field and the username and password fields in the basic_auth section. The other value we need is the name of the Grafana data source for our new Prometheus server. That data source will be named grafana-[accountname]-prom. For our example, that’s grafana-dougtidwell-prom.
Now it’s time to configure our Altinity.Cloud environment.
Configuring an external Prometheus server for an Altinity.Cloud environment
To connect your environment to an external Prometheus server, go to the list of environments in the ACM and click the vertical dots icon and select Edit from the menu:
Figure 7 - The Edit Environment menu
In the Environment Configuration dialog, go to the Metrics tab and fill in the details of your external Prometheus server in the External Prometheus section:
Figure 8 - Configuring an external Prometheus server in the Metrics tab of the Environment Configuration dialog
Click OK to save the new configuration. Now the ACM will start sending metrics to your Prometheus server.
Our example here uses the Grafana Cloud Prometheus service, but the same procedure applies no matter what external Prometheus service your environment is using.
That’s one way to create a connection between your Altinity.Cloud environment and an external Prometheus server. We’ve told our environment to push metrics data elsewhere. The other way is to configure an external Prometheus server to pull metrics from our environment (scrape metrics is the Prometheus term). We’ll take a quick look at that before actually exploring our metrics data.
Allowing an external Prometheus server to scrape metrics from your environment
To let an external server scrape your ClickHouse® clusters for metrics, you need to give that external server access to your environment. Currently the best way to do this is to contact support, who can take you through the process.
Whether metrics from our Altinity.Cloud environment are being sent to a Prometheus server or a Prometheus server is scraping metrics from our environment, we want to explore that data. Grafana Cloud makes it easy to do that; we need to explore the Prometheus data source (grafana-dougtidwell-prom in our example).
Note: We’re using a Prometheus service hosted by Grafana Cloud here. For other Prometheus providers, you’ll need to know the address of the server, its credentials, and how to use the PromQL language to query your metrics. We’ll do things the easy way here.
Click the Grafana menu in the upper left corner, then select the Metrics menu:
Figure 9 - The Metrics menu item
The Metrics page lets you look at the metrics from your Altinity.Cloud environment without writing PromQL queries. Click the button to explore a new set of metrics. When you do, you’ll see a list of all your Prometheus data sources:
Figure 10 - The available Prometheus data sources
We’ll select the grafanacloud-dougtidwell-prom server. A very long page of visualizations will appear:
Figure 11 - Prometheus metrics with no labels selected
Every metric sent to the Prometheus server has one or more labels attached to it. We can filter what we see by selecting one or more labels. Click the button to add a label to the query. When you click the button, you’ll see a dropdown list of labels from all the metrics sent to this server:
Figure 12 - List of labels in the metrics data
With a label selected, you’ll get a dropdown list of all the values for that label:
Figure 13 - List of values for a label
(The Altinity.Cloud environment we’re using here contains ClickHouse clusters named maddie-na and testms.)
The page is filtered to show only visualizations of data tagged with the label and value you selected. In this example, that means everything with a label of clickhouse_altinity_com_chi and a value of maddie-na:
Figure 14 - A filtered set of visualizations
Each visualization is labeled with the name of the metric itself. Clicking the icon displays the datatype of the value:
Figure 15 - Click the icon to see a metric’s datatype
1.5.3.4 - Integrating Loki
Connecting Loki to your Altinity.Cloud environment
An open-source project of Grafana Labs, Loki is a log aggregation system designed to store and query logs from all your applications and infrastructure. You can use the Altinity Cloud Manager (ACM) to connect your Altinity.Cloud environment to an external Loki server.
Setting up an external Loki server with Grafana Cloud
As an example, we’ll look at setting up an external Loki server with Grafana Cloud. What we’ll do here can be done with a free Grafana Cloud account, although users with substantial log data can upgrade to a paid account easily. And of course, there are other services that offer a Loki server, but we’ll stay with the creators of Loki.
Typically using an external Loki server means using the promtail agent to send the contents of our local ClickHouse® logs to a Loki server. Fortunately, promtail is deployed by Altinity.Cloud in the altinity-cloud-system namespace:
With the logging infrastructure set up inside the ACM, it’s time to set up the Loki server in Grafana Cloud. Log in to your Grafana Cloud account (if you don’t have one already, create a free one). Click the Grafana menu in the upper left corner, then select the Connections menu:
Figure 1 - The Connections menu
On the Add new connection page, enter hosted logs as the connection type. You’ll see the tile for Hosted Loki:
Figure 2 - Select Hosted Loki
Click the Hosted logs tile. On the Hosted logs page, select Send logs from a standalone host in section 1:
Figure 3 - Choose where logs are coming from
Next, create a token for the Loki server in section 2. First, give your token a name; this example uses ch-to-loki-at-grafana:
Figure 4 - Naming the token
With the token name defined, click the button. You’ll see something like this:
Figure 5 - Creating a token for the hosted Loki server
Grafana generates a YAML file to configure promtail. Except you don’t have to configure promtail: the ACM has already done that. The one piece of information you need from the YAML file is the value of the URL as highlighted in Figure 7 above. Enter that value in the External Loki URL field of the Logs tab of the Environment Configuration dialog. (See Figure 7 below.) Once the URL is defined in the ACM, promtail is automatically configured.
Now it’s time to configure our external Loki server in the ACM.
Configuring an external Loki server
Integrating Loki with your ClickHouse clusters is done at the environment level in the ACM. To connect your environment to an external Loki server, go to the list of environments in the ACM and click the vertical dots icon and select Edit from the menu:
Figure 6 - The Edit Environment menu
In the Environment Configuration dialog, go to the Logs tab:
Figure 7 - The Logs tab in the Environment Configuration dialog
In the External Loki URL field, enter the URL of your external Loki server in the format https://username:password@lokiurl.com/api/prom/push. The URL, username, and password come from the YAML file generated by Grafana Cloud above. You need to include your username and password as part of the URL, and use the endpoint /api/prom/push to access the Loki API.
A note about the Logs Bucket and Logs Region fields: These let you define the name of the bucket where your Loki logs should be stored and the region where the bucket is hosted. The bucket is used internally by the ACM; it’s not accessible by users. In addition, this setting is only used for Bring Your Own Kubernetes (BYOK) environments. For Bring Your Own Cloud (BYOC) environments, the bucket is configured automatically and these fields are disabled.
Click OK to save your updated configuration. Loki log entries are now being sent to your external Loki server.
Checking your external Loki server
Now that we have the ClickHouse clusters in our Altinity.Cloud environment sending data to the external Loki server at Grafana Cloud, we’ll take a look at that Loki data as a Grafana data source. Switch back to your Grafana Cloud account and click the Grafana menu in the upper left corner. Click on Data sources:
Figure 8 - The Data Sources menu
When the list of data sources appears, you’ll see a tile for each data source. One or more of them will have the Loki logo.
Figure 9 - A Loki data source
The Loki data source we want will be named grafana-[accountname]-logs. Click the button to open the data source.
Exploring the data in the Loki server
After opening the data source, you’ll see the data source explorer:
Figure 10 - The successful connection to the Loki data source
Log messages in Loki consist of a timestamp, some number of labels (name/value pairs), and the text of the message. Click the Label browser button to see the labels available on your Loki server:
Figure 11 - The label browser
Here we’ve selected a couple of labels: namespace and pod. When selecting a label in section 1, the display in section 2 displays the available values for each label. Furthermore, as you select specific values in section 2, the available values under the other labels change. As an example, clicking on the value altinity-maddie-na under the label namespace removes all of the values under the pod label except for clickhouse-operator-7778d7cfb6-9q8ml. Selecting those two values changes the selector in section 3 to match:
To see the logs that match this selector, click the button. You’ll see all the matching messages from the Loki server:
Figure 12 - The log entries matching the selector
The display also includes a graph of how many log messages have been issued over time:
Figure 13 - The volume of log entries over time
In this case the volume of entries has been consistent; if an incident of some kind had happened, there would likely have been a spike in the volume of entries at that point.
It’s straightforward at this point to add data from the Loki service to your Grafana dashboards, including panels that display the log messages themselves and panels that display metric queries based on Loki's built-in aggregation functions. Examples of aggregation functions include rate(), which returns the number of entries per second, and count_over_time(), which counts the number of entries for a given time period.
1.5.3.5 - Replicating Altinity.Cloud backups to S3
Configuring external S3 buckets for Altinity.Cloud backups
You can use external S3 buckets to store replicas of Altinity.Cloud backups of your ClickHouse® data. To configure them, you’ll need to contact us to get an Amazon ARN (Amazon Resource Name) that identifies the S3 bucket you’ll use.
Here are the steps to set everything up:
Create the S3 bucket you want to use.
Contact Altinity support and give us the bucket name. Support will use that bucket name to create the ARN.
Set the ARN and bucket name in the following JSON, then use kubectl to apply it:
This page lets you generate Altinity Cloud Manager API keys for your account. The API keys have the same access and privileges as your account. By default, each key is set to expire in 24 hours, although you can adjust the expiration time. (Be aware that the time is always in GMT.)
In Figure 1 below, there are two keys for this account:
Figure 1 - Altinity Cloud Manager API keys for this account
In the API Keys section, working with keys is straightforward:
Use the button to add an Altinity.Cloud API key.
Use the copy icon to copy a key to the clipboard. Be aware that the API key may be too wide to display completely, so clicking the copy icon is more reliable than highlighting and copying the text directly.
Use the calendar icon to change the expiration time of the key.
Finally, use the trash can icon to delete a key.
The Allow Domains section let you restrict API calls to specific domains. This provides enhanced security by allowing API connections only from certain IP addresses. To specify multiple domains, separate them by commas or put each one on a separate line.
The Anywhere API Access tab lets you generate a new API token. The current API token, if there is one, won’t be displayed when you go to the tab:
Figure 2 - The Anywhere API Access tab
Be aware that an account can have only one Altinity.Cloud Anywhere API token. Generating a new key disables your existing key.
If you don’t have an API token or you want to create a new one, click the button. Click OK in the confirmation dialog to confirm that you want to create a new key. After creating the token, you’ll see it in an entry field on the screen:
Figure 3 - A newly generated Anywhere API access key
Copy the token and store it somewhere secure; you won’t be able to see it again. (You can copy the key with the icon.)
terraform {
  required_providers {
    altinitycloud = {
      source = "altinity/altinitycloud"
      version = "v0.1.2"
    }
  }
}

provider "altinitycloud" {
  # `api_token` can be omitted if ALTINITYCLOUD_API_TOKEN env var is set.
  api_token = "<TOKEN>"
}
You can also store the value of the API key in the variable ALTINITYCLOUD_API_TOKEN to avoid putting the value in your Terraform script. See the Altinity.Cloud Terraform provider documentation for all the details. (And be sure you’re using the latest version of the Terraform provider.)
The Altinity Cloud Manager API
The Altinity Cloud Manager API lets organizations submit commands to manage their Altinity.Cloud environments and clusters.
To authenticate any request, you can use any unexpired ACM API key (the keys in Figure 1 above, for example) with an HTTP X-Auth-Token header.
NOTE: By default, the Swagger UI only displays methods that don’t require authentication. To see the complete UI, use the /login method to log in:
Figure 4 - The Swagger UI for the /login method
Use the username and password from your Altinity.Cloud account, not your ClickHouse® cluster. Click Execute and the results should include a new authentication token:
Figure 5 - A successful response from the /login method, including an authentication token
You’ll use the authentication token from the response in your future calls to the API.
Once you have logged in through the Swagger UI, refreshing the page displays the complete ACM API, including all the methods that require an authentication token.
Similar to the Swagger UI, the JSON definition of the API only contains methods that don’t require authentication. One way to get the complete API in JSON format is to use curl, replacing <TOKEN> with your authentication token:
curl -X GET "https://acm.altinity.cloud/api/reference.json"\
-H "accept: application/json"\
-H "X-Auth-Token: <TOKEN>"
Example: Launch a cluster
The following example demonstrates how to launch a new cluster in Altinity.Cloud. The endpoint is /environment/{environment}/clusters/launch, where {environment} is the ID of your environment. To get that ID, though, you need to call the /environments endpoint to get a list of all environments and their details, replacing <TOKEN> with your API key:
curl -X GET "https://acm.altinity.cloud/api/environments"\
-H "accept: application/json"\
-H "X-Auth-Token: <TOKEN>"
You’ll get a long, unformatted JSON document with extensive details on every environment. The formatted version looks something like this:
With the environment ID, you’re ready to call the environment/{environment}/clusters/launch endpoint. As you would expect, there are many parameters to the method, corresponding to the fields in the Launch Cluster Wizard.
Our sample cluster will have the following settings:
name (name of the cluster): api-test
adminPass (password for the cluster you’re creating): dougspassword
adminUser (username for the cluster you’re creating): admin
https_port: 8443
instanceType: n2d-standard-2
nodes: 2
replicas: 2
secure: true
shards: 1
size (disk storage per node in GB): 100
tcp_port_secure: 9440
version (the tag for the altinity/clickhouse-server container image): 26.1.6.20001.altinityantalya
zookeeper: launch
zookeeperOptions: {"tag": "", size": "single"}
The following command will launch a new ClickHouse cluster with the specifications above, replacing <ENV_ID> with the ID of your environment and <TOKEN> with your API token:
Working with backups is a crucial part of any analytics infrastructure. There is rich backup and restore functionality built into Altinity.Cloud, but some features cannot be directly accessed by users. We’ll look at how to create backups, then we’ll talk about some scenarios for restoring clusters (or individual tables) from backups.
Creating backups
There are a couple of ways of backing up your ClickHouse® clusters:
Creating a backup manually - You can create a backup of a single ClickHouse cluster. This is done from the Clusters view in the Altinity Cloud Manager. Click the ACTIONS menu and select Create Backup to get started. See the page Creating a Cluster Backup in the User Guide for all the details.
Creating backups on a schedule - You can do that for a single ClickHouse cluster or for all the clusters in the environment:
If you’re an administrator of your Altinity.Cloud environment, you can define a backup schedule to back up all the ClickHouse clusters in your environment. All the details are on the Configuring Backups page in the Configuring your Environment section of the Administrator Guide.
To define a schedule for an individual cluster, to go the Clusters view in the Altinity Cloud Manager and click the Backup Settings item in the CONFIGURE menu. See Configuring Backup Settings in the User Guide for the details. NOTE: The backup schedule for an individual cluster overrides any schedule set at the environment level.
Restoring backups - use cases
Please contact Altinity support if you need to restore a backup. The response time for urgent requests is under 4 hours on the Enterprise Support plan, but usually we respond faster.
The most common use cases you’ll encounter are:
Partial data corruption in the table - it is possible to restore the table in the following ways:
Accidental drop cluster - Difficult to do, but the cluster can be fully restored, preserving its configuration. Contact Altinity Support.
Restoring a backup for testing purposes (for testing upgrades, hardware etc.) Contact Altinity Support. Possible use cases include:
Restoring a single database to a separate database of an existing cluster
Restoring a cluster into a new cluster
Restoring a cluster into a new cluster in different region or environment - Contact Altinity Support.
Restoring backups - common tasks
When you’re restoring data from backups, there are several common tasks you’re likely to do, all of which are covered in the following pages:
1.5.5.1 - The Cluster Restore Wizard
The easy way to restore from a backup
The Cluster Restore Wizard lets you restore a cluster from a backup. To restore a backup, begin by selecting Restore a Backup on the ACTIONS menu for your cluster.
WARNING: FOR ADVANCED USERS ONLY.
We’ll go through all the steps and options next, but if you’re looking for help on a particular section of the wizard, you can skip ahead to any of the tabs:
The first step is to specify the location of the backup you’re restoring.
Option 1A - Backup is in Altinity.Cloud
The simplest case is a backup stored in your Altinity.Cloud environment:
Figure 1 - Backup is in Altinity.Cloud
Field details
Source Environment
The name of the Altinity.Cloud environment that holds the backup. Click the down arrow to see a list of all of your environments.
Click NEXT to continue.
Option 1B - Backup is in your AWS account
Another alternative, of course, is that the backup is stored in your AWS or GCP account. The details you need to provide are different in each case, as you would expect. You’ll see this panel if your backup is at AWS:
Figure 2 - Backup is in AWS
Field details
Access Key
The access key for your AWS account.
Secret Key
The secret key for your AWS account.
Region
The AWS region where your backup is stored.
Bucket
The name of the bucket where your backup is stored.
ACM-Compatible Folder Structure
Check this box if the backup was created by ACM or if you know the backup has a fully ACM-compatible structure.
Click NEXT to continue.
NOTE: When you click NEXT, the ACM takes your credentials and attempts to access the bucket you named in the region you selected. If that fails, you’ll get an error message with details on what went wrong:
Figure 3 - Invalid AWS bucket name or credentials
You’ll have to fix the error before you can continue.
Option 1C - Backup is in your GCP account
Finally, if you’re on GCP, you’ll see this instead:
Figure 4 - Backup is in GCP
Field details
Credentials JSON
JSON data that contains credentials associated with a GCP service account. That service account can have access to your entire GCP project, or it may be restricted to a single bucket or even a single folder within a single bucket. See the Google Cloud documentation for details:
The name of the bucket where your backup is stored.
ACM-Compatible Folder Structure
Check this box if the backup was created by ACM or if you know the backup has a fully ACM-compatible structure.
Click NEXT to continue.
NOTE: When you click NEXT, the ACM takes the credentials JSON you entered and attempts to access the bucket you named in the region you selected. If that fails, you’ll get an error message:
Figure 5 - Error message connecting to GCP
You’ll have to fix the error before you can continue.
2. Source Cluster tab
Next we need to select the source cluster for the backup we’re restoring:
Figure 6 - Selecting a source cluster
The available backups are listed in the Cluster column. The Namespace is the Kubernetes namespace that contains your ClickHouse installation. Finally, a checkmark indicates that the backup includes cluster configuration information.
Select a cluster and click NEXT to continue.
3. Source Backup tab
Once you’ve selected a cluster to restore, you’ll see a list of all of the backups for that cluster:
Figure 7 - Selecting a backup for the selected cluster
Select a backup and click NEXT to continue.
4. Tables tab
At this point you’ve specified where the backup is stored, selected the cluster you want to restore, and selected the particular backup of that cluster you want to restore. Next, you need to decide which tables you want to restore.
Option 4A - Restore all tables
You can restore all tables or some tables. When specifying which tables to restore, you can filter on the table name and the table’s engine.
The simplest option, of course, is to restore all tables by not using any filters at all:
Figure 8 - Restoring all tables
Click NEXT to continue.
Option 4B - Restore some tables
You can specify patterns for the table names and engine types you want to include or exclude:
Figure 9 - Restoring some tables
Separate multiple table or engine patterns with commas.
Patterns can contain splat [*] and question mark [?] wildcards:
The splat matches any sequence of characters before or after a separator. For example, default.maddie* matches all tables in the default database that start with maddie.
The question mark matches a single character. For example, db.??_table matches db.ab_table and db.cd_table.
In addition, you can combine table patterns and engine patterns. Figure 9 above excludes any tables with the Kafka engine.
Click NEXT to continue.
5. Destination Cluster tab
The final step is to specify where to put the restored cluster.
Option 5A - Launch in a new cluster
One option is to simply launch a new cluster:
Figure 10 - Restoring to a new cluster
Enter a name for the destination cluster.
NOTE: If you choose to launch a new cluster, at the end of the Cluster Restore Wizard you’ll be taken to the Launch Cluster Wizard to define all the details of the new cluster.
Click NEXT to continue.
Option 5B - Launch a new cluster based on a source cluster
Another possibility is to use the configuration and settings of the source cluster to create a new cluster:
Figure 11 - Restore to a new cluster based on a source cluster
There are some settings you can change, such as the version of ClickHouse the new cluster should run or how much storage the new cluster should have. Beyond the fields shown on this tab, everything else will be the same.
Field details
Name
The name of the restored cluster.
ClickHouse Version
Select the version of ClickHouse you want your cluster to use. Click the down arrow icon to see a list of available versions. ALTINITY BUILDS is selected by default; that lets you choose which Altinity Stable Build you want to use. You can also click UPSTREAM BUILDS to see other versions of ClickHouse.
Beneath the ClickHouse version is a link to the release notes for the build you’ve selected. The release notes have extensive details of what is new and changed and fixed in each release. Click the link to open the release notes in a new browser tab.
Use Private Image Registry
Click this box if you want to use the private image registry you configured in your Environment.
Node Type
Click the down arrow to see what machine types are available. Each item in the list will tell you how many CPUs and how much RAM that machine type has.
Volume Type
Click the down arrow to see what classes of storage are available for your restored ClickHouse cluster.
Node Storage
The amount of storage in GB that each node in the restored cluster will have.
Number of Volumes
The number of storage volumes your restored cluster will have.
Click NEXT to continue.
Option 5C - Launch in an existing cluster
The third option is to restore the backup into an existing cluster:
Figure 12 - Restore to an existing cluster
Click the down arrow icon to select a cluster from the list of available clusters. You also have the option to not download the data part if it already exists on the node. Click NEXT to continue.
6. Review and Confirm tab
The Review and Confirm tab lets you go over the choices you’ve made before restoring the cluster:
Figure 13 - Cluster Restore Wizard summary panel
If everything looks good, click CONTINUE.
If you selected Launch a new Cluster on the Destination Cluster tab (option 5A), you’ll be taken to the Launch Cluster Wizard to specify all of the configuration details and settings for the new cluster. When you’ve completed the Launch Cluster Wizard, the ACM will create the new cluster and restore the backup to it.
If you selected anything else on the Destination Cluster tab, the ACM will start restoring the cluster. As you would expect, this may take several minutes. When the cluster is restored, you’ll get an alert at the top of the ACM UI:
Figure 14 - Cluster restored confirmation message
1.5.5.2 - Restoring an Individual Table
When you don’t need to restore everything
In addition to the cluster-level backup and restore features, you can restore an individual table to an existing database or a different database. To get started, click the EXPLORE button in the Clusters view:
Figure 1 – The EXPLORE button
In the Explorer view, switch to the Schema tab:
Figure 2 – The Schema tab
Click the vertical dots icon next to the table you want to restore and select Restore from Backup:
Figure 3 – The Restore from Backup menu item
Select the backup you want to restore from. By default, the table will be restored from the selected backup into the same database.
NOTE: If you’re restoring a table to the same database, the table is first removed from the database. Once the table is removed, it is restored from the selected backup.
Figure 4 – Restoring the table to the same database
You also have the option of restoring the table from the selected backup to a different database. Select the Different database radio button, then enter the name of the other database:
Figure 5 – Restoring the table to a different database
When you’re ready to restore the table, click CONFIRM. When the table is restored, you’ll see a message in the ACM:
Figure 6 - Table restored success message
1.5.5.3 - Cloning a Database
Making a copy (not a replica) of a ClickHouse® database
Cloning a database creates a copy of that database inside the same ClickHouse cluster. This can be useful for testing applications against realistic data.
NOTE: This operation creates a clone of the database, not a replica. Any changes to the original database will not be reflected in the clone, and any changes to the clone will not be reflected in the original database.
To get started, click the EXPLORE button in the Clusters view:
Figure 1 – The EXPLORE button
In the Explorer view, switch to the Schema tab:
Figure 2 – The Schema tab
Click the vertical dots icon next to the table you want to clone and select Clone Database:
Figure 3 – The Clone Database menu item
You’ll be asked for a database name for the clone. The database name for the clone must begin with an upper- or lowercase letter or an underscore. It can contain letters, numbers, and underscores:
weather2024 - Valid
2024weather - Not valid - names must start with a letter
or underscore
Weather_2024 - Valid
WEATHER_2024 - Valid
wEaThEr_2024 - Valid
WEATHER-2024 - Not valid - only letters, numbers, and
underscores are allowed
_WEATHER_2024 - Valid - names must start with a letter
or underscore
Figure 4 - Clone database dialog
If the name you enter isn’t valid, you’ll see this message:
Figure 5 - Database name error message
Click CONFIRM to clone the database. The cloned database and its tables will show up in the display after a few minutes.
1.5.5.4 - Converting a Table's Engine to ReplicatedMergeTree
Adding replication support to a table
To support replication, you can convert a table’s engine from MergeTree to ReplicatedMergeTree. (A table with a MergeTree engine can’t be replicated.)
To get started, click the EXPLORE button in the Clusters view:
Figure 1 – The EXPLORE button
In the Explorer view, switch to the Schema tab:
Figure 2 – The Schema tab
Click the vertical dots icon next to the table whose engine you want to change and select Convert to ReplicatedMergeTree:
Figure 3 – The Convert to ReplicatedMergeTree menu item
As you would expect, this menu item is only available if a table’s engine is MergeTree.
When you click the menu item, you’ll see a confirmation message:
Click OK to start the conversion. The database engine will display in yellow while the conversion is in progress:
Figure 5 - Conversion to ReplicatedMergeTree in progress
1.5.6 - Working with Object Disks
Using object storage and block storage
ClickHouse® works best with block storage, but in some cases it makes sense to add object storage as well. (Keeping rarely accessed data forever, for example.) ClickHouse itself supports S3, GCS, and Azure Blob storage.
Configuring object disks automatically through the ACM
From the Cluster view, click the Storage menu item to manage object storage for a cluster:
Figure 1 - The Storage menu for a cluster
In the Storage dialog, the ADD OBJECT STORAGE button is currently disabled:
Figure 2 - Adding object storage through the ACM is currently disabled
At present, we recommend that you contact Altinity support if you need object storage. You can allocate object disks by hand, however; read on…
Managing object disks manually: Configuring an S3 bucket for Altinity.Cloud
Once you’ve defined an S3 bucket, there are several configuration tasks you may need to do, including defining policies, setting up credentials, and configuring versioning and soft deletes. We’ll cover those here.
To get started, go to the Cluster view and click the Settings item on the CONFIGURE menu:
Figure 3 - The Settings menu for a cluster
Defining AWS credentials in environment variables
To work with S3 buckets in your AWS account, you’ll need to define your credentials for those buckets. On the Settings page in the ACM, click the Environment Variables tab at the top of the page and define the variables AWS_ACCESS_KEY_ID and AWS_SECRET_ACCESS_KEY:
With your AWS credentials defined, you need to add a configuration file to the config.d directory. Click the Server Settings tab at the top of the page and add a new Setting. You’ll see this dialog:
Figure 5 - Configuring an S3 bucket for object disks
In Figure 5 above, the configuration file is named s3_disk.xml, the region is us-east-1 and the bucket name is object-disk-01. In general, the contents should look something like this:
<clickhouse><storage_configuration><disks><s3><type>s3</type><endpoint>http://s3.REGION.amazonaws.com/BUCKET/clickhouse/{cluster}/{replica}</endpoint><region>REGION</region><access_key_idfrom_env="AWS_ACCESS_KEY_ID"/><secret_access_keyfrom_env="AWS_SECRET_ACCESS_KEY"/><skip_access_check>true</skip_access_check></s3><s3_cache><type>cache</type><disk>s3</disk><path>/var/lib/clickhouse/disks/s3_cache/</path><max_size>20Gi</max_size><cache_on_write_operations>1</cache_on_write_operations></s3_cache></disks><policies><s3><volumes><s3><disk>s3_cache</disk></s3></volumes></s3><tiered><volumes><default><disk>default</disk><volume_priority>1</volume_priority></default><s3><disk>s3_cache</disk><perform_ttl_move_on_insert>0</perform_ttl_move_on_insert><volume_priority>2</volume_priority></s3></volumes><move_factor>0.001</move_factor></tiered></policies></storage_configuration><!-- From 24.3 onwards --><merge_tree><force_read_through_cache_for_merges>1</force_read_through_cache_for_merges></merge_tree></clickhouse>
Obviously you’ll need to replace REGION with the appropriate region in the endpoint and region elements and specify the BUCKET name in the endpoint element. ClickHouse will insert the correct values for {cluster} and {replica}.
The feature flag for write-through caching is turned on with cache_on_write_operations set to 1, but this does not enable write-through caching, it merely makes it possible. To actually enable write-through caching, set the enable_filesystem_cache_on_write_operations and enable_filesystem_cache_log flags in the default profile:
<profiles><default><!-- To enable write-through caching for INSERTs/MERGEs,
put these elements in the default profile: --><enable_filesystem_cache_on_write_operations>1</enable_filesystem_cache_on_write_operations><enable_filesystem_cache_log>1<enable_filesystem_cache_log></default></profiles>
You should always explicitly set the volume_priority in your storage policies. Without this value, ClickHouse assigns priorities based on lexicographical order. In the example above, default will come before s3_cache. That’s what we want, but if we used ssd instead of default, the system’s priorities would be the opposite of what we want.
Starting with version 24.3, the force_read_through_cache_for_merges setting has been moved to the <merge_tree> element. You need to enable this setting to enable write-through cache for merges.
After defining the environment variables and the configuration file, the ACM will create the following in ClickHouse:
A disk named s3 in a particular S3 bucket
A disk named s3_cache that is used as a write-through cache for the s3 disk
A storage policy named s3 that says the disk named s3 uses s3_cache
A storage policy named tiered that uses the default disk and s3_cache. The perform_ttl_move_on_insert and move_factor elements define how tiered storage works. See the ClickHouse documentation on storage policies for all the details on those values.
Note that in the example above, the tiered storage policy has to be applied to each table explicitly. As an alternative, you can make this the default storage policy:
<policies><default><volumes><!-- 'default' volume contains 1 or more disk and will be merged from a standard config –>
<s3>
<disk>s3_cached</disk>
<perform_ttl_move_on_insert>0</perform_ttl_move_on_insert>
</s3>
</volumes>
<move_factor>0.001</move_factor>
</default>
</policies>
After your ClickHouse server is restarted, you can validate your configuration with these queries against the system database:
Once an object storage disk is configured, you may use it to set up TTLs.
First, make sure that table storage policy contains an S3 disk. If the tiered policy has been added, then existing tables that need to be on S3 need to be modified:
If the table is big, it may trigger a lot of work since ClickHouse will start to evaluate what needs to be moved and perform actual moves. The Altinity Knowledge Base has an article on MODIFY / ADD TTL logic and how to control this behavior.
You may also move a single table partition to S3 without adding a TTL:
The Altinity Cloud Manager has a number of features that make it easy for any user with billing access to track spending, estimate your upcoming spending, and manage payment methods and other details. In addition, we also provide a list of tips to help keep your costs under control.
1.5.7.1 - Managing your bill
How to track expenses, estimate upcoming costs, and pay invoices
Accounts with the role orgadmin are able to access the Billing page for their organizations. To access it, click on your account name in the upper right corner and select Billing from the menu:
From the billing page, you can see the Usage Summary and Billing Summary for the environments connected to your account.
Figure 1 - The Billing page, including the Usage Summary and Billing Summary
Usage Summary
The Usage Summary displays, among other things, the following for the current period:
Current Spend: The value of charges for Altinity.Cloud services to this point in the current billing period.
Avg. Daily Spend: The average cost of Altinity.Cloud services per day.
Est. Monthly BIll: The total estimated cost for the current billing period. The estimate includes your costs so far (Current Spend) plus what your charges will be if your current level of usage continues until the end of the billing period.
Cost per Day: A graph of your costs per day, allowing you to see spikes in usage.
You can also click the dropdown menus next to Usage for Period: and Environment: to look at historical usage data.
Billing Summary
The Billing Summary section displays the payment method, service address, and email address used for billing purposes.
You can click the button to change your payment method::
Figure 2 - The Payment Method dialog
The payment methods are:
Payment against invoice (with prepayments): Prepay your charges and Altinity will invoice you against that prepayment.
Payment against invoice (monthly invoice): Altinity will invoice you for your charges each month.
Payment with Amazon Marketplace Account: Subscribe to Altinity.Cloud through the AWS Marketplace. Your Altinity charges are paid through your AWS account.(See the AWS Marketplace documentation for all the details.)
Payment with Google Marketplace Account: Subscribe to Altinity.Cloud through the GCP Marketplace. Your Altinity charges are paid through your GCP account.(See the GCP Marketplace documentation for all the details.)
Payment by credit card: Enter your credit card, expiry date, and CVV number. Altinity will bill that card for your charges each month.
You can click the button to update your address:
Figure 3 - The Billing Address dialog
All fields with a * red asterisk are required.
1.5.7.2 - Ways to Save on your Altinity.Cloud bill
Keeping your costs in line
Your applications are up and running and your business is growing robustly. That’s great, but you want to make sure you keep your costs reasonable as your storage and compute needs grow. Altinity.Cloud has a lot of options and controls that can be used. Here’s a list of them.
Understanding Your Bill
Your Altinity.Cloud Bill is available on the Billing page. Once opened, you’ll see the Usage Summary at the top:
Figure 1 - The billing summary
You can also drill down to specific clusters or environments, but at a high level the summary gives you an understanding of where you spend money.
The are three major line items:
Support is based on the number of ClickHouse nodes.
Compute is based on the number of vCPUs.
Storage (both data and backup) is based on the data volume, and billed only for environments in the Altinity account.
(There’s also the obvious approach of prepaying your bill, which can give you a discount of up to 30%, We cover that later.)
Addressing any of these can reduce your bill. Let’s get started!
Compute Costs Optimization
Compute instances are the biggest part of the bill for many Altinity.Cloud users. There are several ways to reduce the cost.
1. Make sure you are not overprovisioned
Altinity.Cloud has built in monitoring that helps to understand system workload. Check the load average of your ClickHouse nodes. It should be close to the number of vCPUs of the corresponding node type. If it often goes above this level – your nodes are overloaded, if it is below half of vCPUs most of the time – your nodes are underloaded and can be scaled down.
Sometimes schema and query optimization helps to reduce the load. Check query statistics on the Workload tab of the Cluster Explorer in order to understand queries that take use the most CPU.
2. Pick the right instance type
Altinity.Cloud runs in multiple cloud providers and comes with predefined node types for ClickHouse that are suited well for general workloads. However, it is often possible to pick node types that work better and more efficiently for the particular application.
AWS gives you the most flexibility. Gravitons are processors produced by Amazon specifically for AWS. Graviton 2 was the first to work well with ClickHouse starting in 2020. It is 20% cheaper than corresponding Intel m6i instances but slower. Graviton 3 was a big step forward in terms of performance, but the 20% faster/cheaper ratio compared to Intel m7i ones persisted (see the Tournament of AWS CPUs we did a while back). Graviton 4 is the best so far, and m8g/r8g is on par with other node types. So consider the newest Graviton based instances – it will cut compute cost with insignificant performance degradation.
Another possibility is to use compute nodes with more RAM for one CPU core. By default, Altinity.Cloud nodes have 4 GB of RAM per core. Sometimes you need more RAM but fewer vCPUs. Both GCP and AWS have such options, and it may significantly reduce your costs. For example, moving from 8 vCPU 32 GB m7g.2xlarge instance to r7g.xlarge with the same amount of RAM but 4vCPUs would almost halve your compute bill!
3. Use Activity Schedule
Sometimes you do not need the maximum performance all the time. Altinity.Cloud allows you to configure an Activity Schedule. You may define when your ClickHouse cluster is scaled up and down, or even paused completely. It especially makes sense for development or staging systems that do not need to run all the time.
For example, you may configure the staging cluster to run from 7AM to 23PM on workdays, and be paused on weekends. That will save 5*8 + 2*24 = 88 hours per week, that is more than 50% of the hours in a week!
The Activity Schedule also applies to support. There is no support charge for inactive clusters obviously. Note that you do still pay for storage–you would not want to lose that.
Storage Cost Optimization
ClickHouse is very fast at scanning big volumes of data and it quickly develops a habit to store everything. In Altinity.Cloud it is easy to scale storage up, but it is harder to scale it down. So be careful with scaling, since it may result in big bills for storage. Below are some recipes in order to reduce data size.
Make sure you store only the data you need. Altinity.Cloud has some tools to help with that. The Unused Tables section of our DBA Tools lets you find tables that have not been queried for a given period of time. Also check if there are any system tables that grow big – sometimes ClickHouse writes too much. The System Tables section makes it easy to truncate system tables or set a TTL to make sure those are cleaned automatically.
TTL rules can also be set on your application tables.
5. Use codecs and compression
Using column codecs and compression may dramatically reduce the data size and thus allow you to keep more data without the need to increase storage.
Altinity.Cloud uses LZ4 compression for all data by default. LZ4 is the fastest for both writes and reads, but it does not compress as well as ZSTD or some specialized codecs. So the easiest way to compress data more efficiently is to enable ZSTD compression server wide. It can be done by adding a server configuration file like config.d/compression.xml:
This change only applies to new and merged data; old data needs to be explicitly recompressed.
You may also configure TTL Recompress rules for specific tables. See the TTL Recompress example in the Altinity Knowledge Base for details.
Finally you may configure column codecs. This may require quite a lot of work and experimentation, but at the end of the day it lets you get more efficient compression without cost compromises. For examples, check out the Codecs section of the Altinity Knowledge Base.
Keep in mind that you pay for more efficient compression with CPU cycles, especially on write. So when adjusting codes and compression, always re-check performance of queries and CPU metrics.
6. Use Object Storage as a Tier
Object Storage in ClickHouse was introduced back in 2020. Since then Altinity has put a lot of development effort into making it a production-ready storage option for any ClickHouse user, leading a community project to fix some limitations.
Still, object storage is a viable tiered storage option for advanced users today, see the instructions for working with object disks to learn how to configure them for a ClickHouse cluster.
7. Make a flexible backup schedule
Altinity.Cloud stores 7 daily backups by default. While backups are stored on non-expensive object storage, it may be a substantial amount for big clusters. In order to reduce backup costs, users may configure different schedules and retention. For example, if one configures 2 daily backups and 2 weekly ones, that would reduce backup storage costs more than twice compared to the default. Also in AWS, backups that are stored longer than 15 days are automatically switched to Infrequent Access S3 storage class that costs less.
Deployment Optimization
Altinity.Cloud gives users an option to choose from multiple deployment options, those having different price points.
8. Deploy BYOC
One of the ways to use Altinity.Cloud is Bring Your Own Cloud (BYOC). With this option, ClickHouse and infrastructure are deployed in your account. You not only own your data in this case. You can also control costs on your own by deploying reserved instances, savings plans, and credits, thus reducing cloud costs. In return, you pay a management fee to Altinity. Most importantly the BYOC fee is only based on compute usage. It does not include storage.
9. Use a Low-cost Cloud Provider
AWS, GCP, and Azure are the best known but not the only available cloud options. Altinity.Cloud can also run in Hetzner, reducing operational costs 2-3 times compared to major cloud vendors. Hetzner is somewhat bare-bones compared to the rich array of services offered by the major public cloud, but if you just need compute and storage, Hetzner may be a good option with a low price tag.
Billing Optimization
Finally, Altinity.Cloud provides several options to optimize billing itself. Let us name two of them.
10. Pay via Marketplace
Altinity.Cloud is available both on AWS and GCP marketplaces. Marketplace subscriptions are used for billing services only. But it has certain advantages. For example, all spends via marketplaces accumulate to user’s account spends thus allowing to claim private pricing agreements (PPA) and so on. If there are any credits those can be used to pay for Altinity.Cloud as well. It is a good option for startups. You may check with your cloud provider account manager for details. For more information, see our documentation on running Altinity.Cloud in the AWS Marketplace or the GCP Marketplace .
11. Prepay for discounts
We do not discover America here, We’ll state the obvious here: if you pay in advance, there is always a discount. It can be a discount on the bill amount in whole, or a discount on compute only if prepayment is used to buy a savings plan. Please reach out to our sales team for various options.
More to come!
Cost optimization is a key focus for many Altinity.Cloud users. We’re constantly working on improvements to deliver better cost/performance for ClickHouse. One of our biggest areas of investment is better support for shared object storage. We’ll be announcing major improvements in this area soon. Check with us if you want a preview now.
A 12th way to save
Altinity.Cloud flexibility lets you find a workable solution for every user, small or big. We have explained 11 ways to reduce your Altinity.Cloud bill. But there is one more. We work as a team with our users to make everybody successful. So the last way is the easiest. Talk to our excellent support engineers or your customer success rep if you need advice on how to bend cost curves and use Altinity.Cloud more efficiently. There are multiple ways to cut costs specific to particular applications. Let us help you find them!
1.6 - Security Guide
How to keep your account and your data secure
Your data is vital to your business, which means data security is vital to your business. This section features our collected wisdom and best practices to keep your data safe, private, and secure.
1.6.1 - Best Practices
What we’ve learned about keeping your ClickHouse® clusters and data secure
We’ll look at security from three perspectives here, all of which are essential:
The documentation covers specific topics that relate to security. They are referenced throughout this page, but here’s a list if you want to go directly to a particular topic:
Finally, see the Security page in the Altinity Operations Guide for an even more in-depth discussion of security topics.
Securing access to Altinity.Cloud
Your Altinity.Cloud account makes it easy to create and manage your ClickHouse clusters, so securing access to Altinity.Cloud is crucial. There are a few straightforward steps you can take to do this:
Once you’ve set up an external identity provider, it makes sense to disable password logins altogether. This removes the possibility of password leakage. We strongly recommend that anyone using an external identity provider disable password logins, including logins for administrators.
The Login Settings dialog in the ACM has controls to make this easy:
If you use an identity provider, you can set up your Altinity.Cloud account to create a new Altinity.Cloud account for a previously unknown user who authenticated through your identity provider. If you’re an Okta customer, read on; otherwise you’ll need to contact Altinity support to configure Altinity.Cloud for your provider. If you’re curious about the technical details, see the Auth0 integration page.
You can configure automatic user registration as part of the Login settings for your organization. For all the details, see the Synchronizing users with an identity provider section of the Defining login settings page in the Administrator Guide.
Use different roles for different users
Obviously every user should have no more access to your Altinity.Cloud account than they need. See the details of account roles and security tiers to determine the right level of access for each user you create.
In addition, if you use an identity provider, you can define a mapping between roles in your Altinity.Cloud account and roles in your identity provider. (You might map the Okta admin role to the Altinity.Cloud orgadmin role, for example.) Those roles should be mapped to give every user no more access than they need as well. Contact Altinity support to configure how your Altinity.Cloud account works with your identity provider. For all the details, see the Auth0 integration page.
Securing access to your ClickHouse clusters
Altinity.Cloud provides HTTP and TCP access endpoints to your ClickHouse clusters. This traffic is encrypted in transit, and certificates are renewed every three months. If a ClickHouse cluster has sensitive data, you should avoid using a public load balancer. The public load balancer provides a public endpoint for third-party attackers.
There are several ways to secure the endpoints of your ClickHouse clusters:
Use VPC Endpoints (AWS) or Private Service Connect (GCP) endpoints
The best way to secure access to a ClickHouse cluster from within your cloud infrastructure is with a VPC Endpoint (AWS) or a Private Service Connect (GCP). In this scenario, Altinity.Cloud configures an internal load balancer and connectivity between the ClickHouse cluster and your VPC.
When a VPC endpoint is enabled, the public load balancer is automatically turned off, and the cluster view in the ACM displays the VPC endpoint icon:
Altinity.Cloud also supports VPC peering when managing resources in your account. Please contact Altinity support to configure VPC peering.
IP whitelisting
The ACM makes it easy to set up an IP whitelist. You can define one in the Advanced Setup method of the Launch Cluster Wizard (see the Creating a new Cluster page for all the details). You can change it later in the Connection Configuration dialog. IP restrictions are enabled by default, and the default whitelist is simply the IP address from which you’re accessing the ACM. The UI is straightforward:
Figure 3 - Setting IP restrictions
You can enter one or more addresses in CIDR format, separated by commas or newlines.
Looking at the clusters view in the Altinity Cloud Manager, the green lock icon means IP restrictions are enabled, while the red triangle icon means that IP restrictions are not enabled. Mousing over the icons displays a message:
Figure 4 - IP restrictions status
Once your ClickHouse cluster is configured, you can configure the cluster to edit the addresses on the whitelist or disable IP restrictions completely. Complete details are on the Configuring Connections page of the Configuring a Cluster section of the User Guide.
Use Altinity Shield (Beta)
Altinity Shield uses Altinity’s CHGuard as a sidecar proxy to protect your cluster endpoint from DDoS and password enumeration attacks. You can enable it on a per-cluster basis in the Configure Connections dialog:
Figure 5 - Altinity Shield enabled
You can disable it temporarily with the Temporary Bypass slider; that disables the shield without uninstalling it. The cluster view in the ACM displays the shield enabled or or shield bypassed icons:
Figure 6 - Altinity Shield status displayed in the clusters view
Once you’ve secured access to your Altinity.Cloud account and your ClickHouse clusters, there are steps you can take inside ClickHouse itself to protect your data.
The Security page in the Operations Guide has guidelines to secure ClickHouse systems in general, with recommendations for hardening your network, storage, and users. Much of the information in the Operations Guide doesn’t apply to Altinity.Cloud customers because Altinity.Cloud handles network and storage hardening for you automatically. Some of our security features include:
Your ClickHouse clusters are isolated; they’re all in separate Kubernetes clusters.
Your storage is isolated as well, and it users each cloud provider’s encryption features.
TLS is enabled.
VPC endpoints are supported.
Intercluster communications are secured.
For user hardening, you can increase ClickHouse security at the user level with the following techniques:
User configuration: Setup secure default users, roles and permissions through configuration or SQL.
As you would expect, there are links to in-depth documentation throughout.
Disabling password-based logins
Scenario: You want to protect yourself from the security risk of leaked passwords.
The answer: Change your organization’s login settings.
How to do it:
Click the Accounts tab on the left to go to the Accounts page. Click the LOGIN SETTINGS button:
Enable Block password logins and disable Allow password for admins:
See Configuring login settings for complete details. For more information about setting up an identity provider for your Altinity.Cloud account, see our Auth0 page.
Giving someone complete control of all clusters inside certain environments
Scenario: You want a user to be able to create, read, edit, or delete clusters inside the environment(s) you specify. The user is not able to create or delete an environment, however.
The answer: Create a new user with role envadmin.
How to do it:
Click the Accounts tab on the left to go to the Accounts page. Click the + ADD ACCOUNT button:
On the Environment Access tab, select the environments you want. The new user will be able to read or edit any cluster in those environments:
Again, the user will not be able to create or delete environments.
Giving someone access to certain clusters in certain environments
Scenario: You want a user to be able to read, edit, or delete clusters you specify inside the environments you specify. The user can also create new clusters in those environments.
The answer: Create a new user with role envuser.
How to do it:
Click the Accounts tab on the left to go to the Accounts page. Click the + ADD ACCOUNT button:
On the Environment Access tab, select the environments you want. The new user will be able to read, edit, or delete the clusters you select in those environments. They can also create clusters in any of those environments:
On the Cluster Access tab, select the clusters you want. The new user will be able to read, edit, or delete those clusters. The only clusters in the list are the ones in the environments you selected previously:
Giving someone complete access to all environments, including the ability to create or delete them
Scenario: You want a user to be able to do anything with all the environments in your organization, including the ability to create or delete them.
The answer: Create a new user with role orgadmin.
How to do it:
Click the Accounts tab on the left to go to the Accounts page. Click the + ADD ACCOUNT button:
Altinity.Cloud accounts with the role orgadmin are able to create new Altinity.Cloud accounts and associate them with organizations, environments, and one or more clusters depending on their role. (For more information on roles, see Role-Based Access and Security Tiers.)
Users with orgadmin access can manage accounts through the Altinity Cloud Manager. Click the Accounts tab on the left to see the Accounts page:
From the Accounts page, the easiest way to create an account is to click the button. You’ll see the Account Details dialog, which has three tabs (or maybe four):
Basic information about the new account is on the Common Information tab.
Figure 2 - The Common Information tab
Field details
Name
The name of the new account.
Email
The email for the account.
Password
The password for this account. It must be at least 12 characters long, and the two passwords must match. The SAVE button will be disabled until the passwords match and are long enough.
If selected, this account is suspended and no logins will be accepted.
The Environment Access tab
This straightforward tab lets you define which environments are accessible to this account.
Figure 3 - The Environment Access tab
Click the checkboxes for all the environments that should be accessible to this account. The account role determines what actions this account can take with Environments and Clusters.
The Cluster Access tab
This tab only appears if this account has envuser access. This similarly straightforward tab lets you define which clusters are accessible to this account. The only clusters listed here are clusters in the environments you selected on the Environment Access tab.
Figure 4 - The Cluster Access tab
Click the checkboxes for all the clusters that should be accessible to this account. The account will have read, edit, and delete access to the selected clusters.
The API Access tab
Figure 5 - The API Access tab
This tab lets you define the API keys available for this account and the domains allowed to use those keys. Be aware that the API Keys section shown in Figure 5 may not appear for some user roles. For complete details, see the discussion of the API Access tab on the Altinity API Guide page.
Creating an account with the Invite button
Another way to create an account is by inviting a user from the clusters view page. The button is at the top of the page:
Figure 6 - The Invite button on the Clusters View page
Clicking the button takes you to this dialog:
Figure 7 - The Invite User dialog
Enter the user’s email and their role, then click the INVITE button. Once the user has accepted the invitation, you can manage their account from the Accounts page just like any other account.
Creating an account through an identity provider
Whether you’re using Okta or some other provider, contact Altinity support to configure your Altinity.Cloud account so that a user authenticated by your identity provider but previously unknown to Altinity.Cloud will have an account created automatically. See the Auth0 integration page for more details.
Editing an account
Editing an account is straightforward. In the Accounts list, click the vertical dots icon and select Edit from the menu:
Editing an account is straightforward as well. In the Accounts list, click the vertical dots icon and select Delete from the menu:
Figure 9 - The Delete Account menu
You’ll see a confirmation dialog:
Figure 10 - The Delete Account confirmation dialog
Configuring login settings
If you’re using an identity provider to control access to your Altinity.Cloud account, it’s a good idea to disable password access to your account. From the Accounts list, click the button at the top of the Accounts page to control login settings for your organization:
Figure 11 - The Login Settings dialog
These settings let you disable password logins for your organization, block API access, and allow admins to login with a password in case of an emergency. We strongly recommend that you block all password logins and DO NOT allow admin access via password. For a complete discussion of the security impact of these settings, see the section Disable password logins in the Altinity.Cloud Security Guide.
1.6.4 - Role-Based Access and Security Tiers
Altinity.Cloud hierarchy and role-based access.
Introduction
Access to ClickHouse® data hosted in Altinity.Cloud is controlled through a combination of security tiers and account roles. This allows companies to tailor access to data in a way that maximizes security while still allowing ease of access.
Account Roles
The actions that can be taken by Altinity.Cloud accounts are based on the role they are assigned. Here are the roles and their permissions based on the security tier:
Figure 1 - An overview of roles and permissions
Role Descriptions
orgadmin manages the Organization, including all user accounts and Environment settings, and has full access to any Cluster. An orgadmin is the only role that can create or delete an Environment.
envadmin is a member of an Organization, can read and edit specified Environments, and has full access to any Cluster in those environments.
envuser is a member of an Organization, can read specified Environments, and has full access to specified Clusters.
envsupport is a member of an Organization and has read access to specified Environments as well as read and edit access to specified Clusters.
grafanauser is a member of an Organization and has read access to specified Environments.
billing can access the billing page only. From there they can view invoices and update payment details.
Managing roles
Altinity.Cloud accounts with the role orgadmin are able to create and modify roles through the Altinity Cloud Manager. Click the Accounts tab on the left to see the Accounts page:
Figure 2 - The accounts page
Clicking in the upper right takes you to the list of roles:
Figure 3 - The list of roles in this environment
NOTE: Roles with a icon cannot be modified.
You can click the button to add a new role, or you can click the icon next to a role in the list and select Edit from the menu to edit a role. Either way, you’ll see the Account Role Details dialog:
Figure 4 - The Account Role Details dialog
If you’re creating a new role, give it a name in the entry field at the top of the dialog; if you’re editing an existing role, the role name is read-only. (Again, if the role has the icon, everything is read-only.)
There are hundreds of settings, giving you fine-grained control over what each role is allowed to do. You can allow or deny all permissions in a category by selecting the * item, then define individual exceptions as needed. In Figure 4 above, the envsupport role has full permissions for cluster-related actions, with the exception of actionAltinityAccessCredentials, actionBackupCreate, and actionBackupRestore. In other words, this role cannot access credentials stored in the environment, create a backup, or restore from a backup.
When you’ve defined permissions the way you want, click SAVE to save the role.
Security Tiers
Altinity.Cloud groups a set of clusters together in ways that allow companies to give accounts access only to the clusters or groups of clusters that they need. Altinity.Cloud groups clusters into the following security tiers:
Figure 5 - Security tier showing the relationship between an organization, environment, cluster, and ClickHouse database nodes.
Hierarchy
Organizations contain one or more environments.
Environments contain one or more clusters.
Clusters contain ClickHouse databases and manage access.
ClickHouse databases live inside clusters.
Security Tier
Account access is controlled by assigning an account a single role and a security tier depending on their role.
A single account can be assigned to:
A single Organization
One or multiple Environments
One or multiple Clusters within an Environment
Organization Example
The following example shows an Organization called HappyDragon that shows how Accounts and Role assignments are configured. Role names are also shown in Figure 1. The account roles are tied into the security tiers and allow an account to access multiple environments and clusters depending on what tier they are assigned to.
Account
Title
Role
Organization
Accounts
Billing
Environments
Clusters
mary
Administrator
orgadmin
HappyDragon
all
all
Access to all Environments
all
jessica
Operations
envadmin
HappyDragon
n/a
n/a
HappyDragon_Prod HappyDragon_Dev
all
peter
Developer
envadmin
HappyDragon
n/a
n/a
HappyDragon_Dev
all
paul
Marketing
envuser
HappyDragon
marketing
n/a
HappyDragon_Prod
marketing
Account and Roles
Mary (Administrator, Role: orgadmin)
Mary has the orgadmin role, which has the highest level of access in this example.
Has full access to the organization account
Can create and manage accounts for other users
Can create and manage new environments
Can create and manage new clusters
Jessica (Operations, Role: envadmin)
Has read and edit access (but not write or delete access) to both Dev and Prod environments
Has full access to create, read, write and delete clusters in both environments
Peter (Developer, Role: envadmin)
Has read and edit access (but not write or delete access) to the Dev environment only
Has full access to create, read, write and delete any cluster in the Dev environment only
Paul (Marketing user, Role: envuser)
Has create, read, edit and delete access to the cluster marketing in the environment HappyDragon_Prod
1.6.5 - Integrating SSO via Auth0 into the Altinity.Cloud login page
How to set up single sign-on in Altinity.Cloud
Overview
Altinity uses Auth0 so that users who are already logged into other identity providers (Google, Microsoft, or Okta, for example) are automatically granted access to Altinity.Cloud.
The following diagram shows the Altinity.Cloud login process with an SSO provider that uses Auth0. A user clicks the link in the login panel to invoke the SSO provider. The SSO provider returns an Auth0 access token that logs the user into Altinity.Cloud. (Or not, depending on the user’s permissions.)
Figure 1 – Altinity Auth0 login via an SSO provider
Setting up integration with an enterprise identity provider
It’s straightforward to integrate an Auth0 provider with your Altinity.Cloud account.
Gather the following information from your identity provider:
The domain you want to use for single sign-on, such as example.com. Note: This must match your organization’s domain in your Altinity.Cloud account.
The domain set up with your identity provider, such as example.onemicrosoft.com.
The Client Secret from your identity provider.
The Client ID from your identity provider.
Pass that information along to Altinity support. There are a couple of additional things you might want to think about beforehand:
We can configure your account to map roles in your Auth0 provider to roles defined by Altinity.Cloud. For example, you might want the Global Administrator role in Microsoft Entra ID to map to the Altinity.Cloud orgadmin role.
We can also set things up so that user accounts are created for a new user that authenticated through Auth0, including the default role for the new user.
Controlling Altinity personnel’s access to ClickHouse® data and cluster administration
Introduction
Altinity Access settings allow Altinity.Cloud users to limit the level of access Altinity personnel have to customer ClickHouse® data or administrative operations. Altinity.Cloud provides two types of limits:
Data Access - Control the ability of Altinity personnel to view or change data in ClickHouse tables.
Management Access - Control ability to change cluster configuration or perform administrative actions.
If you restrict access to data or management functions you may choose to lift them from time to time to allow Altinity support to diagnose problems or perform operations on your behalf. You can apply the restrictions again afterward.
Viewing and Changing Altinity Access Settings
Access the Cluster Dashboard view of any cluster. The ACCESS button appears in the upper right-hand side of the dashboard view.
Figure 1 - The ACCESS Button in the Cluster Dashboard
Button Colors
The button color indicates Altinity personnel’s access level to your ClickHouse clusters and data.
No Access - Altinity personnel cannot use the ACM Query Browser or Schema Browser. They cannot look at data or schema.
System Access - Altinity personnel can use the ACM Query browser to query system tables and look at table definitions in the Schema Browser, but they cannot look at data. This setting provides a good balance between protecting data and providing the access required for quick support from Altinity. This is the default value.
Read-Only Access - In addition to the above, Altinity personnel can use the ACM Query Browser to run SELECT statements that read data from any table.
Full Access - In addition to the above, Altinity personnel can use the ACM Query Browser to run SQL statements that alter data.
Modifying Altinity access settings
Press the ACCESS button, whatever color it may be, to manage access settings for Altinity personnel.
Data Access Level settings
The four data access levels are at the top of the panel:
Figure 2 - Altinity Access Dialog
Select the new access level and press CONFIRM to save it. The CONFIRM button is disabled until you enter a reason for the change. Changing settings requires an account with EnvUser role or higher.
Management Access settings
You may similarly enable or disable management access using the check boxes in the middle of the panel.
Enable Cluster Configuration Management
Checking this box allows Altinity personnel to perform any of the following cluster configuration operations:
Changing cluster configuration settings
Changing users or profiles
Setting connection configuration
Altering backup settings
Setting activity schedules
Setting alerts
The above actions can cause your server to restart, alter user passwords, or change the information that you receive from Altinity.Cloud about your clusters. If the box is unchecked, only you can make these changes.
Enable Cluster Actions
Checking this box allows Altinity staff to perform any of the following cluster administration operations:
Creating new clusters
Rescaling clusters
Upgrading clusters
Restarting clusters
The above actions may cause your server to restart, behave differently for applications, or affect operating costs. If the box is unchecked, only you can make these changes.
Get Temporary Credentials
The button lets you request temporary credentials that you can give to Altinity support. If you don’t have the appropriate access, you’ll see this message:
Figure 3 - Access denied message
1.7 - Connecting to Altinity.Cloud
Connecting Altinity.Cloud with other services.
There are a number of ClickHouse® libraries in a number of languages that let you interact with your ClickHouse databases.
The following guides are designed to help organizations connect their existing services to Altinity.Cloud.
1.7.1 - Cluster Connection Details
How to view your ClickHouse® cluster’s access information.
There are several ways to access ClickHouse® clusters created in Altinity.Cloud. To view your cluster’s connection details, click the Connection Details link in the Clusters view:
You’ll see the following dialog:
Figure 1 - The Connection Details dialog
The connection details are:
Endpoints
One or more endpoints of the cluster, based on the name of the cluster and environment that host the cluster. The icon indicates that an IP whitelist is defined for that endpoint:
Figure 2 - A cluster with two endpoints, one of which has an IP whitelist
The TCP port for the cluster. This is used by the native ClickHouse binary protocol.
HTTPS Point
The HTTPS port used for the cluster.
Client Connections
Useful commands, URLs, and code you can copy and paste (add your password wherever appropriate, of course):
The clickhouse-client command to connect to this cluster
This cluster’s JDBC URL for Java applications
The URL of this cluster
Python code to import the clickhouse_driver library and create a Client object for this cluster
1.7.2 - Configuring Cluster Connections
Configuring the connections to your ClickHouse® cluster
The Altinity Cloud Manager (ACM) makes it easy to control how applications can connect to your ClickHouse® clusters. For complete details, see the Configuring Connections section of the User Guide.
1.7.3 - Connecting with DBeaver
Creating a connection to Altinity.Cloud from DBeaver.
Connecting to Altinity.Cloud from DBeaver is a quick, secure process thanks to the available JDBC driver plugin.
Required Settings
The following settings are required for the driver connection:
hostname: The DNS name of the Altinity.Cloud cluster. This is typically based on the name of your cluster, environment, and organization. For example, if the organization name is CameraCo and the environment is prod with the cluster sales, then the URL may be https://sales.prod.cameraco.altinity.cloud. Check the cluster’s Access Point to verify the DNS name of the cluster.
port: The port to connect to. For Altinity.Cloud, it will be HTTPS on port 8443.
Username: The ClickHouse® user to authenticate to the ClickHouse server.
Password: The ClickHouse user password used to authenticate to the ClickHouse server.
Example
The following example is based on connecting to the Altinity.Cloud public demo database, with the following settings:
Server: github.demo.trial.altinity.cloud
Port: 8443
Database: default
Username: demo
Password: demo
Secure: yes
DBeaver Example
Start DBeaver and select Database->New Database Connection.
Select All, then in the search bar enter ClickHouse.
Select the ClickHouse icon in the “Connect to a database” screen.
Enter the following settings:
Host: github.demo.trial.altinity.cloud
Port: 8443
Database: default
User: demo
Password: demo
Select the Driver Properties tab. If prompted, download the ClickHouse JDBC driver.
Scroll down to the ssl property. Change the value to true.
Press the Test Connection button. You should see a successful connection message.
1.7.4 - Connecting with clickhouse-client
How to install and connect to ClickHouse® clusters with clickhouse-client.
The clickhouse-client utility makes it easy to connect to ClickHouse® clusters. For more information on clickhouse-client, see the ClickHouse Documentation Command-Line Client page.
The access points for your Altinity.Cloud ClickHouse cluster can be viewed through the Cluster Access Point.
How to install clickhouse-client on Linux
As of this document’s publication, the most recent version of clickhouse-client is
23.9. Here is the install procedure for DEB packages:
ClickHouse client version 23.9.1.1854 (official build).
Connecting to maddie.xxx.altinity.cloud:9440 as user admin.
Connected to ClickHouse server version 23.3.13 revision 54462.

ClickHouse server version is older than ClickHouse client. It may indicate that the server is out of date and can be upgraded.

maddie :)
ClickHouse query examples
At the ClickHouse prompt, enter the query command show tables:
maddie :) show tables

SHOW TABLES

Query id: c319298f-2f28-48fe-96ca-ce59aacdbc43

┌─name─────────┐
│ events       │
│ events_local │
└──────────────┘

2 rows in set. Elapsed: 0.080 sec.
At the ClickHouse prompt, enter the query select * from events:
maddie :)select * from events
SELECT *
FROM events
Query id: 0e4d08b3-a52d-4a03-917d-226c6a2b00ac
┌─event_date─┬─event_type─┬─article_id─┬─title───┐
│ 2023-01-04 │ 1 │ 13 │ Example │
│ 2023-01-10 │ 1 │ 13 │ Example │
│ 2023-01-10 │ 1 │ 14 │ Example │
└────────────┴────────────┴────────────┴─────────┘
3 rows in set. Elapsed: 0.073 sec.
Enter the exit command to return to the command line:
maddie :)exitBye.
1.7.5 - Connecting ClickHouse® to Apache Kafka®
How to connect a ClickHouse® cluster to a Kafka server
Apache Kafka is an open-source distributed event streaming platform used by millions around the world. In this section we’ll cover how to connect a ClickHouse® cluster to a Kafka server. With the connection configured, you can subscribe to topics on the Kafka server, store messages from the Kafka server in a ClickHouse database, then use the power of ClickHouse for real-time analytics against those messages.
ClickHouse has a Kafka table engine that lets you tie Kafka and ClickHouse together. As you would expect, the Altinity Cloud Manager (ACM) makes it extremely easy to configure the Kafka table engine.
We cover working with Kafka in these topics:
1.7.5.1 - Setting up a Kafka® connection
Defining the Kafka server to ClickHouse®
To set up the connection between a Kafka server and your ClickHouse® cluster, go to the cluster view and click the Kafka Connections menu item on the Connections menu:
This takes you to the Kafka Connections dialog. This dialog lets you configure any number of Kafka configuration files, each of which contains any number of configured connections to Kafka servers.
In Figure 2, there are no Kafka settings files. Click the button to create one. That takes you to this dialog:
Figure 3 - The New Kafka Settings File dialog
The fields in Figure 3 create a new Kafka settings file named kafka_settings.xml in the config.d directory. A settings file contains configuration information for some number of Kafka connections. Here we’re creating a new configuration named localhost_testing that connects to the topic named retail_data on a Kafka server at 2.tcp.ngrok.io:14624. Typically you would also define a number of connection parameters for this connection, but for this example we’re connecting to a Kafka server with no authentication required. (We obviously don’t recommend that; we’ll get to more realistic examples on the Configuring a Kafka connection page.)
Click CHECK to test the connection. If the ACM successfully connects to the Kafka server and the topic you specified, you’ll see a dialog like this:
Figure 4 - Configuration information for a successful Kafka connection
Click the button to save these settings into the Kafka settings file. You’ll see your new settings file and its one configuration:
Figure 5 - The new Kafka settings file with a single configuration
Working with the settings file
From thw dialog in Figure 5 you can click the button to edit a given configuration or click the button to delete one. You’ll be asked to confirm your choice if you ask to delete a configuration. And as you would expect, the button lets you create a new configuration in the current settings file and the button lets you create a new settings file altogether.
Be aware that deleting the last configuration in a settings file will also delete the settings file altogether. You’ll be asked to confirm that choice:
Figure 6 - Deleting the last configuration in a Kafka settings file
Some complications:
First of all, if there’s any problem with the configuration parameters you entered, you’ll see an error message:
Figure 7 - A configuration error
Obviously you’ll need to fix the error before you continue.
Secondly, the value in the Configuration name field in the dialog becomes the name of an XML element in the Kafka settings file. In Figure 3, the configuration is named localhost_testing, so the configuration settings will be stored in the XML element <localhost_testing> as shown in Figure 4. That, of course, means the configuration name must be a valid XML element name. If not (a configuration named 42, for example), you’ll get an error message:
Figure 8 - The error message for a connection name that can’t be used as an XML element name
We won’t go into the details here, but an XML element name should start with a letter or an underscore. We also recommend that you use underscores instead of hyphens; that will make things simpler when you use this configuration to create a table with the Kafka table engine. (In other words, use localhost_testing instead of localhost-testing.)
A Kafka settings file can contain multiple connections to multiple Kafka servers and/or topics:
Figure 9 - A Kafka settings file with multiple connections
Click DONE to save the file and exit the dialog.
Once the settings file is created, it appears in the list of settings in the Server Settings list:
Figure 10 - The Kafka settings file in the list of server settings
Pretend we never said this…
Although you can edit the XML file directly, we don’t recommend it. Any changes you make in the Kafka Connections dialog will overwrite any changes you make directly. You’ll get a confirmation message if you try to edit the file directly:
Figure 11 - Warning message against editing XML directly
Defining rack mapping for a Kafka connection
Kafka’s rack awareness feature lets you distribute partition replicas across different physical racks or availability zones. This makes the Kafka cluster more reliable and protected from rack or zone failures.
What’s next
The Kafka connection we created earlier (localhost) didn’t have any parameters for authentication, protocols, etc. As you would expect, most connections are more complicated. Move on to Configuring a Kafka connection for the details.
1.7.5.2 - Configuring a Kafka® connection
Setting up connection parameters
Depending on how your Kafka® server is set up, there are a number of other connection parameters you need to set. There are preset groups of options for common Kafka providers, as well as custom options that let you define the value for any parameter you need. We’ll go through those now.
In this section we’re configuring the details of ClickHouse’s connection to Kafka. That includes details such as the URL of the Kafka server, the name of the topic, and any authentication parameters you need. Those parameters can go in your Kafka configuration file. There are other parameters that configure a ClickHouse table that uses the Kafka engine; those are not part of a Kafka configuration file. (More on the Kafka table engine in a minute.)
A word about certificates
If the connection to your Kafka server requires certificates, you need to go through a couple of steps:
Create a new file in the config.d directory. To do that, create a new setting with the name of your certificate, then paste the value of the certificate in the text box. Here’s an example for the file service.cert:
Figure 1 - Creating a certificate file in the config.d directory
Once you’ve created the settings for all the certificates you need, you can specify the locations of those certificates. The certificates are in the directory /etc/clickhouse-server/config.d. For service.cert, the location is /etc/clickhouse-server/config.d/service.cert.
Preset option groups
There are several groups of preset options available under the ADD PRESET button:
Figure 2 - The Kafka Preset options menu
Each set of options is targeted for a specific platform or Kafka deployment type, but check with your Kafka provider to see which parameters you need. In addition to the parameters added for you automatically, you can add your own custom parameters if needed.
Amazon MSK parameters
If your Kafka server is hosted by Amazon Managed Streaming for Apache Kafka (MSK), three parameters are added to the dialog:
security.protocol: Available options are plaintext, ssl, sasl_plaintext, or sasl_ssl.
sasl.username and sasl.password - Your SASL username and password
The parameters will look like this:
Figure 3 - Amazon MSK parameters
Values with a down arrow icon let you select from a list of values; other value fields let you type whatever you need.
You also need to create a VPC connection to your MSK service. See the page Amazon VPC endpoint for Amazon MSK for complete details on creating the VPC connection.
SASL/SCRAM parameters
security.protocol: Available options are plaintext, ssl, sasl_plaintext, or sasl_ssl.
sasl.mechanism: Available options are GSSAPI, PLAIN, SCRAM-SHA-256, SCRAM-SHA-512, or OAUTHBEARER.
sasl.username and sasl.password - Your SASL username and password
The parameters will look like this:
Figure 4 - SASL/SCRAM parameters
Inline Kafka certificates parameters
ssl.key.pem: The path to your key.pem file.
ssl.certificate.pem: The path to your certificate.pem file.
security.protocol: Available options are plaintext, ssl, sasl_plaintext, or sasl_ssl.
sasl.mechanism: Available options are GSSAPI, PLAIN, SCRAM-SHA-256, SCRAM-SHA-512, or OAUTHBEARER.
sasl.username and sasl.password: Your SASL username and password
auto.offset.reset: Confluent supports three predefined values: smallest, latest, and none, although you may not need this parameter at all. Any other value throws an exception. See the auto.offset.reset documentation for all the details.
ssl.endpoint.identification.algorithm: https is the only option supported. This is typically used only with older servers; you can click the trash can icon to delete it if you don’t need it.
ssl.ca.location: The location of your SSL certificate file. See the discussion of certificates above for more information on working with certificates. As with ssl.endpoint.identification.algorithm, this is typically used only with older servers; you can click the trash can icon to delete it if you don’t need it.
Check the Confluent site to see which parameters you need and the values you should use. Here’s a working example:
Figure 7 - Confluent Cloud parameters
Adding other configuration options
The ADD OPTION button lets you add other configuration parameters. You can use a predefined option or create a custom options:
Figure 8 - The ADD OPTION menu
Predefined options
There are seven predefined options:
security.protocol: plaintext, ssl, sasl_plaintext, or sasl_ssl.
sasl.mechanism: GSSAPI, PLAIN, SCRAM-SHA-256, SCRAM-SHA-512, or OAUTHBEARER.
sasl.username and sasl.password
ssl.ca.location: the location of your SSL certificate
enable.ssl.certificate.verification: true or false
ssl.endpoint.identification.algorithm: https is the only option supported
debug: all is the only option supported
Custom options
A custom option simply gives you entry fields for a name and a value, letting you define any parameters your Kafka server needs. As an example, a connection to a Kafka topic hosted on Aiven cloud looks like this:
Figure 9 - Custom parameters to connect to Aiven Cloud
Once your parameters are set, click the CHECK button to make sure the connection to your Kafka server is configured correctly.
Moving on
With your connection configured correctly, you’re ready to start working with Kafka data in ClickHouse. We cover that in the next section, cleverly named Working with Kafka data in ClickHouse.
1.7.5.3 - Working with Kafka® data in ClickHouse®
Putting things together
Now that we’ve defined our connection to a Kafka® server, we need to set up our ClickHouse® infrastructure to get data from Kafka and put it into ClickHouse. We’ll go through an example with a Kafka server with a topic named retail_data. (For a complete ClickHouse and Kafka application, see the article Connecting ClickHouse® and Apache Kafka® in the Altinity blog.)
The Kafka topic contains JSON documents that look like this:
Each document represents a sale of some number of items to a particular customer in a particular store. Because there can be any number of items in an order, we’ll store item data in a separate table, with the transaction_id acting as a foreign key if we need to do a join on the tables.
The architecture looks like this:
Figure 1 - Architecture to consume Kafka data in ClickHouse
We’ll set up three types of things to consume the topic’s data in the sales database:
A table with engine type Kafka that receives data from the Kafka server (kafka_sales_data)
Tables with engine type ReplicatedMergeTree to hold the data (sales_transactions and sales_items)
Materialized Views (kafka_to_sales_transactions and kafka_to_sales_items) to take data from the kafka_sales_data table and store it in our two ReplicatedMergeTree tables.
Creating a table with a Kafka engine
First we’ll create a table with a Kafka engine. This will use the Kafka configuration we created earlier to consume messages from the topic on the Kafka server:
The fields in the database map to the fields in the JSON document. Because there can be more than one item in each document, we use Array(Tuple(...)) to retrieve the items from each document.
We’re using the Kafka configuration aiven from the settings file in Figure 9, and we’re using the kafka_format parameter JSONEachRow to define the format of the data we’ll get from Kafka. The setting date_time_input_format = 'best_effort' tells the Kafka engine to try to parse the string value timestamp into a DateTime value. We don’t know what applications are writing data to the Kafka topic, and we don’t know what date format those applications might use, so this is a safe way to create DateTime values. Doing that conversion on the data as it comes in from Kafka ensures that we’ll have a valid DateTime value whenever we use that data.
Be aware that if your configuration name contains characters like a hyphen (kafka-37), you need to put the name of the configuration in double quotes:
ENGINE=Kafka("kafka-37")
Using kafka-37 without quotes returns the error DB::Exception: Bad cast from type DB::ASTFunction to DB::ASTLiteral as ClickHouse tries to process the configuration name as the mathematical expression kafka - 37.
Creating tables to hold data from Kafka
We use two tables, one to hold the basic information about a sale, and another to hold all the item details for every sale. Here’s the schema for the sales data:
Finally, we need Materialized Views that take data as it is received by the Kafka engine and store it in the appropriate tables. Here’s how we populate the transactions table:
As sales are reported on the Kafka topic, our tables are populated. We’ll look at some sample data from the Cluster Explorer. First the sales.sales_transactions table:
At this point we’ve set up a connection to a topic on a Kafka server and created the tables and materialized views we need to store that data in ClickHouse. Now we can write queries to analyze sales data in real time, view live sales data in a tool like Grafana, or any number of other useful things.
1.7.6 - Amazon VPC Endpoints
Connecting to your AWS resources from Altinity.Cloud
Almost every AWS user needs to use access-controlled resources in their ClickHouse® clusters. Depending on where you’re running Altinity.Cloud, the kinds of resources you’ll need to create and the access you’ll need to grant to your ClickHouse clusters can vary widely. The following sections will guide you through the requirements for your Altinity.Cloud environment.
1.7.6.1 - Using Amazon VPC Endpoints from Our Cloud
Configure Altinity.Cloud to access Amazon VPC endpoints from Altinity’s cloud
Altinity.Cloud users can connect a VPC (Virtual Private Cloud) Endpoint from existing AWS environments to their Altinity.Cloud environment. The VPC Endpoint becomes a private connection between your existing Amazon services and Altinity.Cloud without exposing the connection to the Internet.
The following instructions are based on the AWS console. Examples of equivalent Terraform scripts are included.
These instructions assume you already have an AWS account with a configured VPC endpoint. From that starting point, there are four steps:
Contact Altinity support to get an endpoint service name and to verify your Altinity.Cloud environment’s URL.
Create a VPC endpoint. This must be in the same region as the AWS-hosted service you’re connecting to.
Step 1. Contact Altinity support
To get started, you’ll need an endpoint service name and your Altinity.Cloud environment’s URL. Contact us to get those.
For an endpoint service name, you’ll need your AWS account ID. You can find that by clicking your username in the upper right corner of the AWS console:
Figure 1 - Getting your AWS account ID
The account ID in Figure 1 is 1111-2222-3333. Given your AWS account ID, Altinity support will give you an endpoint service name from Altinity.Cloud’s AWS account. You’ll use that service name in step 2.
Your Altinity.Cloud environment’s URL is typically internal.[altinity.cloud environment name].altinity.cloud. If your environment name is altinity.maddie, your URL is probably internal.altinity.maddie.altinity.cloud, but Altinity Support will tell you for sure. You’ll use that URL in step 3.
Step 2. Create a VPC endpoint
Now it’s time to create a VPC endpoint. To do that, go to the VPC Dashboard, click Endpoints in the left navigation panel, then click the button:
Figure 2 - The Endpoints dashboard
This takes you to the Endpoint settings panel:
Figure 3 - Creating a VPC endpoint with the service name from Altinity support
On the Endpoint settings panel, select Other endpoint services in the middle of the panel, then paste the service name you got from Altinity support into the Service settings section. Click the button. You should see a green box as in Figure 3 above. If the service name is valid, select a VPC from the dropdown list in the VPC section of the panel. You can also add a name tag for the endpoint at the top of the panel if you want.
Once the service name is verified and the VPC is selected, scroll to the bottom of the page and click the button.
Terraform VPC endpoint configuration
To create a VPC endpoint with Terraform, fill in the appropriate values in this script:
To verify that the VPC Endpoint works, launch a EC2 instance in your environment. Open a shell in that instance and execute this curl command with the URL of your Altinity.Cloud environment:
curl -sS https://internal.altinity.maddie.altinity.cloud
OK
If everything works, the command will return OK. (The -sS options tell curl to either display the output from the endpoint or error messages if anything fails.)
References
Amazon’s documentation has lots of great articles on using AWS services. Here are a couple that we’ve found really useful:
1.7.6.2 - Using Amazon VPC Endpoints from Your Cloud Account
Configure Altinity.Cloud to access Amazon VPC endpoints from your cloud
Altinity.Cloud users can connect a VPC (Virtual Private Cloud) Endpoint from existing AWS environments to their Altinity.Cloud environment. The VPC Endpoint becomes a private connection between your existing Amazon services and Altinity.Cloud without exposing the connection to the Internet.
The following instructions are based on the AWS console. Examples of equivalent Terraform scripts are included.
These instructions assume you already have an AWS account with a configured VPC endpoint. From that starting point, there are four steps:
Contact Altinity support to get an endpoint service name and to verify your Altinity.Cloud environment’s URL.
Create a VPC endpoint. This must be in the same region as the AWS-hosted service you’re connecting to.
Step 1. Contact Altinity support
To get started, you’ll need an endpoint service name and your Altinity.Cloud environment’s URL. Contact us to get those.
For an endpoint service name, you’ll need your AWS account ID. You can find that by clicking your username in the upper right corner of the AWS console:
Figure 1 - Getting your AWS account ID
The account ID in Figure 1 is 1111-2222-3333. Given your AWS account ID, Altinity support will give you an endpoint service name from Altinity.Cloud’s AWS account. You’ll use that service name in step 2.
Your Altinity.Cloud environment’s URL is typically internal.[altinity.cloud environment name].altinity.cloud. If your environment name is altinity.maddie, your URL is probably internal.altinity.maddie.altinity.cloud, but Altinity Support will tell you for sure. You’ll use that URL in step 3.
Step 2. Create a VPC endpoint
Now it’s time to create a VPC endpoint. To do that, go to the VPC Dashboard, click Endpoints in the left navigation panel, then click the button:
Figure 2 - The Endpoints dashboard
This takes you to the Endpoint settings panel:
Figure 3 - Creating a VPC endpoint with the service name from Altinity support
On the Endpoint settings panel, select Other endpoint services in the middle of the panel, then paste the service name you got from Altinity support into the Service settings section. Click the button. You should see a green box as in Figure 3 above. If the service name is valid, select a VPC from the dropdown list in the VPC section of the panel. You can also add a name tag for the endpoint at the top of the panel if you want.
Once the service name is verified and the VPC is selected, scroll to the bottom of the page and click the button.
Terraform VPC endpoint configuration
To create a VPC endpoint with Terraform, fill in the appropriate values in this script:
To verify that the VPC Endpoint works, launch a EC2 instance in your environment. Open a shell in that instance and execute this curl command with the URL of your Altinity.Cloud environment:
curl -sS https://internal.altinity.maddie.altinity.cloud
OK
If everything works, the command will return OK. (The -sS options tell curl to either display the output from the endpoint or error messages if anything fails.)
References
Amazon’s documentation has lots of great articles on using AWS services. Here are a couple that we’ve found really useful:
1.7.6.3 - Using Amazon VPC Endpoints from Your Kubernetes Environment
Configure Altinity.Cloud to access Amazon VPC endpoints from your Kubernetes environment
Altinity.Cloud users can connect a VPC (Virtual Private Cloud) Endpoint from existing AWS environments to their Altinity.Cloud environment. The VPC Endpoint becomes a private connection between your existing Amazon services and Altinity.Cloud without exposing the connection to the Internet.
The following instructions are based on the AWS console. A link to a Terraform script is included.
These instructions assume you already have an AWS account with a configured VPC endpoint. From that starting point, there are four steps:
Contact Altinity support to get an endpoint service name and to verify your Altinity.Cloud environment’s URL.
Create a VPC endpoint. This must be in the same region as the AWS-hosted service you’re connecting to.
Step 1. Contact Altinity support
To get started, you’ll need an endpoint service name and your Altinity.Cloud environment’s URL. Contact us to get those.
For an endpoint service name, you’ll need your AWS account ID. You can find that by clicking your username in the upper right corner of the AWS console:
Figure 1 - Getting your AWS account ID
The account ID in Figure 1 is 1111-2222-3333. Given your AWS account ID, Altinity support will give you an endpoint service name from Altinity.Cloud’s AWS account. You’ll use that service name in step 2.
Your Altinity.Cloud environment’s URL is typically internal.[altinity.cloud environment name].altinity.cloud. If your environment name is altinity.maddie, your URL is probably internal.altinity.maddie.altinity.cloud, but Altinity Support will tell you for sure. You’ll use that URL in step 3.
Step 2. Create a VPC endpoint
Now it’s time to create a VPC endpoint. To do that, go to the VPC Dashboard, click Endpoints in the left navigation panel, then click the button:
Figure 2 - The Endpoints dashboard
This takes you to the Endpoint settings panel:
Figure 3 - Creating a VPC endpoint with the service name from Altinity support
On the Endpoint settings panel, select Other endpoint services in the middle of the panel, then paste the service name you got from Altinity support into the Service settings section. Click the button. You should see a green box as in Figure 3 above. If the service name is valid, select a VPC from the dropdown list in the VPC section of the panel. You can also add a name tag for the endpoint at the top of the panel if you want.
Once the service name is verified and the VPC is selected, scroll to the bottom of the page and click the button.
Terraform VPC endpoint configuration
To create a VPC endpoint with Terraform in a BYOK environment, you’ll need to use the Altinity Terraform provider. Use the AWS example for VPC resources to set up your VPC endpoint.
Testing your endpoint
To verify that the VPC Endpoint works, launch a EC2 instance in your environment. Open a shell in that instance and execute this curl command with the URL of your Altinity.Cloud environment:
curl -sS https://internal.altinity.maddie.altinity.cloud
OK
If everything works, the command will return OK. (The -sS options tell curl to either display the output from the endpoint or error messages if anything fails.)
References
Amazon’s documentation has lots of great articles on using AWS services. Here are a couple that we’ve found really useful:
1.7.7 - Accessing an AWS MSK cluster from Altinity.Cloud
How to connect Altinity.Cloud to Amazon MSK within your VPC
Altinity.Cloud users can connect to Kafka clusters hosted by Amazon MSK (Managed Streaming for Apache Kafka). That makes it easy to use ClickHouse® for real-time analytics on data in Kafka topics. Connecting to MSK from Altinity.Cloud used to be much more complicated, with multiple VPC endpoints and load balancers. With AWS’s multi-VPC connectivity, configuration is much simpler, and scaling your MSK cluster doesn’t require any reconfiguration.
These instructions assume you already have an AWS account with a running MKS cluster. From that starting point, there are four steps to get everything configured and running:
Contact Altinity support to get the ARN (Amazon Resource Name) for Altinity’s service account
Enable multi-VPC connectivity for your MSK cluster
Edit your MSK cluster’s security policy to authorize the Altinity service account to access the cluster
Get back to Altinity support with the ARN of your newly configured MSK cluster.
Step 1. Contact Altinity support
To get started, you’ll need to contact us with your AWS account ID. You can find that by clicking your username in the upper right corner of the AWS console:
Figure 1 - Getting your AWS account ID
In exchange for your AWS account ID, support will give you the ARN of Altinity’s service account. You’ll use that to give Altinity access to your MSK cluster. The ARN will be something like arn:aws:iam::111122223333:root.
Step 2. Enable your MSK cluster for multi-VPC communication
In the AWS console, go to your MSK cluster, click the Actions button, and select Turn on multi-VPC connectivity:
Figure 2 - The Turn on multi-VPC connectivity menu item
In the Turn on multi-VPC connectivity dialog, select the authentication type(s) you’re using, then click Turn on selection to enable multi-VPC connectivity:
Figure 3 - Turning on multi-VPC connectivity
It will take several minutes to change your cluster’s configuration, particularly if your MSK cluster has several broker nodes. You won’t be able to make any other changes to your MSK cluster until that is complete.
BTW, this example uses SASL/SCRAM as the authentication method. If you’re using IAM, there are additional steps.
Step 3. Edit your MSK cluster’s policy
Once your cluster is reconfigured, you’ll be able to click the Actions button and select Edit cluster policy:
Figure 4 - The Edit cluster policy menu item
Click the Advanced radio button to edit the cluster policy. At the top of the policy (line 7 in Figure 5), add the Altinity ARN as a principal to allow access to your MSK cluster:
Figure 5 - Editing the cluster’s security policy
While you’re here, copy the ARN of your MSK cluster (line 15). You’ll need to give that to Altinity support.
To complete the setup of Altinity access to your MSK cluster, contact support and give your support person the ARN of your MSK cluster. From there, Altinity will complete the connection and you can access Kafka topics in your MSK cluster from your ClickHouse clusters. See Connecting ClickHouse to Apache Kafka for all the details.
For more information
VPC connections can be quite complicated. You can find lots more information on the AWS site;
Altinity.Cloud users can use Google Cloud’s Private Service Connect (PSC) to connect to a service in their GCP environment from their Altinity.Cloud environment. The PSC becomes a private connection between your existing GCP services and Altinity.Cloud without exposing the connection to the Internet.
The architecture of the connection looks like this:
Figure 1 - Architecture of a PSC connection
This is a specific example for a Bring Your Own Cloud (BYOC) environment, but the overall architecture is the same no matter how you’re running Altinity.Cloud.
On the left side of the diagram is your Altinity.Cloud account, running in Altinity’s GCP account. That’s where your environment with your ClickHouse® clusters are. On the right side of the diagram is your GCP account. The PSC connection gives your ClickHouse clusters secure access to the services in your GCP account.
To create the architecture in Figure 1, you’ll need to go through these steps:
Create a Private Service Connect in your GCP account
Contact Altinity support to configure the PSC
Creating a Private Service Connect in your GCP account
To get started, go to the list of GCP products and select Networking in the list of categories on the left. Select Network Services:
Figure 2 - Opening Network Services
Next, click Private Service Connect in the list on the left side of the page:
Figure 3 - The Network Services menu
You’ll be on the CONNECTED ENDPOINTS tab. Click CONNECT ENDPOINT in the Endpoints section:
Figure 4 - The CONNECT ENDPOINT link
You’ll see the Connect Endpoint dialog:
Figure 5 - Connecting the endpoint
Make the following choices:
Select Published service. You’re creating an endpoint to a service you’ve published already.
In the Target details field, enter a name in the pattern projects/[^/]+/regions/([^/]+)/serviceAttachments/([^/]+). In the example here we’re using the maddie project in region us-east1.
For the Endpoint details section, enter a name for your endpoint in the first field. Next, select a previously defined network and subnetwork. The network and subnetwork must be in the same region as your published service.
For the IP address field, select a previously defined static IP address or click the Create IP address link to create a new one.
Select Enable global access.
With those things defined, click the button to create the endpoint.
Contacting Altinity
Once you create and configure your endpoint, contact Altinity to finish the configuration. Altinity support will set up the DNS records needed to connect your Altinity.Cloud account and your Google PSC endpoint.
Demo clusters for testing ClickHouse® connections and playing with publicly available data.
Altinity provides a number of sample databases and ClickHouse® clusters for experimenting with various ClickHouse features.
The Antalya Playground on Altinity.Cloud
The Antalya Playground lets you use hybrid tables that let you query ClickHouse MergeTree and shared Iceberg tables to deliver cheap, scalable real-time analytics.
When you log in to the system with the userid/password combination of demo/demo, you’ll see this panel:
Figure 1 - The initial panel of the Antalya Playground
There are several things to notice in Figure 1 above:
If you click the Altinity Logo in the upper left corner, it will display the databases and tables in the system once you’re logged in.
The address bar lets you know the URL of the playground server and the version of Altinity Antalya it is running.
The user demo is logged in.
The main attraction, of course, is the text box where you can execute SQL queries.
The Run button beneath the text box executes your query. As noted on the screen, you can also type Ctrl/Cmd+Enter to run the command without clicking on the button.
The icon on the right side beneath the text box toggles the display between light mode and dark mode.
Here are the results of a sample query:
Figure 2 - A query result in the Antalya Playground
This query looks at all taxi rides where the rider was picked up and dropped off in the same borough, sorted by the percentage of all rides that started in that region. The usual query performance statistics appear between the text box and the results area. For numeric results, the yellow shading in the background provides visual cues to the size of the value.
In Figure 2 we have also clicked the Altinity Logo in the upper left to display all the databases in the system. The query above was in the tripdata.taxi_trips table; hovering over a table’s name shows the size of the table, the number of rows, and its engine.
You can download the results in a variety of data formats by clicking on the button. Select a data format from the dropdown list and click Download:
Figure 3 - Downloading query results
Sample queries on the different tables are in the Datasets section that follows.
Datasets
The Antalya Playground is preloaded with two common databases: Tripdata and OnTime.
In this section we’ll look at a number of interesting queries you can run against the data in the playground. The query results will be displayed in the playground as shown in Figure 2 above. For this page, however, we’ll download the results as a markdown table as shown in Figure 3 and use it to display the results.
Tripdata
The Tripdata dataset contains records of taxi and for-hire vehicle rides in New York City from 2009 to 2025. The original Parquet files are available through the Taxi and Livery Commission's website.
Tables in the Antalya playground include:
tripdata.fhv_trips - Trips from for-hire vehicles and rideshare services starting in 2015
tripdata.taxi_trips - Trips for yellow and green taxis starting in 2014
tripdata.taxi_zones - A table that maps a location_id to a zone name, borough, and subregion. As an example, the location 261 maps to the zone World Trade Center, which is in the manhattan_below_60 subregion of Manhattan. Useful for joins.
Here are some interesting queries against this data:
Trips that started and ended in the same borough
Here’s a query that looks at each of the five boroughs (Bronx, Brooklyn, Manhattan, Queens, and Staten Island) for analytics on trips that started and ended in the same borough.
Most people in Manhattan stayed in Manhattan; on the other hand, more than half the people picked up in Queens went elsewhere (the LaGuardia and JFK airports are in Queens, so lots of people go from the airport to some other borough).
Changing the query to get rideshare data from the fhv_trips table (just change the line above to FROM tripdata.fhv_trips), we get different results:
pickup_borough
total_rides
same_borough_dropoffs
pct_staying_in_borough
Staten Island
17813284
15660329
87.9
Bronx
154618369
119469960
77.3
Brooklyn
360239134
276326236
76.7
Manhattan
547917981
413570842
75.5
Queens
241775840
165807747
68.6
Far more Uber and Lyft trips stayed in the same borough, suggesting that people use Uber and Lyft for shorter trips. (Checking that is left as an exercise to the reader.)
Taxi trips in July
This query shows how many taxi trips happened in the month of July through the dataset:
People are getting into taxis at 6:00 or 7:00 pm every day except Sunday, when the highest traffic seems to be Saturday night revelers hailing a cab after midnight.
For ridesharing services (use FROM taxidata.fhv_trips in the query above), the data is a little different:
day_name
hour
trips
Monday
8
13742138
Tuesday
8
14652655
Wednesday
18
14990988
Thursday
18
15685006
Friday
19
17442085
Saturday
19
17574739
Sunday
0
15792141
Uber and Lyft are more popular on Monday and Tuesday mornings, but as with regular taxis, the night hawks are using ridesharing services after midnight Saturday.
The impact of ridesharing services
Uber launched in NYC in 2011, and Lyft launched in 2014. Here’s a look at the percentage of rides on ridesharing services versus traditional taxis since 2015:
The results are dramatic: In 2015, as ridesharing services were starting to take hold, just over a quarter of rides were with Uber and Lyft. That percentage grew steadily; since 2020, Uber and Lyft have had roughly 85% of the market.
year
avg_monthly_taxi_trips
avg_monthly_fhv_trips
total_trips
pct_fhv
2015
13772750
5282378
228661529
27.72
2016
12293112
11009507
279631429
47.25
2017
10436441
16025796
317546849
60.56
2018
9314153
21739563
372644592
70.01
2019
7574844
23157628
368789663
75.35
2020
2198619
13187945
184638768
85.71
2021
2664393
15783493
221374629
85.56
2022
3374668
18910646
267423763
84.86
2023
3258099
20695722
287445852
86.4
2024
1510582
20954046
23975210
87.4
OnTime
The OnTime dataset has records of airline on-time performance of domestic US flights from 1987 to 2025. It is provided by the Bureau of Transportation Statistics.
Tables in the Antalya playground include:
ontime.fact_ontime and ontime.fact_online_replicated - The main flight data, including the date and time, carrier, origin airport, destination airport, and how many minutes late (if any) a flight arrived. The engines of the two databases are MergeTree and ReplicatedMergeTree, as you would expect, but the data is the same.
ontime.dim_airports and ontime.dim_airports_bts_full - Complete airport metadata, such as airport name, country code, latitude, and longitude. bts_full is an unabridged dataset of all airports, including airports that are now closed.
Here are some interesting queries against this data.
Least punctual airlines
Here’s a query to find the 15 airlines with the worst on-time performance since 2018:
WITHcarrier_namesAS(SELECTCarrier,multiIf(Carrier='AA','American Airlines',Carrier='AS','Alaska Airlines',Carrier='B6','JetBlue Airways',Carrier='CO','Continental Airlines',Carrier='DL','Delta Air Lines',Carrier='EV','ExpressJet Airlines',Carrier='F9','Frontier Airlines',Carrier='FL','AirTran Airways',Carrier='G4','Allegiant Air',Carrier='HA','Hawaiian Airlines',Carrier='HP','America West Airlines',Carrier='MQ','Envoy Air (American Eagle)',Carrier='NK','Spirit Airlines',Carrier='NW','Northwest Airlines',Carrier='OH','PSA Airlines',Carrier='OO','SkyWest Airlines',Carrier='QX','Horizon Air',Carrier='TW','Trans World Airlines',Carrier='UA','United Airlines',Carrier='US','US Airways',Carrier='VX','Virgin America',Carrier='WN','Southwest Airlines',Carrier='YV','Mesa Airlines',Carrier='YX','Republic Airways',Carrier)AScarrier_nameFROMontime.fact_ontimeGROUPBYCarrier)SELECTcn.carrier_name,count()ASflights,round(avg(ArrDelayMinutes),2)ASavg_arr_delay_mins,concat(toDecimalString(round(countIf(ArrDel15=1)*100.0/count(),2),2),'%')ASpct_lateFROMontime.fact_ontimefJOINcarrier_namescnUSING(Carrier)WHERECancelled=0ANDYear>=2018GROUPBYcn.carrier_nameORDERBYavg_arr_delay_minsDESCLIMIT15;
Our multiIf clause replaces the airline carrier code (B6) with the name of the airline (JetBlue Airlines). It makes the query longer, but the results are much more legible.
Here are our results, sorted by how many minutes late an airline’s flights are on average:
carrier_name
flights
avg_arr_delay_mins
pct_late
JetBlue Airways
1923885
21.46
26.68%
Frontier Airlines
1195804
21.4
27.03%
Allegiant Air
869378
19.92
24.65%
ExpressJet Airlines
373917
18.47
21.35%
American Airlines
6787795
17.61
21.54%
Mesa Airlines
824697
16.46
19.27%
Spirit Airlines
1626039
16.28
21.87%
PSA Airlines
1808876
15.8
19.60%
SkyWest Airlines
5845849
14.99
17.26%
United Airlines
4836788
14.82
19.41%
Envoy Air (American Eagle)
2087284
12.65
18.68%
Republic Airways
2383285
11.99
16.44%
Virgin America
17237
11.95
19.96%
9E
1579112
11.5
14.02%
Delta Air Lines
7101668
11.48
15.22%
As you can see, JetBlue, Frontier, and Allegiant are all late roughly a quarter of the time, with those flights averaging 20+ minutes late. (Carrier code 9E is Endeavor Air, btw.)
Late arriving aircraft cascade effect
This query takes a look at how late aircraft impact flights through the day. A given airplane will likely make several flights a day, particularly on regional routes. If any of those flights is late, it affects every subsequent flight that plane is scheduled to fly. Here’s the query:
As you would expect, the average flight delay and the percentage of flights with late aircraft increase through the day, as one delay likely leads to another:
scheduled_hour
avg_dep_delay
pct_flights_with_late_aircraft
flights
5
34.21
1.59
466587
6
24
1.3
3040805
7
22.94
2.95
3884887
8
22.22
5.88
4765492
9
22.7
9.4
4687160
10
23.9
13.08
4904421
11
24.47
14.22
5412825
12
25.51
15.06
5633853
13
26.5
15.87
5992125
14
28.22
17.76
5767062
15
28.79
17.84
6266391
16
30.34
19.54
6292767
17
32.27
20.06
7197384
18
33.68
21.63
6597901
19
35.29
23.19
5936959
20
34.65
21.49
4980095
21
33.33
21.11
3307529
22
33.24
20.04
1704358
23
28.74
14.31
644409
The late aircraft effect peaks around 7:00 pm, then declines. The number of flights per hour are at their highest from 3:00 pm to 6:00 pm; as the number of flights goes down, the impact of late aircraft starts to subside.
Types of delays
The fact_ontime table defines several different types of delays:
Carrier delays - Anything caused by the airline, including maintenance, cleaning, or a late-arriving crew.
Weather - Self-explanatory
NAS (National Air System) - Anything controlled by the FAA, including ground stops and runway changes
Security - Screening issues from the TSA, very rare
Late aircraft - The incoming aircraft arrived late
Here’s a query that finds the various kinds of delays by the 15 airlines with the highest average carrier delay, starting with our multiIf statement:
SELECTmultiIf(Carrier='AA','American Airlines',Carrier='AS','Alaska Airlines',Carrier='B6','JetBlue Airways',Carrier='CO','Continental Airlines',Carrier='DH','Atlantic Coast Airlines / Independence Air',Carrier='DL','Delta Air Lines',Carrier='EV','ExpressJet Airlines',Carrier='F9','Frontier Airlines',Carrier='FL','AirTran Airways',Carrier='G4','Allegiant Air',Carrier='HA','Hawaiian Airlines',Carrier='HP','America West Airlines',Carrier='MQ','Envoy Air (American Eagle)',Carrier='NK','Spirit Airlines',Carrier='NW','Northwest Airlines',Carrier='OH','PSA Airlines',Carrier='OO','SkyWest Airlines',Carrier='QX','Horizon Air',Carrier='TW','Trans World Airlines',Carrier='UA','United Airlines',Carrier='US','US Airways',Carrier='VX','Virgin America',Carrier='WN','Southwest Airlines',Carrier='XE','ExpressJet Airlines',Carrier='YV','Mesa Airlines',Carrier='YX','Republic Airways',Carrier)AScarrier_name,round(avg(CarrierDelay),2)ASavg_carrier_delay,round(avg(WeatherDelay),2)ASavg_weather_delay,round(avg(NASDelay),2)ASavg_nas_delay,round(avg(SecurityDelay),2)ASavg_security_delay,round(avg(LateAircraftDelay),2)ASavg_late_aircraft_delayFROMontime.fact_ontimeWHERECancelled=0ANDArrDelayMinutes>0ANDYear>=2018GROUPBYcarrier_nameORDERBYavg_carrier_delayDESCLIMIT15;
Here are the results:
carrier_name
avg_carrier_delay
avg_weather_delay
avg_nas_delay
avg_security_delay
avg_late_aircraft_delay
SkyWest Airlines
39.03
10.26
10.74
0.12
21.28
Delta Air Lines
31.09
3.92
14.59
0.08
19.77
Mesa Airlines
29.48
7.13
11.74
0.1
31.77
JetBlue Airways
29.08
2.07
15.68
0.16
29.67
Hawaiian Airlines
27.28
1.55
1.28
0.24
16.01
American Airlines
26.91
4.02
12.5
0.15
33.23
ExpressJet Airlines
26.63
3.25
27.56
0
24.64
Allegiant Air
24.83
6.45
13.79
0.26
30.88
9E
24.02
5.89
19
0.03
28.27
Frontier Airlines
22.01
1.7
15.05
0
36.65
PSA Airlines
21.7
5.43
11.35
0.14
36.69
United Airlines
20.26
3.85
18.99
0.01
28.16
Horizon Air
18.63
2.8
8.79
0.16
20.32
Spirit Airlines
18.34
2.55
28.81
0.45
19.73
Republic Airways
17.43
3.98
22.27
0.06
24.02
That data is somewhat misleading, however; we’re showing the average carrier delay. Delta Air Lines has an average carrier delay of more than half an hour, which doesn’t sound good. But how often does a carrier delay happen? If an airline’s carrier delay is long, but that airline hardly ever has a carrier delay, that’s good to know. On the other hand, if an airline has a short average carrier delay but carrier delays happen all the time, that’s also useful information.
Here’s a query that looks at carrier delays, calculating an expected carrier delay based on the average carrier delay and how often a carrier delay happens:
SELECTcarrier_name,round(avg(CarrierDelay),1)ASavg_carrier_delay,round(countIf(CarrierDelay>0)*100.0/count(),1)ASpct_carrier_delay,round((countIf(CarrierDelay>0)*1.0/count())*avg(CarrierDelay),2)ASexpected_carrier_delay_per_flightFROM(SELECTmultiIf(Carrier='AA','American Airlines',Carrier='AS','Alaska Airlines',Carrier='B6','JetBlue Airways',Carrier='CO','Continental Airlines',Carrier='DH','Atlantic Coast Airlines / Independence Air',Carrier='DL','Delta Air Lines',Carrier='EV','ExpressJet Airlines',Carrier='F9','Frontier Airlines',Carrier='FL','AirTran Airways',Carrier='G4','Allegiant Air',Carrier='HA','Hawaiian Airlines',Carrier='HP','America West Airlines',Carrier='MQ','Envoy Air (American Eagle)',Carrier='NK','Spirit Airlines',Carrier='NW','Northwest Airlines',Carrier='OH','PSA Airlines',Carrier='OO','SkyWest Airlines',Carrier='QX','Horizon Air',Carrier='TW','Trans World Airlines',Carrier='UA','United Airlines',Carrier='US','US Airways',Carrier='VX','Virgin America',Carrier='WN','Southwest Airlines',Carrier='XE','ExpressJet Airlines',Carrier='YV','Mesa Airlines',Carrier='YX','Republic Airways',Carrier)AScarrier_name,CarrierDelayFROMontime.fact_ontimeWHERECancelled=0)GROUPBYcarrier_nameORDERBYexpected_carrier_delay_per_flightDESCLIMIT15;
Here are the results:
carrier_name
avg_carrier_delay
pct_carrier_delay
expected_carrier_delay_per_flight
JetBlue Airways
22.2
15.6
3.47
Allegiant Air
24.8
11.1
2.76
Hawaiian Airlines
28.3
9.1
2.57
Mesa Airlines
27.4
9
2.45
Frontier Airlines
18.1
12.9
2.34
ExpressJet Airlines
20.6
10.5
2.16
PSA Airlines
21.5
10
2.15
SkyWest Airlines
26.6
7.9
2.1
Spirit Airlines
17.1
10.2
1.75
American Airlines
21.7
6.4
1.39
9E
21.9
6.2
1.36
Horizon Air
18.6
6.8
1.27
Southwest Airlines
13.8
8.5
1.18
Envoy Air (American Eagle)
15
7.7
1.15
Republic Airways
17.4
6.3
1.1
With this query, Delta Air Lines and United Airlines are no longer in the results, with Southwest Airlines and Envoy air now included.
The Altinity Stable® Playground on Altinity.Cloud
The Altinity Stable Playground lets you run SQL queries against several sample databases. Altinity Stable Builds are 100% compatible with ClickHouse with robust upgrade and 3 years of support.
When you log in to the system with the userid/password combination of demo/demo, you’ll see this panel:
Figure 4 - The initial panel of the Altinity Stable Playground
There are several things to notice in Figure 4 above:
If you click the Altinity Logo in the upper left corner, it will display the databases and tables in the system once you’re logged in.
The address bar lets you know the URL of the playground server and the version of Altinity Antalya it is running.
The user demo is logged in.
The main attraction, of course, is the text box where you can execute SQL queries.
The Run button beneath the text box executes your query. As noted on the screen, you can also type Ctrl/Cmd+Enter to run the command without clicking on the button.
The icon on the right side beneath the text box toggles the display between light mode and dark mode.
Here are the results of a sample query:
Figure 5 - A query result in the Altinity Stable Playground
This query looks at all taxi rides where the rider was picked up and dropped off in the same borough, sorted by the percentage of all rides that started in that region. Most people in Manhattan stayed in Manhattan; on the other hand, more than half the people picked up in Queens went elsewhere (the LaGuardia and JFK airports are in Queens). The usual query performance statistics appear between the text box and the results area. For numeric results, the yellow shading in the background provides visual cues to the size of the value.
In Figure 5 we have also clicked the Altinity Logo in the upper left to display all the databases in the system. The query above was in the tripdata.taxi_trips table; hovering over the table’s name shows the size of the table, the number of rows, and its engine.
If you’d like to run this query yourself, here it is:
You can run queries such as DESCRIBE TABLE tripdata.taxi_trips for information about the structure of the databases.
Datasets
The Altinity Stable Playground is preloaded with two common databases.
OnTime
The OnTime dataset has records of airline on-time performance of domestic US flights from 1987 to 2025.
Tables in the public playground include:
ontime.fact_ontime (main flight data)
ontime.dim_airports (dimension table for active airports)
ontime.dim_airports_bts_full (dimension table for all historical airports)
Tripdata
The Tripdata dataset contains records of taxi and for-hire vehicle rides in New York City from 2009 to 2025.
Tables in the public playground include:
tripdata.fhv_trips (trips from for-hire vehicles/rideshare starting in 2015)
tripdata.taxi_trips (trips for yellow and green cabs)
tripdata.taxi_zones (dimension table for taxi zone codes)
The Altinity.Cloud demo environment
Altinity has created several guides in the Integrations section of the Altinity Documentation site as well as various blog posts posted in the Altinity Resources Page. To accompany these guides, Altinity has created a public ClickHouse® database hosted through Altinity.Cloud. Our goal is to help new users experience ClickHouse and to help experienced ClickHouse administrators test the connections between applications and ClickHouse.
Database Details
The Altinity.Cloud Demo database has the following connection information:
URL: github.demo.altinity.cloud
HTTP Protocol: HTTPS
HTTPS Port: 8443
ClickHouse Client Port: 9440
Database: default
Username: demo
Password: demo
Altinity.Cloud Demo Database Connection Examples
The following examples provide a quick demonstration on how to connect specific interfaces and applications to the Altinity.Cloud Demo ClickHouse cluster.
ClickHouse Play
ClickHouse lets you run queries directly using a simple HTML interface:
The demo user is allowed to access the default database and table functions. You can run SHOW TABLES to list available tables. The main public datasets that are often used in examples are:
ontime
The ontime table is provided by the Bureau of Transportation Statistics. It is collected from Airline On-Time Performance Data. This information is based on flight data collected by US certified air carriers regarding departure and arrival times, flights cancelled, flights with delayed departure or arrival times, and other relevant data.
airports
The table airports is information on airports, including the name of the airport, city, latitude and longitude, and other relevant information. For the Altinity.Cloud Demo database, this is often joined with the ontime table. The information in this table is provided by OpenFlights.org, from their Airport database.
The table github_events is a collection of all Github events between 2011 to 2020, comprising 3.1 billion records and 200 GB of data. This is provided from the GH Archive.
2 - Project Antalya
Delivering the foundation for the next decade of real-time analytic applications
In a nutshell, Project Antalya integrates open-source ClickHouse® and data lakes to lower costs, simplify scaling, and reduce operational complexity in real-time analytic applications. It is 100% compatible with upstream ClickHouse, and many Antalya features have been submitted as PRs.
Key Challenges of Analytics Systems
The project was designed to solve major challenges facing analytics workloads today:
Soaring Storage Costs - Block storage with replication is 10x more expensive than object storage.
Antalya adds the option to work with data lakes hosted on inexpensive, S3-compatible storage in addition to existing MergeTree storage.
Inefficient Use of Compute - Overprovisioning to ingest data and run queries in single processes wastes compute resources.
Antalya’s swarm clusters are clusters of stateless ClickHouse servers that eliminate the need to overprovision compute nodes.
Complex Operations - Large clusters of stateful servers scale slowly and are hard to manage.
Antalya’s swarm clusters manage themselves and scale up or down quickly.
Real-Time Data Lakes with Project Antalya
Project Antalya extends open source ClickHouse to bring the power of real-time query to the low cost and outstanding scalability of Apache Iceberg-based data lakes.
Boost I/O and caching of Parquet to match MergeTree performance
Deliver sub-second query on data lakes with stateless, cheap swarm clusters
Hybrid tables - Query MergeTree data and Iceberg data with a single SQL statement
Archive MergeTree data automatically to Iceberg data (in development; see the 2026 project roadmap for details)
👉 Project Antalya contains cutting edge features. Some features may be experimental, so check product docs to be sure.
Because Antalya development is progressing rapidly, Altinity currently offers support for the latest two releases for six months beyond their first release. In addition, we will support Antalya 25.8 for more than six months based on customer demand. Going forward, support will be offered for x.3 and x.8 releases. A more formal release schedule and support policy will be available in the second half of 2026.
Here are links to the details of all Antalya releases:
The latest releases are version 26.3.13.20001 for the 26.3 branch (release notes) and 25.8.22.20001 for the 25.8 branch (release notes). See the release notes for all the details.
The details
The following pages explain the concepts behind Project Antalya, as well as the configuration settings to enable them and the SQL syntax to access them:
2.1 - Project Antalya Concepts Guide
What is Project Antalya, why did we build it, and how do I set it up?
Overview
Project Antalya is an extended version of ClickHouse® that offers additional features to allow ClickHouse clusters to use Iceberg as shared storage. The following diagram shows the main parts of a Project Antalya installation:
ClickHouse compatibility
Project Antalya builds are based on upstream ClickHouse and follow ClickHouse versioning. They are drop-in replacements for the matching ClickHouse version. They are built using the same CI/CD pipelines as Altinity Stable Builds.
Iceberg, Parquet, and object storage
Project Antalya includes extended support for fast operation on Iceberg data lakes using Parquet data files on S3-compatible storage. Project Antalya extensions include the following:
Integration with Iceberg REST catalogs (compatible with upstream ClickHouse)
Parquet bloom filter support (compatible with upstream ClickHouse)
Iceberg partition pruning (compatible with upstream ClickHouse)
Parquet file metadata cache
Boolean and int type support on native Parquet reader (compatible with upstream ClickHouse)
Iceberg specification support
Generally speaking, Project Antalya’s Iceberg support matches upstream ClickHouse. Project Antalya supports reading Iceberg V2. It cannot write to Iceberg tables. For that you must currently use other tools, such as Spark or pyiceberg.
There are a number of bugs and missing features in Iceberg support. If you find something unexpected, please log an issue on the Altinity ClickHouse repo. Use one of the Project Antalya issue templates so that the report is automatically tagged to Project Antalya.
Iceberg database engine
The Iceberg database engine encapsulates the tables in a single Iceberg REST catalog. REST catalogs enumerate the metadata for Iceberg tables, and the database engine makes them look like ClickHouse tables. This is the most natural way to integrate with Iceberg tables.
Iceberg table engine and table function
Project Antalya offers Iceberg table engine and functions just like upstream ClickHouse. They encapsulate a single table using the object storage path to locate the table metadata and data. Currently only one table can use the path.
Hive and plain S3
Project Antalya can also read Parquet data directly from S3 as well as Hive format. The capabilities are largely identical to upstream ClickHouse.
Swarm clusters
Project Antalya introduces the notion of swarm clusters, which are clusters of stateless ClickHouse servers that can be used for parallel query as well as (in future) writes to Iceberg. Swarm clusters can scale up and down quickly.
To use a swarm cluster, you must first provision at least one Project Antalya server to act as a query initiator. This server must have access to the table schema, for example by connecting to an Iceberg database using the CREATE DATABASE ... Engine=Iceberg command.
You can dispatch a query on S3 files or Iceberg tables to a swarm cluster by adding the object_storage_cluster = <swarm cluster name>setting to the query. You can also set this value in a profile or as as session setting.
The Project Antalya initiator will parse the query, then dispatch subqueries to nodes of the swarm for query on individual Parquet files. The results are streamed back to the initiator, which merges them and returns final results to the client application.
Swarm auto-discovery using Keeper
Project Antalya uses Keeper servers to implement swarm cluster auto-discovery.
Each swarm cluster can register itself in one or more clusters. Each cluster is registered on a unique path in Keeper.
Initiators read cluster definitions from Keeper. They are updated as the cluster grows or shrinks.
Project Antalya also supports the notion of an auxiliary Keeper server for cluster discovery. This means that Antalya clusters can use one Keeper ensemble to control replication, and another Keeper server for auto-discovery.
Swarm clusters do not use replication. They only need Keeper for auto-discovery.
Tiered storage between MergeTree and Iceberg
Project Antalya will provide tiered storage between MergeTree and Iceberg tables. Tiered storage includes the following features.
ALTER TABLE MOVE command to move parts from MergeTree to external Iceberg tables.
TTL MOVE to external Iceberg table. Works as current tiered storage but will also permit different partitioning and sort orders in Iceberg.
Transparent reads across tiered MergeTree / Iceberg tables.
Hybrid tables
One of Project Antalya’s key goals is to manage storage costs. Hybrid tables allow you to query data in tiered storage. Your hot data can be in a MergeTree, with cold data in an Iceberg catalog. Then you can use a single query against all of your data. That can significantly reduce your storage costs without complicating your queries.
The Hybrid table engine lets you specify multiple table segments that are selected by a condition. In this example, the condition is a date:
In this example we have two segments, although you can have more segments for more complex use cases. Data more recent than watermark_date will be in a MergeTree, while older data will be in an Iceberg catalog.
When you run a SELECT against this table, the Hybrid table engine will query the data in all the segments. In addition, the engine will do a simple analysis of the query; for example, if the query contains a WHERE clause on the date that allows the engine to ignore entire segments, it will do so.
Runtime environment
Project Antalya servers can run anywhere ClickHouse runs now. Cloud-native operation on Kubernetes provides a portable and easy-to-configure path for scaling swarm servers. You can also run Antalya clusters on bare metal servers and VMs, just as ClickHouse does today.
Future roadmap
Project Antalya has an active roadmap. Here are some of the planned features:
Automatic archiving of level 0 parts to Iceberg so that all data is visible from the time of ingest.
Materialized views on Iceberg tables.
Fast ingest using Swarm server. This will amortize the effort of generating Parquet files using cheap compute servers.
There are many more possibilities. We’re looking for contributors. Join the fun!
2.2 - Project Antalya Quick Start Guide
Getting up to speed with Project Antalya
Project Antalya delivers new features that make ClickHouse® even more powerful than before. In this guide we’ll show you how to make the most of those features.
EXCITING NEW FEATURE
As of version 26.3, Antalya has GA-level support for OAuth. This lets you manage access to your ClickHouse servers and data in a centralized way, coordinating access to ClickHouse and applications that use it without giving up the full power of ClickHouse’s RBAC.
See the OAuth documentation to learn about Antalya’s OAuth support and how to configure it. Now back to our regularly scheduled Quick Start Guide…
There are three concepts we’ll deal with in this guide:
Swarms - Swarms are pools of stateless ClickHouse clusters. With Project Antalya, ClickHouse can use a swarm to distribute the processing load of a query, giving you much faster query times. They can be spun up or down as needed, and they register (and unregister) themselves with Keeper automatically. And they can cut your compute costs significantly by running on spot instances, which Amazon says can be up to 90% cheaper than regular instances.
Data Lakes - Project Antalya implements data lakes that use Iceberg as their table format, store data as columns in Parquet, and host everything on inexpensive, S3-compatible storage. Most importantly, Project Antalya’s data lakes can be used by multiple applications. Analytics workloads with ClickHouse, AI applications, and batch jobs can all use the same Iceberg catalogs, eliminating silos of data and greatly reducing your storage costs.
Hybrid Tables - Project Antalya delivers the Hybrid table engine, which allows you to divide a dataset between block storage and object storage. Putting your lesser-used data into object storage can have significant cost savings. And even though your data is stored in different places, hybrid tables let you analyze all of your data with a single query.
Throughout this guide we’ll look at two different datasets:
The AWS Public Blockchain dataset - This has 15+ years of data, with thousands of Parquet files, one for each day. It’s a great way to show the benefits of swarm clusters, since we can use multiple threads to read and process those thousands of files in parallel.
The New York Taxi and Limousine Commission dataset, which has more than fifteen years’ worth of data on taxi rides. This is a great dataset to illustrate the power of Hybrid tables. Analytics against this data tend to focus on time-based queries. If there’s a clear line between hot data and cold data, the ability to move cold data to much cheaper object storage yet still query all our data with a single SQL statement has substantial benefits.
2.2.1 - Creating Swarm Clusters
Getting started with swarms
Swarm clusters are ClickHouse® clusters that:
Are stateless and ephemeral - they are provisioned and deprovisioned as needed and have no permanent state or storage
Run on spot instances (typically) to save costs
Self-register and unregister with Keeper (ClickHouse Keeper or Zookeeper)
In this section we’ll look at how to enable swarms for our ClickHouse cluster, then we’ll create one.
But first…
It’s an obvious detail, but make sure your cluster is running an Antalya build:
If you used the Quick Path method to create your cluster, it will use an Altinity Stable build by default. To change to an Antalya build, use the Upgrade menu item on the Cluster Actions menu and select an Antalya build. See the Upgrading a Cluster documentation for all the details.
Enabling swarms
You enable swarm clusters for an individual ClickHouse cluster via the Cluster Actions menu:
NOTE
This menu item is currently disabled by default, but please contact us and we can enable it for your account. You’re also free to skip ahead to the Working with Data Lakes section and work without swarms for now.
Clicking the Enable Swarms menu item asks you to confirm your choice:
Figure 1 - Enabling swarms for a cluster
Simple as that. You’ll get a success message when your cluster is updated. Also, swarms are enabled at the cluster level, so you’ll need to enable swarms for each cluster going forward.
Be aware that enabling swarms may restart the cluster.
Creating a swarm cluster
Once swarms are enabled, the Launch Cluster wizard will have a LAUNCH SWARM button at the top of the Clusters view:
Figure 2 – The LAUNCH SWARM button
In Figure 2, we have a regular cluster named maddie-byok, and we’ve used the menu to enable swarms. Now clicking the LAUNCH SWARM button brings up this simple dialog:
Figure 3 - The Launch a Swarm dialog
Give your swarm cluster a name, select a node type, set the number of nodes, and click the button. Your swarm cluster will be ready shortly. While it’s being provisioned, you’ll see a dialog that gives you the password for the admin user:
Figure 4 - Getting the admin password for your swarm cluster
Click the icon to copy the password. Save the it somewhere safe; you won’t be able to see it later. (You can change it once you’re logged in, however.) When everything is deployed and running, your clusters will be displayed like this:
Figure 5 – A regular cluster and a swarm cluster
In Figure 5, we have a regular cluster named maddie-byok and a swarm cluster named maddie-swarm. With our swarm cluster set up, we’ll use it to query some data.
At this point, we’ve enabled swarms and created a swarm cluster alongside our regular cluster. We’ll run some queries against the AWS Public Blockchain dataset and see how swarms impact our performance.
Running a query without a swarm
We’ll start with a simple query. Here’s how to get the number of transactions and the total value of all outputs from those transactions for each day in 2024:
NOTE: If you’re working with massive datasets, you may need to modify the timeout value for your queries. In the ACM, the default timeout value is 30 seconds. You can change it by editing the Timeout entry field above the Query window. You can also add SETTINGS max_execution_time = 150 to the end of your queries.
Running the query with a swarm
Now we’ll update the query’s SETTINGS to use the swarm cluster and see how that impacts performance:
That’s just over 27X better. That’s running on a four-node swarm, but you can obviously create a larger swarm. This query is a good candidate for larger swarms because we have lots of Parquet files to download. You can also add the setting object_storage_max_nodes to control how many of the swarm’s nodes are used in the query:
That’s almost 35X faster! In this query, swarms let us load the thousands of Parquet files in parallel, making the query much, much faster.
Joins
All of our queries to this point have been against a single table. What if we want to do joins? That’s a problem, because a swarm node doesn’t have any persistent storage where the joined table might be stored.
We’ll set up a query against the Ethereum data that’s part of the AWS dataset. We’ll look at a Parquet file of transaction data; each row has a contract address, but it doesn’t have the token name associated with that address. To find the token name for each address, we’ll create a lookup table with a few address / token pairs:
Now we have a mapping between contract addresses and token names. So let’s find some Ethereum data and use a JOIN to get the token names that aren’t part of the table:
Code: 81. DB::Exception: Received from chi-maddie-swarm-maddie-swarm-0-0-0.chi-maddie-swarm-maddie-swarm-0-0.altinity-cloud-managed-clickhouse.svc.cluster.local:9000. DB::Exception: Database eth does not exist. (UNKNOWN_DATABASE) (version 25.8.16.20002.altinityantalya (altinity build))
The swarm cluster is being asked to do a join against the eth.token_addresses lookup table. But remember, the swarm cluster is ephemeral; it has no permanent storage, so it can’t find the lookup table. The solution is to use the object_storage_cluster_join_mode = 'local' setting, which tells the initiator node to do the join locally. If we add that to the query, everything works:
Whenever you get a “Database does not exist” from a swarm cluster, it’s most likely because you’re doing a JOIN without the object_storage_cluster_join_mode setting.
That’s all we’ll do with the Ethereum data; we’ll go back to the Blockchain data for our next examples.
Where swarms make a big impact
Swarms gave us a massive performance improvement. Here are aspects of the BTC dataset that are uniquely suited to swarms:
Many small files — The BTC dataset has thousands of Parquet files (one per day going back to 2009). A swarm can fetch those in parallel across nodes dramatically faster than a single node.
External data joins — joining a large local table against a large remote S3 dataset, where each node can pull its share of the remote data independently.
Very large local tables — once you’re in the tens of billions of rows, the parallelism across nodes becomes meaningful for aggregations.
Troubleshooting your query
There are three common error messages you may get when you run your query against a swarm.
Swarm syntax not supported
The first error tells you that the basic syntax for specifying the swarm cluster name isn’t supported:
Code: 115. DB::Exception: Setting object_storage_cluster is neither a builtin setting nor started with the prefix 'SQL_' registered for user-defined settings. (UNKNOWN_SETTING) (version 25.3.6.10034.altinitystable (altinity build))
This tells us that the object_storage_cluster setting isn’t recognized…which means this cluster is running a non-Antalya build. (Scroll over to the end of the message for the crucial clue.) You’ll need to upgrade your cluster to an Antalya build before swarm queries will work. See the Upgrading a Cluster documentation for all the details.
Swarm cluster can’t be found
Another common message tells us our swarm cluster can’t be found:
This one can be more frustrating; it’s telling us the maddie-swarm cluster can’t be found. The swarm cluster is active, and we’re running an Antalya build. There isn’t anything wrong with the maddie-swarm cluster, so what’s going on? The swarm cluster can’t be found because the cluster you’re using isn’t enabled for swarms. See the section on Enabling Swarms for the details. It’s an easy fix, but nothing works until you enable swarms for each cluster that needs them. Enabling swarms only enables them for a single cluster, not all clusters in your environment.
A swarm cluster says a database does not exist
Finally, you may get a message from a swarm cluster that a database does not exist:
Code: 81. DB::Exception: Received from chi-maddie-swarm-maddie-swarm-0-0-0.chi-maddie-swarm-maddie-swarm-0-0.altinity-cloud-managed-clickhouse.svc.cluster.local:9000. DB::Exception: Database eth does not exist. (UNKNOWN_DATABASE) (version 25.8.16.20002.altinityantalya (altinity build))
Our next step is to create a data lake. With the data lake created, we’ll run queries against it with the swarm cluster we created earlier.
Here are the steps we’ll go through:
Enable an Iceberg catalog for our Altinity.Cloud environment
Get the connection details for our Iceberg catalog
Write data to our Iceberg catalog (this takes place outside the ACM)
Create a ClickHouse database that’s connected to our Iceberg catalog
Use a swarm cluster to run queries against that database
Enabling an Iceberg catalog
Before we can work with data lakes, we need to enable an Iceberg catalog for your Altinity.Cloud environment. From the Environments tab, select the Catalogs menu item:
Figure 1 - The Catalogs menu item
You’ll see this dialog:
Figure 2 - Enabling an Iceberg catalog
Click the button to enable the catalog. (You may need to click the button a few times while the catalog is created.) When the catalog is enabled, you’ll see the connection details for the catalog:
Figure 3 - Connection details for the Iceberg catalog
The Altinity Cloud Manager now supports creating multiple catalogs, including (for SaaS and BYOC environments) catalogs stored in your AWS account. Complete information about working with Iceberg catalogs is in the Enabling an Iceberg Catalog documentation.
Any time you need the connection details for a cluster you can click on the Catalog menu. You’ll see a list of all your catalogs, along with a Connection Details link next to each one:
Figure 4 - The catalog list
Writing data to the Iceberg catalog
Now it’s time to take the credentials from Figure 3 above and use them to load data into our catalog. There are a number of tools that can do this, but we’ll use Ice, an open-source tool from Altinity.
First, we’ll put the connection details into the file .ice.yaml:
(Notice that the field in the YAML file is uri, not url.)
With the YAML file configured, we’ll load a Parquet file from the AWS public blockchain dataset into the catalog entry named blockchain.data (be sure your AWS credentials are set before you try to insert data into the catalog):
For this example, we loaded the blockchain data from the first day of August, 2025.
Creating a database from the Iceberg catalog
By using the connection details in Figure 3 above, we were able to load data into the catalog. But now we need to create a ClickHouse database to query the data in our catalog. We do that with the DataLakeCatalog engine, which lets us query an Iceberg table like any other ClickHouse data source.
Using the information in Figure 3 above, here’s the syntax:
Using swarm clusters to run queries against our Iceberg catalog
At this point we can use our swarm cluster to run queries against this table, which is actually a link to our Iceberg catalog of Parquet files stored on S3-compatible storage. We’ll see similar performance improvements as in the previous section. As we mentioned above, our sample catalog contains public blockchain data from the first ten days of August, 2025.
We’ll start by running the query from the previous section against our data lake without swarms:
Even though this is a very small data lake, a swarm-assisted query is over 6X faster once the cache is loaded. As you work with larger data lakes and larger swarm clusters, the performance benefits will be even greater.
That’s a look at swarm clusters and how they can make your queries much faster and efficient. Let’s move on to our next topic…
Hybrid tables are one of the most powerful features of Project Antalya. The Hybrid engine gives you the ability to keep some of your data in a traditional MergeTree engine and some of your data in an Iceberg catalog, then run a single query across all of your data. Your hot data can stay in block storage for maximum performance, while your cold data can move to object storage for the cost savings.
Comparison of storage types
Here’s how MergeTree tables and Iceberg catalogs compare:
MergeTree table
Iceberg catalog
Loads almost instantly
Loaded in batches, e.g., every hour
Compaction is built-in and fast
Compaction is external and often slow
Low latency to first record
High latency to first record
Expensive
Cheaper storage and compute
Scaling is slow and limited: vertical scaling
Fast horizontal and vertical scaling
Limited I/O bandwidth
Unlimited I/O bandwidth
Access only through ClickHouse server
Shareable with other applications
Hybrid tables give you a tremendous amount of flexibility. You define what hot and cold data looks like, then the Hybrid table engine manages that for you. You create a Hybrid table with a date called a watermark, something like “look in hot storage for any data newer than January 1st, 2025, and look in cold storage for anything older.”
Our scenario
We’ll move on from the blockchain dataset to a database of New York City taxi data from October 2024 through March 2025. Here we’ll work with data that’s in our ClickHouse cluster, not somewhere on the internet. At first, all of our data will be stored in a MergeTree. That has great performance, but all of our data will be in expensive block storage. Here’s our starting point:
Figure 1 - A MergeTree table - all data in block storage
What we’ll move to is a Hybrid table that has the data from October through December 2024 (cold data) in Parquet files in object storage, and January through March 2025 (hot data) in block storage. Our watermark will be January 1, 2025. Here’s our goal:
Figure 2 - A Hybrid table - some data in object storage, some in block storage
What makes the scenario in Figure 2 work is the Hybrid table engine. With a Hybrid table, we can execute a single query against all of our data. If that query is against hot data, the performance is virtually identical to our original MergeTree. But we’re not paying for expensive block storage for all of our cold data. If the query includes cold data as well, ClickHouse still finds all of our data. The performance will be slower than our original MergeTree, but our costs will be lower.
Best of all, we have complete control of how the data is partitioned. We know what data we work with most, so we can decide the best point in time to separate our data.
Iceberg catalogs and Parquet files
Data in cold storage uses two crucial technologies: Iceberg catalogs and Parquet files. We’ll use an S3-compatible bucket that will hold the catalog and the files. The Iceberg catalog will contain metadata about the Parquet files and the data they contain, so ClickHouse will start by looking at the Iceberg catalog, then looking at the appropriate Parquet files. The DataLakeCatalog engine lets us access an Iceberg catalog as if it were any other ClickHouse table.
Let’s get to work!
We’ll go through these steps to create a Hybrid table:
Use Antalya features to export cold data from a MergeTree to a Parquet file in S3
Use ice to process the Parquet files we created and update the Iceberg catalog
Delete the cold data from the MergeTree
Create the Hybrid table, pointing to the original MergeTree for hot data and the Iceberg catalog for cold data.
A key point here is that we’ll be working with partitioning. In our taxi data example, we’ll partition our tables by month. That makes it very easy and efficient for Iceberg to find the Parquet files that ClickHouse needs to search. We might have 20 years’ worth of taxi data, but if we want to analyze March 2024, Iceberg points ClickHouse to the Parquet files from that month. With exactly 20 years of data, that means ClickHouse can ignore 239 of the 240 partitions, making the query orders of magnitude simpler and faster. Even better, we’ll sort the data in our Parquet files, so ClickHouse may be able to ignore even more data inside the Parquet files for a given month.
Enough explaining, it’s time to create the infrastructure we need and see a Hybrid table in action.
Create the database and tables we need
First, let’s create the database we’ll use throughout:
Notice that we’re partitioning our data by month, but we’re doing that with the function toYYYYMM(tpep_pickup_datetime) instead of creating a column in the table itself.
Now let’s create the table of metadata. If a taxi ride started at pickup location 132 (PULocationID = 132), the metadata tells us that’s JFK Airport in Queens. That’ll be useful for some queries we’ll look at later.
From having worked with NYC taxi data in the past, we know there can be some bad data in the source files. Let’s see if we have any data that’s out of range:
From now on, we’ll have 22,346,514 total records in our dataset.
Creating our Iceberg catalog database
To set up our Hybrid table, we’ll export some of our data as Parquet files in S3-compatible storage. Before we do that, we need to create a database with the DataLakeCatalog engine. We only need one DataLakeCatalog database in our environment. If it doesn’t exist already, fill in this statement with the appropriate values and create the table:
The DataLakeCatalog engine lets us access data in the data lake just like any other ClickHouse table. You’ll need the details of the Iceberg catalog that’s part of your environment. From the Environment display, click the Catalogs tab to see your details:
Use the values of Catalog URL, Auth Token, and Warehouse in Figure 3 to fill in the URL of the catalog, the auth_header setting, and the warehouse setting. You must define the authentication header as shown in the CREATE TABLE statement above.
After we export our Parquet files to the S3 bucket altinity-01234567-iceberg, we’ll use the ice tool to update the Iceberg catalog.
Exporting our data as Parquet files in S3
Now we’ll export the data from October through December to our S3 bucket. We’ll use Antalya’s ALTER TABLE EXPORT PART command to do that. (Our data is already partitioned, so there’s no reason to use SELECT to find the data we want.)
PRO TIP
If you’re working in the ACM, be sure to turn off the slider above the Query window before running ALTER TABLE EXPORT PART. If you forget, it will fail immediately with the message Unsupported type of ALTER query. If you’re in clickhouse-client, you may need to run SET allow_distributed_ddl = 0;.
This SELECT statement gets the list of parts we care about, then generates the command we need to export each one:
SELECT'ALTER TABLE antalya.taxi_rides EXPORT PART '''||name||''' TO TABLE FUNCTION s3(\'s3://altinity-01234567-iceberg/antalya/taxi_rides/data/pickup_month={_partition_id}/{_file}.parquet\', format=\'parquet\') PARTITION BY toYYYYMM(tpep_pickup_datetime) SETTINGS allow_experimental_export_merge_tree_part = 1;'FROMsystem.partsWHEREdatabase='antalya'ANDtable='taxi_rides'ANDactiveANDpartitionIN('202410','202411','202412')FORMATTSVRaw;
You’ll get a list of commands:
ALTERTABLEantalya.taxi_ridesEXPORTPART'202410_0_5_1_6'TOTABLEFUNCTIONs3('s3://altinity-01234567-iceberg/antalya/taxi_rides/data/pickup_month={_partition_id}/{_file}.parquet',format='parquet')PARTITIONBYtoYYYYMM(tpep_pickup_datetime)SETTINGSallow_experimental_export_merge_tree_part=1;ALTERTABLEantalya.taxi_ridesEXPORTPART'202410_7_14_1'TOTABLEFUNCTIONs3('s3://altinity-01234567-iceberg/antalya/taxi_rides/data/pickup_month={_partition_id}/{_file}.parquet',format='parquet')PARTITIONBYtoYYYYMM(tpep_pickup_datetime)SETTINGSallow_experimental_export_merge_tree_part=1;ALTERTABLEantalya.taxi_ridesEXPORTPART'202411_0_7_2_8'TOTABLEFUNCTIONs3('s3://altinity-01234567-iceberg/antalya/taxi_rides/data/pickup_month={_partition_id}/{_file}.parquet',format='parquet')PARTITIONBYtoYYYYMM(tpep_pickup_datetime)SETTINGSallow_experimental_export_merge_tree_part=1;-- more commands follow, one for each part
The ALTER TABLE EXPORT PART statements export the data to our S3 bucket, using the partition key to store each month’s data in a separate directory. Some notes on the generated commands:
The high-level path is antalya/taxi-rides. We’re going to create a database table named antalya.taxi_rides in a minute. The path and table name should be the same as they are here; if they aren’t, you’ll get an odd error message that asks you to rerun the ice command. More on that in a minute.
We’re creating a directory structure where all the Parquet files from a particular partition will be stored in a directory named something like pickup_month=202410. You must include the partition name ({_partition_id}) in the directory name.
We’re using {_file} to use the part name (not the partition name) and .parquet as the filename. You must put .parquet at the end of the filename. The ice tool will only process a file if it has the parquet extension.
We have to add SETTINGS allow_experimental_export_merge_tree_part = 1 to the end of each command for this to work. If you like, you can add this setting to a profile or as a server setting so you don’t have to specify it. See the documentation for configuring profiles or configuring settings for all the details.
After you run the commands, the directory structure in the bucket looks like this (you’ll probably have a lot more files, btw):
(We’ll talk about the commit_... files in a minute.)
Monitoring exports
If you’re curious about what’s happening, while ALTER TABLE EXPORT PART is running, the system.exports table shows extensive details about the export in progress:
The records in the system.exports table are ephemeral; once a part is exported, it won’t be in the table anymore. The table only contains records for exports currently in progress. To see details about exports later, you can look in system.part_log:
Now we’ll use Altinity's open-source ice tool to process the Parquet files and update the Iceberg catalog with the metadata from those Parquet files.
NOTE: ice writes data to the S3 bucket that contains our Parquet files and the Iceberg catalog. That means your AWS credentials must be set when you run it.
The ice command creates a table named antalya.taxi_rides in the ice database. Notes on the command options:
The Parquet files we created above are already in the same S3 bucket as our Iceberg catalog, so we use the --no-copy attribute to tell ice not to make a copy of the data.
We’re giving ice 10 threads to do its work.
The --partition attribute is part of the Iceberg spec; it allows us to create a partition key by converting a DateTime value to a month. (There are other options, including hour, day, and year. See the Iceberg partitioning spec if you’d like more details.)
Finally, specifying a sort order makes queries against the Iceberg catalog even more efficient. Our assumption is that we’ll be doing lots of queries about pickup and drop off locations. For example, “How many rides are there from JFK airport for each day of the week?” Having the data sorted by the PULocationID lets ClickHouse skip directly to the data for that value (for JFK Airport it’s 132).
NOTE: The name of our table is antalya.taxi_rides, and the path to our Parquet files starts with antalya/taxi_rides. If those don’t match (you create a table named antalya.ride_data, for example), you’ll get an error from ice because the Parquet files aren’t where it expects them to be. You can run the ice command again with the --force-no-copy option, but…don’t. Make sure your table name matches your directory structure.
Assuming ice processed our data without errors, the new table should have only data from October, November, and December. Let’s take a look:
(Notice that we have to use ` backticks ` around the table name in the ice database.) We’ve got the same data in both places:
┌──count()─┐
1. │ 11148508 │ -- 11.15 million
└──────────┘
┌──count()─┐
1. │ 11148508 │ -- 11.15 million
└──────────┘
Out of paranoia, let’s check one more thing. When we run ALTER TABLE EXPORT PART, Antalya writes the Parquet file to the S3 bucket. After all the data has been written, it creates the commit_... files we saw earlier. This query checks our S3 bucket, looks for every Parquet file Antalya created, then makes sure there’s a corresponding commit_... file:
(That was totally overkill, but better safe than sorry.)
Now let’s delete the parts we just moved into object storage. This SELECT statement gets the list of parts and generates the ALTER TABLE DROP PART commands we’ll need:
SELECT'ALTER TABLE antalya.taxi_rides DROP PART '''||name||''';'FROMsystem.partsWHEREdatabase='antalya'ANDtable='taxi_rides'ANDactiveANDpartitionIN('202410','202411','202412')FORMATTSVRaw;
The commands will look like this:
ALTERTABLEantalya.taxi_ridesDROPPART'202410_0_5_1_6';ALTERTABLEantalya.taxi_ridesDROPPART'202410_7_14_1';ALTERTABLEantalya.taxi_ridesDROPPART'202411_0_7_2_8';-- more commands follow, one for each part
Copy, paste, and run those commands. All our data still exists, but half of it is in expensive block storage and half of it is in much cheaper object storage.
Creating our Hybrid table
Now it’s time to create our Hybrid table. Here’s the syntax:
We’re creating a Hybrid table cleverly named antalya.taxi_rides_hybrid. It has the same schema as antalya.taxi_rides. For any data from January 1, 2025 or later, the Hybrid table engine will look in the antalya.taxi_rides table; for anything earlier than that, it will look in ice.`antalya.taxi_rides`.
With the table created, let’s put it to the test! Our hybrid table should have the same number of records as the tables we have in hot and cold storage:
┌──count()─┐
1. │ 22346514 │ -- 22.35 million
└──────────┘
┌─total_count─┐
1. │ 22346514 │ -- 22.35 million
└─────────────┘
Success!
Querying our Hybrid table
All our data is where it’s supposed to be, so let’s run a couple of queries. First, we’ll look at the average taxi fare for each hour of the day during November 2024:
Here’s a more complicated example, what is the total of all fares for each borough from December 2024 through March 2025, ordered by borough. Most importantly, this query involves a JOIN on the antalya.taxi_zones table so we can find the borough for a given taxi ride:
Now let’s look at the swarm-enabled query of taxi rides, revenue, and average fare for each borough. Here are the performance numbers for the original query:
So we have gains here, but not nearly as significant as the swarm queries we used against the BTC dataset. There are a couple of reasons for that:
Our dataset is small. We’ve got fewer than 25 million records, so ClickHouse isn’t doing any heavy lifting here.
We don’t have many partitions. The BTC dataset has a Parquet file for each day; the small portion of the taxi dataset we’re using here has 10 files for 90 days.
We’ve seen how Hybrid tables let us save money by using object storage without losing the ability to work with all of our data. And we saw how combining Hybrid tables and swarms really show off the power of Antalya.
At this point we’ve used all the major features of Antalya. We’ve seen how swarm clusters can speed up queries, and we’ve seen how Hybrid clusters can save you money by letting you put your cold data into object storage. Here are the key technologies Antalya delivers:
Swarm clusters - Swarm clusters give us the benefits of horizontal scaling and caching. Swarms are also cheaper than clusters of regular nodes, so we save money as well.
Hybrid tables - Hybrid tables save us money, letting us store cold data in cheaper object storage.
Inserting data - When we run an INSERT statement, that statement is handled by the regular cluster and the data goes into block storage.
Exporting data - When we run ALTER TABLE EXPORT PART, our data is written as Parquet files in object storage. We use ice to update the Iceberg catalog based on the data and metadata in the Parquet files, but that’s outside this picture. (At some point, Iceberg catalogs will be updated automatically without using ice.)
Searching a Hybrid table - When we search the Hybrid table, ClickHouse uses the watermark (2025-01-01 in the example) to determine what data to search.
Summary
Project Antalya adds significant benefits to what is already the premier open-source analytics platform. You can use swarm clusters and hybrid tables together or separately, making your queries faster while lowering your storage and computing costs.
2.3 - Using OAuth with Project Antalya
How to use ClickHouse® with an OAuth provider
Altinity’s Project Antalya supports authenticating users via OAuth tokens issued by an external Identity Provider (IdP) such as Keycloak, Microsoft Entra ID, the Google Auth Platform or any service that supports OpenID Connect (OIDC). This allows you to manage users at an organizational level instead of defining them in ClickHouse and other systems.
OAuth support first shipped in Altinity Antalya 26.1, and is officially GA as of Altinity Antalya 26.3.
The power of OAuth
When someone or something authenticates with an IdP, they get three tokens:
An access token that tells ClickHouse the roles held by anyone who has this token. The token also has an expiration timestamp that indicates when it is no longer valid.
A refresh token that ClickHouse can use to get a new access token from the IdP when it expires.
An ID token that identifies a user or application.
A ClickHouse server configured to use OAuth manages these tokens for you. A refresh token typically has a much longer lifecycle than an access token. If the access token has expired, ClickHouse can send the refresh token to the IdP to get a new one. If the refresh token has expired as well, the user or application has to reauthenticate with the IdP.
Most importantly, given the claims in an access token, ClickHouse can determine what roles and grants the holder of that access token should have. This is especially useful for managing access permissions for an LLM. With OAuth in the picture, the LLM sends an access token to ClickHouse with a query; the access token tells ClickHouse exactly what access the LLM has. An LLM can’t work around access limits by asking a question a different way with a different query — if the LLM’s access token doesn’t give it the access it needs to run a query, the query will fail. You have the simplicity of managing users with OAuth without giving up the full power of ClickHouse’s RBAC.
Managing access to ClickHouse with OAuth has substantial advantages over a static username and password:
Tokens expire - Even if a credential is compromised, its lifespan is short, so the potential for damage is limited.
Fine-grained access control - Given the claims in an access token, ClickHouse can determine exactly what roles and grants apply.
Audit trail - An OAuth server provides a full audit trail of every token issued to a service account.
Antalya uses OpenID Connect (OIDC). OIDC adds claims to OAuth tokens, adding information about the token holder’s identity. (Claims are often called fields, but “claim” is the official OIDC term. For example, the name/value pair 'email': 'doug@example.com' is a claim.) We’ll configure Antalya to control access based on the values of those claims.
Define token processors - We can define any number of token processors to work with the IdPs that manage the tokens we’ll use. We can set these up in several different configurations; we’ll talk about the pros and cons of each.
Set up an IdP as an external user directory - A major advantage of OAuth is that we can manage access for users that aren’t defined to ClickHouse. If a token belongs to a user ClickHouse doesn’t know, we can go to an external user directory to determine what access (if any) that user should have.
Enabling token authentication
You don’t need to do anything here; token authentication is enabled by default. However, you can disable it in config.xml if you want:
<enable_token_auth>0</enable_token_auth>
When disabled, token processors are not parsed, TokenAccessStorage is not available, and authentication via tokens (with the clickhouse-client --jwt option or by passing an Authorization: Bearer header) is rejected.
Enabling token authentication for a ClickHouse user
In an OAuth environment, users are typically managed by the IdP. However, you can also create a ClickHouse user that should be authenticated with a token instead of other methods. Enabling token authentication with SQL is simple:
CREATEUSERmy_userIDENTIFIEDWITHjwt;
You can also enable token authentication for a user in users.xml. Use the jwt section instead of password or other similar sections in the user definition:
Here, the claims element says the JSON Web Token (JWT) payload must contain ["view-profile"] on path resource_access.account.roles, otherwise authentication will fail. Per-user claims are enforced only when the token is a JWT (validated by a JWT processor such as jwt_static_key or jwt_dynamic_jwks). When the user authenticates with an opaque (access) token (for example, from Azure, OpenID, or Google token processors), claims are not checked and authentication succeeds if the token is otherwise valid.
NOTE: A user definition cannot have JWT authentication together with any other authentication method. The presence of any other sections such as password alongside jwt will force ClickHouse to shut down.
Defining token processors
There are several ways to define a token processor to Antalya. To use token authentication, you need to add a token_processors section to config.xml and define at least one token processor in it. There are several types of token processor, and we’ll look at the details of all of them, but first we need to talk about the architecture of our application and look at JSON Web Tokens, the most common data format for tokens.
Application architecture
At a high level, there are two ways to set up a token processor:
Validate tokens locally - The first time a token comes in from a particular IdP, Antalya gets its public key. From that point, Antalya uses the IdP’s public key to verify the signature in every token it receives.
Pros: No network latency; we don’t have to go to the IdP for every token.
Cons: If a token hasn’t expired, ClickHouse blindly accepts it. It’s possible that the token holder’s access has been revoked at the IdP. Until the token expires, the token holder will get access they’re not entitled to.
Validate tokens remotely - ClickHouse calls the IdP’s userinfo endpoint on every token.
Pros: If the token holder’s access has been revoked at the IdP, the token will be rejected immediately.
Cons: We’ve got a network call for every single token. That puts the IdP in our critical path.
Which one you choose mainly depends on the sensitivity of your data. If you’re working with financial data or anything with privacy concerns, you’ll need to validate tokens remotely. On the other hand, if you’re okay with a token holder potentially having unauthorized access until a token expires, you can use the local approach. Finally, if your IdP works with opaque tokens (tokens that are a string instead of a JSON object), you’ll have to validate those tokens remotely.
JSON Web Tokens
Most of the tokens we’ll work with are JSON Web Tokens. A JWT has three sections:
Header: - Contains the ID of an IdP’s public key and the algorithm used to sign the token
Payload: The data we care about. It includes claims for things like the URL of the IdP who issued the token, a unique ID for the holder of the token, an expiration timestamp, and the groups the token holder belongs to.
Signature: The token’s signature, created with the IdP’s private key. We can use the IdP’s public key to verify the signature.
Determining the access a token holder should have involves verifying the signature and then looking at the values in the payload.
Be aware there are also opaque tokens, which are strings that don’t use the JWT structure. (7f8d9e4b-1234-5678-9876543210ef, for example.) If that’s what we’re working with, we have to configure the token processor to take every token it receives and send it to the IdP for verification.
There are three ways Antalya can store an IdP’s public key:
Static public key: We get the public key of the IdP and hardcode it into the definition of the token processor. Verifying the token simply means checking the signature against the hardcoded public key. However, if the IdP rotates its keys, we have to reconfigure the token processor.
Static JSON Web Key Set (JWKS): A JWKS is a JSON document that contains one or more public keys. Each key has an ID defined by the IdP, and every token signed by the IdP includes the token ID in its header. Verifying a token means getting the key ID in the token’s header, finding the public key with that ID, then checking the signature against the key. We can store the JWKS in a file and reference the filename, or we can put the contents of the JWKS in the configuration itself. As you would expect, if the key set changes, we have to reconfigure the token processor.
Dynamic JWKS: We configure the token processor by giving it the URL of the JWKS at the IdP. As with a static JWKS, the token processor finds the public key that matches the ID in the token header and validates the signature. However, if the token processor gets a token with a key ID it doesn’t recognize, the token processor goes back to the IdP and downloads an updated key set. We can also configure the token processor to update the key set on an interval. This is the configuration you would use in production with a real IdP.
Basic syntax and parameters
We define one or more token processors in the token_processors section of config.xml. As an example, here’s the partial definition of a token processor named keycloak:
There are four parameters common to every type of processor:
type - The type of token processor. Supported values are jwt_static_key, jwt_static_jwks, jwt_dynamic_jwks, entra, and openid. (We’ll look at the details of each of the five types next.) Mandatory, case-insensitive.
token_cache_lifetime - The maximum lifetime of a cached token in seconds. If the token reaches its expiration before the cache, it is no longer valid. If the cache lifetime is reached, the token is no longer valid, even if its expiration date hasn’t been reached. Optional, default: 3600.
username_claim - The name of the claim in the payload of a JWT that will be treated as the ClickHouse username. Optional, default: sub.
groups_claim - The name of the claim that contains the list of groups the user belongs to. Optional, default: groups.
There are additional specific parameters for each token processor type, some of which are mandatory. We cover those next. Be aware that any parameters that are not required for a given processor type are ignored.
Static public key token processor
We need to define the signing algorithm and the key:
algo - The algorithm for signature validation. Mandatory. Supported values:
HMAC
RSA
ECDSA
PSS
EdDSA
HS256
RS256
ES256
PS256
Ed25519
HS384
RS384
ES384
PS384
Ed448
HS512
RS512
ES512
PS512
ES256K
None is also supported, but it is not recommended and must NEVER be used in production.
static_key - The key for symmetric algorithms. Mandatory for HS* family algorithms.
public_key - The public key for asymmetric algorithms. Mandatory except for HS* family algorithms and None.
claims - A string containing a JSON object that should be contained in the token payload. If this parameter is defined, a token without a corresponding payload will be considered invalid. Optional.
static_key_in_base64 - Indicates if the static_key key is base64-encoded. Optional, default: False.
private_key - The private key for asymmetric algorithms. Optional.
public_key_password - The public key password. Optional.
private_key_password - The private key password. Optional.
expected_issuer - The expected value of the iss (issuer) claim in the JWT. If specified, tokens with a different issuer will be rejected. Optional.
expected_audience - The expected value of the aud (audience) claim in the JWT. If specified, tokens with a different audience will be rejected. Optional.
allow_no_expiration - If true, tokens without the exp (expiration) claim are accepted. Otherwise they are rejected. Optional, default: false.
Static JWKS processor
We need to define the JWKS to the processor, either by storing it in a file and using the filename or putting its contents directly into the XML.
static_jwks_file - The path to a file with the JWKS data.
NOTE: You must define either static_jwks or static_jwks_file. If you define both or neither, the configuration will not be parsed and the token processor will not be used.
claims - A string containing a JSON object that should be contained in the token payload. If this parameter is defined, a token without the corresponding payload will be considered invalid. Optional.
verifier_leeway - Specifies the clock skew tolerance in seconds. Useful for handling small differences in system clocks between ClickHouse and the token issuer. Optional.
expected_issuer - The expected value of the iss (issuer) claim in the JWT. If specified, tokens with a different issuer will be rejected. Optional.
expected_audience - The expected value of the aud (audience) claim in the JWT. If specified, tokens with a different audience will be rejected. Optional.
allow_no_expiration - If true, tokens without the exp (expiration) claim are accepted. Otherwise they are rejected. Optional, default: false.
NOTES:
For JWKS-based validators (jwt_static_jwks and jwt_dynamic_jwks), RS* and ES* family algorithms are supported.
jwks_cache_lifetime - The time period in seconds between resend requests for refreshing the JWKS. Optional, default: 3600.
claims - A string containing a JSON object that should be contained in the token payload. If this parameter is defined, a token without a corresponding payload will be considered invalid. Optional.
verifier_leeway - Specifies the clock skew tolerance in seconds. Useful for handling small differences in system clocks between ClickHouse and the token issuer. Optional.
expected_issuer - The expected value of the iss (issuer) claim in the JWT. If specified, tokens with a different issuer will be rejected. Optional.
expected_audience - The expected value of the aud (audience) claim in the JWT. If specified, tokens with a different audience will be rejected. Optional.
allow_no_expiration - If true, tokens without the exp (expiration) claim are accepted. Otherwise they are rejected. Optional, default: false.
Microsoft Entra ID
To use Microsoft Entra ID, you need to provide your tenant_id:
tenant_id - Your Microsoft tenant ID (a GUID, or an *.onmicrosoft.com domain). Mandatory. Multi-tenant aliases (common, organizations, consumers) are rejected because JwksJwtProcessor does exact-match issuer validation.
The remaining parameters are optional:
jwks_uri — Override for the JWKS endpoint. Default: https://login.microsoftonline.com/{tenant_id}/discovery/v2.0/keys. Override only for sovereign clouds (login.microsoftonline.us, login.partner.microsoftonline.cn).
expected_issuer — Expected value of the iss claim. Default: https://login.microsoftonline.com/{tenant_id}/v2.0 (derived from tenant_id). Override for v1.0 tokens (https://sts.windows.net/{tenant_id}/) or sovereign clouds.
expected_audience — Expected value of the aud claim, normally your app’s Application ID URI (e.g. api://clickhouse) or client ID. If not set, no audience check is performed, so any token will authenticate if its signature is valid. A warning is logged at startup so the gap is visible.
username_claim — JWT claim to use as the ClickHouse username. Default: sub. Common Entra alternatives: preferred_username, upn, oid.
groups_claim — JWT claim that carries the array of group identifiers. Default: groups. Set to roles when using App Roles. See Mapping groups to ClickHouse roles below for details of how to get human-readable values instead of GUIDs.
verifier_leeway - Specifies the clock skew tolerance in seconds. Useful for handling small differences in system clocks between ClickHouse and the token issuer. Optional.
jwks_cache_lifetime - The time period in seconds between resend requests for refreshing the JWKS. Optional, default: 3600.
claims - A string containing a JSON object that should be contained in the token payload. If this parameter is defined, a token without a corresponding payload will be considered invalid. Optional.
allow_no_expiration - If true, tokens without the exp (expiration) claim are accepted. Otherwise they are rejected. Optional, default: false.
token_cache_lifetime - The maximum lifetime of a cached token in seconds. Optional, default: 3600.
Mapping groups to ClickHouse roles
By default the groups claim contains group object IDs (GUIDs), not names. There are three ways to surface human-readable identifiers, in order of preference:
Option A — App Roles (recommended)
Operator-chosen role strings in a separate roles claim. Compact even for users in many groups (no hasgroups overage indicator), and immune to Entra-side group renames.
App registration → App roles → Create app role. Set Value to the string ClickHouse should receive (e.g. ch_admin); Allowed member types = Users/Groups.
Enterprise application → Users and groups → assign each user or security group to a role. Group assignment requires Entra ID P1/P2; free-tier tenants can only assign individual users here.
On the processor: <groups_claim>roles</groups_claim>.
Option B — Format the groups claim
Names emitted in the existing groups claim. Works on free tier; useful when group membership is already maintained in Entra and a separate role-assignment surface is not wanted.
Prerequisites in the app registration:
"groupMembershipClaims": "ApplicationGroup" (or "SecurityGroup" for tenant-wide).
optionalClaims.accessToken entry for groups with additionalProperties set to one or more of:
Value
Effect
sam_account_name
On-prem-synced groups emit as sAMAccountName.
dns_domain_and_sam_account_name
On-prem-synced groups emit as DOMAIN\sAMAccountName.
cloud_displayname
Cloud-only groups emit their displayName.
Entra picks per group; groups not covered by a chosen format still emit as GUIDs. Display names are mutable — a rename in Entra silently breaks the mapping until config is updated.
Leave <groups_claim>groups</groups_claim> (the default).
Option C — roles_mapping
Keep GUIDs in the token and translate them in the user-directory config (see Using an IdP as an external user directory below). Always works, including on free tier. Tedious for many groups but immune to renames.
NOTE: When switching from GUIDs to names, retune any roles_filter regex — for example \bclickhouse-[a-zA-Z0-9]+\b will not match strings like ch_admin.
Generic OpenID processors
OpenID token processors are flexible, generic processors to handle a wide variety of IdPs. They can be configured to validate tokens locally or remotely:
configuration_endpoint - The URI of the OpenID configuration (often ends with .well-known/openid-configuration).
To validate every token remotely (required for opaque tokens):
userinfo_endpoint - The URI of the endpoint that returns user information in exchange for a valid token.
token_introspection_endpoint - The URI of the token introspection endpoint (returns information about a valid token).
jwks_uri - The URI of the OpenID configuration (often ends with .well-known/jwks.json). Optional.
NOTE: Either configuration_endpoint or both userinfo_endpoint and token_introspection_endpoint (and, optionally, jwks_uri) must be set. If none of them are set or all three are set, this is an invalid configuration that will not be parsed and the token processor will not be used.
jwks_cache_lifetime - The time period in seconds between resend requests for refreshing the JWKS. Optional, default: 3600.
verifier_leeway - Specifies the clock skew tolerance in seconds. Useful for handling small differences in system clocks between ClickHouse and the token issuer. Optional, default: 60
expected_issuer - The expected value of the iss (issuer) claim in the JWT. If specified, tokens with a different issuer will be rejected. Optional.
expected_audience - The expected value of the aud (audience) claim in the JWT. If specified, tokens with a different audience will be rejected. Optional.
allow_no_expiration - If true, tokens without the exp (expiration) claim are accepted. Otherwise they are rejected. Optional, default: false.
Sometimes a token is a valid JWT. In that case, the token will be decoded and validated locally if the configuration endpoint returns a JWKS URI (or jwks_uri is specified alongside userinfo_endpoint and token_introspection_endpoint).
Using an IdP as an external user directory
If the username in a token is not pre-defined in ClickHouse, authentication is still possible: The IdP can be used as source of user information. To allow this, add a token section to the user_directories section of the config.xml file.
At each login attempt, ClickHouse tries to find the user definition locally and authenticate it as usual. If a token is provided but the user is not defined, ClickHouse will treat the user as externally defined and will try to validate the token and get user information from the specified processor. If validated successfully, the user will be considered existing and authenticated. The user will be assigned roles from the list specified in the roles section. All this implies that the SQL-driven Access Control and Account Management is enabled and roles are created using the CREATE ROLE statement.
NOTE: For now, no more than one token section can be defined inside user_directories. This may change in the future.
Parameters
processor — The name of one of the processors defined in a token_processors config section as described above (my_static_key_validator, my_static_jwks_validator, my_dynamic_jwks_validator, entra_prod, or keycloak). This parameter is mandatory.
common_roles — A list of locally defined roles that will be assigned to each user retrieved from the IdP. Optional.
default_profile — The name of a locally defined settings profile that will be assigned to each user retrieved from the IdP. If the profile does not exist, a warning will be logged and the user will be created without a profile. Optional.
roles_filter — A regex string for groups filtering. Only groups matching this regex will be mapped to roles. Optional.
roles_transform — A sed-style substitution pattern to apply to group names before mapping to roles. Format: s/pattern/replacement/flags. The g flag applies the replacement globally (all occurrences). In the example above, s/-/_/g converts clickhouse-grp-dba to clickhouse_grp_dba. (Keycloak group names can use hyphens, while names in the SQL world tend to use underscores; the substitution pattern fixes that for us.) Optional.
2.4 - Command and Configuration Reference
The technical details you’ll need to make the most of Antalya
NOTE
If you’re using Antalya through the Altinity Cloud Manager (ACM), the ACM automatically enables and configures Antalya settings for you.
SQL Syntax Guide
This section shows how to use the Iceberg database engine, table engine, and table functions.
Iceberg Database Engine
The Iceberg database engine connects ClickHouse to an Iceberg REST catalog. The tables listed in the REST catalog show up as database. The Iceberg REST catalog must already exist. Here is an example of the syntax. Note that you must enable Iceberg database support with the allow_experimental_database_iceberg property. This can also be placed in a user profile to enable it by default.
The Iceberg database engine takes three arguments:
url - Path to Iceberg READ catalog endpoint
user - Object storage user
password - Object storage password
The following settings are supported.
auth_header - Authorization header of format ‘Authorization: <scheme> <auth_info>’
auth_scope - Authorization scope for client credentials or token exchange
oauth_server_uri - OAuth server URI
vended_credentials - Use vended credentials (storage credentials) from catalog
warehouse - Warehouse name inside the catalog
storage_endpoint - Object storage endpoint
Iceberg Table Engine
Will be documented later.
Iceberg Table Function
The Iceberg table function selects from an Iceberg table. It uses the path of the table in object storage to locate table metadata. Here is an example of the syntax.
The iceberg() function is an alias for icebergS3(). See the upstream docs for more information.
It’s important to note that the iceberg() table function expects to see data and metadata directories after the URL provided as an argument. In other words, the Iceberg table must be arranged in object storage as follows:
http://minio:9000/warehouse/data/metadata - Contains Iceberg metadata files for the table
http://minio:9000/warehouse/data/data - Contains Iceberg data files for the table
If the files are not laid out as shown above the iceberg() table function may not be able to read data.
Swarm Clusters
Swarm clusters are clusters of stateless ClickHouse servers that may be used for parallel query on S3 files as well as Iceberg tables, which are just collections of S3 files. (The Altinity blog has a good overview of swarm clusters and how they work if you’d like to know more.)
Using Swarm Clusters to speed up query
Swarm clusters can accelerate queries that use any of the following functions.
s3() function
s3Cluster() function – Specify as function argument
iceberg() function
icebergS3Cluster() function – Specify as function argument
Iceberg table engine, including tables made available via using the Iceberg database engine
To delegate subqueries to a swarm cluster, add the object_storage_cluster setting as shown below with the swarm cluster name. You can also set the value in a user profile, which will ensure that the setting applies by default to all queries for that user.
Here’s an example of a query on Parquet files using Hive partitioning.
The following list shows the main query settings that affect swarm cluster processing.
Setting Name
Description
Value
enable_filesystem_cache
Use filesystem cache for S3 blocks
0 or 1
input_format_parquet_use_metadata_cache
Cache Parquet file metadata
0 or 1
input_format_parquet_metadata_cache_max_size
Parquet metadata cache size in bytes (defaults to 500MiB - 500000000)
Integer
object_storage_cluster
Swarm cluster name
String
object_storage_max_nodes
Number of swarm nodes to use (defaults to all nodes)
Integer
use_hive_partitioning
Files follow Hive partitioning
0 or 1
use_iceberg_metadata_files_cache
Cache parsed Iceberg metadata files in memory
0 or 1
use_iceberg_partition_pruning
Prune files based on Iceberg data
0 or 1
Configuring swarm cluster autodiscovery
Cluster-autodiscovery uses [Zoo]Keeper as a registry for swarm cluster members. Swarm cluster servers register themselves on a specific path at start-up time to join the cluster. Other servers can read the path to find members of the swarm cluster.
To use auto-discovery, you must enable Keeper by adding a <zookeeper> tag similar to the following example. This must be done for all servers including swarm servers as well as ClickHouse servers that invoke them.
When using a single Keeper for all servers, add the following remote server definition to each swarm server configuration. This provides a path on which the server will register.
<remote_servers><!-- Swarm cluster built using remote discovery --><swarm><discovery><path>/clickhouse/discovery/swarm</path><secret>secret_key</secret></discovery></swarm></remote_servers>
Add the following remote server definition to each server that reads the swarm server list using remote discovery. Note the <observer> tag, which must be set to prevent non-swarm servers from joining the cluster.
<remote_servers><!-- Swarm cluster built using remote discovery. --><swarm><discovery><path>/clickhouse/discovery/swarm</path><secret>secret_key</secret><!-- Use but do not join cluster. --><observer>true</observer></discovery></swarm></remote_servers>
Using multiple keeper ensembles
It’s common to use separate keeper ensembles to manage intra-cluster replication and swarm cluster discovery. In this case you can enable an auxiliary keeper that handles only auto-discovery. Here is the configuration for such a Keeper ensemble. ClickHouse will use this Keeper ensemble for auto-discovery.
<clickhouse><!-- Zookeeper for registering swarm members. --><auxiliary_zookeepers><registry><node><host>keeper</host><port>9181</port></node></registry></auxiliary_zookeepers><clickhouse>
This is in addition to the settings described in previous sections, which remain the same.
Configuring Caches
Caches make a major difference in the performance of ClickHouse queries. This section describes how to configure them in a swarm cluster.
Iceberg Metadata Cache
The Iceberg metadata cache keeps parsed table definitions in memory. It is enabled using the use_iceberg_metadata_files_cache setting, as shown in the following example:
Reading and parsing Iceberg metadata files (including metadata.json, manifest list, and manifest files) is slow. Enabling this setting can speed up query planning significantly.
Parquet Metadata Cache
The Parquet metadata cache keeps metadata from individual Parquets in memory, including column metadata, min/max statistics, and Bloom filter indexes. Swarm nodes use the metadata to avoid fetching unnecessary blocks from object storage. If no blocks are needed the swarm node skips the file entirely.
The following example shows how to enable Parquet metadata caching.
The server setting input_format_parquet_metadata_cache_max_size controls the size of the cache. It currently defaults to 500MiB.
S3 Filesystem Cache
This cache stores blocks read from object storage on local disk. It offers a considerable speed advantage, especially when blocks are in storage. The S3 filesystem cache requires special configuration each swarm host.
Define the cache
Add a definition like the following to /etc/clickhouse/filesystem_cache.xml to set up a filesystem cache:
Find out how many S3 calls an individual ClickHouse is making. When caching is working properly you should see the values remain the same between successive queries.
Listing files in object storage using the S3 ListObjectsV2 call is expensive. The S3 List Objects Cache avoids repeated calls and can cut down significant time during query planning. You can enable it using the use_object_storage_list_objects_cache setting as shown below.
The setting can speed up performance enormously but has a number of limitations:
It does not speed up Iceberg queries, since Iceberg metadata provides lists of files.
It is best for datasets that are largely read-only. It may cause queries to miss newer files, if they arrive while the cache is active.
3 - Altinity Stable® and FIPS-Compatible Builds
ClickHouse® tested and verified for production use with 3 years of support.
ClickHouse®, as an open source project, has multiple methods of installation. Altinity recommends either using Altinity Stable® Builds for ClickHouse, or upstream builds.
The Altinity Stable builds are releases with extended service of ClickHouse that undergo rigorous testing to verify they are secure and ready for production use. Altinity Stable Builds provide a secure, pre-compiled binary release of ClickHouse server and client with the following features:
The ClickHouse version release is ready for production use.
100% open source and 100% compatible with ClickHouse upstream builds.
Provides Up to 3 years of support.
Validated against client libraries and visualization tools.
Altinity Stable and FIPS-Compatible Builds Lifecycle Table
The following table lists Altinity Stable and Altinity Stable FIPS-Compatible builds and their current status. Upstream builds of ClickHouse are no longer available after upstream Support EOL (shown in red). Contact us for build support beyond the Altinity Extended Support EOL.
* During Upstream Support bug fixes are automatically backported to upstream builds and picked up in refreshes of Altinity Stable builds.
** Altinity Extended Support covers P0-P1 bugs encountered by customers and critical security issues regardless of audience. Fixes are best effort and may not be possible in every circumstance. Altinity makes every effort to ensure a fix, workaround, or upgrade path for covered issues.
3.1 - Altinity Stable® Builds Install Guide
How to install Altinity Stable® Builds for ClickHouse®
Installing ClickHouse® from the Altinity Stable® Builds, available from builds.altinity.cloud, takes just a few minutes.
Notice
Organizations that have used the legacy Altinity Stable Release repository at packagecloud.io can upgrade to the Altinity Stable Build without any conflicts. For more information on using the legacy repository, see the Legacy ClickHouse Altinity Stable Releases Install Guide.
General Installation Instructions
When installing or upgrading from a previous version of ClickHouse from the Altinity Stable Builds, review the Release Notes for the ClickHouse version to install and upgrade to before starting. This will inform you of additional steps or requirements of moving from one version to the next.
Part of the installation procedures recommends you specify the version to install. The Release Notes lists the version numbers available for installation.
There are three main methods for installing Altinity Stable Builds:
Deb Packages
RPM Packages
Docker images
The package sources come from two sources:
Altinity Stable Builds: These are built from a secure, internal build pipeline and available from builds.altinity.cloud. Altinity Stable Builds are distinguishable from upstream builds when displaying version information:
How to install the Altinity Stable® Builds for ClickHouse® on Debian based systems.
Installation Instructions: Deb packages
ClickHouse® can be installed from the Altinity Stable® builds, located at https://builds.altinity.cloud, or from the ClickHouse community repository.
IMPORTANT NOTE
We highly encourage organizations use a specific version to maximize compatibility, rather than relying on the most recent version. Instructions for how to specify the specific version of ClickHouse are included below.
Deb Prerequisites
The following prerequisites must be installed before installing an Altinity Stable build of ClickHouse:
curl
gnupg2
apt-transport-https
ca-certificates
These can be installed prior to installing ClickHouse with the following command:
When prompted, provide the password for the default clickhouse user.
Restart server.
Installed packages are not applied to an already running server. It makes it convenient to install the packages first and restart later when convenient.
sudo systemctl restart clickhouse-server
Remove Community Package Repository
For users upgrading to Altinity Stable builds from the community ClickHouse builds, we recommend removing the community builds from the local repository. See the instructions for your distribution of Linux for instructions on modifying your local package repository.
How to install the Altinity Stable® Builds for ClickHouse® on RPM based systems
Installation Instructions: RPM packages
ClickHouse® can be installed from the Altinity Stable® builds, located at https://builds.altinity.cloud, or from the ClickHouse community repository.
Depending on your Linux distribution, either dnf or yum will be used. See your particular distribution of Linux for specifics.
The instructions below uses the command $(type -p dnf || type -p yum) to provide the correct command based on the distribution to be used.
IMPORTANT NOTE
We highly encourage organizations use a specific version to maximize compatibility, rather than relying on the most recent version. Instructions for how to specify the specific version of ClickHouse are included below.
RPM Prerequisites
The following prerequisites must be installed before installing an Altinity Stable build:
curl
gnupg2
These can be installed prior to installing ClickHouse with the following:
Install ClickHouse server and client with either yum or dnf. It is recommended to specify a version to maximize compatibly with other applications and clients.
To specify the version of ClickHouse to install, create a variable for the version and pass it to the installation instructions. The example below specifies the version 21.8.10.1.altinitystable:
For users upgrading to Altinity Stable builds from the community ClickHouse builds, we recommend removing the community builds from the local repository. See the instructions for your distribution of Linux for instructions on modifying your local package repository.
RPM Downgrading Altinity ClickHouse Stable to a Previous Release
To downgrade to a previous release, the current version must be installed, and the previous version installed with the --setup=obsoletes=0 option. Review the Release Notes before downgrading for any considerations or issues that may occur when downgrading between versions of ClickHouse.
How to install the Altinity Stable® Builds for ClickHouse® with Docker
Installing with Docker
These included instructions detail how to install a single Altinity Stable® Build of ClickHouse® container through Docker. For details on setting up a cluster of Docker containers, see the Altinity Kubernetes Operator for ClickHouse documentation.
Docker Images are available for Altinity Stable builds and Community builds. The instructions below focus on using the Altinity Stable builds for ClickHouse.
IMPORTANT NOTE
The Altinity Stable builds for ClickHouse do not use the latest tag. We highly encourage organizations to install a specific version of Altinity Stable builds to maximize compatibility. For information on the latest Altinity Stable Docker images, see the Altinity Stable for ClickHouse Docker page.
To install a ClickHouse Altinity Stable build through Docker:
Create the directory for the docker-compose.yml file and the database storage and ClickHouse server storage.
mkdir clickhouse
cd clickhouse
mkdir clickhouse_database
Create the file docker-compose.yml and populate it with the following, updating the clickhouse-server to the current altinity/clickhouse-server version:
Launch the ClickHouse Server with docker-compose or docker compose depending on your version of Docker:
docker compose up -d
Verify the installation by logging into the database from the Docker image directly, and make any other necessary updates with:
docker compose exec clickhouse_server clickhouse-client
root@67c732d8dc6a:/# clickhouse-client
ClickHouse client version 21.3.15.2.altinity+stable (altinity build).
Connecting to localhost:9000 as user default.
Connected to ClickHouse server version 21.1.10 revision 54443.
67c732d8dc6a :)
How to install the ClickHouse® Altinity Stable® Releases from packagecloud.io.
NOTE
This content is deprecated; it applies to versions of ClickHouse 21.3 and older. We’ve left it here for historical purposes.
ClickHouse® Altinity Stable® Releases are specially vetted upstream builds of ClickHouse that Altinity certifies for production use. We track critical changes and verify against a series of tests to make sure they’re ready for your production environment. We take the steps to verify how to upgrade from previous versions, and what issues you might run into when transitioning your ClickHouse clusters to the next Stable Altinity ClickHouse release.
As of October 12, 2021, Altinity replaced the ClickHouse Altinity Stable Releases with the Altinity Stable Builds, providing longer support and validation. For more information, see Altinity Stable Builds.
Legacy versions of the ClickHouse Altinity Stable Releases are available from the Altinity ClickHouse Stable Release packagecloud.io repository, located at https://packagecloud.io/Altinity/altinity-stable.
The available Altinity ClickHouse Stable Releases from packagecloud.io for ClickHouse server, ClickHouse client and ClickHouse common versions are:
Altinity ClickHouse Stable Release 21.1.10.3
Altinity ClickHouse Stable Release 21.3.13.9
Altinity ClickHouse Stable Release 21.3.15.2
Altinity ClickHouse Stable Release 21.3.15.4
General Installation Instructions
When installing or upgrading from a previous version of legacy ClickHouse Altinity Stable Release, review the Release Notes for the version to install and upgrade to before starting. This will inform you of additional steps or requirements of moving from one version to the next.
Part of the installation procedures recommends you specify the version to install. The Release Notes lists the version numbers available for installation.
There are three main methods for installing the legacy ClickHouse Altinity Stable Releases:
Altinity ClickHouse Stable Releases are distinguishable from upstream builds when displaying version information. The suffix altinitystable will be displayed after the version number:
This guide assumes that the reader is familiar with Linux commands, permissions, and how to install software for their particular Linux distribution. The reader will have to verify they have the correct permissions to install the software in their target systems.
Installation Instructions
Legacy Altinity ClickHouse Stable Release DEB Builds
To install legacy ClickHouse Altinity Stable Release version DEB packages from packagecloud.io:
Update the apt-get repository with the following command:
ClickHouse can be installed either by specifying a specific version, or automatically going to the most current version. It is recommended to specify a version for maximum compatibility with existing clients.
To install a specific version, create a variable specifying the version to install and including it with the install command:
To install the most current version of the legacy ClickHouse Altinity Stable release without specifying a specific version, leave out the version= command.
FIPS 140-3 is a United States standard for cryptography used in high-security government environments. FIPS 140-3 specifies a number of properties for encryption including handling of keys, permitted versions of TLS, allowed cipher suites, and protections against tampering of builds.
ClickHouse uses OpenSSL libraries for encryption of most application and inter-server traffic. Starting with v25.3, Altinity FIPS-compatible builds use AWS-LC (Amazon’s fork of BoringSSL) libraries for encryption of most application and inter-server traffic. AWS-LC FIPS 2.0.0 has been validated under FIPS 140-3 (CMVP Certificate #4816). Combined with documented procedures this enables ClickHouse to function in a manner that is compatible with the FIPS standard.
FIPS-compatible Altinity Stable Builds are built, tested, and released in the same way as regular Altinity Stable Builds for ClickHouse. FIPS-compatible builds have altinityfips embedded in the release name. They use separate channels for distribution on builds.altinity.cloud/#altinityfips and have separate release notes. FIPS-compatible builds are also available as Docker images.
Release notes
For more technical details, see the release notes for the FIPS releases:
The following network connections of ClickHouse can operate in FIPS-compatible mode in Altinity FIPS builds.
Name
Type
Description
Default Server Port
HTTPS Port
Server
Accepts HTTPS API connections from clients
8443
Secure Native TCP Port
Server
Accepts native TCP protocol connections from clients (e.g., clickhouse-client)
9440
Interserver HTTPS Port
Server & Client
Used for communication between ClickHouse replicas
9010
ZooKeeper
Client Connection
Client Connection from ClickHouse to ZooKeeper or ClickHouse Keeper
Keeper Server Port
Server
Accepts ZooKeeper protocol connections from clients
9281
Raft Server Port
Server & Client
Used for synchronization between ClickHouse Keeper servers
9444
Prerequisites for FIPS-Compatible Operation
The minimal requirements for FIPS-compatible operation are:
Install FIPS-compatible Altinity Stable Build.
Apply FIPS-compatible configuration settings to set allowed ports, TLS version, and ciphers.
Installation
Yum and Apt Packages
FIPS-compatible Altinity Stable releases are distributed from a separate repo from standard Altinity Stable Builds. Follow the directions to set the repo for FIPS-compatible builds at builds.altinity.cloud/#altinityfips.
Important note! FIPS builds use a different repo from standard Altinity Stable Builds. Be sure you’re in the FIPS-compatible build section.
Once the repo is set correctly, you can download and install packages using the same commands as for regular Altinity Stable Builds.
Docker
FIPS-compatible Altinity Stable containers have altinityfips in the container tag. For example:
The Altinity FIPS build ships with the AWS-LC FIPS cryptographic module enabled at startup. That module must be paired with a FIPS-compatible configuration as described below.
ClickHouse Server Configuration
Required server configuration changes include the following. These settings are by convention stored in /etc/clickhouse-server/config.xml and /etc/clickhouse-server/config.d/.
The FIPS 140-3-compatible configuration for the ClickHouse server includes the following:
<clickhouse><!-- Explicitly disable non-TLS listeners: HTTP, TCP, interserver HTTP, mysql, and postgresql --><tcp_portremove="1"/><http_portremove="1"/><interserver_http_portremove="1"/><mysql_portremove="1"/><postgresql_portremove="1"/><!-- Enable HTTPS and Secure TCP --><https_port>8443</https_port><tcp_port_secure>9440</tcp_port_secure><!-- Enable interserver HTTPS --><interserver_https_port>9010</interserver_https_port><openSSL><server><!-- Replace certificate paths with your layout. --><certificateFile>/etc/clickhouse-server/certs/server.crt</certificateFile><privateKeyFile>/etc/clickhouse-server/certs/server.key</privateKeyFile><!-- For production with a public CA, use <loadDefaultCAFile> true and omit <caConfig> where appropriate. --><caConfig>/etc/clickhouse-server/certs/ca.crt</caConfig><loadDefaultCAFile>false</loadDefaultCAFile><!-- If you use ECDSA server certificates, add the corresponding ECDHE-ECDSA-* entries to <cipherList>. --><cipherList>ECDHE-RSA-AES128-GCM-SHA256:ECDHE-RSA-AES256-GCM-SHA384:AES128-GCM-SHA256:AES256-GCM-SHA384</cipherList><cipherSuites>TLS_AES_128_GCM_SHA256:TLS_AES_256_GCM_SHA384</cipherSuites><disableProtocols>sslv2,sslv3,tlsv1,tlsv1_1</disableProtocols><preferServerCiphers>true</preferServerCiphers><!-- For lab/self-signed, use <verificationMode> none on the server block and <name> AcceptCertificateHandler under <client><invalidCertificateHandler>. --><verificationMode>relaxed</verificationMode></server><client><caConfig>/etc/clickhouse-server/certs/ca.crt</caConfig><loadDefaultCAFile>false</loadDefaultCAFile><cipherList>ECDHE-RSA-AES128-GCM-SHA256:ECDHE-RSA-AES256-GCM-SHA384:AES128-GCM-SHA256:AES256-GCM-SHA384</cipherList><cipherSuites>TLS_AES_128_GCM_SHA256:TLS_AES_256_GCM_SHA384</cipherSuites><disableProtocols>sslv2,sslv3,tlsv1,tlsv1_1</disableProtocols><preferServerCiphers>true</preferServerCiphers><verificationMode>relaxed</verificationMode><invalidCertificateHandler><name>RejectCertificateHandler</name></invalidCertificateHandler></client></openSSL></clickhouse>
Keeper Cluster Configuration
Configure each Keeper cluster node to use secure ports.
<zookeeper><!-- Each Keeper node is configured to use a secure port --><node><host>keeper1.example.com</host><port>9281</port><secure>1</secure></node><node><host>keeper2.example.com</host><port>9281</port><secure>1</secure></node><node><host>keeper3.example.com</host><port>9281</port><secure>1</secure></node></zookeeper>
ClickHouse Keeper
The FIPS 140-3 compatible configuration for ClickHouse Keeper includes the following:
Explicitly disable the non-TLS TCP listener (9181)
Enable the secure TCP port
Configure each Raft server to use a secure port
Path:/etc/clickhouse-server/config.d/keeper.xml
<clickhouse><keeper_server><!-- Explicitly disable the non-TLS TCP listener (9181) --><tcp_portremove="1"/><!-- Enable the secure TCP port --><tcp_port_secure>9281</tcp_port_secure><server_id>1</server_id><log_storage_path>/var/lib/clickhouse/coordination/log</log_storage_path><snapshot_storage_path>/var/lib/clickhouse/coordination/snapshots</snapshot_storage_path><raft_configuration><!-- Each Raft server is configured to use a secure port --><secure>true</secure><server><id>1</id><hostname>keeper1.example.com</hostname><port>9234</port></server><server><id>2</id><hostname>keeper2.example.com</hostname><port>9234</port></server><server><id>3</id><hostname>keeper3.example.com</hostname><port>9234</port></server></raft_configuration></keeper_server></clickhouse>
ClickHouse Client Configuration
The FIPS 140-3 compatible configuration for the ClickHouse client is provided below.
Path:/etc/clickhouse-client/config.d/fips.xml
<config><secure>true</secure><openSSL><client><caConfig>/etc/clickhouse-server/certs/ca.crt</caConfig><loadDefaultCAFile>false</loadDefaultCAFile><cipherList>ECDHE-RSA-AES128-GCM-SHA256:ECDHE-RSA-AES256-GCM-SHA384:AES128-GCM-SHA256:AES256-GCM-SHA384</cipherList><cipherSuites>TLS_AES_128_GCM_SHA256:TLS_AES_256_GCM_SHA384</cipherSuites><disableProtocols>sslv2,sslv3,tlsv1,tlsv1_1</disableProtocols><preferServerCiphers>true</preferServerCiphers><!-- For self-signed or lab certificates only, you may set <verificationMode> none and <name> AcceptCertificateHandler. --><verificationMode>relaxed</verificationMode><invalidCertificateHandler><name>RejectCertificateHandler</name></invalidCertificateHandler></client></openSSL></config>
Note: With <secure>true</secure>, the client uses TLS by default. Specify --port 9440 when connecting.
Running AWS-LC SSL and ACVP Validation Tests
The cryptographic module in Altinity FIPS builds can be verified by running the AWS-LC SSL conformance tests (8,037 tests) and ACVP known-answer tests (31 algorithm suites).
Prerequisites
An installed Altinity FIPS build of ClickHouse (.deb package or Docker image)
Go >= 1.13 installed on the test machine
The AWS-LC FIPS 2.0.0 source (used as the test harness):
PASS
ok boringssl.googlesource.com/boringssl/ssl/test/runner 142.538s
ACVP Tests (31 algorithm suites)
These validate that the FIPS cryptographic module produces correct outputs for known-answer test vectors covering AES, ECDSA, RSA, HMAC, KDF, DRBG, and more.
# Build the test toolscd"$AWSLC_SRC/util/fipstools/acvp/acvptool"go build -o /tmp/acvptool .
cd"$AWSLC_SRC/util/fipstools/acvp/acvptool/testmodulewrapper"go build -o /tmp/testmodulewrapper .
# Run the testscd"$AWSLC_SRC/util/fipstools/acvp/acvptool/test"go run check_expected.go \
-tool /tmp/acvptool \
-module-wrappers "modulewrapper:/usr/bin/clickhouse-acvp-server,testmodulewrapper:/tmp/testmodulewrapper"\
-tests tests.json
A passing run ends with:
31 ACVP tests matched expectations
Verification of FIPS-Compatible Altinity Stable Operation
Verify FIPS library Startup
FIPS-compatible Altinity.Cloud servers will print the following message after a successful start-up test. This ensures that FIPS AWS-LC libraries are present and free from tampering.
# grep 'FIPS mode' /var/log/clickhouse-server/clickhouse-server.log
2026.06.10 13:26:03.528228 [ 1 ] {} <Information> Application: Starting in FIPS mode, KAT test result: 1, Integrity check: 1
Verify FIPS-Compatible Altinity Stable Version
To verify the software version, run select version() on the running server with any client program. This example confirms the version for both clickhouse-client as well as clickhouse-server.
$ clickhouse-client
ClickHouse client version 25.3.8.30001.altinityfips (altinity build).
Connecting to localhost:9000 as user default.
Connected to ClickHouse server version 25.3.8.
6fddd889dc9b :) SELECT version() FORMAT TSVRaw
25.3.8.30001.altinityfips
3.3 - Troubleshooting Altinity Builds
Figuring out what’s wrong when something goes wrong
The ClickHouse® development process moves quickly. Thanks to the hard work of the ClickHouse community, the product’s thousands of core features are all well-tested and stable. To maintain that stability, ClickHouse is built with a CI system that runs tens of thousands of tests against every commit.
But as with any other software, bad things may happen.
Most bugs occur in new functionality or in a set of features that may not have been fully tested together. (Sadly, combinatorics make that last part impossible.) However, new features tend to be adopted by the ClickHouse community quickly, fleshing out any bugs that might have been missed in testing.
What should I do if I found a bug in ClickHouse?
First of all, if you’re an Altinity customer, you can contact Altinity support to file an issue. (If you’d like to go through the troubleshooting tips outlined below before you reach out to us, that’s fine but not necessary.)
If you’re not an Altinity customer, try to upgrade to the latest bugfix release. If you’re using v25.8.22.28-lts but you know that v25.8.23.13-lts exists, start by upgrading to the bugfix. Upgrades to the latest maintenance releases are smooth and safe.
If you can reproduce the bug, try to isolate it. For example, remove pieces of a failing query one by one, creating the simplest scenario where the error still occurs. Creating a minimal reproducible example is a huge step towards a solution.
Once you have that minimal reproducible example, see if it fails on the newest version of ClickHouse (not just the latest bugfix release of the version you’re using).
Current and previous pricing plans are now displayed on a billing page (Billing)
Added a Bearer Token authentication option for external Prometheus (Environment)
Added an option to configure multiple managed catalogs (Environment)
Added support for using Keeper instead of ZooKeeper. It is turned off by default, but can be enabled for a specific cluster or environment if needed (Environment)
Automatic notification is now sent when new ClickHouse release is available for upgrade (Cluster)
Automatic notification is now sent when used ClickHouse version is going out of support (Cluster)
Node name has been added to all DBA tools screens (Cluster)
Cluster settings now support search (Cluster)
DataLake connection wizard now supports Polaris catalog (Cluster)
Added an option to enable or disable health checks for alternate endpoints (Cluster)
Added an option to rescale swarm cluster to a specified number of nodes when inactive (Cluster)
Changed
Monthly cost estimate now includes discounts (Billing)
Cluster page has been fully redesigned (Cluster)
Data Lake Catalogs were renamed to Data Lake Connections on a cluster page (Cluster)
Any cordoned volume now can be freed. Previously, only the last volume could be freed (Cluster)
<yandex> tag has been finally replaced with <clickhouse> one in injected configuration snippets (Cluster)
Fixed
Swarm cost estimates are now correct in pricing service (Billing)
Fixed ClickHouse upgrade recommendations that were misleading in some cases (Cluster)
Fixed a bug when restoring table partitions from a backup could fail for multi-column partition expressions (Cluster)
Fixed a bug when Altinity access was reset when restoring a table from a backup (Cluster)
Fixed a bug when adjusting TTL settings for system tables did not auto-publish being turned off (Cluster)
Fixed a bug where health checks were sometimes failing for heavily loaded clusters (Cluster)
The ‘Used’ flag to Node Types tab has been added to show that particular node type is in use (Environment)
New high throughput settings 1500MB/s and 2000MB/s for AWS gp3 volumes are now supported (Cluster)
Notification is now sent to cluster owner when cluster is stopped due to inactivity schedule (Cluster)
ClickHouse will now connect to ZooKeeper running at the same availability zone. This is available for new clusters running ClickHouse 24.8+ by default. Old clusters require a manual conversion since it triggers a downtime (Cluster)
Changed
UI design has been updated across all pages
Environment and Node view pages have been refactored for ease of use
UI timestamps are now converted from absolute UTC timestamps to relative ones like minutes ago, hours ago, days ago etc.
Rescale wizard has been refactored (Cluster)
When cluster is locked, operations that do not change it are now allowed, for example ‘Create a backup’ or ‘Export configuration’ (Cluster)
When dropping detached parts errors are now ignored (Cluster)
ClickHouse ‘max_server_memory_usage_to_ram_ratio’ was lowered to 0.85 (default is 0.9) in order to reduce chances of OOM killer when ClickHouse does not count RAM properly (Cluster)
Fixed
Fixed a bug when environment with a custom display name could not be deleted (Environment)
Fixed format of total detached parts size (Cluster)
Fixed MySQL port number display in connection details, when the port number is different from default 9004 (Cluster)
Fixed a bug in Explorer when DDL query was not properly processed if it started with a comment line (Cluster)
Fixed setting grants for Altinity user on ClickHouse versions 24.4 and earlier (Cluster)
Fixed a bug when discount description with dash symbol was displayed incorrectly in generated PDF invoices (Billing)
Fixed Auth0 login screen that required too many clicks previously
Fixed setting TTL to system.opentelemetry_span_log table
Adjusted system.metric_log table settings that might consume too much RAM on ClickHouse versions 25.6 and above
Fixed Schema Consistency for multi-shard clusters
Moved AltinityAccessRefresh to the ‘System Operations’ section of audit log
25.6.35 2025-12-11
Added
New Health Dashboard that integrates with alert managed (Environment)
Ability to use GCP service account for backup access (Environment)
Activity Schedule may now re-scale number of swarm nodes on schedule (Cluster)
Swarm clusters may now be used from an Explorer to extend compute of other clusters without rewriting the query (Cluster)
Logged ACM user is now added to ClickHouse query_log for audit (Cluster)
Query API endpoints may now be exported and imported as a single piece of configuration. That allows to move the code between clusters if needed (Cluster)
Line item description is now displayed for discounts in usage reports (Billing)
Changed
It is not allowed to delete or suspend a user that is a cluster owner anymore (Organization)
Maintanance window configuration screen has been improved (Environment)
ZooKeeper reliability improvements (Cluster):
Now nodes of ZooKeeper cluster are exposed as separate services that allows better load balancing and reliability
Changed ZooKeeper cluster configuration to build quorum reliably when nodes are randomly restarted
Improved automatic scale-up and disabled scale down
Cluster endpoint healthcheck has been extended to probe all configured endpoints. Previously it only checked for the first one (Cluster)
When cluster is deleted, now it is possible to lock specific backups, not only the latest one (Cluster)
“Workload->Replication Queue” tab has been improved (Cluster)
Fixed
Fixed an incorrect environment type display when BYOC environment provisioning is in progress (Environment)
Exceptions are now shown to the user if some action fails in DBA tools (Cluster)
Fixed storage cost estimates to take region into account (Cluster)
Fixed a bug when swarm registry was scaled to 3 nodes incorrectly in some cases (Cluster)
Fixed a bug when swarm version for upgrade was not picked up correctly in some cases (Cluster)
Fixed a bug when Query API Endpoints containing macros could not be correctly displayed (Cluster)
Fixed a bug when empty notifications were sent to env admins for clusters with deleted cluster owner (Cluster)
Node pool capacity can now be configured for BYOC environments (Environment)
External IP is now available in node list on Environment screen (Environment)
Added support for spot instances (Environment)
New Quick Launch cluster wizard (Cluster)
Extra parameters and advanced backup settings can be configured in Cluster backup options in order to accommodate non-standard setups (Cluster)
Added IOPS management for high throughput EBS volumes (Cluster)
Setting up cluster alerts is simplified (Cluster)
Changed
Subscription activation screen now displays more detail about support plans and correct cost estimates (Organization)
Now there is a limit on the number of trial environments that can be created in a trial organization: 1 SaaS and 3 BYOC/BYOK (Organization)
Usage period in Billing is extended to 13 months (Organization)
BYOK/BYOC env and org admins can now edit resource quotas (Environment)
Now whitespaces are automatically removed between multiple emails when setting up alerts (Cluster)
ClickHouse “default” user is completely removed from new clusters. Previously it has been protected but could be used when accessing pod directly (Cluster)
Improved query results in Explorer (Cluster)
Fixed
Fixed a bug when incorrect backups were deleted on backup schedule changes (Cluster)
Fixed a bug when an operation in progress was not correctly displayed in some cases (Cluster)
Fixed a bug where a replica cluster did not start correctly after switching to an internal custom registry (Cluster)
New ‘Clone’ action allows users to clone a cluster and all configuration settings under a different name (Cluster)
Preferred replica can now be configured for a backup (Cluster)
An Environment can now be exported to a Terraform script (Environment)
ClickHouseOperatorConfiguration resources can be accessed directly now (Environment)
New signup screen
Changed
Cost allocation tags UI has been improved (Environment)
DBA Tools -> Cleanup storage UI has been improved (Cluster)
Resources pie charts on the Environment screen have been improved (Environment)
In the pending changes screen, the user name is now displayed (Cluster)
When configuring ZooKeeper, the custom root path is used now by default (Cluster)
Modification time is added to the list of detached parts in DBA tools (Cluster)
Fixed
Alternate DNS names can now be used with internal subdomain (Cluster)
ON CLUSTER queries are now handled correctly for table names containing whitespaces (Cluster)
Cluster Export/Import now respects Datadog configuration properly (Cluster)
Fixed UI issues for users that do not have any environments available
Fixed a race condition with restoring a cluster from a backup from a non-standard backup location, when restore could start before the configuration is applied (Cluster)
24.6.29
Released 2024-11-18
Added
New Cleanup Storage tool in DBA tools (DBA Tools)
MySQL protocol can be enabled for BYOC environments under private network (Cluster)
Okta roles mapping is now available for users in Login Settings (Organization)
Anywhere environments can be exported into Terraform configuration (Environment)
Node taints are now displayed (Environment)
Restore a specific table partition from a backup (Cluster)
Hetzner Cloud support (Cluster)
Changed
Availability Zones can now be selected when re-scaling cluster
Deleted cluster and user names are preserved in Audit log now (Organization)
Cluster->Configure menu has been reordered (Cluster)
Kafka Connections is not a part of cluster configuration. Multiple connections are supported (Cluster)
Altinity user is now managed by RBAC. That makes changes of Altinity access instant
Environment backup settings can only be changed for BYOK environments. Contact Altinity support if you need to change for other types. (Environment)
Fixed
Fixed resuming the cluster if node type has been changed
Fixed Test Connection button that was not available for users
24.5.31
Released 2024-10-03
Added
Added Okta role mappings for envsupport and grafana roles
Added an option to configure custom label for availability zone separation
Fixed
Fixed a bug with re-scale on schedule that did not trigger node type change correctly
Fixed a bug where SaaS environments provisioned using Anywhere stack were displayed as BYOC
Fixed a bug where users logging in with Okta are denied access sometimes
24.5.25
Released 2024-09-17
Added
Added the new 2FA option for password logins that validates login using security code from email (Organization)
Added an option to configure default user role and ‘Opened’ mode in Login Settings (Organization)
Added an option to use S3 compatible non-AWS storage for backups (Environment)
Added cost estimate when re-scaling a cluster (Cluster)
Added configurable query timeout in Explorer (Cluster)
Changed
Improved flexibility of availability zones configuration for BYOC/BYOK (Environment)
Proper tolerations are prepopulated now on BYOC nodes (Environment)
Environments can now be deleted with 2FA via email confirmation (Environment)
Alert user if EBS params controller is missing in AWS BYOK environment (Storage)
Improved conversion procedure from non-replicated to ReplicatedMergeTree table (DBA Tools)
Fixed
Fixed a bug that allowed user to bypass Okta and use password login in some cases (Organization)
Fixed a bug that did not allow to re-scale cluster, i.e. change a node type, until cluster is online (Cluster)
Fixed a bug that could result in cluster online status to be stale for several minutes (Cluster)
Fixed a bug that allowed to scale cluster volumes over 16TB that is not supported by AWS/GCP (Storage)
Fixed a bug that did not allow to free a cordoned volume properly before deleting (Storage)
Fixed a bug that could cause Kafka tables not properly restarted (Workload)
Fixed a bug that did not allow to use non-letter characters in backup inclusion and exclusion rules (Backup)
Fixed a bug that did not allow to create table on all nodes when table name contained non-alphanumeric characters (DBA Tools)
24.4.20
Released 2024-07-24
Added
Cloud-specific cost allocation tags can be configured for BYOC environments now
Annotations can now be specified for ClickHouse® clusters. Those can be useful in some BYOK environments.
Infrequent access tier is now used for backups on S3 that are stored more than 2 weeks (e.g. weekly and monthly)
New environment creation wizard and numerous improvements for Anywhere environments configuration
Changed
Backup operations are now enabled for env admins
XML configuration files are now validated for XML correctness
It is now allowed to have two payment methods for one account, e.g. credit card and marketplace
Performance for Schema and Kafka tabs was improved
Increased the number of IP addresses that can be used in IP whitelisting. Now it is more than 200.
Improved Zookeeper deployment manifests
Fixed
Fixed compatibility issues with 24.3+ ClickHouse versions
Fixed a bug when two settings with the same key could be entered
Fixed display of query results in Explorer for ClickHouse versions 24.3 and above
Added PodDisruptionBudget back for Zookeeper that had been incidentally removed in earlier releases
Billing data is now correctly displayed when there are multiple organizations with the same domain name
24.3.30
Released 2024-05-28
Added
New Audit Report functionality in DBA Tools
Secret references can be used for all server configuration settings now
Added list view for Nodes
Added tax configuration to the billing
When cluster is rescaled from 1 to more replicas, users are warned about existing non-replicated tables and suggested to convert those to replicated ones
Last Login column has been added to the Accounts view
Maintenance Window configuration is now available
Changed
Improved configuration of node types for Anywhere clusters
Improved performance of starting up clusters with a lot of data
Red icon is displayed if cluster is open to the public Internet
Backup infrastructure deployment has been improved to avoid unnecessary restarts. After this release no new restarts will be needed.
Backup and object storage for ClickHouse® data is now displayed separately in usage details and invoices
When cluster is restored from a backup, node/storage/version is properly retrieved from a source cluster
Added extra checks when restoring a cluster from a backup to avoid incorrect restore
Enabled multiple include/exclude table/engine filters when restoring a cluster from a backup
Fixed
Fixed the ClickHouse version inconsistency display during version upgrades
Fixed a bug with new Anywhere environments configuration that could be configured to incorrect Kubernetes namespace sometimes
Fixed a bug with Anywhere BYOC AWS setup did not prepopulate default node groups and storage classes
Fixed a bug when ClickHouse users could not be managed properly via UI in certain cases
Anywhere users can subscribe to alerts finally. It did not work before.
Several backup actions can not be executed in parallel for the same cluster anymore, since it could lead to errors
Fixed a bug when Publish on a stopped cluster unexpectedly resume it
24.2.25
Released 2024-04-03
Added
Enabled integration with Prometheus and Loki, for example Grafana Cloud
Added an option to configure logs retention period for Anywhere clusters
Added a new workload page for Kafka consumers
The trial expiration is set to 14 days from the first user login
Added an option to export a cluster as CHI yaml manifest
Enabled cluster audit logs for envadmins
Changed
Import dataset feature is improved to work properly on replicated clusters
When restoring a cluster from a backup, source cluster node type and version is preselected now
Clusters list view is improved
Fixed
Fixed a bug when new environment could not be created if user’s first or last name is not defined
Fixed a bug when envuser could not change Altinity Access for the cluster
Fixed Environment screen rendering for mobile devices
Fixed display of running queries and replication queue on heavy loaded servers
Fixed a bug when availability zones would be applied in the wrong order in rare cases
Fixed a bug when adding unsupported node type was silently ignored. Now error is returned
Fixed a bug when backup costs were not included to cost by day charts
Fixed a bug when node view could not be open on inactive/failed node
Fixed a bug when converting non-replicated to ReplicatedMergeTree table on a multi-node cluster could result in inconsistent data
Fixed a bug when errors could be ignored when running multi-statement queries in Explorer
24.1.21
Released 2024-02-15
Added
‘Uptime Schedule’ is renamed to ‘Activity Schedule’. It now allows to specify an instance type for inactive time, scaling down cluster in low hours automatically
GCP Marketplace integration is added. GCP Marketplace is available as a payment method
Display a message that cluster is connected to the remote backup bucket
When external custom domain is configured instructions for DNS configuration are now displayed
Discounts are now applied to the current period. Previously, discounts were only applied to generated invoices for the previous months
Added an option to select ZooKeeper node type when launching a new cluster if multiple node types are configured for ZooKeeper
Changed
Upgraded clickhouse-operator to from 0.22.1 to 0.23.1 version release notes
Upgraded clickhouse-backup from 2.4.6 to 2.4.31 version release notes
Better progress is displayed when provisioning the BYOK/BYOC environments
Removed redundant fields from Cluster Launch Wizard
Allow to start volume modification if previous modification is still in progress
Improved performance of listing backups
Fixed
Fixed restart behaviour when server settings are changed. Previously, cluster would not restart sometimes when needed.
Fixed a number of issues when updating and removing volumes in multi-volume clusters
Fixed a bug when ZooKeeper cluster size was not respected when stopping/starting ClickHouse® cluster
CPU/RAM settings for unknown node type are now preserved (BYOK)
23.7.37
Released 2023-12-12
Added
New users except ‘admin’ are now created in SQL with CREATE USER
SQL users can be used in Explorer
RBAC data (SQL users) are stored in and restored from a backup
Allow to export table level statistics (sizes, row counts) to the Datadog
Default On/Off switch for Datadog configuration
Allow to switch On/Off zone awareness routing to ClickHouse® nodes
Allow to restore selected tables or database engines from a backup
Cloud regions are automatically pre-populated for Anywhere environments
Azure support
Changed
IP whitelisting is enabled by default for new cluster. User IP is detected.
Named collection control is enabled for admin
Improvements to managing AWS volumes. Allow to change volume type
“Copy Data between Clusters” now allows the external destination
Added validation for node type configuration
Improved performance of test datasets loading
Usability improvements on Workload tab
System events are now hidden in Audit log by default, but can be shown using a switch
Fixed
Fixed a bug when System node pool could not be managed from ACM
Fixed a bug when node endpoint was not accessible under custom domain name
23.6.37
Released 2023-10-24
Added
Tiered storage support for EBS/PD volumes
Allow to free and remove disks in multi-volume configuration
Alert user is cluster is stopped for more than 30 days
New Monitoring role for Grafana access only
New Env Support role for accessing clusters without destructive actions
Access token for Anywhere API
Map Octa roles to ACM roles
Added Azure as a backup destination option
Added on screen notification when ClickHouseInstallation templates are used
Added on screen notification when cluster is connected to other cluster’s backup and a way to reset it
Added cluster lock feature to prevent accidental changes
Added an option to restore a table from the backup to a different database
Added alternate DNS names to Connection Details popup
Enabled storage of UDF metadata in ZooKeeper for ClickHouse® 23.3 and above
Added ‘Enabled object labels’ option to backup settings
Added new ‘Setup Environment’ wizard
Added AWS Marketplace integration
Changed
Do not allow to start a cluster without CPU cores configured for a node type
Made a link ClickHouse release notes more visible
Clicking to Upgrade advisory icon now opens up an Upgrade screen
Success/Failure notifications are not sent to both user who started the process and cluster owner
Improved setting up BYOC Anywhere clusters UI
Fixed
Fixed a bug when load balancer status for a node was not properly changed and displayed
Fixed a bug with KILL MUTATION that might not work in some cases
Fixed a bug when Kafka Connection wizard could trigger the cluster update
Fixed default ZooKeeper storage class
Fixed a Back button navigation from Nodes screen
Fixed a bug when launching cluster from a backup could use incorrect CPU/RAM requests
23.5.15
Released 2023-08-15
Added
Environment audit logs, available for env and org admins
Org admins can now configure login settings
Allow to login with password for org admins even if passwords access is disabled for organization
Cluster role
Changed
Distributed queries are now handled using ‘secret’ to authenticate between nodes
Changed description of available login option to make it more clear
Fixed
Fixed an inconsistent display of storage usage across nodes that happens sometimes
Fixed storage throughput calculation that was sometimes incorrect
23.4.36
Released 2023-07-25
Added
Access change reason to Altinity Access
Startup time option for slow starting clusters
Storage management for supporting multiple volumes in a more flexible way
Management of auto templates for Anywhere environments
History of cluster setting is now preserved, and it allows to rollback
Stop button when rebalancing disks
Changed
Added DataDog and Loki logs configuration on the separate Environment tag
‘default_replica_path’ now includes uuid
Upgrade version recommendations have been improved
Access Management is enabled for ‘admin’ user by default in new clusters
Cost estimates for are more accurate now
Workload->Mutations has been improved
clickhouse-backup has been upgraded to 2.2.8
It is now possible to change ZooKeeper node type for running clusters
Improvements to Node Type configuration
Allow IAM role access to the backup bucket instead of credentials
Fixed
Fixed node storage % incorrect display in some cases
Fixed hint for Clone Database
Fixed datadog deployment in Anywhere environment
Fixed Anywhere environment setup when EKS cluster is provisioned by Altinity
23.3.31
Released 2023-06-07
Changed
Disable ‘Reset Anywhere’ for users
Fixed
Removed an error from the logs that table system.crash_log does not exist when opening up a cluster page
Fixed Node Selector spec
23.3.28
Released 2023-05-31
Changed
clickhouse-operator has been upgraded to 0.21.1 version
Added a user friendly page when ACM is not-available
Disable gp2 storage class
Fixed
Correctly set 4000 IOPS for 1000MB/s gp3 volumes throughput
Fixed some corner cases with ZooKeeper re-scale
23.3.26
Released 2023-05-17
Added
Allow to modify gp3 volume throughput in Rescale
New ‘Mutations’ tab in Workflow
New ‘Crashes’ tab in DBA tools
Introduce cluster owner, allow to change owner
Set labels on S3/GCS backups
Configure logs location in environment settings for Anywhere environments
Delete of Anywhere environments
Added a support for custom image registries for Anywhere environments
Allow to test backup bucket access
Allow to pick up availability zones when starting a cluster
Changed
Changed default Altinity Access level to ‘System’
ALERTS popup has been improved
Improved ClickHouse® version upgrade recommendations that were incorrect sometimes
system.session_log is enabled by default (it has been disabled in 22.8+ ClickHouse releases)
ZooKeeper configuration management has been changed. That allows re-scale w/o a downtime and also better HA
Allow to use IAM access for backup buckets
ZooKeeper node configuration is now re-created using Publish
Upgraded clickhouse-backup to 2.2.5. That fixes the concurrency issue and also allows to resume interrupted backup automatically.
Upgraded clickhouse-operator to 0.21.0. That eliminates some unneeded restarts, e.g. when changing log level.
Fixed
Fixed a bug with ‘Copy Data between Clusters’ that could not copy some types of MergeTree tables
Fixed a bug where pressing MANAGE CLUSTERS in Environments List page did not navigate to cluster page properly
Fixed ‘Last Insert Timestamp’ that has been empty in some cases
Automatically enabled monitoring and backups for new Anywhere environments
23.2.35
Released 2023-04-17
Fixed
Fixed Cluster soft restart
Backup creation waiting time has been increased to 23 hours
Zookeeper tolerations are now updated on rescale/republish
Fixed display of tolerations when re-connecting to an existing Anywhere environment
23.2.33
Released 2023-04-11
Added
Backup configuration is now available on a cluster level. Different clusters may have different backup settings.
New volume performance guidelines when starting a cluster
Now user is alerted it profile setting is used instead of a server setting
New resource limit for total number of nodes
Allow to exclude individual node from a load balancer
Users can add custom Grafana dashboards
Support alternate cluster names
New Altinity Support role (available for Altinity staff only)
Discounts management (available for Altinity staff only)
Changed
SHARE button has been renamed to INVITE
Rescale screen shows storage units now
“Kafka Connection Check” has been moved to the cluster page. It can not insert Kafka configuration directly to the cluster
Notifications include FQDN for cluster names now
Improvements to Environment dashboard
If environment backup settings are changed those are applied automatically to clusters now
More DataDog regions are available now
Fixed
Fixed “Copy Data between Clusters” for Anywhere environments with custom node taints
Fixed a bug when Node View was not available for offline nodes
Rebalance is available back for envadmins
23.1.23
Released 2023-03-10
Fixed
Fixed a bug with version upgrades for ClickHouse® 23.1 and above that might result in cluster not going online after restart
Fixed a bug with “Workload->Replication” screen did not display any results
Fixed a bug with “Copy Data Between Clusters” tool that did not work correctly in a replicated cluster with non-partitioned tables in some cases
Display an error message if “Schema Consistency -> Create table on all nodes” fails with an error
23.1.21
Released 2023-02-20
Added
Clone database feature that allows to clone database w/o data copy on same host
Force restart of an individual node
Show pod events in a node view
Current quota usage is now displayed on an environment screen
User role can be specified when inviting user to an environment
Progress bar when applying changes to a cluster
Operator managed persistence is now default for new environments, and can be turned on for existing ones. It allows to re-scale volumes w/o downtime
Re-publish ZK clusters
Changed
Backup configuration is currently always deployed, even if schedule is disabled
ClickHouse® version recommendations were improved
IAM-managed access to backup bucket is now allowed
Data rebalance UI has been improved
Cluster are now sorted alphabetically
Asynchronous metrics log frequency is reduced for new clusters
Changed some ‘default’ profile settings (part of operator release):
Fixed data consistency checks for 3 replica clusters
Improved loading speed for Accounts screen
Copy Data wizard can now work with non-Altinity.Cloud ClickHouse
Fixed Auth0 integration with Okta
22.12.25
Released 2022-12-25
Added
User is notified with a warning sign when backups are not configured
User is notified with a popup message when data migration is completed or failed
‘Delete table’ action is added to Data Consistency tab
List of databases granted to ClickHouse® user are displayed
Quick filter was added in order to see unhealthy nodes on Dashboard page
Support Bare Metal environments as a hook for non-cloud customers billing
Markdown is supported for Notifications (Altinity only)
Recipients selection has been re-worked for Notifications (Altinity only)
Altinity is notified when user removed the payment method (Altinity only)
Changed
‘Environment Settings’ was renamed to ‘Environment Variables’ on the cluster page
DBA tools UI was made more intuitive
Improved new Anywhere environment setup process
Improved Data Rebalance function that could sometimes move too much data
Backup configuration is moved to a separate resources instead of being bundled with ClickHouse configuration. This change requires restart.
Backup stability improvements, and clickhouse-backup:2.1.1 certification
Fixed
Fixed a bug when node status was not updated for a few minutes after ClickHouse cluster is up an running
Fixed a bug with backup being restored from AWS to GCP environments or vice versa could not be restored to a new cluster due to mismatching node types
Fixed a bug when Rescale ignored auto publishing being turned off
Fixed a bug when ‘Run DDL ON CLUSTER’ did switch off automatically when specific node is selected
Fixed a bug with rescaling GCP clusters in old tenants
Fixed a bug when profile settings could not be changed on a cluster that can not start
Fixed Data Migration tool that did not work in Anywhere environments due to hard-coded tolerations
Fixed a bug with backup compression format was not respected for GCP clusters
Fixed a bug with memory and volume graphs displaying incorrect data
22.11.30
Released 2022-11-14
Added
Used/available quota is now displayed when starting a cluster
New System Metrics Grafana dashboard
Reset Anywhere action in order to disconnect from the Anywhere environment
Rebalance data across storage volumes
Tracking customer credits when invoicing
Changed
In the list of accounts, environments for a particular account are now displayed
Anywhere connection wizard has been improved
Sensitive environment settings are back to readonly for non-Anywhere clusters
Multiple improvements to backup functionality
Multiple improvements to Copy Data between Clusters feature
Log storage has been migrated to Grafana Loki
Fixed
Fixed latest backup timestamp that has not been updated sometimes
StatusCheck now works for Anywhere environments
Billing estimates are now correct for Anywhere clusters
MaterializedView tables are now correctly restored when using Consistency check tool
Fixed a UI bug with ClickHouse version was not displayed when one of cluster nodes was down
Fixed Kafka Connection tool generated XML that was sometimes incorrect
Fixed Environment Variable settings page that did not allow to specify non-secret settings
Fixed a bug that did not allow to restore GCP backup to AWS or vice versa to an automatically created cluster due to incorrect node specifications
Billing reports are now displayed correctly for Anywhere clusters
22.10.24
Released 2022-09-15
Added
Allow to restrict access to cluster management for Altinity stuff
Setup and initial configuration of Anywhere environments
Dashboard is enabled for env and org admins
Copy Data feature is enabled for env and org admins
Logging into Loki for Anywhere tenants
Option to turn on ClickHouse SQL access management for users
New ‘Errors’ tab under DBA tools
New ‘Cluster Consistency’ tab under DBA tools
Pod status in the Node view
Environment variables from a k8s secret
Changed
Processes tab have been improved
Multi-statements now can be executed in Explorer
When ClickHouse cluster is upgraded to the new version, the UI now allows to easily pick Altinity.Stable and Community versions
ClickHouse version upgrade recommendations have been improved
When user returns with a direct cluster link, cluster Environment is automatically selected as a current one
Fixed
Fixed sort order in a list of nodes dropdown in Explorer
Fixed backup restore scenarios between different environments and clusters
Fixed a bug with detached parts could not be deleted for ‘.inner.’ tables
Fixed Kafka connection tool in GCP environments
22.9.21
Released 2022-08-15
Added
Added a feature to convert from non-replicated to replicated MergeTree (available for Altinity staff only)
Data Migration Tool to copy data between clusters (available for Altinity staff only)
New ‘Launch from Backup’ wizard that allows to pick any backup source, including outside of Altinity.Cloud
Replication status in Workload
Alert cluster owners when Altinity access level is changed
Backlink button to the Environment page
Proxy connection mode for Anywhere clusters
Changed
Workload tab was refactored to show 3 panels: Queries, Replication and Processes
Workload is sorted in descending order by default
Table creation hints were updated in Explorer
Improved loading test datasets feature
User is automatically redirected to the last visited page on re-login
Fixed
Fixed restoring a backup in sharded and replicated cluster with tables replicated to every shard
Fixed sorting order in dashboard
Last insert timestamp now displays timestamp for Kafka inserts correctly now
Fixed SELECT ALL IGNORED for detached parts
22.8.15
Released 2022-07-07
Added
New tool to review and remove detached parts
New tool to test connectivity to Kafka broker
New tool to import test datasets – available for 22.3 ClickHouse version and above
Changed
Default log level for new clusters is set to ‘information’. Users can edit log level using ’logger/level’ cluster setting
Storage size is displayed as ‘Pending’ if rescale has not been complete
Improved version upgrade recommendations
Improved Schema and Workload tabs
Fixed
Fixed a bug with uptime schedule that could unexpectedly stop clusters sometimes
Fixed a bug with memory configuration settings if cluster is resumed to the different node size
22.7.13
Released 2022-06-03
Added
User role is now displayed on Account page
A warning is displayed on ClickHouse version upgrade is available
Sorting has been added to the Schema tab
A tool to convert a table from MergeTree to ReplicatedMergeTree (available for superadmins only)
VPC Endpoint status is displayed on Connections popup
Custom tolerations can be specified for node types
Changed
User is automatically authenticated as ClickHouse admin when starting a new cluster
Schedule icon opens a Schedule popup now
When rescaling a volume, minimum rescale ratio is 20% of the volume size
Org admin can access Environment details now (previously it was only possible with Env admin)
Fixed
ClickHouse use authentication fixes
List of backups was sometimes not properly sorted
Fixed a possible race condition in backup and restore of replicated clusters
22.6.18
Released 2022-05-13
Added
Explorer now requires user authorization using ClickHouse user/password
Altinity staff does not have an access to the data by default. Multiple levels of access can be granted by a customer – that enables ‘altinity’ user to work with the data.
New ‘Workload’ tab in Explorer to analyze typical queries
Copy to Clipboard buttons in Connection Details
Changed
DataDog metrics are labeled with environment and cluster
clickhouse-operator user is restricted to Altinity network only
Brute force protection is enabled for password recovery form
22.5.15
Released 2022-04-25
Added
Cluster Uptime feature that allows stopping the cluster automatically when inactive or by schedule.
Reset to defaults is available on ClickHouse settings and profile settings pages.
Email notification is sent to the user when trial is extended.
Connection to Remote environment via Altinity Connector.
Changed
Display a warning when downgrading ClickHouse major version
Display a warning when non-replicated MergeTree table is created on replicated cluster
Cluster Dashboard now shows LB type and storage type
Fixed
Fixed UI slowness when a long query is being executed.
Fixed Schema tab that may be not displaying tables when databases contains hundreds of those.
Small UI fixes in different places.
22.4.15
Released 2022-04-06
Added
Breakdown by clusters on a billing page
Initial support for user managed environments
Environment connection status
Changed
Changed cluster wizard to make it easier to use
Fractional disk sizes are not allowed anymore
‘Pay by Invoice’ option is disabled
Fixed
Fixed a bug with local backups not being deleted that might result in higher disk usage
Fixed a possible backup failure on clusters with async_inserts=1
Fixed a bug with ALTER TABLE did not work sometimes on clusters restored from a backup
Fixed a bug with schema did not refresh sometimes
Fixed a bug in incorrect retention of backups of sharded cluster
22.3.14
Released 2022-03-17
Added
Allow to select a node type when launching a cluster from backup (available for Altinity staff only)
Changed
DROP TABLE is executed now before restoring a table from the backup
CPU is correctly displayed in cores on Environment page in this release
clickhouse-operator has been upgraded to 0.18.3
Fixed a bug that did not allow to enter ‘0’ in cluster settings
Fixed a bug that might result in cluster not going online when using ClickHouse versions 22.2 and above
Fixed a bug with incorrect display of billing data for GCP environments
Fixed a bug with AWS NLB usage
Fixed a bug with cluster metadata not being stored in backup sometimes
22.2.15
Released 2022-02-28
Added
Notifications for cluster related events can be configured
Datadog integration
Option to force Auth0 authentication for organization
Dark UI theme
Cmd/Ctrl+Enter in Explorer can be used to run a query
Changed
ZooKeeper is now stopped when cluster is stopped
Warning has been removed from volume rescale popup
Monitoring links have been moved to the top in order to make it easier to find
Max part size has been reduced to 50GB
Column compression tab is more compact now
When backup operation is in progress all operations that may incidentally restart the cluster are blocked now
Fixed
Fixed a bug with list of databases sometimes could not be parsed in user dialog
Fixed a bug with replica cluster creation
Fixed latest backup timestamp display for stopped clusters
Fixed a bug with table restore from a backup that could download full cluster backup instead of a single table
22.1.28
Released 2022-01-31
Added
Restore cluster from an External backup (available for superadmins only)
Restore single table from a backup
New Grafana dashboard for logs
Changed
UI facelifting on Cluster and Nodes dashboards
System tables are now hidden by default on Schema dashboard
Stronger security for Grafana monitoring dashboard
Better performance of Billing dashboard
Use ‘pd-ssd’ fast storage for ZooKeeper nodes in GCP
Cluster dashboard now shows a warning if backup utility is outdated
Backup line item is now correctly displayed for GCP clusters
Support plan is now displayed on a billing page
Error Log section is removed from ClickHouse logs page
Fixed
Fixed ON CLUSTER switch behavior
Removed deprecated ClickHouse settings from default profile
Removed deprecated node annotations
21.13.21
Released 2021-12-21
Added
Expiration date for trials can be adjusted from UI (previously it could only be done with an API call)
Expiration date for notifications can be configured
Units to the billing usage page
Legend to the Columns tab that clarifies key flags
Changed
UI has been refreshed with a new version of Clarity.Design library
When user VPC endpoint is configured Access Point URLs are switched to ‘internal’ now
AWS NLB is disabled by default. It can be enabled on Environment level if needed
Cron job logs are sent to centralized logging
Fixed
Processes view is fixed for ClickHouse versions 21.8
Estimated costs for GCP are corrected
Trial notifications are not longer created for blocked organizations
21.12.26
Released 2021-12-01
Added
Post-trial workflow allows user to signup to the paid account
Column level compression tab in Schema popup
New billing user role in order to access billing only
Soft rolling restart of ClickHouse nodes is now available. The previous ‘hard’ restart can be used as well.
Background operation status is now displayed on the cluster dashboard
Billing integration for GCP
Backups for GCP
Changed
ZooKeeper is updated to 3.7.0. It only affects new clusters.
clickhouse-backup is updated to 1.2.2
User will receive notification when subscribes or unsubscribes from ClickHouse alerts
Billing company name can now be different from the organization name
Fixed
Fixed ‘Refresh’ button on Processes tab that did not refresh the screen sometimes
Fixed an issue when sometimes schema was displayed as empty
21.11.24
Released 2021-10-27
Added
Usage details are available in Billing
Download links to issued invoices are available in Billing
Backup cost is extracted as a separate line item. Previously it was a part of a storage cost.
VPC Endpoint status is displayed when enabled
Datadog integration is supported for ClickHouse logs. Contact us with your datadog agent id.
GCP support
Enabled support for Altinity Builds of ClickHouse
Changed
Networks are removed from ClickHouse users creation. It is now controlled in Connectivity on a cluster level
ZooKeeper cluster size can not be selected anymore. It is adjusted automatically.
Available API endpoints are now filtered according to the user role. Previously, user could see all API even if those could not be used.
Fixed
Fixed a bug with node endpoints being unavailable under VPC endpoint
21.10.28
Released 2021-09-21
Added
Allow users to configure alerts for the cluster. Note: cluster may be restarted when email is used for a first time
IP/CIDR whitelisting to protect access point access
Compression ratio column on a Schema tab
Email notifications (system)
Notifications to a specific recipient (system)
‘Prepare All Invoices’ super-button that sends invoices to all paid customers (system)
CC and BCC addresses for invoices
Changed
Users and ClickHouse users passwords are now required to be 12 characters at least
Session timeout is increased to 60 minutes
Troubleshooting mode now allows Altinity Engineers to enter the failed node
Support for multiple environments for an organization
Basic usage information at the billing page
Download of logs
Password recovery if user has lost his password
Externally available status page that can be referenced as https://status.<tenant-name>.altinity.cloud
Changed
ClickHouse custom images are restricted to Yandex and Altinity only
Non-XML config files are now allowed (e.g. for dictionaries)
Backup and security improvements
21.6.9
Released 2021-05-19
Added
New Environment Settings section into cluster configuration
default_replica_path and default_replica_name settings are now pre-populated that to simplifies creation of ReplicatedMergeTree tables (requires ClickHouse 21.1+)
Node selector is now available at the Explorer page. It allows to run queries against an individual node.
Changed
Improved usability of cluster settings
Fixed a bug with “.inner.” tables did not properly work in Explorer
Fixed a bug with orgadmin did not have permissions to modify cluster settings
Fixed a bug with orgadmin could see user plain password in user audit log when password is changed
Upgraded to clickhouse-operator to 0.14.1. That fixes a possible failure of schema creation when adding a new replica to the cluster.
Upgraded clickhouse-backup to 1.0.9. That fixes restore of materialized views and distributed tables.
Backup and security improvements
21.5.10
Released 2021-04-27
Added
Node endpoints connection details
Last query and last insert timestamps
Fixed default ClickHouse version when upgrading.
Login screen protection from a brute force attack
Changed
Now it is possible to rollback quickly to the older version if ClickHouse does not start after upgrade
Fixed Share feature when user belongs to a different environment
Atomic databases can be now correctly backed up with the new version of backup utility (requires cluster re-publish)
We have added gp3 storage option, and removed unencrypted volumes completely
ClickHouse Version is now automatically defaults to the latest Altinity Stable release
The number of replicas for Zookeeper clusters has been added to a list of Zookeepers
General stability and security improvements
21.3.21
New ‘Share’ function to invite users
Cluster created by one user can not be deleted by another user anymore
Improved Account Details screen
New service status page that allows to subscribe for status changes
Added a startup mode advanced setting. New ‘Direct’ mode decreases startup times for huge clusters
Added input validation in different places
Added a limit on maximum number of shards and replicas
Added an option to re-scale ZooKeeper from 1 to 3 nodes and vice versa (available only for admins yet)
Stability, security and backup improvements
21.2.15
Grafana is now accessible under ‘/monitoring’ path rather than a separate endpoint. That works under VPC as well.
Individual shards and replicas can be directly accessed by TCP and HTTP clients. In order to use that cluster needs to be re-published. Ask us for more detail if interested.
Flexible backup schedule (available on request)
Restore a backup to a new cluster (available on request)
Cluster names are now forced to use only lower case latin characters and numbers
Fixed a bug with RENAME TABLE query did not work in ON CLUSTER mode
Fixed a bug with losing SSL files when stopping the cluster for a long time
UI stability improvements and bug fixes
21.1.12
UI performance optimizations
Usability changes in Rescale screen
Added a validation to Profile Settings values
Login attempts are now correctly logged into Audit Log
Macros section is removed. Macros can be overridden via Settings if needed and looked up in system.macros table
Fixed a bug in Query Explorer that did not display query results with WITH statement properly
Fixed a bug that did not allow to Resume to a different node type
UI improvements and minor bug fixes
20.5.10
Handling of custom configuration files in cluster settings has been improved
Altinity Stable ClickHouse version has been upgraded to 20.8.11.17
Cluster Migrate feature has been temporary disabled
UI improvements and minor bug fixes
20.4.3
Grafana has been switched to Edge Ingress load balancer, and is now secured by https
UI improvements and minor bug fixes
20.3.4
Platform specific settings are now protected from user modifications
Node and Cluster status is displayed correctly
ClickHouse version has been added to the clusters list
Session times out after 30 minutes of user inactivity
Healthcheck screen has been improved
Automatic redirect from HTTP to HTTPs when accessing the management plane
4.2 - Altinity Project Antalya Builds for ClickHouse® Release Notes
Altinity’s open-source Project Antalya is a new branch of ClickHouse® designed to combine Clickhouse’s lightning-fast queries with Data Lakes that use Iceberg as the table format, store data as columns in Parquet, all hosted on S3-compatible storage.
26.3.13.20001 Altinity Antalya (7c4787e) as compared to 26.3.10.20001 Altinity Antalya (0ef53dd)
Backward Incompatible Change
Turn system.replicated_partition_exports table into a history table by removing the TTL. Closes #1281 (#1917 by @arthurpassos)
Performance Improvements
Replace the export partition local manifests lock by a multiversion container. Yet another attempt to reduce lock contention observed while slow writes / commits to iceberg backed by ice-rest-catalog (#1912 by @arthurpassos)
Improvements
Add caching for REST catalog vended credentials. Added a new setting vended_credentials_cache_ttl: maximum cache entry lifetime (in seconds) for vended credentials (REST catalogs only). Default 300; 0 disables caching. (#1923 by @zvonand)
Applies to part and partition export the same auto cast ClickHouse INSERT … SELECT does. Current rules in this PR: Schema column count must match Check is done by column position, not by name. Lossy casts are allowed if export_merge_tree_part_allow_lossy_cast=1 (#1779 by @arthurpassos)
Bug Fixes (user-visible misbehavior in an official stable release)
Fix aggregation flow with remote initiator (#1872 by @ianton-ru)
Fixed system.tables.partition_key and system.tables.sorting_key returning empty strings for Iceberg tables that have no data snapshot, including all empty tables and (more frequently) tables accessed via the Glue catalog. Also added a defensive guard against Iceberg V1 metadata files missing sort-orders. (#1874 by @il9ue)
Fix cluster functions with hive partitioning (#1863 by @ianton-ru)
Fix Iceberg read optimization returning NULL for every column when reading manifests without per-file column statistics (e.g. pyiceberg with default settings). Affects icebergLocal, icebergS3, icebergAzure, icebergHDFS, and all *Cluster variants (#1991 by @zvonand)
Build/Testing/Packaging Improvements
Use gh artifacts with aws s3 fallback to lower usage costs. (#1837 by @MyroTk)
Upgrade Ubuntu Docker image packages to apply available security fixes (#1972 by @CarlosFelipeOR via #1974)
Update libssl in the Ubuntu Docker image to fix an existing CVE. (#1925 by @CarlosFelipeOR)
And ALL features included in previous Antalya releases
26.3.10.20001 Altinity Antalya (0ef53dd) as compared to 26.1.11.20001.altinityantalya (75d2d67)
Backward Incompatible Change
Added a new entra processor type which works with Entra using OIDC flow. Old azure type will be an alias. User now needs to specify tenant_id in configuration. (#1784 by @zvonand)
New Features
Introduce the export partition all command, which schedules exports for all partitions in a given table. Introduce a setting to control scheduling failure behavior (#1741 by @arthurpassos)
clickhouse-client: added --jwt-command, which invokes an external script to obtain a token; the script is re-invoked on every reconnect. (#1809 by @zvonand)
Added initial support for s3 tables (Iceberg REST catalog) (#1808 by @subkanthi)
Performance Improvements
Reading a single large local Parquet file via file() / File engine is now parallelised across multiple sources, each handling a subset of row groups. (ClickHouse#104251 by @alexey-milovidov via #1806)
Don’t commit while holding the export manifests locks. This avoid contention when the network / commit process is slow. (#1813 by @arthurpassos)
Do not make ‘describe table’ query when schema is known (#1845 by @ianton-ru)
Improvements
SELECT * FROM system.databases now always lists data lake catalog databases regardless of the show_data_lake_catalogs_in_system_tables setting. Previously they were hidden by default, which was inconsistent with SHOW DATABASES that always showed them. (ClickHouse#103444 by @alsugiliazova via #1689)
Remove the export_merge_tree_partition_lock_inside_the_task setting. No longer maintained (#1713 by @arthurpassos)
Make export part and partition respect background tasks memory limit (#1728 by @arthurpassos)
Observability over exceptions on export partition operations was broken and not reliable. This PR simplifies it by making it a single JSON array instead of multiple paths in zookeeper. Another change is that now system.replicated_partition_exports returns only local information, it does not reach zookeeper. (#1730 by @arthurpassos)
Support for ’time’ type in Iceberg, read and write. (#1761 by @ianton-ru)
Adds native support for importing and exporting UUID data types in Arrow and Parquet formats. Users can now directly query and transfer UUID data between ClickHouse and other data tools without requiring manual string conversions or workarounds. Automated logical inference for top-level UUIDs, and support for explicit schema hint for nested UUIDs (ClickHouse#99521 by @ivanmantova via #1774)
Exporting UUIDs to Parquet via the Arrow encoder now includes the correct UUID type annotation, eliminating the need to manually cast FixedString(16) data when reading the files back into ClickHouse or other systems (ClickHouse#100150 by @ivanmantova via #1774)
Object information used for parsing data files in iceberg now contains the number of file rows and file size in bytes parsed from manifest file (ClickHouse#100645 by @divanik via #1776)
Hybrid tables now can ignore the segments that can’t be reached by the combination of WHERE and segment predicate (#1788 by @mkmkme)
Added system.hybrid_watermarks to introspect the hybrid tables watermarks (#1789 by @mkmkme)
Various token-based auth improvements (#1799 by @zvonand)
Change the interface for Iceberg inserts with the catalog. Deprecate settings: storage_catalog_type, storage_aws_access_key_id, etc (ClickHouse#100334 by @scanhex12 via #1800)
Support Iceberg tables that have data files outside the table location or on a different object storage (#1812 by @zvonand)
No longer require allow_insert_into_iceberg to be enabled on all replicas for the partition export to work. (#1836 by @arthurpassos)
Make the export task timeout 24 hours instead of 1 hour (#1843 by @arthurpassos)
Prevent commit race conditions by adding a per-task commit_lock (#1847 by @arthurpassos)
Bug Fixes (user-visible misbehavior in an official stable release)
Fix incorrect work view over Iceberg table (#1759 by @ianton-ru)
Fix infinite recursion with empty namespace in Iceberg catalog (#1762 by @ianton-ru)
Fix server crash (LOGICAL_ERROR) when executing ALTER TABLE UPDATE/DELETE on Iceberg tables when no prior SELECT or INSERT was done on the table in the same server lifetime (ClickHouse#102113 by @alexey-milovidov via #1767)
Fix LOGICAL_ERROR crash “Unexpected number of rows in column subchunk” in native Parquet V3 reader when reading nullable columns with a WHERE filter (ClickHouse#102628 by @groeneai via #1768)
Now ClickHouse should properly handle spark-style tables (where we have full absolute path for each file or relative path to common table path) (ClickHouse#99935 by @alesapin via #1769)
Fix logical error exception when inserting into an Iceberg table with a Date column partitioned by year, month, or day transforms (ClickHouse#100404 by @alexey-milovidov via #1770)
Fix Iceberg INSERT retry loop failing when the table was created with iceberg_metadata_file_path and the target metadata version already exists (ClickHouse#101548 by @groeneai via #1771)
Fix server crash (LOGICAL_ERROR) when SELECT-ing from a materialized view backed by an IcebergLocal table engine (ClickHouse#101577 by @groeneai via #1772)
Fix Logical error: 'partitions_count > 0' exception when performing consecutive ALTER TABLE UPDATE on a partitioned Iceberg table (ClickHouse#101278 by @Desel72 via #1773)
Fix crash in IcebergLocalALTER TABLE ... UPDATE when using Avro format, caused by LowCardinality/Nullable wrapper types not being unwrapped before serialization (ClickHouse#102337 by @Desel72 via #1773)
Fix exception “Logical error: prewhere_info” when querying URL/S3 Parquet tables with a row-level security policy and no PREWHERE clause. (ClickHouse#100361 by @alexey-milovidov via #1733)
Fix test_database_iceberg/test.py::test_namespace_filter (#1842 by @ianton-ru)
Use object_storage_remote_initiator without object_storage_cluster on initial node. (#1608 by @ianton-ru)
Make changes to the export partition background engine and support experimental exports to apache iceberg (#1618 by @arthurpassos)
SELECT * FROM system.databases now always lists data lake catalog databases regardless of the show_data_lake_catalogs_in_system_tables setting. Previously they were hidden by default, which was inconsistent with SHOW DATABASES that always showed them. (ClickHouse#103444 by @alsugiliazova via #1690)
Change the default value of export_merge_tree_partition_manifest_ttl from 180 seconds to 86400 (a day). This gives visibility over completed export partitions on real usage scenarios. (#1692 by @arthurpassos)
Bug Fixes (user-visible misbehavior in an official stable release)
Solved #1486 File identifier for distributed tasks was changed between 25.8 and 26.1 In frontport #1414 it was missed and rescheduleTasksFromReplica continued to use old variant. Fix unsynchronized access to replica_to_files_to_be_processed class member. (#1493 by @ianton-ru)
Fix Apache Iceberg queries not hitting the parquet metadata cache (#1631 by @arthurpassos)
Build/Testing/Packaging Improvements
Update libssl and libcrypto libraries to fix existing CVEs. (#1656 by @MyroTk)
Different improvement for remote initiator (#1577 by @ianton-ru)
Performance Improvement
Improve the performance of data lakes. In previous versions, reading from object storage didn’t resize the pipeline to the number of processing threads. (ClickHouse#99548 by @alexey-milovidov via #1580)
Improvements
Add support for EC JWT validation (ES* algorithms) (#1596 by @zvonand)
Add role-based access to Glue catalog. Use settings aws_role_arn and, optionally, aws_role_session_name. (ClickHouse#90825 by @antonio2368 via #1427)
Improve system.replicated_partition_exports performance and add metrics zk partition export (#1402 by @arthurpassos)
Add setting to define filename pattern for part exports - helps with sharding (#1490 by @arthurpassos)
Enabled experimental datalake catalogues by-default (#1504 by @Enmk)
Fix local replicated_partition_exports table might miss entries (#1500 by @arthurpassos)
Bump scheduled exports count only in case it has been scheduled (#1499 by @arthurpassos)
Improved processing ‘show tables’ query by fetching only names of tables and improved getLightweightTablesIterator to return structure containing only table names (ClickHouse#97062 by @SmitaRKulkarni via #1552)
Avoid scanning the whole remote data lake catalog for “Maybe you meant …” table hints when show_data_lake_catalogs_in_system_tables is disabled (ClickHouse#100452 by @alsugiliazova via #1583)
Bug Fixes (user-visible misbehavior in an official stable release)
Fixes an issue when Iceberg columns with dot in names returned NULL as values (ClickHouse#94335 by @mkmkme via #1448)
Use serialized metadata size to calculate the cache entry cell (#1484 by @arthurpassos)
Fix timezone parameter in sorting key for Iceberg table when type of key is DateTime and setting iceberg_partition_timezone is used (#1526 by @ianton-ru)
Fix export task not being killed during s3 outage (#1564 by @arthurpassos)
Use key (parsed without URI decoding) so that percent-encoded characters in object keys are preserved. Fixes issues where there retrieving data returns a 404 when there are slashes in s3 path (#1516 by @subkanthi)
Export Partition - release the part lock when the query is cancelled (#1593 by @arthurpassos)
Fix row policies silently ignored on Iceberg tables with PREWHERE enabled (#1597 by @mkmkme)
CI Fixes or Improvements
Fixes export part / partition tests failing under db disk integration test suites because those tests require MinIO traffict to be blocked and db disk relies on remote metadata stored in MinIO/s3 for plain merge tree tables, causing a deadlock and the suite to time out (#1478 by @arthurpassos)
25.8.22.20001 Altinity Antalya (6657993) as compared to v25.8.16.20002.altinityantalya (49bb3f7)
New Features
Different improvement for remote initiator (#1576 by @ianton-ru)
Improvements
Add support for EC JWT validation (ES* algorithms) (#1598 by @zvonand)
Use object_storage_remote_initiator without object_storage_cluster on initial node. (#1638 by @ianton-ru)
Bug Fixes (user-visible misbehavior in an official stable release)
Fix incorrect potential initiator crash in cluster request when cluster node is unavailable. Fix file identifier for distributed tasks in cluster request. (#1561 by @ianton-ru)
Fix attempt to create table from table function (#1701 by @ianton-ru)
Fix race in DDLWorker that broke recursive deletion of the DDL queue path in ZooKeeper. (#1712 by @CarlosFelipeOR)
Fix incorrect encoding special characters in S3 paths (#1537 by @ianton-ru)
CI Fixes or Improvements
Fix regression parquet suite running some tests multiple times; fix red PR workflow for PRs from third party repos (#1468 by @strtgbb)
For MergeTree tables using object storage which do not support writing with append, it will not support transactions. (ClickHouse#88490 by @tuanpach via #1475)
Automated upload and sanity check for binaries to include symtable; Fixes for package installation as signing runner was updated to ubuntu 24.04 (#1374 by @MyroTk)
Set regression job.name properly in new reusable suite; copy known broken tests from stable 25.8; remove references to upstream packages from server/keeper dockerfile (#1439 by @strtgbb)
Allow merge tree materialized / alias columns to be exported through part export. (#1324 by @arthurpassos)
Add export_merge_tree_part_throw_on_pending_mutations and export_merge_tree_part_throw_on_pending_patch_parts to control the behavior of pending mutations / patch parts on the export part feature. By default it will throw. It is important to note that when exporting an outdated part it will never throw. (#1294 by @arthurpassos)
Now engine=Hybrid can access columns which are defined as ALIAS in segments. (#1272 by @filimonov)
Add query id to system.part_log, system_exports and system.replicated_partition_exports. (#1330 by @arthurpassos)
Accept table function as destination for part export, inherit schema if not explicitly provided. (#1320 by @arthurpassos)
Bug Fixes (user-visible misbehavior in an official stable release)
Now ClickHouse will show data lake catalog database in SHOW DATABASES query by default. (ClickHouse#89914 by @alesapin via #1283)
Fixed an issue when Iceberg columns with dot in names returned NULL as values. (#1319 by @mkmkme)
Introduce token-based authentication and authorization (#1078 by @zvonand)
Split large parquet files on part export, preserve entire settings object in part export (#1229 by @arthurpassos)
Improvements
Profile events for task distribution in ObjectStorageCluster requests (#1172 by @ianton-ru)
Set max message size on parquet v3 reader to avoid getting DB::Exception: apache::thrift::transport::TTransportException: MaxMessageSize reached (#1198 by @arthurpassos)
Fix segfault in requests to system,table when table in Iceberg catalog does not have snapshot (#1211 by @ianton-ru)
Now datalakes catalogs will be shown in system introspection tables only if show_data_lake_catalogs_in_system_tables explicitly enabled (ClickHouse#88341 by @alesapin via #1239)
Bug Fixes (user-visible misbehavior in an official stable release)
Allow to read Iceberg data from any location. (#1092, #1163 by @zvonand)
Preserve a few file format settings in the export part manifest to be able to better control parallelism. (#1106 by @arthurpassos)
Do not send min/max info on swarm nodes when setting allow_experimental_iceberg_read_optimization is turned off. (#1109 by @ianton-ru)
More metrics for Iceberg, S3, and Azure. (#1123 by @ianton-ru)
Fix parquet writing not preserving original order when using single threaded writing with the native writer. (#1143 by @arthurpassos)
Preserve the entire format settings object in export part manifest. (#1144 by @arthurpassos)
Added experimental support in the Hybrid table engine to automatically reconcile column-type mismatches across segments via hybrid_table_auto_cast_columns (analyzer only). This allows queries to return consistent headers even when the underlying tables use different physical types. (#1156 by @filimonov)
Bug Fixes (user-visible misbehavior in an official stable release)
Fixed an issue when the missing “field_id” would cause the query to fail. (#1171 by @mkmkme)
This release is based on upstream ClickHouse® 25.6. There were a number of changes between upstream ClickHouse versions 25.3 (the previous base for Antalya) and 25.6. For complete details on those changes, see the release notes for upstream versions 25.4 through 25.6 in the ClickHouse repo:
Only parse hive partition columns as LowCardinality if they are parsed as Strings. (#1037 by @arthurpassos)
Fix lock_object_storage_task_distribution_ms when a replica is lost, changed lock_object_storage_task_distribution_ms default value to 500. (#1042 by @ianton-ru)
Implement AWS S3 authentication with an explicitly provided IAM role. Implement OAuth for GCS. These features were recently only available in ClickHouse Cloud and are now open-sourced. Synchronize some interfaces such as serialization of the connection parameters for object storages. (ClickHouse#84011 by @alexey-milovidov via #986)
Experimental Feature
Restart loading files from object storage on other nodes when one node down in a swarm query. (#780 by @ianton-ru)
JOIN with *Cluster table functions and swarm queries. (#972 by @ianton-ru)
SYSTEM STOP SWARM MODE command for graceful shutdown of swarm node. (#1014 by @ianton-ru)
Improvement
Expose IcebergS3 partition_key and sorting_key in system.tables. (#959 by @zvonand)
Fix an issue where the exception was thrown upon clickhouse-client connection to the server with a DataLakeCatalog database misconfigured. The exception will still be logged in the server log. (ClickHouse#83298 by @scanhex12 via #970)
Bug Fix (user-visible misbehavior in an official stable release)
IcebergS3 supports count optimization, but IcebergS3Cluster does not. As a result, the count() result returned in cluster mode may be a multiple of the number of replicas. (ClickHouse#79844 by @wxybear via #878, #885)
Add several convenient ways to resolve root metadata.json file in an iceberg table function and engine. Closes #78455. (ClickHouse#78475 by @divanik via #841)
Iceberg as alias for DataLakeCatalog with catalog_type=‘rest’. (#822 by @ianton-ru)
Bug Fix (user-visible misbehavior in an official stable release)
Fixed Context expiration for Iceberg queries. (#839 by @ianton-ru)
Build/Testing/Packaging Improvement
Fixed parquet metadata related tests. (#824 by @Enmk)
Packages
Available for both AMD64 and Aarch64 from builds.altinity.cloud as either .deb, .rpm, or .tgz
4.3 - Altinity Stable® Builds for ClickHouse® Release Notes
These release notes are for:
Altinity Stable Builds for ClickHouse, releases built by Altinity and supported for three full years
Altinity Stable Releases for ClickHouse, releases marked as stable by Altinity but built elsewhere
The release notes are organized by major release and release date.
4.3.1 - Altinity Stable® Build for ClickHouse® 26.3
Here are the detailed release notes for version 26.3.
Release history
Version 26.3.16.10001 is the latest release. We recommend that you use this version. But read the detailed release notes and upgrade instructions for version 26.3 first. Once you’ve done that, review the details for each release for known issues and changes between the Altinity Stable Build and the upstream release.
Major new features in 26.3 since the previous Altinity Stable release 25.8
Everything new since the 25.8 baseline, consolidated across releases 25.9 through 26.3.
Across ClickHouse 25.9 → 26.3 there were 154 new features, 608 improvements, 160 performance enhancements 75 backward-incompatible changes, and 41 known issues. (1872 distinct changes deduped from 2250 changelog entries.) Because the differences for this release are substantial, we’ve broken them into sections:
Column Statistics & Text Index — Automatic column statistics (auto_statistics_types) and scalable full‑text indexing (v3) reach production, dramatically accelerating analytics on semi‑structured and text data (25.10/25.12)
QBit Vector Data Type — Bit‑sliced vector storage plus approximate L2 distance enable high‑speed, tunable‑accuracy vector search inside ClickHouse (25.10)
Geometry Type & Geospatial Functions — A native Geometry type with WKB/WKT I/O and area/perimeter functions brings first‑class geospatial support (25.11/25.12)
Data Lake Integration — Direct query of Apache Paimon tables, Microsoft OneLake catalogs, and Google BigLake catalogs; Iceberg/Delta Lake metadata logging and expire_snapshots (25.10–26.2)
Async Inserts & Deduplication Defaults – Async inserts and unified dedup are now enabled by default, reducing part count and improving write throughput (26.2/26.3)
Fractional LIMIT/OFFSET – LIMIT 0.25 and negative LIMIT/OFFSET provide flexible row‑selection without subqueries (25.11)
Polyglot SQL Transpiler – Write queries in 30+ SQL dialects (e.g. Snowflake, MySQL) and have them automatically translated to ClickHouse (26.3)
Nullable(Tuple) & Materialized CTEs – Experimental Nullable(Tuple) and materialized CTEs expand SQL expressiveness for complex workflows (26.1/26.3)
Bottom line: Across 25.9–26.3 ClickHouse doubled down on zero‑effort performance (default async inserts, built‑in statistics, smarter parallel replicas) while adding high‑value new data types (QBit, Geometry, full‑text) and deepening data lake integration (Paimon, OneLake, BigLake). The result is a platform that requires less operator tuning, handles more workloads out‑of‑the‑box, and meets users where they are – in Snowflake, on object storage, or in geospatial analytics.
Forbid subqueries in table key expressions — Disallows subqueries in ORDER BY, PARTITION BY, PRIMARY KEY, SAMPLE BY, TTL, and index expressions, changing the error code from UNKNOWN_FUNCTION to BAD_ARGUMENTS. Prevents logical errors; users must rewrite queries that previously used subqueries in key expressions. (introduced in 26.2)#96847
Variant type throws on type mismatch instead of returning NULL — Changes Variant type operations (e.g., comparison) to throw an exception on type mismatch, replacing the previous silent NULL return. Catches type errors early and avoids silent data issues, but may break queries that relied on the old NULL behavior. (introduced in 26.2)#95811
Correct SHOW COLUMNS permission check for CREATE TABLE … AS … — Changes the permission check for CREATE TABLE ... AS ... queries from SHOW TABLES to SHOW COLUMNS, which is the correct grant for this type of permission check. Operators must update grants: users now require SHOW COLUMNS privilege instead of SHOW TABLES for these queries, breaking existing permissions. (introduced in 26.1)#94556
Functions
Rename searchAny/searchAll to hasAnyTokens/hasAllTokens — Renames the functions searchAny and searchAll to hasAnyTokens and hasAllTokens respectively, aligning their naming with the existing hasToken function. This is a breaking change; old function names will no longer work. Provides consistent naming for token search functions, but requires users to update queries that used the old names. (functions hasAnyTokens, hasAllTokens) (introduced in 25.10)#88109
e.g. SELECT hasAnyTokens(text, 'foo bar'); -- instead of searchAny(text, 'foo bar')
MergeTree-related
⭐ Inverted text index v3: part-wide format, requires rebuild — Rewrites the storage layout of the inverted text index to a part-wide format optimized for object storage, removes bloom filters, and improves merge performance. Existing indexes must be dropped and rebuilt after upgrade. Delivers faster reads from object storage and better merge performance, but requires manual index rebuild to avoid incompatibility. (settings enable_full_text_index) (introduced in 25.12)#91518
e.g. ALTER TABLE table DROP INDEX idx; ALTER TABLE table ADD INDEX idx (col) TYPE full_text;
⭐ Rework inverted text index for scalability (backward incompatible) — Rewrites the inverted text index from scratch to support datasets that do not fit into RAM, introducing new settings for Bloom filter usage and query plan direct reads. Existing inverted indexes must be rebuilt after upgrade; this change enables full-text search on very large datasets efficiently. (settings text_index_use_bloom_filter, query_plan_direct_read_from_text_index) (introduced in 25.9)#86485
⭐ Packed format for column statistics introduced — Changes the storage format of column statistics to a single packed file instead of multiple files. Improves storage efficiency and reduces file count, but requires a migration and is backward incompatible. (introduced in 26.2)#93414
Refactor do_not_merge_across_partitions_select_final; add automatic decision setting — Makes the setting explicit: do_not_merge=1 now unconditionally enables the optimization, while automatic decision is controlled by new setting enable_automatic_decision_for_merging_across_partitions_for_final (default enabled). Clarifies behavior and avoids confusion; operators must review their use of the setting after upgrade. (settings enable_automatic_decision_for_merging_across_partitions_for_final) (introduced in 26.2)#96110
e.g. SET do_not_merge_across_partitions_select_final = 1
Escape filenames for Variant subcolumns in MergeTree — Escapes filenames created for Variant type subcolumns in Wide data parts to handle special characters like backslashes in timezone names. This breaks compatibility with old tables using Variant/Dynamic/JSON types. Fixes storage of types with special symbols; requires migration or disabling the setting for existing tables. (settings escape_variant_subcolumn_filenames) (introduced in 25.11)#69590
Forbid empty ORDER BY keys in special MergeTree tables — Prevents creation of special MergeTree tables (e.g., ReplacingMergeTree, CollapsingMergeTree) with an empty ORDER BY key, as merge behavior is undefined. Override with allow_suspicious_primary_key setting. Eliminates merge errors and undefined behavior; forces users to define an explicit sorting key. (introduced in 25.12)#91569
e.g. CREATE TABLE ... ENGINE = ReplacingMergeTree ORDER BY () -- will fail unless allow_suspicious_primary_key=1
Fix projection recognition for multi-column sorting keys — Corrects metadata of normal projections so that multi-column sorting keys are properly recognized, enabling correct projection matching for query optimization. Ensures projections with complex sorting keys are used effectively, preventing missed optimization opportunities. (introduced in 26.3)#90429
Codecs / compression
Remove DEFLATE_QPL and ZSTD_QAT codecs — Removes the DEFLATE_QPL and ZSTD_QAT compression codecs (backed by Intel QPL/QAT libraries). Existing data using these codecs must be converted before upgrade. Users who have data compressed with these codecs will be unable to read it after upgrade unless they first convert it to a supported codec. (introduced in 26.1)#92150
Fix fatal error in T64 codec for non-aligned data sizes — Fixes a fatal error that occurred when compressing data with the T64 codec if the data size was not aligned to the element size. Eliminates crashes when using the T64 compression codec with certain data patterns, but may require upgrading compressed data. (introduced in 25.11)#89282
ObjectStore - S3/Azure/GCS
Add S3 schema validation — Adds validation of S3 schema configuration, ensuring that S3-related settings conform to expected structure. Prevents misconfigured S3 storage that could lead to errors or silent failures. (introduced in 26.2)#96089
Prohibit multiple plain-rewritable disks on shared object storage path — Adds a startup check that throws an error if two plain-rewritable disks have overlapping object storage prefixes with different metadata stores, preventing undefined behavior and potential data loss. Eliminates a dangerous configuration that could cause data corruption and loss when multiple plain-rewritable disks accidentally share the same object storage path. (introduced in 25.11)#89038
Datalakes & catalogs
⭐ Remove allow_dynamic_metadata_for_data_lakes setting — Deprecates the setting allow_dynamic_metadata_for_data_lakes; Iceberg and DeltaLake tables now always fetch up-to-date schema before each query. Simplifies configuration and ensures schema freshness for data lake tables. (introduced in 25.9)#86366
e.g. system.delta_lake_metadata_log
New setting makes DataLakeCatalog throw on metadata access errors by default — Adds setting database_datalake_require_metadata_access (default true) that causes DataLakeCatalog to throw an error when it cannot access table metadata, instead of silently ignoring the error. This is backward-incompatible for users relying on the old behavior. Operators must set database_datalake_require_metadata_access to false if they previously relied on ignoring metadata access errors, otherwise queries will fail. (settings database_datalake_require_metadata_access) (introduced in 26.1)#93606
e.g. SET database_datalake_require_metadata_access = 0;
Integrations
Capture UDF stderr in query logs for debugging — Changes UDF stderr handling: stderr_reaction defaults to ’throw’, and captures full stderr (up to 1MB) before throwing, exposing Python tracebacks in system.query_log.exception. Enables effective debugging of UDF failures by making error messages visible in query logs instead of only files. (introduced in 26.1)#92209
Fix Kafka SASL settings precedence to respect table-level config — Table-level SASL settings specified in CREATE TABLE queries now correctly override consumer/producer-specific settings from configuration files. Ensures explicit per-table security settings take effect as intended, improving security consistency. (introduced in 25.11)#89401
e.g. CREATE TABLE my_table (key UInt32, value String) ENGINE = Kafka() SETTINGS kafka_sasl_username = 'user', kafka_sasl_password = 'pass'
S3Queue
S3Queue metadata cache now size-limited; system tables renamed — Introduces a size-limited in-memory cache for S3Queue/AzureQueue metadata with configurable byte and element limits, and renames system tables from system.s3queue to system.s3queue_metadata_cache (and similarly azure_queue). Prevents unbounded memory growth; operators must update queries that reference the old system table names. (settings metadata_cache_size_bytes, metadata_cache_size_elements) (introduced in 26.1)#96828
e.g. SELECT * FROM system.s3queue_metadata_cache
Limit S3Queue/AzureQueue in-memory metadata; rename system tables — Introduces a size-limited in-memory cache for S3Queue/AzureQueue metadata (configurable via metadata_cache_size_bytes and metadata_cache_size_elements) and renames system tables from system.s3queue to system.s3queue_metadata_cache and system.azure_queue to system.azure_queue_metadata_cache. Prevents unbounded memory growth and improves resource management; operators must update queries referencing the old system table names. (settings metadata_cache_size_bytes, metadata_cache_size_elements) (introduced in 26.2)#95809
Formats
Schema inference respects metadata nullability by default — Changes the default of schema_inference_make_columns_nullable to 3, which respects nullability information from Parquet/ORC/Arrow metadata instead of making all columns nullable. Provides more accurate schema inference; may break queries that expected all columns to be nullable. (introduced in 25.10)#71499
Operations
Refine min_free_disk settings: use unreserved space, skip system tables — Changes min_free_disk_bytes and min_free_disk_ratio to use unreserved disk space instead of available space, and excludes system tables from these checks. More accurate free space accounting prevents unnecessary insert rejections and ensures system logs remain operational. (introduced in 25.10)#88468
CLI
Client returns non-zero exit code on receive_timeout — The clickhouse-client now exits with code 159 (TIMEOUT_EXCEEDED) instead of 0 when a query times out due to receive_timeout. Scripts and automation can now reliably detect timeout failures instead of mistaking them for success. (introduced in 25.12)#91432
Keeper
⭐ Enable async replication for Keeper by default — Enables async mode for Keeper’s internal replication by default, preserving the same behavior with potential performance improvements. Operators upgrading from versions older than 23.9 must follow a multi-step upgrade or temporarily disable async replication to avoid issues. (introduced in 25.10)#88515
e.g. Set keeper_server.coordination_settings.async_replication to 0 before update if needed.
Misc
⭐ Propagate serialization versions to nested types — Enables propagation of serialization versions like with_size_stream to nested types (Array, Map, Variant, JSON), controlled by new MergeTree setting propagate_types_serialization_versions_to_nested_types enabled by default. New parts cannot be read by older ClickHouse versions; upgrade safe but downgrade not. Ensures consistency of serialization across nested structures. (settings propagate_types_serialization_versions_to_nested_types) (introduced in 26.3)#94859
⭐ Introduce dedicated Geometry type with WKB/WKT I/O — Adds a new Geometry data type that replaces the previous String alias. Supports reading WKB and WKT formats via readWkb and readWkt functions. Enables type-safe geospatial data storage and processing, but existing columns using Geometry as String will need migration. (functions readWkt, readWkb) (introduced in 25.11)#83344
e.g. readWkt, readWkb functions
⭐ Enable async inserts by default — Changes the default value of async_insert to true, so small inserts are batched automatically. The old behavior can be restored via compatibility setting. Reduces number of parts and improves write throughput, but may change behavior for applications expecting synchronous inserts. (introduced in 26.2)#98752
e.g. SET compatibility = '26.1'; -- to disable async_insert by default
⭐ Enable proper MySQL data type mapping by default — Changed the default value of mysql_datatypes_support_level from empty to decimal,datetime64,date2Date32, enabling correct mapping of MySQL DATE to Date32, DECIMAL to Decimal, and DATETIME/TIMESTAMP with precision to DateTime64. Prevents data corruption for historical dates (pre-1970) and improves MySQL compatibility out of the box. (introduced in 26.3)#97716
e.g. With the new default, MySQL DATEcolumns are mapped toDate32instead ofDate, avoiding range issues.
⭐ Async inserts enabled by default — Changed the default value of async_insert from false to true, so small INSERT queries are batched by default. Old behavior can be restored via compatibility settings or by explicitly setting async_insert = 0. Operators must verify their workloads tolerate batching or disable async inserts to preserve synchronous insertion behavior. (introduced in 26.3)#97590
e.g. SET async_insert = 0; SET compatibility = '25.12';
⭐ Enable deduplication for all inserts by default (breaking change) — Changes the default value of deduplicate_insert from ‘backward_compatible_choice’ to ’enable’, and deduplicate_blocks_in_dependent_materialized_views from false to true, enabling deduplication for all inserts (sync, async, materialized views) by default. Ensures consistent deduplication behavior across all insert methods, but users who relied on the old behavior must explicitly set these settings to maintain previous semantics. (introduced in 26.2)#95970
e.g. To keep old behavior: SET deduplicate_insert='backward_compatible_choice'; SET deduplicate_blocks_in_dependent_materialized_views=0;
⭐ Enable advanced shared data for JSON by default (downgrade incompatible) — Enables advanced shared data serialization for JSON and Dynamic types by default, changing the defaults of MergeTree settings. Downgrade to versions before 25.8 becomes impossible because older versions cannot read new data parts. Improves storage efficiency for JSON columns, but requires careful upgrade planning to avoid incompatibility with older versions. (introduced in 25.12)#93224
e.g. SET compatibility = '25.8' before upgrading to ensure safe operation.
⭐ Enable advanced shared data for JSON types by default (breaking) — Enables new advanced shared data serialization for JSON and Dynamic types by default, changing several MergeTree settings. Data written with this format is not readable by versions prior to 25.8. Improves storage efficiency for JSON columns, but prevents downgrade to versions older than 25.8. Operators can set compatibility to the previous version or explicitly set dynamic_serialization_version=‘v2’, object_serialization_version=‘v2’ before upgrade. (introduced in 26.1)#92511
e.g. SET compatibility = '25.7' -- before upgrade to keep old format
⭐ Remove Lazy database engine — The Lazy database engine is removed and no longer available; all uses must be migrated to another engine. Users with Lazy engine databases must recreate or convert them before upgrading, as they will no longer function. (introduced in 26.1)#91231
Escape index filenames to prevent broken parts — Introduces proper escaping of non-ASCII characters in index filenames to prevent broken parts, with a backward-compatible setting to load old indices. Prevents data corruption for indices with non-ASCII names; existing indices created by previous versions must be loaded with escape_index_filenames set to false. (settings escape_index_filenames) (introduced in 26.1)#94079
e.g. SETTINGS escape_index_filenames = false
Introduce enable_positional_arguments_for_projections setting — Marks disabled positional arguments in projections as a backward-incompatible change and introduces the enable_positional_arguments_for_projections setting to allow a safe upgrade for clusters with positional arguments in projections. Operators must enable this setting before upgrade if their projections use positional arguments, otherwise those projections will become invalid. (settings enable_positional_arguments_for_projections) (introduced in 25.10, 25.11)#92119#92120
e.g. SET enable_positional_arguments_for_projections = 1;
Mark disabled positional arguments in projections as backward-incompatible change — Introduces the enable_positional_arguments_for_projections setting to safely manage the disabling of positional arguments in projections, allowing a controlled upgrade process. Prevents unexpected query behavior changes during cluster upgrades when projections contain positional arguments. (settings enable_positional_arguments_for_projections) (introduced in 25.12)#92007
e.g. SET enable_positional_arguments_for_projections = 1;
Rename setting query_plan_use_new_logical_join_step to query_plan_use_logical_join_step — Renames the setting query_plan_use_new_logical_join_step to query_plan_use_logical_join_step with a backward-compatible alias; the old name is deprecated. Users need to update configurations to use the new setting name; the old name still works but will be removed in future. (settings query_plan_use_logical_join_step) (introduced in 25.10)#87679
e.g. SET query_plan_use_logical_join_step = 1
Forbid Dynamic type in JOIN keys by default — Disables using Dynamic type in JOIN keys due to potential unexpected comparison results; a new setting allow_dynamic_type_in_join_keys (default false) is added for compatibility. Prevents silent wrong results in queries with Dynamic type joins; users must cast Dynamic columns to required type. (settings allow_dynamic_type_in_join_keys) (introduced in 25.10)#86358
e.g. SET allow_dynamic_type_in_join_keys = 1;
HTTP response exception tagging with new setting — Adds exception tagging in HTTP results for reliable client parsing, controlled by new setting http_write_exception_in_output_format (disabled by default). Clients can now parse exceptions more reliably, but the change is opt‑in and may affect existing integrations that rely on the previous format. (settings http_write_exception_in_output_format) (introduced in 25.11)#75175
e.g. SET http_write_exception_in_output_format = 1
Remove experimental detectProgrammingLanguage function — Removes the previously experimental detectProgrammingLanguage function. Users relying on this function must remove references from their queries; this change reduces maintenance burden. (introduced in 26.3)#99567
mergeTreeAnalyzeIndexes functions now accept array of part names instead of regexp — Changes the internal table functions mergeTreeAnalyzeIndexes and mergeTreeAnalyzeIndexesUUID to accept an array of part names instead of a regexp string, making them faster and more robust for large numbers of parts. This is a backward-incompatible change for users of these experimental functions; queries must be updated to pass an array of part names instead of a regexp. (introduced in 26.3)#98474
e.g. SELECT * FROM mergeTreeAnalyzeIndexes(array('part1', 'part2'))
Fix NOT operator precedence to match SQL standard — Changed NOT operator precedence so it binds looser than IS NULL, BETWEEN, LIKE, and arithmetic operators. Previously NOT (x) IS NULL was parsed as (NOT x) IS NULL; it is now parsed as NOT (x IS NULL). Queries relying on the old non-standard precedence may produce different results after upgrading; review queries using NOT with operators like IS NULL or BETWEEN. (introduced in 26.3)#97680
e.g. Old behavior: NOT x IS NULL→(NOT x) IS NULL. New behavior: NOT x IS NULL→NOT (x IS NULL).
Enable apply_row_policy_after_final by default — Enables the setting apply_row_policy_after_final by default, causing row policies to always be applied after FINAL, restoring previous behavior and fixing a regression where PREWHERE did not work with row policies. Changes behavior for optimize_move_to_prewhere_if_final=1; operators must use apply_row_policy_after_final instead to control row policy evaluation order. (introduced in 25.12, 26.2)#87303#97402
Hash long skip index filenames to prevent file name too long errors — Hashes long skip index filenames when they exceed max_file_name_length, preventing ‘File name too long’ errors and making indices with long names work correctly. This is backward compatible (new servers read old parts), but downgrading may cause long-named indices to be ignored. Ensures skip indices with long names are properly handled and not ignored during downgrades. (introduced in 26.3)#97128
Remove experimental hypothesis skip index type — Removes the hypothesis skip index type entirely. Creating tables with INDEX … TYPE hypothesis will now produce an error. Existing tables using this index type must be altered or dropped before upgrading to avoid errors. (introduced in 26.3)#96874
e.g. ALTER TABLE table DROP INDEX index_name -- to remove hypothesis index before upgrade
Variant type throws on type mismatch instead of NULL — Changes Variant type operations (e.g., comparison) to throw an exception on type mismatch instead of returning NULL, fixing a logical error. Existing queries that rely on NULL returns from type mismatches will now fail; users must adjust queries or data. (introduced in 26.1)#96147
joinGet/joinGetOrNull now enforce SELECT privilege on Join table — joinGet and joinGetOrNull functions now check that the user has SELECT privilege on the underlying Join table’s key and attribute columns; lack of privilege results in ACCESS_DENIED. Enhances security by enforcing access control on join table data, but may break existing workflows that rely on joinGet without explicit grants. (introduced in 26.1)#94307
e.g. GRANT SELECT(key_col, attr_col) ON db.join_table TO user
Move format settings to regular settings causing errors in table engine definitions — Changed several settings (exact_rows_before_limit, rows_before_aggregation, cross_to_inner_join_rewrite, regexp_dict_allow_hyperscan, regexp_dict_flag_case_insensitive, regexp_dict_flag_dotall, dictionary_use_async_executor) from format to regular settings. Specifying them in table engine definitions (e.g., Iceberg, Kafka) now throws an error instead of being ignored. Users with these settings in table engine definitions must remove them to avoid errors. (introduced in 26.1)#94106
Enable cpu_slot_preemption by default — Changes the default value of cpu_slot_preemption server setting from false to true, making CPU scheduling preemptive by default. Existing workloads may need adjustment; operators should review CPU scheduling behavior. (introduced in 26.1)#94060
e.g. SETTINGS cpu_slot_preemption = false
Revert INSERT into simple ALIAS columns due to format incompatibility — Reverts the ability to INSERT into simple ALIAS columns because the feature did not work with custom formats and was not guarded by a setting. Restores previous behavior – INSERTs into ALIAS columns are no longer allowed; users relying on this functionality must adjust their workflows. (introduced in 25.12)#93061
Fix bitShiftLeft and bitShiftRight to return zero when shifting by full bit width — Changes the behavior of bitShiftLeft and bitShiftRight functions to return zero or empty value when the shift amount equals the bit width of the type, instead of non-zero values. Corrects a semantic bug in bit shift operations, but may change results for existing queries relying on the old behavior. (introduced in 25.12)#91943
e.g. SELECT bitShiftLeft(1, 8) -- previously returned 256, now returns 0
Fix implicit indices metadata handling — Fixes multiple issues with implicit minmax indices created by settings. Implicit indices are no longer included in table metadata, which may cause metadata errors on older replicas during rolling upgrades. Prevents schema inconsistencies and potential errors when using implicit indices with ReplicatedMergeTree. (introduced in 25.12)#91429
Change default of check_query_single_value_result to false for detailed CHECK TABLE output — Changes the default value of setting check_query_single_value_result from true to false, so CHECK TABLE now returns detailed per-part results instead of a single aggregated 0/1. Provides more informative CHECK TABLE output by default, but may break scripts that parse the old format. (introduced in 25.12)#91009
e.g. CHECK TABLE table_name;
Statistics format change for Nullable columns requires regeneration — Fixes statistics format incompatibility when altering columns to Nullable(String); old statistics cause crashes. Operators must run ALTER TABLE … MATERIALIZE STATISTICS ALL to regenerate. Failing to regenerate statistics may lead to server crashes after upgrade. (introduced in 25.12)#90311
e.g. ALTER TABLE table_name MATERIALIZE STATISTICS ALL
Remove settings allowing non-comparable types in ORDER BY and comparisons — Removes the settings allow_not_comparable_types_in_order_by and allow_not_comparable_types_in_comparison_functions, which allowed using non-comparable types like QBit in orderings and comparisons, causing potential logical errors. Prevents silent logical errors by enforcing type safety in ordering and comparison operations. (introduced in 25.12)#90028
Ngram tokenizer no longer returns short ngrams; empty search returns no rows — Changes the ngram tokenizer to not return ngrams shorter than the configured length N, and makes text search return no rows when search tokens are empty. Ensures consistent behavior, but may break existing queries that relied on the old (incorrect) tokenizer output or empty search token handling. (introduced in 25.12)#89757
Prohibit multiple plain-rewritable disks with shared object storage path — Adds a startup check that prevents creating multiple plain-rewritable disks on top of the same object storage path, as colliding metadata transactions can cause undefined behavior and data loss. Eliminates the risk of data corruption when multiple plain-rewritable disks mistakenly share the same object storage prefix. (introduced in 25.10)#89358
Enable with_size_stream serialization for String columns by default — Enables the new with_size_stream serialization format for String columns in MergeTree tables, which is incompatible with versions before 25.10. Improves storage efficiency but prevents downgrade to versions before 25.10 unless legacy settings are configured. (introduced in 25.11)#89329
e.g. To preserve downgrade capability, set serialization_info_version=‘basic’andstring_serialization_version=‘single_stream’ in the merge_tree configuration.
Remove obsolete LIVE VIEW feature — Removed the deprecated LIVE VIEW feature entirely; existing LIVE VIEW tables must be dropped before upgrading to this version. Upgrading will fail if any LIVE VIEW tables exist, so users must migrate away beforehand. (introduced in 25.11)#88706
Remove cache_hits_threshold from filesystem cache — Removes the cache_hits_threshold feature from the filesystem cache. This setting, which deferred caching until a certain number of hits, is now redundant due to the SLRU cache policy. This is a backward incompatible change; any configurations using cache_hits_threshold will be ignored and caching behavior may change. (introduced in 25.10)#88344
New tokenizer parameter syntax for text indexes — Changes tokenizer parameter syntax and names: old names (default, split, ngram, no_op) are replaced with new ones (splitByNonAlpha, splitByString, ngrams, array) and parameters use function-style notation. Existing DDLs using old tokenizer names will fail; must be updated to new syntax. (introduced in 25.10)#87997
e.g. ALTER TABLE ... ADD INDEX my_idx TYPE full_text(ngrams(2))
Default deduplication window reduced from 1 week to 1 hour — Decreases the default value of replicated_deduplication_window_seconds from 604800 to 3600 to reduce ZooKeeper znode storage. Reduces ZooKeeper storage for low insertion rates; may cause duplicate inserts if replication delay exceeds one hour. (introduced in 25.10)#87414
e.g. SET replicated_deduplication_window_seconds = 604800;
Force storage_metadata_write_full_object_key on by default — Enables the server setting storage_metadata_write_full_object_key by default and makes it immutable; metadata writes always use the full object key format. Simplifies metadata handling but restricts downgrade compatibility to 25.x releases only; downgrading to earlier versions is not supported. (introduced in 25.10)#87335
Disable nonsensical binary operations with IPv4/IPv6 and non-integer types — Disables plus/minus arithmetic operations between IPv4/IPv6 values and non-integer types (e.g., Float, DateTime), which previously caused logical errors or crashes. Prevents incorrect queries and potential crashes; existing queries or views using such operations will fail and require adjustment. (introduced in 25.9)#86336
Remove deprecated Object data type — Removes the deprecated Object data type used for storing semi-structured JSON-like data. Tables with Object columns must be migrated before upgrading. Upgrade will fail if any table still uses the Object type; requires pre-upgrade migration to avoid data loss. (introduced in 25.11)#85718
e.g. ALTER TABLE table MODIFY COLUMN col JSON
Revert INSERT into ALIAS columns feature — Reverts the previous change that allowed INSERT into simple ALIAS columns, as it did not work with custom formats and was not guarded by a setting. Users who relied on this feature must adjust their queries; the feature is removed. (introduced in 26.1)#84154
Fix alias substitution in formatter, potentially breaking CREATE VIEW with IN — Fixes inconsistent formatting caused by incorrect alias substitution; some CREATE VIEW queries with IN referencing an alias may fail when the analyzer is disabled. Operators using the old analyzer (disabled) may need to enable the analyzer to prevent incompatibility. (introduced in 26.1)#82833
Disallow empty column list in JOIN USING — Makes USING() with no columns a syntax error instead of causing runtime or logical errors. Prevents confusing crashes and logical errors, enforcing correct SQL syntax. (introduced in 26.1)#82502
Stop formatting operators as table functions in syntax output — Changes formatting: EXPLAIN SYNTAX no longer formats operators as if they were table functions, and clickhouse-format/formatQuery will not convert functional syntax to operator syntax. Queries that relied on the old formatting may produce different output; EXPLAIN SYNTAX now better reflects actual syntax. (introduced in 25.10)#81601
Query cache ignores log_comment setting — Made the query result cache ignore the log_comment setting so that queries differing only in log_comment hit the cache. Improves cache efficiency but breaks users who used log_comment for cache segmentation; they should switch to query_cache_tag. (introduced in 25.10)#79878
JSON type SKIP REGEXP uses partial match by default — Changed the default matching behavior of SKIP REGEXP in JSON type to use partial match instead of full match. Queries relying on full match may produce different results on upgrade. (introduced in 26.1)#79250
Remove transposed_with_wide_view mode of metric_log — Removes the transposed_with_wide_view mode for system.metric_log because it was unusable due to a bug. Defining this mode is no longer allowed. Users with custom metric_log configurations using this mode must remove it before upgrading to avoid errors; no data loss is expected. (introduced in 26.1)#78412
Infer PostgreSQL DATE columns as Date32 — DATE columns from PostgreSQL are now inferred as Date32 in ClickHouse instead of Date, and Date32 values can be inserted back to PostgreSQL. Correctly handles dates outside the narrow Date range; existing tables relying on Date inference may break on upgrade. (introduced in 26.2)#73084
ALTER MODIFY COLUMN requires explicit DEFAULT when converting nullable to non-nullable — When converting a Nullable column to a non-nullable type, ALTER MODIFY COLUMN now requires an explicit DEFAULT expression; NULLs are replaced with the default instead of causing an error. Prevents stuck ALTERs and provides consistent behavior for nullable-to-nonnullable conversions. (introduced in 25.12)#5985
e.g. ALTER TABLE t MODIFY COLUMN x Int32 DEFAULT 0;
⭐ Add polyglot SQL transpiler for 30+ external dialects — Integrates a Rust-based polyglot SQL transpiler that allows writing queries in over 30 SQL dialects (e.g., MySQL, PostgreSQL, SQLite) and transpiles them to ClickHouse SQL, controlled by two experimental settings: allow_experimental_polyglot_dialect and polyglot_dialect. Enables users to write queries in familiar SQL syntax from other databases without manual translation, reducing migration friction. (settings allow_experimental_polyglot_dialect, polyglot_dialect) (introduced in 26.3)#99496
e.g. SET dialect = 'polyglot', polyglot_dialect = 'snowflake'; SELECT IFF(1 > 0, 'yes', 'no');
⭐ Support Nullable(Tuple) type experimentally — Adds support for the Nullable(Tuple) type, enabled by the setting allow_experimental_nullable_tuple_type. This also changes JSON/Dynamic/Variant tuple subcolumns to return NULL instead of default values. Enables more flexible schema handling where tuple fields can be null, but note the breaking change for JSON/Dynamic/Variant subcolumns. (settings allow_experimental_nullable_tuple_type) (introduced in 26.1)#89643
e.g. CREATE TABLE test (id UInt32, data Nullable(Tuple(String, Int64)))
⭐ ClickHouse gains bit-sliced vector type QBit and approximate L2 distance function — Adds the QBit data type for storing vectors in bit-sliced format and the L2DistanceTransposed function for approximate vector search with precision-speed trade-off. Enables efficient approximate nearest neighbor search with tunable accuracy. (settings allow_experimental_qbit_type; functions L2DistanceTransposed) (introduced in 25.10)#87922
e.g. SELECT L2DistanceTransposed(vector, [1.0, 2.0]) FROM table;
⭐ Add IS DISTINCT FROM and enhance <=> operator — Adds the IS DISTINCT FROM operator and enhances the existing IS NOT DISTINCT FROM (<=>) operator to support compatible numeric types (e.g., UInt32 vs Int64) and nullable combinations. This improves SQL standard compliance and provides more flexible null-safe comparisons across different numeric types. (functions isDistinctFrom, isNotDistinctFrom) (introduced in 25.11)#87581
e.g. SELECT 1 IS DISTINCT FROM NULL; -- returns 1
⭐ Support Materialized CTE (Common Table Expressions) — Allows CTEs to be evaluated only once during query execution, with results stored in temporary tables, avoiding repeated computation. Improves performance for queries that reference the same CTE multiple times. (introduced in 26.3)#100331
e.g. SET enable_materialized_cte = 1; WITH top_users AS MATERIALIZED (SELECT user_id, count() AS cnt FROM events GROUP BY user_id ORDER BY cnt DESC LIMIT 1000) SELECT * FROM top_users INNER JOIN (SELECT us
⭐ EXPLAIN PLAN gets pretty and compact formatting options — Adds pretty=1 to display the query plan as a tree using Unicode line-drawing characters, and compact=1 to hide Expression steps and detailed action descriptions. EXPLAIN PLAN output becomes more readable and concise, aiding in query debugging and optimization. (introduced in 26.3)#98500
e.g. EXPLAIN pretty=1, compact=1 SELECT URL, count() FROM hits WHERE URL LIKE '%google%' GROUP BY URL ORDER BY count() DESC LIMIT 10;
⭐ Add fractional LIMIT and OFFSET support — Allows LIMIT and OFFSET to be fractional values (e.g., 0.5) to select a percentage of rows from a query result. Simplifies sampling and percentile queries without needing to know the total row count. (introduced in 25.11)#81892
e.g. SELECT county, avg(price) AS price FROM uk_price_paid GROUP BY county ORDER BY price DESC LIMIT 0.25;
⭐ Add system.unicode table for Unicode character properties — Adds a system.unicode table containing a list of Unicode characters and their properties. Provides an easy way to query Unicode character data directly from SQL. (introduced in 25.11)#80055
e.g. SELECT block, general_category, groupConcat(code_point) FROM system.unicode WHERE name LIKE '%LEAF%' GROUP BY ALL
⭐ Add LIMIT BY ALL syntax — Introduces LIMIT BY ALL which automatically expands to include all non-aggregate expressions from the SELECT clause as LIMIT BY keys. Simplifies queries by eliminating the need to explicitly list all non-aggregate columns when limiting per group. (introduced in 25.10)#59152
e.g. LIMIT 5 BY ALL
⭐ Add support for negative LIMIT and negative OFFSET — Allows negative LIMIT to return the last N rows and negative OFFSET to skip from the end of the result set. Provides more flexible pagination and tail-row retrieval without requiring subqueries. (introduced in 25.10)#28913
e.g. SELECT * FROM logs WHERE date = today() ORDER BY time LIMIT -100;
New deduplicate_insert setting for unified dedup control — Introduces the deduplicate_insert setting that overrides both insert_deduplicate and async_insert_deduplicate, providing centralized control over block deduplication for INSERTs into Replicated tables. Simplifies configuration by replacing two settings with one, reducing confusion and potential misconfiguration. (settings deduplicate_insert) (introduced in 26.2)#94413
e.g. SET deduplicate_insert = 'enable';
Add default_dictionary_database setting — Introduces a new setting default_dictionary_database that specifies the default database for unqualified external dictionary references, easing migration from XML-defined to SQL-defined dictionaries. Simplifies dictionary migration by allowing legacy dictionary queries to work without modification. (settings default_dictionary_database) (introduced in 26.2)#91412
e.g. SET default_dictionary_database = 'mydb'; SELECT dictGet('dict_name', 'attr', key);
Alias table engine moved behind experimental flag — Moves the Alias table engine to experimental, requiring the setting allow_experimental_alias_table_engine to be enabled (default false) to create new Alias tables. Existing Alias tables continue to work. Provides a safety net by marking Alias engine as experimental, preventing accidental use and allowing future development. (settings allow_experimental_alias_table_engine) (introduced in 25.11)#89712
Add setting to auto-create parent directories for INTO OUTFILE — Introduces the into_outfile_create_parent_directories setting that automatically creates missing parent directories when writing query results to a file via INTO OUTFILE. Simplifies workflows by eliminating the need to manually create directories before writing output files. (settings into_outfile_create_parent_directories) (introduced in 25.11)#88610
e.g. SET into_outfile_create_parent_directories=1; SELECT * FROM table INTO OUTFILE '/tmp/new_dir/output.csv';
Add SOME keyword for subquery expressions — Users can now use the SOME keyword in subquery expressions, which behaves identically to ANY. Provides alternative syntax, improving SQL compatibility and readability. (introduced in 26.3)#99842
e.g. SELECT * FROM t1 WHERE col1 = SOME(SELECT col2 FROM t2);
Nullable query parameters default to NULL when omitted — When a query parameter has Nullable type and is not provided, it is treated as NULL instead of causing an error. Simplifies usage of optional parameters in queries. (introduced in 26.3)#93869
e.g. SELECT {param:Nullable(String)}
Add table function primes and system table system.primes — Introduces a table function primes and corresponding system table system.primes that return prime numbers in ascending order. Provides a convenient, built-in source of prime numbers for testing, benchmarking, or mathematical queries without external data. (introduced in 26.2)#90839
e.g. SELECT * FROM primes(100) LIMIT 10
Async insert deduplication now works with dependent materialized views — Implements deduplication for async inserts into tables that have dependent materialized views: when a block_id collision occurs, conflicting rows are filtered out and remaining rows are transformed through the materialized views’ select queries to produce a deduplicated block. Enables idempotent async inserts into tables with materialized views, preventing duplicate data ingestion. (introduced in 26.1)#89140
Full-text search moves to private preview — Full-text search functionality has been promoted from experimental to a private preview stage, indicating greater stability and readiness for testing. Users can now evaluate full-text search in a more stable environment, moving it closer to general availability. (introduced in 25.11)#88928
Add temporary views support — Introduces CREATE TEMPORARY VIEW with session-scoped visibility, similar to temporary tables, including a dedicated access privilege. Enables users to define temporary named queries for session-local use without persisting them, improving workflow flexibility. (introduced in 25.9)#86432
e.g. CREATE TEMPORARY VIEW my_view AS SELECT * FROM table WHERE condition;
Support Alias table engine for table aliasing — Introduces the Alias table engine, allowing creation of a table that is an alias for another existing table. DML queries on the alias are redirected to the referenced table; DDL operations (DROP, DETACH, SHOW CREATE) act on the alias itself. Provides a lightweight way to create alternative names for tables, simplifying query writing and migration scenarios. (introduced in 25.9)#76569
e.g. CREATE TABLE alias_table ENGINE = Alias('target_table')
Allow SQL-standard functions without parentheses — Allows certain niladic SQL functions (e.g., NOW, CURRENT_TIMESTAMP, CURRENT_USER) to be called without parentheses, improving compatibility with other SQL dialects. Reduces syntactic noise and aligns ClickHouse SQL syntax with standard SQL. (introduced in 26.2, 26.3)#52102
e.g. SELECT CURRENT_TIMESTAMP;
Support CREATE OR REPLACE for temporary tables — Adds the ability to use CREATE OR REPLACE TABLE syntax for temporary tables, atomically replacing an existing temporary table if it exists. Simplifies managing temporary tables by avoiding separate DROP and CREATE statements. (introduced in 25.11)#35888
e.g. CREATE OR REPLACE TEMPORARY TABLE t (x Int32) ENGINE = Memory
Functions
⭐ Add reverseBySeparator function — Adds a new function reverseBySeparator that reverses the order of substrings in a string separated by a specified separator. Provides a built-in efficient way to reverse DNS-like strings or other delimited substrings. (functions reverseBySeparator) (introduced in 26.1)#91463
e.g. SELECT reverseBySeparator('benchmark.clickhouse.com', '.')
⭐ Add argAndMin and argAndMax aggregate functions — Introduces two new aggregate functions argAndMin and argAndMax that return a tuple containing both the argument and the corresponding minimum/maximum value. Provides a convenient way to retrieve both the value and its min/max key in one function call, reducing query complexity. (functions argAndMin, argAndMax) (introduced in 25.11)#89884
e.g. SELECT argAndMax(town, price) FROM uk_price_paid WHERE toYear(date) = 2025;
⭐ Add cume_dist window function — Implements the standard SQL cume_dist window function to compute cumulative distribution within a window partition. Enhances SQL compatibility and enables percentile-like analytical queries. (functions cume_dist) (introduced in 25.11)#86920
e.g. SELECT cume_dist() OVER (ORDER BY value) FROM table
⭐ Experimental WebAssembly UDF support — Adds experimental support for WebAssembly-based user-defined functions, allowing custom function logic implemented in Wasm to be executed within ClickHouse using the Wasmtime backend. Enables powerful user-defined logic in SQL without C++ extensions, expanding extensibility for custom data processing. (introduced in 26.3)#88747
Add unicode_word tokenizer for full-text indexes and tokens function — Adds a unicode_word tokenizer for full-text indexes and a tokens function that splits text using Unicode word boundary rules, with configurable stop words defaulting to common CJK punctuation. Enables better full-text search on multilingual text, especially for CJK content. (functions tokens) (introduced in 26.3)#99357
e.g. SELECT tokens('Hello world')
Add normalizeUTF8NFKCCasefold function — Adds the normalizeUTF8NFKCCasefold string function that combines NFKC normalization with Unicode case folding. Enables case-insensitive identifier matching and normalization according to NFKC_Casefold standard. (functions normalizeUTF8NFKCCasefold) (introduced in 26.3)#99276
e.g. SELECT normalizeUTF8NFKCCasefold('Hello')
Add caseFoldUTF8 and removeDiacriticsUTF8 functions — Introduces two new functions for Unicode case folding and diacritical mark removal using the ICU library. Enables case-insensitive and accent-insensitive string matching and comparison. (functions caseFoldUTF8, removeDiacriticsUTF8) (introduced in 26.3)#98973
e.g. SELECT caseFoldUTF8('Hello'); SELECT removeDiacriticsUTF8('Café');
Add xxh3_128 hash function with UInt128 return type — Introduces the xxh3_128 hash function that returns a UInt128 value, compatible with reference xxHash3 implementations for single arguments. Provides a high-performance, non-cryptographic 128-bit hash function for use in queries. (functions xxh3_128) (introduced in 26.2)#96055
e.g. SELECT xxh3_128('hello');
Add cosineDistanceTransposed function — Introduced the cosineDistanceTransposed function that efficiently approximates the cosine distance between two points using QBit columns with adjustable precision. Enables fast approximate cosine distance computation for similarity searches and vector processing. (functions cosineDistanceTransposed) (introduced in 26.1)#93621
e.g. SELECT cosineDistanceTransposed(quantileBFloat16(embedding1), quantileBFloat16(embedding2)) FROM vectors_table;
Add colorOKLABToSRGB and colorSRGBToOKLAB functions — Adds two scalar functions for converting between sRGB and OKLAB color spaces. Enables color space transformations directly in SQL for analytics and data processing. (functions colorOKLABToSRGB, colorSRGBToOKLAB) (introduced in 26.2)#93361
e.g. SELECT colorSRGBToOKLAB(0.5, 0.5, 0.5);
Implement FunctionVariantAdaptor for Variant type support — Adds a FunctionVariantAdaptor to provide default implementations for functions operating on Variant types, enabling support for variant arguments in functions like flipCoordinates. Extends function compatibility with the Variant data type, improving flexibility. (settings use_variant_default_implementation_for_comparisons) (introduced in 26.1)#90900
e.g. SELECT flipCoordinates(variant_column) FROM table;
Add naturalSortKey function for human-friendly string ordering — Introduces the naturalSortKey function that encodes digit sequences with a sortable prefix, enabling natural ordering (e.g., ‘hello4world5’ before ‘hello4world10’). Allows intuitive sorting of strings with embedded numbers, useful for filenames and version strings. (functions naturalSortKey) (introduced in 26.3)#90322
e.g. SELECT naturalSortKey('hello4world10')
Implement dictGetKeys function for reverse dictionary lookup — Adds the dictGetKeys function that returns the dictionary key(s) whose attribute equals a specified value, using a per-query reverse-lookup cache tuned by the max_reverse_dictionary_lookup_cache_size_bytes setting to speed up repeated lookups. Enables efficient reverse dictionary lookups without full scan, useful for finding keys by attribute value. (settings max_reverse_dictionary_lookup_cache_size_bytes; functions dictGetKeys) (introduced in 25.12)#89197
e.g. SELECT dictGetKeys('my_dict', 'attribute_column', 'target_value');
Add areaCartesian, areaSpherical, perimeterCartesian, perimeterSpherical functions — Adds SQL functions areaCartesian, areaSpherical, perimeterCartesian, perimeterSpherical to compute area and perimeter of Geometry objects using Boost.Geometry. Users can now perform geometric calculations directly in SQL on geometry columns. (functions areaCartesian, areaSpherical, perimeterCartesian, perimeterSpherical) (introduced in 25.12)#89047
e.g. SELECT areaCartesian(geom) FROM table;
Add midpoint scalar function and avg2 alias for averaging values — Introduces the midpoint scalar function (and avg2 as a synonym for two arguments) that computes the average of its arguments, supporting numeric and temporal types. Provides a concise way to compute averages of two or more values, particularly useful for date/time arithmetic. (functions midpoint, avg2) (introduced in 25.11)#89029
e.g. SELECT midpoint(3, 7); -- returns 5
Add case-insensitive startsWith and endsWith functions — Adds optimized case-insensitive variants of startsWith and endsWith: startsWithCaseInsensitive, endsWithCaseInsensitive, and their UTF8 counterparts (startsWithCaseInsensitiveUTF8, endsWithCaseInsensitiveUTF8). Enables efficient case-insensitive prefix/suffix matching without needing to use lower() first, and improves ILIKE rewrite performance. (functions startsWithCaseInsensitive, endsWithCaseInsensitive, startsWithCaseInsensitiveUTF8, endsWithCaseInsensitiveUTF8) (introduced in 25.10)#87374
e.g. SELECT startsWithCaseInsensitive('Hello', 'hel'); -- 1
Implement quantilePrometheusHistogram aggregate functions — Adds aggregate functions quantilePrometheusHistogram and quantilesPrometheusHistogram that compute quantiles from Prometheus histogram bucket boundaries and cumulative counts using linear interpolation. Enables direct compatibility with Prometheus classic histograms, simplifying analysis of Prometheus metrics in ClickHouse. (functions quantilePrometheusHistogram, quantilesPrometheusHistogram) (introduced in 25.10)#86294
e.g. SELECT quantilePrometheusHistogram(upper_bounds, cumulative_counts) FROM prometheus_histogram_data
Add timeSeriesChangesToGrid and timeSeriesResetsToGrid aggregate functions — Implements PromQL-style changes and resets for time series data, counting value changes or decreases within a sliding window on a regular time grid, returning Array(Nullable(Float64)). Enables Prometheus-like monitoring queries directly in ClickHouse without external tools. (functions timeSeriesChangesToGrid, timeSeriesResetsToGrid) (introduced in 25.9)#86010
e.g. SELECT timeSeriesChangesToGrid(start, end, step, lookback)(timestamp, value) FROM time_series
Add studentTTestOneSample aggregate function — Adds the studentTTestOneSample aggregate function that performs a one-sample Student’s t-test, returning t-statistic and p-value. Enables statistical hypothesis testing directly in SQL without external tools. (functions studentTTestOneSample) (introduced in 25.10)#85436
e.g. SELECT studentTTestOneSample(value) FROM table
Add isValidASCII function to check ASCII-only strings — Adds the isValidASCII scalar function that returns 1 if the string contains only ASCII characters, otherwise 0. Provides a simple way to validate string encoding directly in SQL. (functions isValidASCII) (introduced in 25.9)#85377
e.g. SELECT isValidASCII('Hello')
New conv function for base conversion (2-36) — Adds the conv() function to convert numbers between bases 2 to 36. Provides built-in base conversion without requiring external functions or UDFs. (functions conv) (introduced in 25.10)#83058
e.g. SELECT conv('FF', 16, 10) AS result;
Add arrayExcept function — Returns elements from the first array that are not present in the second array, treating arrays as sets (set difference). Provides a missing set operation for arrays, enabling cleaner queries. (functions arrayExcept) (introduced in 25.9)#82368
e.g. SELECT arrayExcept([1,2,3], [2,4])
Add flipCoordinates function to swap pointers in arrays — Added flipCoordinates function that unwraps the required number of dimensions in an array and swaps pointers inside the Tuple column. Enables transformation of coordinate-like data (e.g., swapping x and y values in an array of tuples). (functions flipCoordinates) (introduced in 25.11)#79469
e.g. SELECT flipCoordinates([(1.0, 2.0), (3.0, 4.0)]) AS swapped_coords
Add naiveBayesClassifier function for text classification — Introduces the naiveBayesClassifier function that classifies text using a Naive Bayes model with n-grams and Laplace smoothing. Models are configured server-side via nb_models config. Enables in-database text classification without external ML tools, useful for spam detection, sentiment analysis, or any text categorization task. (functions naiveBayesClassifier) (introduced in 25.10)#78700
e.g. SELECT naiveBayesClassifier('model_name', body) AS category FROM emails
Add HMAC SQL function — Adds the HMAC(algorithm, message, key) function for keyed‑hash message authentication. Enables authenticated hash computations directly in SQL, useful for data integrity and security checks. (functions HMAC) (introduced in 25.12)#73900
e.g. SELECT HMAC('SHA256', 'my message', 'secret')
Add arrayRemove function — Adds the arrayRemove(arr, elem) function to remove all elements equal to elem from an array. Provides a convenient way to filter array elements by equality directly in SQL queries. (functions arrayRemove) (introduced in 25.11)#52099
e.g. SELECT arrayRemove([1, 2, 3, 2], 2) → [1, 3]
Incremental improvements for WASM UDF support — Adds incremental improvements to the WASM UDF infrastructure, enhancing experimental support for user-defined functions compiled to WebAssembly. Moves the WASM UDF feature closer to production readiness, expanding UDF options for advanced users. (introduced in 26.3)#99373
Support has() function with primary key indexes for constant arrays — Allows the has() function to leverage primary key and data skipping indexes when the first argument is a constant array. Speeds up queries using has(constant_array, column) by avoiding full table scans. (introduced in 25.12)#90980
e.g. SELECT * FROM table WHERE has([1, 2, 3], indexed_column);
searchAll and searchAny work without text index — Makes searchAll and searchAny functions work on columns without a text index by falling back to brute-force scan using the default tokenizer. Users can now use these search functions on any string column even without a text index, though performance may be slower. (introduced in 25.10)#87722
e.g. SELECT searchAll(text_col, 'term') FROM table
Add allow_reentry option to windowFunnel — Adds an optional allow_reentry parameter to the windowFunnel aggregate function that, when used with strict_order, ignores out-of-order events instead of stopping the funnel analysis. Enables accurate funnel analysis for user journeys with refreshes or back-navigation without underreporting conversion rates. (introduced in 25.12)#86916
e.g. SELECT windowFunnel(3600)(1, time, event) WITH allow_reentry FROM events
MergeTree-related
⭐ Bucketed serialization for Map columns in MergeTree — Introduces hash-based bucketed serialization for Map columns, enabling single-key lookups to read only one bucket instead of the entire column, with speedup 2-49x. Adds settings: map_serialization_version, max_buckets_in_map, etc. Supports skip indexes and subcolumn rewrite. Dramatically improves performance for queries accessing individual Map keys in MergeTree tables. (settings map_serialization_version, max_buckets_in_map, map_buckets_strategy, map_buckets_coefficient, map_buckets_min_avg_size, map_serialization_version_for_zero_level_parts) (introduced in 26.3)#100900
e.g. CREATE TABLE t (m Map(String, Int64)) ENGINE = MergeTree ORDER BY tuple() SETTINGS map_serialization_version = 'with_buckets'; SELECT m['key'] FROM t;
⭐ Introduce new syntax and framework for projection index — Adds a new syntax and framework to simplify and extend the projection index feature, following the prior preliminary work. Provides a more intuitive and powerful way to define and use projections for faster queries. (introduced in 26.1)#91844
⭐ Add projection-level settings via WITH SETTINGS clause — Introduces projection-level settings through the new WITH SETTINGS clause in ALTER TABLE … ADD PROJECTION, allowing projections to override MergeTree storage parameters like index_granularity on a per-projection basis. Enables fine-grained tuning of storage and indexing parameters for individual projections, optimizing query performance for specific access patterns. (introduced in 25.12)#90158
e.g. ALTER TABLE my_table ADD PROJECTION my_proj (SELECT ...) WITH SETTINGS index_granularity = 8192
Add setting to disable partition pruning — Introduces the use_partition_pruning setting (alias use_partition_key) that, when set to false, disables partition key pruning for MergeTree tables, allowing debugging of partition-based filtering. Helps diagnose issues with partition pruning by providing a way to bypass it. (settings use_partition_pruning) (introduced in 26.3)#97888
e.g. SET use_partition_pruning = 0;
Add table_readonly setting for MergeTree tables — Introduces the MergeTree setting table_readonly that, when enabled, prevents inserts and mutations on the table while still allowing ALTER MODIFY SETTING to toggle the flag. Provides a lightweight way to mark tables as read-only without changing permissions, useful for archival or maintenance scenarios. (settings table_readonly) (introduced in 26.3)#97652
e.g. ALTER TABLE t MODIFY SETTING table_readonly = 1;
New mergeTreeTextIndex table function for text index introspection — Added the mergeTreeTextIndex(database, table, index) table function that allows reading data directly from a text index for introspection or aggregation. Enables advanced troubleshooting and analysis of text index data like tokens, cardinalities, and posting flags. (functions mergeTreeTextIndex) (introduced in 26.3)#97003
e.g. SELECT * FROM mergeTreeTextIndex('default', 'my_table', 'my_idx')
Add OPTIMIZE DRY RUN to simulate merges without committing — Introduces OPTIMIZE <table> DRY RUN PARTS <part names> query to simulate merges of specified parts without committing the result part, optionally validating with checkDataPart. Enables safe testing of merge correctness, deterministic reproduction of merge bugs, and reliable merge performance benchmarking. (settings optimize_dry_run_check_part) (introduced in 26.2)#96122
e.g. OPTIMIZE table DRY RUN PARTS 'part1', 'part2';
Add server setting insert_deduplication_version for unified dedup hash migration — Introduces the server setting insert_deduplication_version to allow migrating from separate sync/async deduplication hashes to a unified hash, with stages old_separate_hashes, compatible_double_hashes, and new_unified_hash. Enables safe migration of insert deduplication behavior across sync and async inserts, avoiding duplicates or missed deduplication during upgrade. (settings insert_deduplication_version) (introduced in 26.2)#95409
New setting use_primary_key to disable primary key pruning — Introduces a setting to control whether the primary key index is used for granule pruning in MergeTree tables. Useful for debugging index-related issues or when the primary key provides little benefit. (settings use_primary_key) (introduced in 26.1)#93319
e.g. SET use_primary_key = 0;
New setting limits dynamic subcolumns in merged Wide parts — Adds the MergeTree setting merge_max_dynamic_subcolumns_in_wide_part to cap the number of dynamic subcolumns in a Wide part after merge, independent of the data type parameters. Gives operators control over the growth of JSON subcolumns during merges, preventing excessive part complexity and potential performance degradation. (settings merge_max_dynamic_subcolumns_in_wide_part) (introduced in 25.10)#91308
e.g. ALTER TABLE my_table MODIFY SETTING merge_max_dynamic_subcolumns_in_wide_part = 1000;
Add table setting min_level_for_wide_part — Introduces a new table setting ‘min_level_for_wide_part’ that specifies the minimum part level for creating a part as Wide format instead of Compact. Provides fine-grained control over data part format, enabling users to manage storage trade-offs and optimize performance for different part levels. (settings min_level_for_wide_part) (introduced in 25.10)#88179
e.g. CREATE TABLE t (id UInt32) ENGINE = MergeTree ORDER BY id SETTINGS min_level_for_wide_part = 5
Add setting to limit dynamic subcolumns in merged Wide parts — Introduces the MergeTree setting merge_max_dynamic_subcolumns_in_wide_part to cap the number of dynamic subcolumns in a Wide part after merge, independently of data type parameters. Gives operators control over dynamic subcolumn metadata size, preventing excessive growth and improving part storage efficiency. (settings merge_max_dynamic_subcolumns_in_wide_part) (introduced in 25.11)#87646
e.g. ALTER TABLE my_table MODIFY SETTING merge_max_dynamic_subcolumns_in_wide_part = 1000
Auto-create statistics on MergeTree columns with auto_statistics_types setting — Adds table-level setting auto_statistics_types to automatically create specified statistics types (e.g., minmax, uniq, countmin) on all suitable columns in MergeTree tables. Simplifies statistics management by allowing automatic creation of column statistics without manual per-column configuration. (settings auto_statistics_types) (introduced in 25.10)#87241
e.g. ALTER TABLE my_table MODIFY SETTING auto_statistics_types = 'minmax,uniq'
Start deduplication hash migration to compatible double hashes — Changes the default deduplication hashing to use compatible double hashes, unifying sync and async insert deduplication. Ensures new writes use compatible hashes across insert types, improving deduplication consistency and future migration. (introduced in 26.2)#97562
Support direct nested loop join for MergeTree tables — Introduces support for direct (nested loop) join algorithm for MergeTree tables, controlled by the setting join_algorithm = 'direct'. It pushes join key filters directly to the storage layer and builds a hash map on the fly, currently supporting INNER and LEFT joins with single-column equality keys. Enables efficient join execution by pushing filters directly to the storage layer, improving performance for join patterns that benefit from nested loop joins. (introduced in 25.12)#89920
e.g. SET join_algorithm = 'direct'; SELECT * FROM t1 INNER JOIN t2 ON t1.key = t2.key;
Add text index support for Array columns — Enables full-text indices (using preprocessing like lowercasing) on columns of type Array in MergeTree tables by applying the preprocessing per array element. Extends full-text search capabilities to array data, improving search flexibility and query performance. (introduced in 26.1)#89895
e.g. CREATE TABLE t (arr Array(String), INDEX idx arr TYPE full_text GRANULARITY 1) ENGINE = MergeTree ORDER BY tuple();
Add preprocessor argument for text index construction — Allows users to specify an arbitrary expression as a preprocessor for text indexes, transforming each document before tokenization. Enables custom preprocessing of text data (e.g., normalization, stripping HTML) at index time for improved search behavior. (introduced in 25.11)#88272
e.g. CREATE TABLE t (content String, INDEX idx content TYPE text WITH preprocessor = lower(content)) ENGINE = MergeTree ORDER BY tuple();
Add sparse_gram bloom filter index — Adds a new sparse_gram bloom filter index for efficient long substring search using a convex-hull algorithm. Improves substring search performance for large text columns in MergeTree tables. (introduced in 25.10)#79985
e.g. CREATE TABLE t (s String, INDEX idx s TYPE sparse_gram(3, 4) GRANULARITY 1) ENGINE = MergeTree ORDER BY s
Performance
⭐ Add Parquet metadata SLRU cache to reduce re-downloads — Introduces an SLRU (Segmented LRU) cache for Parquet file metadata, avoiding re-downloading the metadata on subsequent reads of the same Parquet file, with configurable size and policy. Significantly speeds up repeated queries on Parquet files by caching metadata, reducing I/O and improving latency. (settings use_parquet_metadata_cache, parquet_metadata_cache_policy, parquet_metadata_cache_size, parquet_metadata_cache_max_entries, parquet_metadata_cache_size_ratio) (introduced in 26.3)#98140
e.g. SET use_parquet_metadata_cache = 1; -- enabled by default; customize with server settings
⭐ Add SLRU cache for Parquet metadata — Added a new SLRU cache for Parquet file metadata (footer, column chunks, index pages) to avoid re-downloading files when reading metadata. The cache can be dropped with SYSTEM DROP PARQUET METADATA CACHE. Improves reading performance by caching metadata, reducing latency and network traffic for repeated queries. (settings parquet_metadata_cache_policy, parquet_metadata_cache_size, parquet_metadata_cache_max_entries, parquet_metadata_cache_size_ratio) (introduced in 26.2)#89102
e.g. SYSTEM DROP PARQUET METADATA CACHE
⭐ Distribute vector index search across replicas for large indexes — Enables distributed loading and searching of vector index parts across replicas, allowing vector indexes to exceed single-node memory capacity. Supports large-scale vector search workloads that cannot fit on a single VM, improving scalability. (introduced in 26.2)#95876
Add setting to control streams in Cluster table functions — Introduces the setting max_streams_for_files_processing_in_cluster_functions to limit the number of streams used for parallel reading of files in *Cluster table functions. Allows fine-tuning of parallelism for distributed file processing, avoiding excessive resource usage. (settings max_streams_for_files_processing_in_cluster_functions) (introduced in 25.12)#90223
e.g. SET max_streams_for_files_processing_in_cluster_functions = 4;
Split Cache Strategy Improves Server Startup Time — Enable splitting data and system files in cache into separate segments, using a separate eviction policy to keep system files longer. Reduces server restart times by reducing S3 requests for system files. (settings filesystem_cache_use_split_cache, filesystem_cache_split_ratio) (introduced in 26.2)#87834
e.g. Set filesystem_cache_use_split_cache=1andfilesystem_cache_split_ratio=0.2.
Codecs / compression
⭐ Add ALP floating-point compression codec — Introduces the ALP compression codec for Float32/Float64 columns, providing improved compression ratios compared to existing codecs. Reduces storage footprint for floating-point data without sacrificing performance. (introduced in 26.3)#91362
e.g. CREATE TABLE metrics (timestamp DateTime, value Float64 CODEC(ALP, ZSTD)) ENGINE = MergeTree ORDER BY timestamp;
Other small SQL
Alias table engine becomes experimental — Moves the Alias table engine behind a new setting allow_experimental_alias_table_engine (default false). Existing tables continue to work, but new creation requires the setting to be enabled. Operators must enable the experimental setting to create new Alias tables, ensuring this engine is used cautiously and signaling its non-production readiness. (settings allow_experimental_alias_table_engine) (introduced in 25.10)#89843
e.g. SET allow_experimental_alias_table_engine = 1; CREATE TABLE t ... ENGINE = Alias;
Add Alias table engine for proxying operations to target table — Creates a new Alias table engine that acts as a proxy to another table, forwarding all reads, writes, and DDL operations to the target table while storing no data itself. Provides a lightweight way to rename or redirect access to a table without moving or duplicating data. (introduced in 25.10)#87965
e.g. CREATE TABLE my_alias ENGINE = Alias('mydb.target_table')
JSON data type
⭐ Add has() function for JSON type to check path existence — Enables the has() function on JSON type to check whether a given path exists, similar to the Map type. Provides a consistent and efficient way to test JSON path existence, simplifying queries on JSON data without parsing errors. (functions has) (introduced in 26.3)#96927
e.g. SELECT * FROM events WHERE has(data, 'metrics.latency')
⭐ Add experimental lazy type hints for JSON columns — When enabled via allow_experimental_json_lazy_type_hints, ALTER TABLE … MODIFY COLUMN json JSON(path TypeName) becomes metadata-only, adding type hints without rewriting historical data. Old parts apply hints at query time; new data materializes them during inserts and merges. Speeds up schema evolution for JSON columns by avoiding full data rewrites. (introduced in 26.3)#97412
e.g. ALTER TABLE events MODIFY COLUMN data JSON(metrics.count UInt64);
Add setting to skip invalid typed paths in JSON columns — Adds a new setting type_json_skip_invalid_typed_paths that disables exceptions when inserting JSON with values that cannot be cast to explicit typed paths, falling back to null/zero values. Allows more lenient handling of JSON data with type mismatches, enabling inserts of imperfect data without errors. (settings type_json_skip_invalid_typed_paths) (introduced in 25.12)#89886
e.g. SET type_json_skip_invalid_typed_paths = 1; INSERT INTO t_json VALUES ('{"path": "invalid"}');
ObjectStore - S3/Azure/GCS
Make filesystem background download configurable per query — Allows disabling background download of nearby part data on a per-query basis via the filesystem_cache_allow_background_download setting. Gives users control to avoid unnecessary S3 egress or latency for specific queries. (settings filesystem_cache_allow_background_download) (introduced in 25.11)#89524
e.g. SET filesystem_cache_allow_background_download = 0;
Datalakes & catalogs
⭐ Add Paimon REST catalog support — Adds support for the Paimon REST catalog as a new DataLake catalog type, allowing ClickHouse to interact with Paimon tables via REST API. Enables querying Paimon tables stored in a REST catalog directly from ClickHouse, expanding data lake integration. (settings allow_experimental_database_paimon_rest_catalog) (introduced in 26.1)#92011
⭐ Add Microsoft OneLake catalog integration for Iceberg — Adds support for Microsoft OneLake as a catalog type for Iceberg tables, using Azure Entra ID authentication via settings for tenant, client ID, and client secret. Enables querying Iceberg tables stored in Microsoft OneLake directly from ClickHouse using catalog semantics. (settings onelake_tenant_id, onelake_client_id, onelake_client_secret) (introduced in 25.11)#89366
e.g. CREATE DATABASE db ENGINE = Iceberg(catalog_type = 'OneLake', onelake_tenant_id = 'tenant', onelake_client_id = 'client', onelake_client_secret = 'secret')
⭐ Add system.iceberg_metadata_log for Iceberg metadata debugging — Introduces a system table to log Iceberg metadata files (root metadata, manifest lists, manifests) during SELECT, controlled by the iceberg_metadata_log_level setting. Improves debuggability of Iceberg tables by providing insights into the metadata files accessed. (settings iceberg_metadata_log_level) (introduced in 25.9)#86152
e.g. CREATE TABLE my_iceberg (...) ENGINE = IcebergS3(...) SETTINGS iceberg_metadata_async_prefetch_period_ms = 60000; SELECT ... FROM my_iceberg SETTINGS iceberg_metadata_staleness_ms = 30000;
⭐ Add query support for Apache Paimon — Adds table functions paimon, paimonS3, and paimonAzure to allow direct querying of Apache Paimon tables. Enables ClickHouse to interact with Paimon data lake storage, expanding integration options. (functions paimon, paimonS3, paimonAzure) (introduced in 25.10)#84423
e.g. SELECT * FROM paimon('s3://...');
⭐ Add Google BigLake catalog integration — Introduces integration with Google BigLake catalog, enabling querying of tables managed by BigLake. Extends ClickHouse’s data lake capabilities to Google Cloud’s BigLake ecosystem, allowing seamless querying of external data. (introduced in 26.2)#95339
New icebergLocalCluster table function for distributed Iceberg reads — Adds a table function to enable distributed reading of Iceberg tables stored on shared local disk across cluster nodes. Allows querying Iceberg tables in a distributed manner without external object storage. (functions icebergLocalCluster) (introduced in 26.1)#93323
e.g. SELECT * FROM icebergLocalCluster('path', 'format');
System table for Delta Lake metadata logging — Introduced system.delta_lake_metadata_log to log metadata files read from Delta Lake tables, controlled by the setting delta_lake_log_metadata. Helps debug and audit Delta table schema evolution by exposing metadata access logs. (settings delta_lake_log_metadata) (introduced in 25.10)#87263
e.g. SELECT * FROM system.delta_lake_metadata_log
Allow Iceberg and Delta Lake tables to use custom disk configurations — Introduces settings allowed_disks_for_table_engines and datalake_disk_name to let Iceberg and Delta Lake tables use user-specified disks instead of default ones. Enables storing datalake data on custom local or S3 disks, providing greater storage flexibility. (settings allowed_disks_for_table_engines, datalake_disk_name) (introduced in 25.9)#86778
e.g. CREATE TABLE test ENGINE = Iceberg('path/inside/disk') SETTINGS datalake_disk_name = 'my_disk';
Implement expire_snapshots for Iceberg tables — Adds the ALTER TABLE ... EXECUTE expire_snapshots('<timestamp>') command to expire old Iceberg snapshots and clean up associated files. Enables lifecycle management of Iceberg table snapshots directly from ClickHouse. (introduced in 26.3)#97904
e.g. ALTER TABLE iceberg_table EXECUTE expire_snapshots('2025-01-01 00:00:00');
Support ORDER BY in CREATE for Iceberg and sorting in INSERT — Enables specifying an ORDER BY clause in CREATE TABLE for Iceberg tables and supports sorted inserts into Iceberg. Improves data organization and query performance in Iceberg tables by allowing a defined sort order. (introduced in 25.12)#89916
e.g. CREATE TABLE t (id Int32) ENGINE = Iceberg S3(...) ORDER BY id;
Multistage PREWHERE for ParquetReaderV3 — Implemented multi-stage PREWHERE in ParquetReaderV3, splitting prewhere conditions into multiple steps to improve filter effectiveness for data lake formats (Iceberg, Delta Lake, Hudi). Significantly boosts query performance on data lakes by reducing the amount of data read after early filtering. (introduced in 26.1)#89101
Add ALTER UPDATE support for Iceberg tables — Adds the ability to perform UPDATE mutations on Iceberg table engine, previously only DELETE was supported. Enables full mutation support for Iceberg tables in ClickHouse, making them more flexible for data modification. (introduced in 25.9)#86059
e.g. ALTER TABLE iceberg_table UPDATE col = val WHERE condition
Integrations
⭐ Add NATS JetStream support to NATS engine — Allows users to specify nats_stream and nats_consumer settings in the NATS table engine to consume messages from NATS JetStream streams. Enables consumption from JetStream, extending ClickHouse’s message ingestion capabilities. (settings nats_stream, nats_consumer) (introduced in 25.9)#84799
New setting to skip envelope bytes in Kafka messages for schema registries — Adds the ‘kafka_schema_registry_skip_bytes’ setting to skip a specified number of header bytes (e.g., 5 for Confluent, 19 for AWS Glue) before parsing the Kafka message payload. Enables ClickHouse to consume messages from schema registries that add metadata headers without requiring preprocessing or custom deserializers. (settings kafka_schema_registry_skip_bytes) (introduced in 25.11)#89621
Add setting for Arrow Flight descriptor type for Dremio compatibility — Adds the arrow_flight_request_descriptor_type setting to switch between path and command descriptors, enabling compatibility with Dremio and similar Arrow Flight servers. Allows ClickHouse to connect to Dremio and other servers that require command-style descriptors. (settings arrow_flight_request_descriptor_type) (introduced in 25.11)#89523
e.g. SET arrow_flight_request_descriptor_type = 'command';
Add Prometheus HTTP Query API support — Enables Prometheus HTTP Query API handlers (/api/v1/query_range and /api/v1/query) via a new configuration rule type ‘query_api’ in the section. Allows ClickHouse to serve as a Prometheus datasource, enabling PromQL queries on TimeSeries tables. (introduced in 25.11)#86132
e.g. <prometheus><rule type='query_api' ...></rule></prometheus>
S3Queue
⭐ Add move and tag actions for processed files in S3/Azure Queue — Extends the after_processing setting of S3Queue and AzureQueue tables with move (relocate processed file) and tag (add key‑value tags) actions. Enables more flexible post‑processing pipelines for queue‑based ingestion from object storage. (introduced in 25.12)#72944
e.g. CREATE TABLE queue (name String, value UInt32) ENGINE = S3Queue('s3://...') SETTINGS mode = 'unordered', after_processing = 'keep';
Formats
⭐ New Buffers format for lightweight binary I/O — Introduces the Buffers format that serializes data like Native but without column names, types, or metadata, reducing overhead for bulk transfers. Provides a more efficient binary format for scenarios where schema is known externally, lowering transfer size. (introduced in 25.12)#84017
e.g. SELECT number, toString(number) FROM numbers(5) FORMAT Buffers
Operations
⭐ Add settings to limit skipped unavailable shards — Introduces max_skip_unavailable_shards_num and max_skip_unavailable_shards_ratio settings to limit how many shards can be silently skipped when skip_unavailable_shards is enabled. If the threshold is exceeded, a TOO_MANY_UNAVAILABLE_SHARDS exception is thrown instead of returning incomplete results. Prevents returning incomplete query results without notification when many shards are unavailable, giving operators control over data completeness guarantees. (settings max_skip_unavailable_shards_num, max_skip_unavailable_shards_ratio) (introduced in 26.3)#99369
e.g. SET skip_unavailable_shards = 1; SET max_skip_unavailable_shards_num = 5; SET max_skip_unavailable_shards_ratio = 0.1;
⭐ Max-min fair scheduler for concurrency control — Introduces a max-min fair scheduler for concurrency control that allocates CPU slots more fairly under high oversubscription, preventing short queries from being starved by long-running queries. Improves query fairness and responsiveness in high-concurrency workloads. (introduced in 26.1)#94732
e.g. concurrent_threads_scheduler: max_min_fair
⭐ Add files column to system.parts for part file count — Adds a files column to the system.parts table that shows the number of files in each data part. Enables easier monitoring of storage efficiency and merge behavior per part. (introduced in 26.1)#94337
e.g. SELECT name, rows, marks, bytes, files FROM system.parts WHERE database = 'default' AND table = 'github_events'
Add restore_access_entities_with_current_grants setting — Adds a server setting that, when enabled, allows RESTORE to succeed even if the restoring user has fewer grants than the backup, by intersecting restored grants with the user’s grantable rights. Prevents RESTORE from failing with ACCESS_DENIED when restoring users/roles with more permissions than the restoring user can grant. (settings restore_access_entities_with_current_grants) (introduced in 26.3)#98795
e.g. SET restore_access_entities_with_current_grants = 1;
Add lazy_load_tables database setting for deferred table loading — Introduces a new database-level setting lazy_load_tables that defers table loading during database startup; a lightweight proxy is created and the real table engine loads on first access. Reduces startup time and memory usage for databases with a large number of tables. (settings lazy_load_tables) (introduced in 26.2)#96283
e.g. CREATE DATABASE mydb ENGINE=Atomic SETTINGS lazy_load_tables=1
Prevent dropping named collections still in use by tables — Introduces setting check_named_collection_dependencies (default true) that prevents DROP NAMED COLLECTION if any table depends on it. Avoids accidental data loss by protecting named collections referenced by existing tables. (settings check_named_collection_dependencies) (introduced in 26.2)#96181
Add startup and shutdown console log level options — Adds new configuration options to override the console log level during server startup and shutdown, enabling easier debugging of startup/shutdown issues. Allows operators to get more verbose logs during startup/shutdown without affecting normal operation log level. (settings logger.startup_console_log_level, logger.shutdown_console_log_level) (introduced in 26.2)#95919
e.g. Set in config.xml: <logger.startup_console_log_level>debug</logger.startup_console_log_level>
New setting max_insert_block_size_bytes for byte-based block formation — Introduces a new setting max_insert_block_size_bytes to control the maximum block size during insertion in bytes, working alongside max_insert_block_size_rows for finer control. Allows users to limit block sizes based on memory or file size constraints rather than only row count. (settings max_insert_block_size_bytes, max_insert_block_size_rows) (introduced in 26.1)#92833
e.g. SET max_insert_block_size_bytes = 104857600;
Add send_profile_events setting to reduce network traffic — Adds the send_profile_events setting that allows clients to disable sending of ProfileEvents packets over the native protocol, reducing network traffic when profile events are unused. Reduces unnecessary network traffic for clients that do not require profile events, improving performance in high-connection environments. (settings send_profile_events) (introduced in 25.11)#89588#89972
e.g. SET send_profile_events = 0;
Limit number of named collections with new server settings — Adds max_named_collection_num_to_warn and max_named_collection_num_to_throw settings to control the maximum number of named collections, with a warning threshold (1000) and a hard limit (0 for unlimited). Also adds the NamedCollection metric and TOO_MANY_NAMED_COLLECTIONS error. Operators can now guard against excessive named collections that could degrade performance or cause management issues. (settings max_named_collection_num_to_warn, max_named_collection_num_to_throw) (introduced in 25.10)#87343
Add startup and shutdown log level configuration — New configuration options logger.startupLevel and logger.shutdownLevel allow overriding the root log level during server startup and shutdown phases. Helps debug startup/shutdown issues without enabling verbose logging permanently. (settings logger.startupLevel, logger.shutdownLevel) (introduced in 25.9)#85967
e.g. <logger><startupLevel>debug</startupLevel><shutdownLevel>trace</shutdownLevel></logger>
Add async metrics for kernel TCP buffer memory of HTTP connection pool — Introduces asynchronous metrics reporting the kernel TCP receive and transmit buffer memory (sk_rmem_alloc, sk_wmem_alloc) for HTTP connection pool sockets, including p50/p75/p90/p95 percentiles and totals per connection group. Provides deeper visibility into network memory usage, aiding in performance tuning and troubleshooting. (introduced in 26.2, 26.3)#102251#102253
Distroless Docker image variants for server and keeper — Adds distroless Docker image variants tagged with -distroless for clickhouse-server and clickhouse-keeper, reducing image size and attack surface. Enhances security by providing minimal container images suitable for production. (introduced in 25.12)#101442
Allow custom HTTP handlers per port via config — Adds an optional key to type=http entries in , allowing each HTTP port to use a different set of HTTP routing rules defined in a separate <http_handlers_*> config section. Enables flexible request routing per HTTP port, e.g., to serve different endpoints on different ports within the same server. (introduced in 26.3)#98414
e.g. <type>http</type><port>8124</port><handlers>my_handlers</handlers>
Add system.fail_points table for failpoint inspection — Introduces system.fail_points that lists all registered failpoints, their types, and enable status, allowing dynamic introspection and management for testing. Enables easier automated testing and debugging by providing visibility into failpoints. (introduced in 26.2)#96762
e.g. SELECT * FROM system.fail_points
Introduce SYSTEM CLEAR … CACHE as clearer alias for DROP CACHE — Adds SYSTEM CLEAR … CACHE as an alias for SYSTEM DROP … CACHE to clearly indicate that caches are cleared, not disabled. Reduces confusion for operators managing caches, as the new syntax more accurately reflects the action. (introduced in 26.1)#93727
e.g. SYSTEM CLEAR DNS CACHE;
Add ClickHouse_Info metric to Prometheus /metrics — Introduced a new ClickHouse_Info metric to the Prometheus ‘/metrics’ endpoint that exposes version information as labels, enabling tracking of version distributions over time. Allows operators to monitor ClickHouse version deployments through existing Prometheus infrastructure. (introduced in 26.1)#91125
Add system.user_defined_functions table for UDF monitoring — Adds the system.user_defined_functions system table with columns for status, errors, configuration, and execution parameters to monitor user-defined function loading. Operators can now inspect UDF loading status and errors without relying on logs. (introduced in 26.2)#90340
e.g. SELECT * FROM system.user_defined_functions WHERE status != 'OK';
Add memory_usage to HTTP progress and summary headers — Adds a memory_usage field to X-ClickHouse-Progress and X-ClickHouse-Summary HTTP headers for real-time client-side memory consumption tracking. Enables clients to monitor query memory usage in real time, improving observability and resource management. (introduced in 25.11)#88393
Add configuration-based workload and resource definitions — Introduces WorkloadEntityConfigStorage to load WORKLOAD and RESOURCE definitions from the server configuration file under resources_and_workloads. Enables defining workload management entities declaratively in configuration, supporting dynamic reload without SQL statements. (introduced in 25.10)#87430
e.g. <resources_and_workloads><workload name="my_workload" .../></resources_and_workloads>
Add CPU and memory overload warnings to system.warnings — Adds warnings to the system.warnings table when CPU usage exceeds 90% or memory usage exceeds 90% for 10 minutes (thresholds configurable). Helps operators proactively monitor resource overload via a system table, improving operational visibility. (introduced in 25.9)#86838
e.g. SELECT * FROM system.warnings
CLI
ClickHouse client gains TLS SNI override option — Adds the –tls-sni-override option to clickhouse-client, allowing users to set the SNI hostname in the TLS handshake independently of the actual host. Enables connections through proxies or tunnels that require a specific SNI. (introduced in 26.1)#89761
e.g. clickhouse-client --host actual-host --tls-sni-override desired-sni
Enable OAuth login for ClickHouse Cloud via –login flag — Adds the –login flag to the ClickHouse client to authenticate with ClickHouse Cloud using OAuth device code flow and token exchange. Simplifies authentication to Cloud instances without requiring manual token management. (introduced in 25.12)#89261
e.g. clickhouse client --login --host https://myinstance.cloud.clickhouse.com
Add –semicolons_inline option to clickhouse-format — Adds a --semicolons_inline option to the clickhouse-format tool that places semicolons on the same line as the last line of the query instead of on a new line. Improves formatting convenience for use in IDEs and scripts where inline semicolons are preferred. (introduced in 25.10)#88018
e.g. clickhouse-format --semicolons_inline --query 'SELECT 1'
Add config option to swap Ctrl+R/Ctrl+T keybindings in clickhouse client — With <interactive_history_legacy_keymap>true</interactive_history_legacy_keymap>, the CLI client can now fall back to Ctrl R for regular search like before, while Ctrl T does fuzzy search. Users who prefer traditional shell-like search behavior can now customize keybindings. (introduced in 26.1)#87785
e.g. Set <interactive_history_legacy_keymap>true</interactive_history_legacy_keymap> in config.xml.
CLI client option to suppress version mismatch message — Adds --no-server-client-version-message flag to suppress the version mismatch warning message. Users can clean up CLI output when mismatched versions are intentional or non-issue. (introduced in 25.12)#87784
e.g. clickhouse-client --no-server-client-version-message
OAuth2 login for ClickHouse Cloud via –login flag — Adds a –login flag to clickhouse-client to authenticate to ClickHouse Cloud using OAuth2 device code flow or custom OAuth providers. Simplifies authentication for cloud instances without manual token management. (introduced in 25.10)#82753
e.g. clickhouse-client --login
Web UI
Add embedded ClickStack dashboard for debugging and local development — Introduces an embedded observability UI (ClickStack) accessible via /clickstack, providing logs, traces, and metrics directly from the ClickHouse server. Enables developers and administrators to debug and monitor ClickHouse locally without external tools. (introduced in 26.2)#96597
e.g. Open http://localhost:8123/clickstack in a browser.
Web UI adds download button for full results — Adds a download button in the Web UI that downloads the full result set, even if the UI only displays a portion. Allows users to export complete query results easily. (introduced in 25.11)#89768
Security
⭐ User impersonation via EXECUTE AS statement — Introduces the EXECUTE AS SQL statement to allow authenticated users to execute queries with the privileges and row policies of another user, controlled by the allow_impersonate_user setting and the IMPERSONATE grant. Enables secure privilege delegation and fine-grained access control in multi-user environments. (settings allow_impersonate_user; functions authenticatedUser) (introduced in 25.11)#39048
e.g. EXECUTE AS target_user SELECT * FROM table;
⭐ TOTP two-factor authentication support — Adds time-based one-time password (TOTP) as a second authentication factor for ClickHouse client connections. Enhances security by enabling two-factor authentication for database access. (introduced in 26.2)#71273
⭐ Automatic TLS certificate retrieval via ACME — Adds an experimental ACME client to automatically obtain and renew TLS certificates from providers like Let’s Encrypt, following RFC 8555. Simplifies TLS certificate management for ClickHouse servers, reducing manual renewal overhead. (introduced in 25.11)#66315
Add LDAP follow_referrals option to control referral chasing — Adds a per-server LDAP configuration option ‘follow_referrals’ (default false) to control whether the LDAP client follows referral responses, avoiding timeouts in Active Directory environments. Referral messages are moved from warn to trace log level. Prevents timeouts and hangs when using LDAP authentication with Active Directory domain-root base DN, and reduces log noise. (settings follow_referrals) (introduced in 26.3)#96765
e.g. <follow_referrals>false</follow_referrals>
Add data masking policy parser (Cloud-only) — Introduced the parser and interpreter infrastructure for Data Masking Policies, a new access control feature. Currently throws ‘SUPPORT_IS_DISABLED’ for self-managed users. Lays the groundwork for data masking policies to control column-level data visibility in ClickHouse Cloud. (introduced in 25.12)#90552
Database=Replicated
Allow ON CLUSTER for Replicated databases via new setting — Introduces ignore_on_cluster_for_replicated_database setting to allow DDL queries with ON CLUSTER clause to execute on Replicated databases by ignoring the cluster name. Simplifies migration from non-replicated to replicated databases without requiring DDL query changes. (settings ignore_on_cluster_for_replicated_database) (introduced in 26.1)#92872
e.g. SET ignore_on_cluster_for_replicated_database=1; CREATE TABLE ... ON CLUSTER 'any_cluster' ...
Support auxiliary ZooKeeper for DatabaseReplicated — Extends auxiliary ZooKeeper support to DatabaseReplicated, allowing it to use a non-default ZooKeeper cluster (specified via zookeeper name in the path), similar to ReplicatedMergeTree. Provides flexibility for multi-ZooKeeper deployments, reducing load on the main ZooKeeper cluster and enabling better isolation. (introduced in 26.2, 26.3)#91683#95590
Async inserts now support parallel quorum — Enables parallel quorum for async inserts: data is replicated to the quorum before acknowledging, and duplicates wait for prior replication to complete. Provides strong consistency for async inserted data while maintaining high throughput. (introduced in 26.2)#93356
New system table database_replicas for replicated database status — Adds system.database_replicas containing information about replicated databases, similar to system.replicas for tables. Operators can now monitor replication health at the database level. (introduced in 25.9)#83408
e.g. SELECT * FROM system.database_replicas;
Parallel replicas
⭐ Automatic parallel replicas based on runtime statistics — Introduces an experimental setting to automatically execute queries using parallel replicas based on collected statistics from single-node execution, controlled by automatic_parallel_replicas_mode. Allows query performance to benefit from parallel replicas without manual opt-in for complex queries. (settings automatic_parallel_replicas_mode, automatic_parallel_replicas_min_bytes_per_replica) (introduced in 25.12)#87541
e.g. automatic_parallel_replicas_mode
Distributed index analysis for SharedMergeTree — Introduces the experimental setting distributed_index_analysis to offload index analysis to replicas via consistent hashing, improving query performance on large clusters with shared storage. Reduces query latency for large primary keys and huge data volumes on shared storage by parallelizing index analysis. (settings distributed_index_analysis) (introduced in 26.1)#86786
e.g. SET distributed_index_analysis = 1
Keeper
⭐ New ‘rcfg’ command for dynamic Keeper cluster reconfiguration — Introduces a new four-letter command rcfg that allows programmatic changes to Keeper cluster configuration via JSON, including member removal/addition, leadership transfer, and priority setting with preconditions. Enables automated cluster reconfiguration without restarts, improving operational flexibility. (introduced in 26.1)#91354
e.g. rcfg{"preconditions":{"leaders":[1,2]},"actions":[{"transfer_leadership":[3]},{"remove_members":[1,2]}]}
⭐ Add system.zookeeper_info table for ZooKeeper introspection — Introduces a new system table system.zookeeper_info that provides combined introspection metrics from all configured ZooKeeper nodes, including cluster name, host, port, connection status, latency, packet counts, leader info, and file descriptor counts. Enables comprehensive monitoring and debugging of ZooKeeper clusters directly from ClickHouse without external tools. (introduced in 26.1)#88014
e.g. SELECT * FROM system.zookeeper_info
⭐ Add SYSTEM RECONNECT ZOOKEEPER command — Adds a new SYSTEM command SYSTEM RECONNECT ZOOKEEPER to force a disconnect and reconnect to ZooKeeper/Keeper. Allows operators to rebalance connections after keeper restarts without waiting for long fallback session timeouts. (introduced in 25.10)#87318
e.g. SYSTEM RECONNECT ZOOKEEPER
⭐ HTTP API and embedded Web UI for ClickHouse Keeper — Adds an HTTP API and a built-in Web UI to ClickHouse Keeper, allowing users to interact with Keeper via REST endpoints and a browser interface for monitoring and management. Provides a convenient, out-of-the-box way to inspect and manage Keeper state without external tools, simplifying operations. (introduced in 26.1)#78181
e.g. keeper_server: http_control: port: 9182
Support ZooKeeper persistent watches in ClickHouse Keeper — Adds support for ZooKeeper persistent watches in ClickHouse Keeper, enabling more efficient watch handling with new request/response types and a feature flag. Improves Keeper’s compatibility and performance for ZooKeeper-based workloads by reducing watch-related overhead. (introduced in 25.12)#88813
Keeper support for ZooKeeper create2 operation — Adds support for the ZooKeeper create2 operation, which returns statistics on node creation, improving compatibility with ZooKeeper clients. Increases compatibility with ZooKeeper clients that require stat responses on create, easing migration. (introduced in 25.12)#88797
Add recursive cp and mv commands to Keeper client — Adds cpr (recursive copy) and mvr (recursive move) commands to the ClickHouse Keeper client for subtree operations on znodes. Enables easier management of hierarchical data in Keeper. (introduced in 25.10)#88570
e.g. cpr /path/source /path/dest
Add aggregated ZooKeeper log system table — Introduces system.aggregated_zookeeper_log table with aggregated statistics (count, latency, errors) of ZooKeeper operations grouped by session, path, and operation type, periodically flushed to disk. Provides a lightweight monitoring alternative to the detailed ZooKeeper log for production use. (introduced in 25.9)#85102
e.g. SELECT * FROM system.aggregated_zookeeper_log
Introspection
⭐ Introduce mergeTreeAnalyzeIndexes table function for index introspection — Adds a new table function mergeTreeAnalyzeIndexes that shows which parts and ranges are selected by primary key and skip indexes for a given query, enabling deep index usage analysis. Helps users understand and optimize index usage in MergeTree tables. (functions mergeTreeAnalyzeIndexes) (introduced in 26.1)#92954
e.g. SELECT * FROM mergeTreeAnalyzeIndexes(default, github_events, repo_name = 'ClickHouse/ClickHouse')
⭐ Add runtime instrumentation with LLVM XRay for production debugging — Introduces LLVM XRay-based runtime instrumentation that allows dynamic addition and removal of instrumentation points, enabling deterministic profiling and debugging in production without rebuilding ClickHouse. Operators can now profile and debug live ClickHouse instances with minimal overhead, gaining visibility into performance bottlenecks and hard-to-reproduce issues. (introduced in 25.12)#74249
e.g. Use system.xray_instrumentation to enable/disable instrumentation points at runtime.
Native macOS symbol introspection via Mach-O parsing — On macOS, ClickHouse can now parse Mach-O symbol tables to resolve addresses to symbols, exposed through SymbolIndex, addressToSymbol function, system.symbols table, and buildId. Enables debugging and introspection capabilities on macOS builds of ClickHouse, matching existing Linux support. (functions addressToSymbol) (introduced in 26.3)#99014
e.g. SELECT addressToSymbol(addr) FROM ...
Add server-side AST fuzzer settings — Introduces ast_fuzzer_runs and ast_fuzzer_any_query settings to run randomized AST mutations after query execution for testing. Helps find bugs by fuzzing queries server-side without external tools. (settings ast_fuzzer_runs, ast_fuzzer_any_query) (introduced in 26.2)#97568
e.g. SET ast_fuzzer_runs = 10;
Misc
Add experimental support for Elbrus (e2k) CPU architecture — Adds experimental support for the e2k (Elbrus-2000) CPU architecture, including CMake toolchain, architecture detection, and conditional compilation to avoid unsupported instructions. Extends ClickHouse to run on Elbrus processors, broadening deployment options for users in relevant environments. (introduced in 25.11)#90159
Move vector out of loop in reverseSplit function to avoid per-iteration allocations — Optimizes the internal implementation of the reverse_split function by moving std::vector allocation outside the loop, avoiding per-iteration memory allocations. Reduces memory allocation overhead when using functions like reverseSplit, improving query performance. (introduced in 26.2)#95178
Improve levenshteinDistance performance with Myers algorithm — Optimizes the levenshteinDistance function by implementing the Myers algorithm for short strings and block Myers for medium strings, achieving up to 16x speedup for short strings and 8-9% for longer strings. Significantly speeds up fuzzy string matching and similarity computations, benefiting data quality and deduplication workflows. (introduced in 26.3)#94543
e.g. SELECT levenshteinDistance('kitten', 'sitting')
Optimize distinctJSONPaths to read only paths from data parts — Optimizes the distinctJSONPaths aggregate function to read only JSON paths from data parts instead of the entire JSON column, reducing I/O and improving query performance. Speeds up queries that need only distinct JSON paths, especially on large datasets with JSON columns. (introduced in 25.12)#92711
e.g. SELECT distinctJSONPaths(json_col) FROM table;
Improve performance of tokens and related functions — Refactors tokenization in tokens, hasAllTokens, and hasAnyTokens to use a callback pattern, eliminating per-row heap allocations and reducing virtual function overhead. Makes string token analysis significantly faster for large datasets. (introduced in 25.10)#88416
MergeTree-related
⭐ Optional .size subcolumn for String columns in MergeTree — Adds an optional .size subcolumn for top-level String columns in MergeTree tables, improving compression and enabling efficient subcolumn access; introduces settings for serialization version and empty string optimization. Reduces storage footprint and speeds up length queries on String columns. (settings optimize_empty_string_comparisons, serialization_info_version, string_serialization_version) (introduced in 25.10)#82850
e.g. SELECT col.size FROM table;
⭐ MergeTree PREWHERE optimized with in-place filtering — Implements in-place filtering for MergeTree PREWHERE to reduce memory allocation, improving performance for low-selectivity filters. Reduces memory overhead and speeds up queries using PREWHERE with low selectivity filters. (introduced in 25.12)#87119
Batch ZooKeeper requests during clone replica for many parts — Batches ZooKeeper create requests into multi requests when cloning a replica, with a new setting clone_replica_zookeeper_create_get_part_batch_size to control batch size. Significantly improves clone replica performance for tables with many parts. (settings clone_replica_zookeeper_create_get_part_batch_size) (introduced in 26.2)#94847
Heuristic to reduce merge widths based on partition fullness — Introduces a heuristic that dynamically lowers max_parts_to_merge_at_once when a partition’s part count approaches parts_to_throw_insert, controlled by the new setting merge_selector_enable_heuristic_to_lower_max_parts_to_merge_at_once. Helps prevent TOO_MANY_PARTS errors by performing more narrower merges when a partition is near its part limit, at the cost of increased write amplification. (settings merge_selector_enable_heuristic_to_lower_max_parts_to_merge_at_once) (introduced in 25.12)#91163
e.g. SET merge_selector_enable_heuristic_to_lower_max_parts_to_merge_at_once = 1;
Optimize vertical merge after lightweight delete — Improves vertical merge performance after lightweight deletes by applying delete filtering during the merge instead of forcing horizontal merge, reducing memory usage. Reduces memory consumption and improves merge speed in tables with lightweight deletes. (settings vertical_merge_optimize_lightweight_delete) (introduced in 25.9)#86169
Use skip indexes for WHERE clauses with OR conditions — Extends skip index analysis to WHERE clauses with mixed AND/OR conditions, controlled by setting use_skip_indexes_for_disjunctions (default: on). Previously only pure conjunctions were supported. Queries with complex filter logic can now leverage skip indexes, reducing full table scans and improving performance. (settings use_skip_indexes_for_disjunctions) (introduced in 25.12)#75228
e.g. SELECT * FROM table WHERE (col1 = 1) OR (col2 = 2)
Fix key condition analysis for DateTime64 primary keys with integer constants — Corrects key condition analysis to properly handle DateTime64 primary keys compared with integer constants, enabling granule pruning that was previously missing. Significantly improves query performance on DateTime64 primary keys by allowing index-based granule skipping instead of full scans. (introduced in 26.3)#98410
e.g. SELECT * FROM table WHERE dt = 1700000000; -- now uses index efficiently
Partial materialized text index read optimization — Previously, text index direct read optimization required all parts to have a materialized text index. This change allows parts with materialized indexes to use the optimization, while parts without fall back to executing the original filter expression. Improves query performance for tables where only some parts have materialized text indexes. (introduced in 26.2)#96411
Enable marks caching and disable direct IO for MergeTreeLazy reader — Enables saving marks in cache and disables direct IO for the MergeTreeLazy reader, improving read performance. Reduces disk I/O and speeds up reads for MergeTree tables using lazy materialization. (introduced in 25.9)#90371
Cache marks and avoid direct IO in MergeTreeLazy reader — Enables caching of marks and disables direct IO for the MergeTreeLazy reader, improving read performance. Reduces IO overhead when reading from MergeTree tables. (introduced in 25.10)#87989
Zero-copy final aggregation for any/anyLast on large types — Reduces memory allocation and copy for SimpleAggregateFunction(anyLast) columns during SELECT … FINAL from AggregatingMergeTree by using reference-based, zero-copy final merge. Improves memory efficiency and speed for queries using FINAL on tables with large string, array, or map types. (introduced in 25.10)#84428
e.g. SELECT * FROM table FINAL
Performance
⭐ Join reorder uses statistics for bushy join trees — Integrates table statistics from MergeTree data parts into the join order optimizer to enable bushy join trees, achieving dramatic speedups (e.g., TPC-H Q5 from 5s to 100ms). Massively improves query performance for complex joins by using accurate statistics to choose optimal join order. (settings allow_statistics_optimize) (introduced in 25.9)#86822
e.g. SET allow_statistics_optimize = 1; SET query_plan_optimize_join_order_limit = 10
⭐ Rewrite ANY JOIN to SEMI/ANTI and FULL JOIN to LEFT/RIGHT based on filter conditions — Optimizes JOINs by converting LEFT/RIGHT ANY JOIN to SEMI/ANTI and FULL ALL JOIN to LEFT ALL/RIGHT ALL when filter conditions guarantee certain rows are never matched, controlled by setting query_plan_convert_any_join_to_semi_or_anti_join. Significantly improves query performance for common JOIN patterns by selecting more efficient join types. (settings query_plan_convert_any_join_to_semi_or_anti_join) (introduced in 25.9)#86028
e.g. SELECT * FROM large_table LEFT ANTI JOIN small_table USING (id)
⭐ Trim CachedOnDiskReadBufferFromFile size 50x, saving up to 90 GiB RAM — Reduces memory usage of CachedOnDiskReadBufferFromFile by 50x by removing per-file-segment profiling counters, using global counters instead. Drastically lowers RAM consumption for file cache buffers, saving up to 90 GiB in large deployments. (introduced in 26.2)#96098
⭐ ANTI JOINs get runtime filter speedup — Adds support for JOIN runtime filters for ANTI JOINs, significantly improving performance (e.g., TPC-H Q21 drops from 29s to 12.8s). The implementation is also refactored to reduce lock contention. Greatly speeds up ANTI JOIN queries, making them comparable to INNER JOIN performance. (introduced in 25.12)#89710
⭐ Push more filters down joins — Allows constant predicates to be pushed further in JOIN execution, removing a check that prevented pushdown when one side had a constant column. Improves query performance for JOINs with filter conditions. (introduced in 26.1)#85556
e.g. SET use_join_disjunctions_push_down;
⭐ 8x faster SELECT on tables with 10K+ parts via reduced lock contention — Reduces lock contention on the data parts mutex by introducing shared locks for read-only access and caching shared parts list for queries, enabling up to 8x faster SELECT queries with heavy partition pruning on tables with 10K+ parts. Dramatically improves performance for partition-heavy workloads, enabling faster queries on large tables. (introduced in 25.11)#85535
⭐ Extend JIT compilation to more functions — Enables JIT compilation for decimal and bigint types and additional SQL functions, and changes the default of min_count_to_compile_expression to 0. Speeds up queries with many function evaluations, though compilation overhead may increase for very short queries. (introduced in 26.1)#73509
e.g. SELECT caseFoldUTF8('Straße') = caseFoldUTF8('STRASSE')
Optimize text index dictionary with renamed tokens cache — Renames the text index dictionary block cache to tokens cache and adds a new bulk get method, improving text index analysis performance. Reduces latency for text index operations; existing configurations using old cache setting names must be updated. (settings text_index_tokens_cache_policy, text_index_tokens_cache_size, text_index_tokens_cache_max_entries, text_index_tokens_cache_size_ratio, use_text_index_tokens_cache) (introduced in 26.3)#97519
Reduce INSERT/merge memory usage for wide tables with adaptive write buffers — Introduces adaptive write buffers that reduce memory usage during INSERTs and merges for tables with many columns, enabled when column count exceeds min_columns_to_activate_adaptive_write_buffer (default 500). Also adds support for encrypted disks. Lowers memory consumption for very wide tables during writes and merges. (settings min_columns_to_activate_adaptive_write_buffer) (introduced in 26.1)#92250
Parallelize non-joined row processing in ParallelHashJoin — Speeds up RIGHT/FULL JOINs by processing non-joined rows from the right table in multiple threads instead of one, controlled by the new setting ‘parallel_non_joined_rows_processing’ (enabled by default). Provides significant performance improvement for joins with complex predicates on large tables. (settings parallel_non_joined_rows_processing) (introduced in 26.2)#92068
e.g. SET parallel_non_joined_rows_processing = 1;
Implement DPsize join reordering for INNER JOINs — Introduces a new experimental setting query_plan_optimize_join_order_algorithm that allows using DPsize algorithm for better join order optimization, with fallback to greedy. Improves query performance for complex queries with many INNER JOINs by finding more optimal join orders. (settings query_plan_optimize_join_order_algorithm) (introduced in 25.12)#91002
e.g. SET query_plan_optimize_join_order_algorithm='dpsize,greedy';
High-performance tokenization via forEachToken callback interface — Refactors tokenization to a new high-performance forEachToken callback interface, replacing the old iterator-style API to support SIMD and stateful tokenizers. Provides faster tokenization for text processing workloads, enabling better performance in full-text search and text analysis. (functions {'name': 'tokensForLikePattern', 'kind': 'scalar'}) (introduced in 26.3)#90268
Optimize ORDER BY … LIMIT N queries with skip indexes and dynamic filtering — Implements optimizations using minmax skip index and dynamic threshold filtering to skip irrelevant granules, reducing rows processed for top-K queries; adds settings use_skip_indexes_for_top_k, use_top_k_dynamic_filtering, query_plan_max_limit_for_top_k_optimization. Significantly reduces query latency and memory for ORDER BY LIMIT queries. (settings use_skip_indexes_for_top_k, use_top_k_dynamic_filtering, query_plan_max_limit_for_top_k_optimization) (introduced in 25.12)#89835
Optimize read order through joins for better performance — Introduces a new optimization to preserve read order from the left table in LEFT/INNER JOINs, allowing subsequent steps to benefit; adds setting query_plan_read_in_order_through_join. Reduces unnecessary re-sorting after joins, improving query performance. (settings query_plan_read_in_order_through_join) (introduced in 25.12)#89815
Add cache for text index posting lists — Introduces a cache for text index posting lists (the largest data component) to improve performance on consecutive queries; new settings control cache policy, size, and enablement (disabled by default). Significantly reduces latency and increases throughput for repeated text index queries when the cache is enabled. (settings text_index_postings_cache_policy, text_index_postings_cache_size, text_index_postings_cache_max_entries, text_index_postings_cache_size_ratio, use_text_index_postings_cache) (introduced in 25.11)#88912
Text index dictionary block cache for faster token lookups — Improves text index performance by caching dictionary blocks and using hash tables for token lookups instead of binary search. Adds configurable cache settings. Significantly reduces latency and increases throughput for text index queries, especially with large numbers of queries. (settings use_text_index_dictionary_cache, text_index_dictionary_block_cache_policy, text_index_dictionary_block_cache_size, text_index_dictionary_block_cache_max_entries, text_index_dictionary_block_cache_size_ratio) (introduced in 25.11)#88786
e.g. SET use_text_index_dictionary_cache = 1;
Improve filtering with text index hint for like/equals/has — Adds a preliminary filter hint from the text index to improve filtering performance for predicates using functions like like, equals, has. Controlled by new settings query_plan_text_index_add_hint and text_index_hint_max_selectivity. Also improves text index usage for Map columns. Significantly speeds up queries with text-based filters on columns with text index. (settings query_plan_text_index_add_hint, text_index_hint_max_selectivity) (introduced in 25.12)#88550
e.g. SET query_plan_text_index_add_hint = 1;
Distributed execution: split tasks by row groups for better parallelism — Improves task splitting in CLUSTER table function from file-level to row-group level, reducing skew and improving parallelism for large Parquet files. Queries on large Parquet files via cluster table function become faster and more balanced across nodes. (settings cluster_table_function_split_granularity, cluster_table_function_buckets_batch_size) (introduced in 25.11)#87508
Optimize LIKE with prefix/suffix by rewriting to startsWith/endsWith — A new setting optimize_rewrite_like_perfect_affix (default on) rewrites LIKE expressions with fixed prefix or suffix into startsWith or endsWith functions for better performance. Improves query performance for LIKE patterns with leading/trailing wildcards. (settings optimize_rewrite_like_perfect_affix) (introduced in 25.10)#85920
e.g. SELECT * FROM t WHERE name LIKE 'prefix%' -- automatically rewritten to startsWith(name, 'prefix')
Push down disjunction JOIN predicates to inputs — Introduces optimization that pushes OR-connected parts of JOIN conditions down to the respective input sides, enabling early filtering. Controlled by setting use_join_disjunctions_push_down (default off). Can significantly reduce data read and speed up JOIN queries with OR conditions. (settings use_join_disjunctions_push_down) (introduced in 25.10)#84735
e.g. SET use_join_disjunctions_push_down = 1; SELECT ... FROM t1 JOIN t2 ON (t1.a = 1 AND t2.b = 2) OR (t1.a = 2 AND t2.b = 1);
Fix INSERT performance regression when deduplicate_insert=enable — Optimizes data hash computation during INSERT by deferring it from squashing to the sink stage and using batch column hashing via updateHashWithValueRange, reducing overhead from ~2.5s to ~0.5s for 5M rows with 22 columns. Fixes a significant performance regression caused by the default deduplication setting, improving INSERT throughput. (introduced in 26.2)#101914
Fix INSERT performance regression with deduplicate_insert enabled — Defer data hash computation from squashing to sink and use batch column hashing, reducing overhead from ~2.5s to ~0.5s for 5M rows with 22 columns. Restores INSERT performance when deduplication is enabled, avoiding significant slowdown. (introduced in 26.3)#101736
Avoid unnecessary computation of String .size subcolumn during enumeration — Avoids computing the .size subcolumn for String columns when not needed during subcolumn enumeration. Reduces overhead for queries that enumerate subcolumns, improving performance. (introduced in 26.3)#100600
Optimize PrefetchingHelper with integer arithmetic — Replaces floating-point math with pure integer arithmetic in PrefetchingHelper::calcPrefetchLookAhead, reducing cycle overhead and improving instruction cache layout during aggregation loops. Provides approximately 3.5% performance improvement in high-cardinality aggregations. (introduced in 26.3)#99327
Reduce cache contention in RIGHT and FULL JOINs — Adds a check-then-store pattern for JoinUsedFlags atomic flags to avoid unnecessary memory store operations when the flag is already set. Significantly improves performance in high-contention scenarios for RIGHT and FULL joins. (introduced in 26.3)#99274
Read-in-order optimization for reverse-order reads — Extends the read_in_order_use_virtual_row optimization to support reverse-order reads, reducing unnecessary data scanning in ORDER BY DESC + LIMIT queries on MergeTree tables. Speeds up descending order queries with LIMIT, improving query performance. (introduced in 26.3)#99198
e.g. SELECT * FROM table ORDER BY timestamp DESC LIMIT 10;
Optimise INTERSECT ALL and EXCEPT ALL with branch removal (~13% speedup) — Removes a branch in the row filtering logic for INTERSECT ALL and EXCEPT ALL, simplifying the inner loop and reducing query latency by about 13%. Faster execution of set operations. (introduced in 26.3)#99097
Enable read-in-order and key pruning for CAST to Nullable(T) — Allows read-in-order optimization and primary-key pruning when the CAST target type is Nullable(T) and the conversion is monotonic, enabling efficient ORDER BY and filter pushdown for expressions like x::Nullable(UInt64). Improves query performance for tables with primary keys on columns that are cast to Nullable types, enabling faster order-by and filtering via index usage. (introduced in 25.12, 26.1, 26.2, 26.3)#98482#99048#99050#99052
e.g. SELECT * FROM table WHERE x::Nullable(UInt64) > 500000 ORDER BY x::Nullable(UInt64)
Add compareTrackAt method to IColumn for sorted merges — Adds a new method compareTrackAt to the IColumn interface, enabling more efficient comparisons during sorted merge operations. Improves performance of sorted merges by providing a dedicated comparison track function, reducing overhead in merge processing. (introduced in 26.3)#99013
Reduce memory and improve performance for parallel window functions and arrayFold — Replaces heuristic average-size preallocation with exact row counts and skips empty output chunks in scatter transforms, reducing memory usage and page-fault pressure. Improves query stability under tight memory limits and speeds up window function and arrayFold workloads. (introduced in 26.3)#98892
Optimize avgWeighted aggregation by up to 27% for Nullable inputs — Uses local accumulators in avgWeighted aggregate function to avoid per-row store-forwarding through aggregate state, improving performance for Nullable inputs by up to 27%. Faster aggregation for weighted averages. (introduced in 26.3)#98793
Enable optimize_syntax_fuse_functions by default — Changes the default value of the setting optimize_syntax_fuse_functions to true, enabling fusion of aggregate functions like sumIf into sum(if(…)) automatically. Automatically improves performance for queries using conditional aggregates without requiring manual rewriting. (introduced in 26.3)#98424
e.g. SELECT sumIf(x, cond) FROM t; -- now automatically rewritten to sum(if(cond, x, 0))
Improve performance of queries with constant long arrays or maps — Improves performance of queries with constant expressions that generate very long arrays or maps by removing redundant type calculations. Speeds up queries involving large constant array/map constructions. (introduced in 26.3)#98287
Improve text index analysis for combined indexed/non-indexed conditions — Fixes early exit optimization in text index analysis that was incorrectly disabled when queries combine indexed and non-indexed columns, improving performance (backport to 26.2). Speeds up queries that use text indexes alongside non-indexed filters. (introduced in 25.12, 26.2)#98182#98184
Improve text index analysis with combined conditions — Improves performance of text index analysis for queries with combined conditions involving both indexed and non-indexed columns by correctly determining when all tokens must be read. Speeds up queries with full-text search on mixed indexed and non-indexed columns. (introduced in 26.3)#98096
Skip storing original block for single-token sync inserts — For synchronous inserts, the original block was always stored for deduplication. This optimization skips storing the full block for single-token sync inserts, computing the hash on the fly to save memory. Reduces memory usage during synchronous inserts, improving overall server efficiency. (introduced in 26.2, 26.3)#96661#97942
Speed up LZ4 decompression on ARM by removing slower NEON path — Removes a slower NEON code path for 16-byte blocks during LZ4 decompression on ARM, replacing it with a faster scalar fallback. This improves decompression speed, especially on Graviton 4 instances. Faster decompression means improved query performance on ARM-based infrastructure. (introduced in 26.3)#97774
Optimizer swaps join sides for ANTI, SEMI, and FULL joins using statistics — Enables the optimizer to swap the build and probe sides of ANTI, SEMI, and FULL joins based on table size statistics, choosing the smaller table as the build side. Improves join performance for these join types, especially when table sizes differ. (introduced in 26.3)#97498
Optimize minmax skip index computation during INSERT — Removed unnecessary data copy and enabled vectorized min/max calculation using std::minmax for numeric columns during minmax skip index updates on INSERT. Reduces minmax skip index overhead from ~30% to ~1.6%, significantly improving INSERT performance. (introduced in 26.2)#97392
Replace hardcoded cache line size with arch-specific constant — Replaces the hardcoded cache line size of 64 with an architecture-specific constant CH_CACHE_LINE_SIZE, fixing performance regressions on ARM caused by LLVM’s inflated hardware_destructive_interference_size. Improves performance on ARM architectures by using the correct cache line size, and adds a style check to prevent regressions. (introduced in 26.3)#97357
Optimize PrimaryKeyExpand in FINAL queries to skip unnecessary granule scanning — If a FINAL query uses a primary key condition for filtering followed by skip indexes, the PrimaryKeyExpand processing step now only checks the initial shortlisted primary key ranges for intersection, preventing unnecessary granule scanning. Improves query performance for FINAL queries that use skip indexes, reducing I/O and CPU usage. (introduced in 25.12)#97061
Apply lazy materialization to all UNION ALL branches — Extends the lazy materialization optimization to every branch of a UNION ALL query, not just the first one, reducing I/O for multi-branch sorted limited reads. Faster UNION ALL queries combining sorted reads from multiple MergeTree tables. (introduced in 26.2)#96832
LZ4 decompression 1.46x faster for 32-byte blocks on x86 — Optimizes LZ4 decompression for 32-byte blocks using SSSE3 SIMD instructions, achieving up to 1.46x speedup on large files. Improves performance for compressed data workloads, especially with small block sizes. (introduced in 26.2)#96778
Add minmax and bloom_filter indexes on system log tables for faster filtering — Adds minmax secondary indexes on time columns and bloom_filter indexes on query_id/initial_query_id columns to MergeTree-based system log tables (e.g., query_log, trace_log). Speeds up time-range queries and query ID lookups on system log tables, reducing latency when diagnosing issues. (introduced in 26.2)#96712
Improve build time by avoiding boost/multiprecision headers on ARM — Avoids including heavy boost/multiprecision headers on platforms with adequate long double (e.g., ARM), reducing build time by about 7.9%. Faster compilation for developers and build systems. (introduced in 26.2)#96633
Skip storing original_block in DeduplicationInfo when deduplication disabled — Avoids storing original_block in DeduplicationInfo when deduplication is not enabled, reducing memory usage during INSERTs. Lowers peak memory consumption for insert-heavy workloads without deduplication. (introduced in 26.2)#96503
Enable runtime filters for RIGHT OUTER JOINs — Extends runtime join filter optimization to RIGHT OUTER JOINs (ALL and ANY), reducing memory usage and speeding up queries. Improves performance for queries using RIGHT OUTER JOINs, which previously could not benefit from this optimization. (introduced in 26.2)#96183
Optimize HashTable resize for empty tables — HashTable::resize now skips copying data when the table is empty, avoiding unnecessary overhead during resize operations like set_index construction. Improves performance for operations that frequently resize empty HashTables. (introduced in 26.2)#96180
Reduce CachedOnDiskReadBufferFromFile memory usage by 50x — Removes per-file-segment profiling counters from CachedOnDiskReadBufferFromFile, reducing its structure size by ~50x and saving up to 90 GiB of RAM in large deployments. Significantly lowers memory footprint for systems with many concurrent reads using the filesystem cache. (introduced in 25.11)#96175
Revert 64-byte alignment for ProfileEvents::Counter to reduce memory usage — Removes 64-byte alignment from ProfileEvents::Counter, significantly reducing memory consumption (~4x less) for the Counters object. Lowers memory footprint, especially in deployments with many counters, saving tens of GiB. (introduced in 26.2)#96097
Batch decimal conversion speeds up casting by hoisting loop-invariant computations — Optimizes decimal type conversions by adding batch processing functions that hoist scale comparison and multiplier computation outside the loop, reducing per-element overhead. Faster casting between decimal types, especially in bulk operations. (introduced in 26.3)#95923
Speed up uniq over numeric types with batched hash inserts — Optimizes the uniq aggregate function for numeric types by batching 8 values at a time into the hash set, achieving ~1.23x speedup. Faster COUNT(DISTINCT) queries on numeric columns with no additional configuration. (introduced in 26.2)#95904
Postpone PREWHERE optimization for runtime filter pushdown — Defers PREWHERE optimization until after JOIN runtime filters are added, so runtime filters can also be pushed into the PREWHERE step. Improves query performance for joins with runtime filters by enabling better filter pushdown. (introduced in 26.2)#95838
Optimize PrimaryKeyExpand in FINAL queries with skip indexes — In FINAL queries that use a primary key filter followed by skip indexes for other conditions, PrimaryKeyExpand now only checks the initial primary key ranges for intersection, avoiding unnecessary granule scans. Reduces query latency and I/O for FINAL queries with multiple filters, particularly on large MergeTree tables. (introduced in 26.2)#94903
Improved devirtualization with linker flags — Adds linker options to improve devirtualization during ThinLTO compilation, leading to general performance improvements across queries. Provides a performance boost with no user configuration changes. (introduced in 26.2)#94737
Optimize memory for named tuple AST objects — Stores named tuple element names directly as strings instead of using AST literal nodes, reducing memory consumption for queries and metadata involving named tuples. Reduces memory usage for queries and schemas with named tuples, especially beneficial for large schemas. (introduced in 26.2)#94704
Optimize Enum AST memory with specialized node — Introduces ASTEnumDataType to store enum values as (string, integer) pairs instead of ASTLiteral children, reducing memory consumption for large enums. Reduces memory footprint for queries involving large Enum types. (introduced in 26.1)#94178
Optimize read-in-order by skipping constant ORDER BY columns from WHERE clause — The read-in-order optimization now ignores ORDER BY columns that are constant due to WHERE conditions, allowing efficient reverse-order reads (e.g., InReverseOrder) instead of a full sort for queries like WHERE tenant=‘42’ ORDER BY tenant, event_time DESC. Significantly improves performance for multi-tenant queries by enabling optimal read direction without sorting. (introduced in 26.1)#94103
e.g. SELECT * FROM events WHERE tenant='42' ORDER BY tenant, event_time DESC
Skip reading left side of hash join when right side is empty — Optimizes hash joins by skipping reading the left side entirely when the right side is empty, instead of reading until first non-empty block. Improves performance and reduces memory consumption for queries with empty right-side tables. (introduced in 26.1)#94062
Reduce ASTLiteral memory footprint by removing optional token iterators — Removes std::optional fields from ASTLiteral, storing token information only when needed for highlighting and VALUES parsing. Reduces memory usage for query ASTs, especially beneficial for complex or numerous queries. (introduced in 26.2)#93974
Optimize isValidASCII for all-ASCII inputs — Reapplied an optimized implementation of isValidASCII using an optimistic byte check (OR all bytes, compare to 0x7F) yielding 1.7–4.4x speedup for common all-ASCII inputs. Queries using isValidASCII on ASCII-heavy data execute significantly faster without any behavioral change. (introduced in 26.1)#93611
Optimize isValidASCII for all-ASCII input — Optimizes isValidASCII function for positive outcomes (all-ASCII) with up to 4.4x speedup, while non-ASCII cases see a slight slowdown. Accelerates ASCII detection in workloads with predominantly ASCII text. (introduced in 26.1)#93347
Optimize uniqExact for consecutive duplicates — Improves performance of uniqExact aggregation by skipping insertion of consecutive identical elements, achieving up to 35% faster execution on real queries. Faster aggregation for workloads with repeated values, reducing query time. (introduced in 26.1)#93268
Use fastrange for parallel partitioning in query pipeline — Replaces modulus-based partitioning with the fastrange (Daniel Lemire) method for data distribution in the query pipeline, improving performance for parallel sorting and JOINs. Faster query execution for parallel operations on large datasets. (introduced in 26.1)#93080
Optimize full-text search by reducing searched tokens with sparseGrams — Improves performance of full-text search using text index with sparseGrams tokenizer by reducing the number of tokens searched in the index through compaction and filtering of already covered tokens. Faster full-text search queries, especially on large text datasets. (introduced in 26.1)#93078
Extend join condition pushdown to ANY, SEMI, ANTI joins — Pushes filters from the ON clause to the appropriate side when the filter references only one side, now also for ANY, SEMI, and ANTI joins. For ANTI joins, the condition is negated to maintain semantics. Reduces data processed during joins, improving query performance for these join types. (introduced in 26.1)#92584
Optimize granule skipping for pointInPolygon with large polygons — Improves granule skipping for pointInPolygon queries with large polygons and fixes an index analysis error during primary key pruning. Significantly speeds up geospatial queries on large polygon datasets. (introduced in 26.3)#91633
Avoid needless parts filtering by virtual columns — Skips expensive parts filtering via virtual columns when no virtual columns are used in the WHERE clause. Improves query performance by avoiding unnecessary computation on virtual columns. (introduced in 26.1)#91588
Speed up sorting of single numeric block via dynamic dispatch — Adds dynamic dispatch to the column comparison function, enabling AVX2/AVX512BW code paths for sorting single numeric blocks, improving sorting throughput. Delivers faster sorting performance for numeric data, benefiting queries with ORDER BY and other sorting operations. (introduced in 25.12)#91213
Speed up column-to-bool conversion with AVX2/AVX512BW dynamic dispatch — Speeds up converting columns to boolean values (used in WHERE clauses) using AVX2 and AVX512BW dynamic dispatch optimizations. Improves query performance for WHERE clauses that involve implicit or explicit boolean conversions. (introduced in 25.12)#91203
Optimize memory usage of fractional LIMIT/OFFSET — Optimizes performance and memory usage for fractional LIMIT and OFFSET by early-detecting blocks that can be dropped or pushed to output while still reading, reducing peak memory. Reduces memory consumption for queries with fractional limits and offsets, improving stability and enabling larger datasets. (introduced in 26.1)#91167
Fix Parquet v3 Prefetcher to use faster random read logic — Fixes the Parquet v3 Prefetcher to use the faster readBigAt path for object storage reads by adding missing method overrides in wrapper buffers. Improves I/O performance for Parquet reads from S3/Azure/GCS. (introduced in 26.1)#90890
Speed up T64 decompression via SIMD dynamic dispatch — Optimized T64 decompression by using SIMD dynamic dispatch (AVX512BW/AVX2) for reverseTranspose, achieving >2x throughput improvement. Faster data decompression improves query performance, especially for workloads using T64 codec. (introduced in 25.12)#90610
JIT: Avoid unnecessary result column zero-initialization — Optimizes JIT functions by not initializing result columns to zero unnecessarily, saving CPU cycles. Yields ~25% throughput improvement for certain queries using JIT compilation. (introduced in 25.12)#90449
Use advanced SIMD for logical functions via dynamic dispatch — Adds AVX512BW and AVX2 SIMD implementations for logical functions (and, or, xor) with runtime dispatch to select the best implementation. Improves performance of logical operations on supported hardware. (introduced in 25.12)#90432
Speed up minmax index load by caching serialization and datatype pointers — Caches serialization and datatype pointers in minmax index granules to avoid repeated computations during deserialization, reducing latency for large minmax indexes with millions of granules. Improves query planning performance for tables with large minmax indexes. (introduced in 25.12)#90428
Optimize topK aggregate function performance — Adds batch processing for numeric types in topK, fixes potential overflow in SpaceSaving alpha values that could cause incorrect results, and improves accuracy on drops/merges. Faster and more accurate topK computations for numeric data. (introduced in 25.12)#90091
Increase lazy materialization limit default from 10 to 100 — Raises the default value of query_plan_max_limit_for_lazy_materialization from 10 to 100, allowing lazy materialization to apply to queries with larger LIMIT clauses. Improves performance for many queries by reducing unnecessary data materialization. (introduced in 25.11)#89772
Speed up countDistinct with faster HashSetTable::merge — Reduces overhead in HashSetTable::merge by early returning for empty tables, preemptive resizing, and saving hash recomputation, which accelerates countDistinct aggregate operations. Queries using countDistinct (e.g., uniq, uniqExact) become faster, especially on large datasets. (introduced in 25.11)#89727
Reduce atomic operations in async logging queue — Reduces atomic reference counting operations per entry during async log message enqueuing by using std::move instead of copying shared_ptr. Decreases overhead in high-throughput logging scenarios, improving overall performance. (introduced in 25.11)#89651
Allow lazy materialization with read-in-order sorting — Enables the lazy materialization optimization to work simultaneously with optimize_read_in_order, improving performance for ORDER BY … LIMIT queries on sorted keys. Faster query execution for large sorted datasets. (introduced in 25.10, 25.9)#89504#89506
Rewrite ANY LEFT/RIGHT JOIN to ALL INNER JOIN when possible — Allows the optimizer to rewrite ANY LEFT JOIN or ANY RIGHT JOIN to ALL INNER JOIN in certain cases, enabling more efficient join execution. Improves query performance by using more efficient join types when logically safe. (introduced in 25.11)#89403
Implement lazy columns replication in JOIN and ARRAY JOIN — Avoids converting special column representations (Sparse, Replicated) to full columns in JOIN and ARRAY JOIN, and in some output formats, reducing unnecessary data copying in memory. Reduces memory consumption and speeds up queries involving JOIN or ARRAY JOIN on tables with sparse or replicated columns. (introduced in 25.10)#89182
Disable ThreadFuzzer by default in non-server binaries — ThreadFuzzer now starts disabled by default in all binaries (except server) and only enables itself if effective, reducing unnecessary overhead. Improves startup performance for non-server binaries like clickhouse local and clickhouse client. (introduced in 25.11)#89115
Streaming LIMIT BY for sorted input data — When input sort order matches the LIMIT BY keys, a streaming transform is used instead of a hash table, reducing memory and CPU overhead. Improves performance and lowers memory consumption for LIMIT BY queries operating on already sorted data. (introduced in 25.11)#88969
Combine read in order with lazy materialization — Allows queries to benefit from both optimize_read_in_order and query_plan_optimize_lazy_materialization simultaneously. Improves query performance by enabling both optimizations together, reducing data read and materialization overhead. (introduced in 25.11)#88767
Lazy columns replication in JOIN and ARRAY JOIN — Implements lazy column replication in JOIN and ARRAY JOIN, avoiding conversion of special column representations (Sparse, Replicated) to full columns in output formats. Reduces unnecessary data copy in memory, improving query performance. (introduced in 25.11)#88752
Inline AddedColumns::appendFromBlock for join performance — Inlines the appendFromBlock method to reduce function call overhead, improving join performance in some cases. Provides a small performance boost for joins, particularly in scenarios with many columns. (introduced in 25.10)#88455
Improve LZ4 decompression speed by 5-10% — Optimizes LZ4 decompression by simplifying copy logic, removing AVX512 shuffle code, and tweaking algorithm selection. Benchmarks show a 4-10% throughput improvement across various CPU architectures. Faster decompression improves overall query performance, especially for compressed data reads. (introduced in 25.11)#88360
Optimize failpoint checks to reduce overhead when failpoints are disabled — Removes the slowdown_index_analysis failpoint and adds an atomic fast-path to skip failpoint checks entirely when no failpoints are enabled. Eliminates unnecessary performance overhead in production environments where failpoints are not used. (introduced in 25.10)#88196
Push outer filter into view to enable PREWHERE with parallel replicas — Pushes down outer filters into views, allowing PREWHERE optimization to be applied on local and remote nodes when parallel replicas are used. Improves query performance by reducing data transferred from remote nodes and enabling more efficient filtering. (introduced in 26.1)#88189
Optimize FINAL queries on ReplacingMergeTree with is_deleted column — FINAL queries on ReplacingMergeTree tables using is_deleted now skip the final merge transform for non-intersecting ranges and single-part partitions, applying a simple filter instead, improving parallelism. Significantly accelerates SELECT … FINAL queries on tables with is_deleted, especially for large tables with many partitions. (introduced in 25.10)#88090
Skip redundant hash table statistics recalculation in join optimization — Avoids recalculating hash table statistics during join order optimization by caching the cache key in the logical join step, and adds ProfileEvents for join and query plan optimization timing. Reduces query planning time for joins by eliminating duplicate statistics computation, improving overall query performance. (introduced in 25.10)#87683
Optimize Field destructor for integer-heavy workloads — Reduces the overhead of the Field destructor by resetting the ‘which’ field before destruction and adding a likely hint, decreasing profile overhead from 15% to 6%. Improves query performance by ~10% for workloads with many integer fields, such as ClickBench Q19. (introduced in 25.10)#87631
Optimize text index build for rare tokens — Improves performance of building text indexes for documents with many rare tokens by using a small stack-allocated array for low-cardinality posting lists, delaying Roaring bitmap allocation. Faster index creation for full-text search on texts with many unique tokens. (introduced in 25.10)#87546
DB::SharedMutex gets ~10% performance boost — Applies micro-optimizations to DB::SharedMutex, including a fast path for lock when uncontested and removal of the writer_thread_id field. Improves shared mutex performance by approximately 10%. (introduced in 25.10)#87491
Disable sort order optimization for window functions by default — Disables the sort order optimization for window functions when the partition by clause matches the sorting key, improving parallel execution performance. Prevents single-threaded execution and speeds up window function queries with matching sorting keys. (introduced in 26.1)#87299
Optimize patch join cache with btree_map and hint insertion — Replaced flat_hash_map with btree_map for offsets and added insertion hints to reduce overhead from hash map merges when applying patch parts in join mode. Improves JOIN performance by reducing CPU and memory overhead during patch application. (introduced in 25.9)#87094
Optimize MarkRanges by using devector — Replaces the internal container for MarkRanges from deque to devector, yielding ~39% QPS improvement for fast queries with many parts. Speeds up queries on tables with a large number of parts, reducing latency and improving throughput. (introduced in 25.9)#86933
Optimize SELECT DISTINCT using aggregate projections — Enables SELECT DISTINCT queries to use aggregate projections when the distinct columns are a subset of projection keys, avoiding full scans and recomputation. Significantly improves performance for SELECT DISTINCT queries on tables with pre-defined aggregate projections. (introduced in 25.11)#86925
RadixSort boosted with SIMD unrolling and Intel prefetching — Adds loop unrolling to help compilers use SIMD, and Intel-specific software prefetching via dynamic dispatch, improving throughput up to 10% on both AMD and Intel CPUs. Faster sorting improves performance of query operations relying on sorting (ORDER BY, GROUP BY, etc.). (introduced in 25.9)#86378
HashJoin performance improved for unmatched rows in LEFT/RIGHT joins — Optimizes HashJoin by inlining the appendDefaultRow function, improving performance by ~10% for LEFT/RIGHT joins with a large number of unmatched rows. Speeds up join-heavy queries, especially those with many non-matching rows, reducing query execution time. (introduced in 25.9)#86312
Fix VDSO symbol lookup on AArch64 for better performance — Fixes VDSO symbol lookup on AArch64 Linux systems that use GNU hash tables (e.g., Ubuntu AMIs), enabling proper VDSO usage and avoiding frequent clock_gettime syscalls. Improves performance on ARM64 systems by restoring efficient time functions. (introduced in 25.11)#86096
Fix GROUP BY performance regression for large string keys — Adds a heuristic to fall back to per-row serialization when total key size exceeds 4x L2 cache or average key size >= 128 bytes, restoring performance for large string/number composite keys. Fixes performance degradation in GROUP BY queries with many or large string columns. (introduced in 25.10)#85924
Optimize AggregateFunctionHistogram by sorting tail only — Optimizes AggregateFunctionHistogram by sorting only the tail of the points array and skipping sort for monotonic inputs, achieving ~10% speedup. Improves performance of histogram aggregation for large datasets. (introduced in 25.12) (#85760)
Improve prewhere optimizer for function-on-primary-key and IN conditions — Enhances the prewhere optimizer to correctly handle conditions that cannot use primary index (e.g., func(primary_column) = 'xx') and improves selectivity estimation for IN operators. Better ordering of prewhere conditions can significantly improve query performance. (introduced in 25.9)#85529
Allow filter pushdown using equivalent sets for SEMI JOIN — Enables filter pushdown for SEMI JOIN queries using equivalent sets, reducing the amount of data processed. Speeds up SEMI JOIN queries that involve equality conditions. (introduced in 26.1)#85239
Allow index pruning for integral column compared with float literal — Enables primary key index pruning and filter pushdown when an integral column is compared with a float literal (e.g., WHERE x < 10.5), and fixes unbounded execution for table functions like primes() and numbers() with such filters. Significantly improves query performance for mixed-type comparisons and prevents runaway queries. (introduced in 26.3)#85167
e.g. SELECT * FROM numbers WHERE number < 1e5
Prefetch keys during hash table iteration — Prefetches keys during hash table iteration to reduce cache misses, improving performance in hash table heavy operations like GROUP BY. Reduces query execution time for operations involving large hash tables. (introduced in 25.12)#84708
Allow WHERE clause in distributed INSERT SELECT for parallel execution — Removes constraints that previously prevented WHERE clauses in distributed INSERT SELECT queries, restoring the ability to use parallel distributed execution with filtering. Improves performance for distributed INSERT SELECT queries that filter data. (introduced in 25.12)#84611
e.g. INSERT INTO table SELECT * FROM s3Cluster('cluster', ...) WHERE condition
Improve string search performance with StringZilla library — Integrates the StringZilla library to accelerate case-sensitive string search operations (e.g., LIKE, substring matching) using SIMD CPU instructions. Faster filtering on string columns, benefiting queries with LIKE or substring patterns. (introduced in 25.10)#84161
e.g. SELECT * FROM table WHERE URL LIKE '%google%'
Micro-optimizations for small query speed — A series of micro-optimizations in the pipeline executor and MergeTree reader reduce overhead for small queries. Improves latency for lightweight queries. (introduced in 25.10)#83096
Compress logs and profile events in native protocol — Enables compression for logs and profile events sent over the native protocol between ClickHouse instances. Reduces network bandwidth usage significantly on clusters with many replicas, improving responsiveness on slow connections. (introduced in 25.10)#82533
Apply query condition cache earlier to reduce index analysis overhead — Moves Query Condition Cache (QCC) filtering before primary key and skip index analysis, and caches index analysis results for multiple range filters, reducing redundant computation. Significantly speeds up queries dominated by index analysis, especially those using skip indexes like vector or inverted indexes. (introduced in 25.10)#82380
Optimize ColumnVector::replicate with dynamic dispatch — Implemented dynamic dispatch with AVX512, AVX2, SSE42 for ColumnVector::replicate, speeding up hash join operations. Provides significant performance improvements for hash joins on modern CPUs. (introduced in 26.2)#79573
RIGHT and FULL JOINs now use ConcurrentHashJoin — RIGHT and FULL JOIN implementations now utilize ConcurrentHashJoin, enabling parallel execution and improving performance up to 2x for various join cases. Queries using RIGHT or FULL JOINs will run faster with higher degrees of parallelism, reducing execution time for analytical workloads. (introduced in 25.11)#78027
Optimize query plans by removing unused columns — Adds an optimization to eliminate columns not needed by the query from the execution plan, reducing I/O and processing overhead. Queries reading wide tables will benefit from faster scans and lower memory usage. (introduced in 25.12)#75152
Parallel merge for fixed hash map aggregation states — When grouping by a small integer column, ClickHouse now merges aggregation states in parallel, exploiting the fixed hash map structure. Speeds up GROUP BY queries over low-cardinality integer keys by utilizing multiple threads for state merging. (introduced in 25.11)#63666
Fail fast on query row limit hits — When a query reaches its row limit (e.g., LIMIT clause), execution stops early instead of continuing unnecessary processing. Reduces wasted work and delivers results faster for queries with row limits. (introduced in 25.12)#61872
Sparse serialization for Nullable columns — Enables sparse serialization for columns of Nullable type, reducing storage overhead when most values are NULL. Improves storage efficiency and query performance for datasets with sparse null values. (introduced in 25.12)#44539
Allow partition pruning through deterministic function chains — Enables partition pruning when predicates use comparison operators on partition keys wrapped in deterministic functions (e.g., toYYYYMM(x) < 2026). Reduces data scanned by skipping irrelevant partitions even with transformed partition keys. (introduced in 26.3)#28800
e.g. SELECT * FROM t WHERE toYYYYMM(date_col) = 202601;
Improve performance of Decimal comparison operations — Optimizes the comparison operations for Decimal data types for faster execution. Speeds up queries that filter or sort on Decimal columns. (introduced in 25.12)#28192
Allow any deterministic expression in Primary Key for data skipping — Enables primary keys with deterministic expressions (e.g., cityHash64(user_id)) to be used for data skipping with =, IN, has, and if injective also !=, NOT IN, NOT has. Extends primary key indexing to non-trivial expressions, improving query performance for predicates on transformed values. (introduced in 26.2)#10685
e.g. SELECT * FROM t WHERE cityHash64(user_id) = 12345;
Optimize repeated inverse dictionary lookups — Speeds up repeated inverse dictionary lookups by caching possible key values in a precomputed set. Improves performance for queries that frequently perform reverse dictionary lookups. (introduced in 25.12)#7968
Improve DISTINCT performance on LowCardinality columns — Optimizes DISTINCT execution for LowCardinality columns by leveraging faster dictionary lookups. Reduces query latency when deduplicating low-cardinality data. (introduced in 26.1)#5917
Codecs / compression
Accelerate T64 codec compression with CPU dispatch on x86 — Speeds up T64 codec compression by using dynamic dispatch to leverage AVX-512, AVX2, and SSE4.2 instructions on x86. Improves compression performance for tables using the T64 codec, especially on modern CPUs. (introduced in 26.2)#95881
Other small SQL
Avoid full scan for system.tables with uuid filter — Optimizes queries on system.tables by prefiltering using the extracted uuid column, avoiding a full table scan when filtering by uuid. Speeds up system.tables lookups by uuid (common when using UUIDs from logs or ZooKeeper paths). (introduced in 25.10)#88379
e.g. SELECT * FROM system.tables WHERE uuid = 'abcd-ef12-3456-7890'
JSON data type
Optimize JSON type parsing with direct serialization — Improved JSON type parsing performance by directly serializing values into shared data buffers, avoiding temporary column allocations and adding safety checks. Faster parsing of JSON columns reduces query latency for workloads with large JSON data. (introduced in 26.2)#93614
Optimize distinctJSONPaths to skip reading full JSON column — Optimizes the distinctJSONPaths aggregate function to only read JSON paths from data parts instead of the entire JSON column. Improves performance for queries that need distinct JSON paths, especially on large datasets. (introduced in 26.1)#92196
ObjectStore - S3/Azure/GCS
Reduce S3 listing by pushing down _path filter values for glob tables — Improves query performance for S3 tables created with glob patterns by extracting _path values from query filters and using them to directly iterate over matching files instead of performing listing operations. Controlled by the new setting s3_path_filter_limit. Significantly reduces S3 listing costs and improves query speed when querying a subset of files matching a glob pattern. (settings s3_path_filter_limit) (introduced in 25.12)#91165
e.g. SELECT * FROM s3('http://bucket/*.parquet') WHERE _path LIKE '%important%' SETTINGS s3_path_filter_limit = 100;
Add checksum-based key prefixes for S3 backup sharding — Introduces data_file_name_generator and data_file_name_prefix_length BACKUP settings to name backup files using content hash prefixes, improving S3 key distribution. Reduces risk of S3 request throttling for large backups by spreading load across partitions. (settings data_file_name_generator, data_file_name_prefix_length) (introduced in 25.11)#88418
e.g. BACKUP TABLE my_table TO S3('bucket/path') SETTINGS data_file_name_generator='checksum', data_file_name_prefix_length=3
Allow WHERE clause in distributed INSERT SELECT from s3cluster — Restores the ability to use WHERE clauses in INSERT SELECT FROM s3cluster() queries for parallel distributed execution, which was previously restricted. Enables more efficient filtered data ingestion from S3 clusters with better parallelism. (introduced in 25.10, 25.11)#92310#92312
e.g. INSERT INTO table SELECT * FROM s3cluster(default, 'http://...', 'key', 'secret') WHERE size > 100
Datalakes & catalogs
⭐ Optimize read-in-order for Iceberg tables — Enables reading data in the declared sort order of Iceberg tables, reducing unnecessary sorting overhead. Improves query performance for Iceberg tables, especially when queries can benefit from sorted data. (introduced in 25.10)#88454
e.g. CREATE TABLE hits ( ... ) ENGINE = IcebergS3(...) ORDER BY (CounterID, EventTime DESC)
Iceberg gains async metadata cache prefetch and staleness settings — Adds iceberg_metadata_async_prefetch_period_ms for background metadata refresh and iceberg_metadata_staleness_ms to serve old metadata without contacting the catalog. Reduces query latency by minimizing catalog calls and allowing cached metadata reuse within a staleness window. (settings iceberg_metadata_async_prefetch_period_ms, iceberg_metadata_staleness_ms) (introduced in 26.3)#96191
e.g. CREATE TABLE X (...) ENGINE = Iceberg(...) SETTINGS iceberg_metadata_async_prefetch_period_ms = 60000; SELECT ... SETTINGS iceberg_metadata_staleness_ms = 600000;
Partition pruning for Paimon table functions — Adds partition pruning for Paimon table functions, controlled by experimental setting use_paimon_partition_pruning, skipping irrelevant partitions during data file iteration. Significantly improves query performance on Paimon tables by reducing I/O when filtering on partition columns. (settings use_paimon_partition_pruning) (introduced in 25.12)#90253
e.g. SELECT * FROM paimonTable WHERE partitionDate = '2023-01-01'
Optimize pipeline resizing for data lake queries — Fixes reading from object storage for data lakes to resize the query pipeline to the number of processing threads, improving parallelism. Significantly improves query performance on data lakes by utilizing all available threads. (introduced in 26.3)#99548
Improve performance of icebergCluster — Optimizes icebergCluster queries by making ManifestFileEntry non-copyable and using shared_ptr, reducing overhead and yielding up to 5x performance improvement. Iceberg catalog queries are significantly faster, reducing latency for users querying Iceberg tables. (introduced in 26.1)#91462
Integrations
Enable parallel reads from YTsaurus table engine — Enables parallel reads from the YTsaurus table engine by splitting static table reads into multiple row-range streams, and adds optional transaction and lock support for consistent snapshots. Significantly improves query performance on YTsaurus tables by utilizing multiple threads for parallel reads. (settings use_lock, transaction_timeout_ms, min_rows_for_spawn_stream, max_streams) (introduced in 26.3)#97343
S3Queue
S3Queue ordered mode uses StartAfter to skip already-processed keys — In ordered mode, S3Queue now resumes listing from a persisted checkpoint using StartAfter, reducing the number of ListObjectsV2 calls. Reduces S3 API costs and improves performance for S3Queue in ordered mode. (introduced in 26.3)#96370
Formats
Enable Parquet reader v3 by default — Switches the default Parquet reader to version 3, improving read performance and adding CRC checksum verification for data integrity. Users may see faster Parquet imports and better detection of data corruption. (introduced in 25.11)#88827
Analyzer
Optimizer: Push filter steps over BuildRuntimeFilterStep — Improves the query optimizer to push newly added runtime filter steps over existing BuildRuntimeFilterStep-s when multiple joins and multiple runtime filters are present. Speeds up complex queries with multiple joins by enabling more efficient runtime filter propagation. (introduced in 25.11)#89725
Optimize ConstantNode for large arrays in analyzer — Caches the AST for ConstantNode to avoid unnecessary string building for large constant arrays, fixing a 100x slowdown. Eliminates severe performance regression for queries with large constant arrays in scalar subqueries. (introduced in 25.11)#72880
Parallel replicas
Push down filter into views with parallel replicas — Allows the query optimizer to push down an outer filter into a view, enabling the use of PREWHERE on both local and remote nodes when parallel replicas are enabled. Reduces data transfer and improves query performance for SELECTs on views with parallel replica execution. (introduced in 25.12)#95532
Keeper
Reduce Keeper memory with CompactChildrenSet — Replaces absl::flat_hash_set with CompactChildrenSet for storing node children, storing 0-1 children inline without heap allocation, reducing KeeperMemNode size from 144 to 128 bytes. Lowers memory usage in Keeper, beneficial for deployments with many nodes. (introduced in 26.3)#99860
Optimize aggregated ZooKeeper log with CityHash64 and lock-free error counter — Optimizes the aggregated ZooKeeper log by replacing SipHash with CityHash64 for hashing and replacing a mutex-guarded unordered_map with a lock-free atomic array for error counting, reducing CPU consumption of ZooKeeper::observeOperations from >20% to ~5.7%. Reduces CPU overhead on ZooKeeper receive thread, improving overall system performance in ZooKeeper-heavy deployments. (introduced in 26.2)#95962
Fix column rollback in Buffer engine to prevent in-memory corruption on insertion failuredata-loss — Fixes column rollback in Buffer engine when an exception occurs during appending a new block, preventing corrupted in-memory state by restoring columns to their pre-transaction state. Ensures data integrity when using the Buffer engine, preventing silent corruption on insertion errors. (introduced in 25.12, 26.1, 26.2)#98647#98649#98651
Fix column corruption rollback in Buffer engine on insertion failuredata-loss — Fixes rollback logic in StorageBuffer::appendBlock to use column checkpoints, preventing in‑memory column corruption when an exception occurs during block insertion. Ensures data integrity and avoids inconsistent state in Buffer engine tables after partial insert failures. (introduced in 26.3)#98551
Fix Keeper data loss on restart with Azure s3_plain log storagedata-loss — Fixes a bug in path handling when Keeper uses Azure Blob Storage with s3_plain metadata, preventing data loss on restart by replacing std::filesystem::path operations with string concatenation (backport to 26.1). Prevents critical data loss for Keeper deployments using Azure Blob Storage with s3_plain metadata. (introduced in 25.12, 26.1, 26.2)#98172#98174#98176
Fix Keeper data loss on restart with Azure s3_plain log diskdata-loss — Fix a bug in ContainerClientWrapper where absolute path replacement caused Keeper log files to become invisible after restart when using Azure Blob Storage with s3_plain metadata for log storage, leading to data loss. Operators using Keeper with Azure Blob Storage for log storage risk silent data loss on restart; this fix ensures all log files are visible and Keeper recovers correctly. (introduced in 26.3)#97987
Fix mutation corruption with exists() and mutations_execute_subqueries_on_initiatordata-loss — Fixes a bug where the exists() function in ALTER TABLE UPDATE mutations caused mutation corruption when the setting mutations_execute_subqueries_on_initiator = 1 was enabled, potentially crashing the server or making the table unloadable. Prevents data corruption and crashes during UPDATE mutations involving scalar subqueries with exists(). (introduced in 26.2)#97347
Fix data loss race in sharded HASHED dictionary parallel loadingdata-loss — Fixes a TOCTOU race condition in the sharded HASHED dictionary parallel loader that could cause worker threads to exit early, leaving some rows unloaded. Prevents missing rows in dictionaries, ensuring all data is loaded correctly and avoiding silent data loss. (introduced in 26.2)#96953
Fix JSON SKIP path prefix matching causing data lossdata-loss — Fixes a bug where JSON(SKIP path) incorrectly skipped all keys whose prefix matched the skip path (e.g., skipping ‘path’ also skipped ‘pathpath’), causing data loss. Now only exact path prefix with dot separator is skipped. Prevents unintended data loss when using JSON SKIP path feature. (introduced in 25.11, 25.12, 26.1, 26.2)#95948#96211#96213#96215
e.g. CREATE TABLE t (j JSON(SKIP path)) ... -- now only key 'path' is skipped, not 'pathpath'
Fix data corruption in concurrent async inserts with same parameter namesdata-loss — Resets template state when query parameters change to prevent cross-contamination of values from concurrent async inserts using identical parameter names. Prevents silent data corruption in async insert workloads with parameterized queries. (introduced in 26.2)#96035
Improve rollback reliability in plain-rewritable unlink metadata operationsdata-loss — Fixes the rollback logic in plain-rewritable unlink metadata operations so that the source blob is restored even if the removal fails, preventing data loss or inconsistency. Ensures consistency and prevents data loss in object storage metadata operations. (introduced in 26.1, 26.2)#95302#95419
Fix data loss race in ReplicatedMergeTree DROP PARTITION with concurrent INSERTdata-loss — Fix a race condition where DROP PARTITION could remove parts created by later log entries due to non-atomic block number allocation; corrects a timeout bug and throws an exception if a ZooKeeper path does not disappear in time. Prevents data loss when concurrent INSERT and DROP PARTITION operations occur, ensuring data integrity. (introduced in 25.10, 25.11, 25.12)#94635#94636#94637
Fix FILE_DOESNT_EXIST after sparse column mutation with ratio changedata-loss — Fixes an error where UPDATE mutations on sparse columns fail with FILE_DOESNT_EXIST if the sparse serialization ratio was altered to 1.0, due to leftover files not being cleaned up. Prevents data loss and failed mutations when changing sparse column storage parameters. (introduced in 25.10, 25.11, 25.12)#93180#93182#93184
Fix FILE_DOESNT_EXIST error after sparse column mutation with altered serialization ratiodata-loss — Fixes an error where UPDATE mutations did not clean up old sparse serialization files when the column storage format changed, causing FILE_DOESNT_EXIST. Prevents data errors when altering sparse column serialization settings. (introduced in 26.1)#93016
e.g. ALTER TABLE my_table MODIFY SETTING ratio_of_defaults_for_sparse_serialization = 1.0; -- after mutation, no longer crashes.
Avoid caching partition key with non-deterministic functions in S3 enginedata-loss — Prevents the S3 table engine from caching partition keys computed from non-deterministic functions, ensuring each insert computes a fresh partition value. Eliminates data corruption where multiple inserts would incorrectly use the same partition key for non-deterministic expressions. (introduced in 26.1)#92844
Fix serialization inconsistency in Tuple columns with sparse and nullable substreamsdata-loss — Resolves a serialization inconsistency between sparse and nullable substreams in Tuple columns that could lead to corrupted parts or crashes during reading. Improves data integrity and stability when using Tuple columns with sparse or nullable subcolumns. (introduced in 25.12)#91932
Fix data corruption when merging JSON columns in Summing/Aggregating/Coalescing MergeTreedata-loss — Fixes merging of JSON columns in Summing, Aggregating, and Coalescing MergeTree engines. Previously, merges could produce unexpected dynamic paths during writing to data parts, leading to potential data corruption. Prevents possible data loss or query errors when using JSON columns in these specialized MergeTree engines. (introduced in 25.10, 25.11, 25.12, 25.9)#91151#91265#91267#91269
Fix Buffer engine background flush never triggers with frequent INSERTsdata-loss — Ensures the background flush of Buffer table engine is immediately scheduled when the flush time has already elapsed, preventing unbounded row accumulation during frequent INSERTs. Prevents data loss and unbounded memory growth in Buffer tables, ensuring rows are flushed to the destination table as expected. (introduced in 25.10, 25.11, 25.9)#90933#90935#90937
Fix Buffer engine background flush not triggering with frequent INSERTsdata-loss — Fixes a bug where the Buffer table engine’s background flush would never schedule when inserts were frequent, causing data to remain buffered indefinitely. Prevents unbounded memory growth and potential data loss in Buffer tables. (introduced in 25.12)#90892
Fix data loss when merge task is canceleddata-loss — Immediately removes the partially created resulting part when a merge or mutate task is canceled, preventing the disk transaction revert that could wrongly delete data from S3. Avoids potential data loss due to canceled merge tasks. (introduced in 25.10)#90215
Fix move operation for plain-rewritable disks with nested directoriesdata-loss — Fixes the move operation on plain-rewritable disks to correctly handle directories of arbitrary depth, preventing data inconsistency. Ensures data integrity when moving folders on plain-rewritable disks. (introduced in 25.10)#88586
Fix data corruption in MergeTree tables with column TTL and sparse serializationdata-loss — Fixes a data corruption bug in MergeTree tables with column TTL when sparse serialization is used. The fix clears serialization caches and removes a problematic setColumns call that caused incorrect handling of serialization info during TTL-based column removal. Prevents potential data loss or silent corruption in tables using column TTL, ensuring data integrity. (introduced in 25.10)#88095
Hash MergeTree file names on case-insensitive filesystems to avoid corruptiondata-loss — Always hashes MergeTree file names on case-insensitive filesystems to prevent collisions when column/subcolumn names differ only in case. Prevents data corruption on case-insensitive filesystems (e.g., MacOS) and ensures safe upgrades. (introduced in 26.1)#86559
Fix Materialized View failure after drop and recreate with same namedata-loss — Fixes a bug where a Materialized View could stop working after being dropped and recreated with the same name due to double dependency removal. Ensures Materialized Views remain functional after typical DDL operations. (introduced in 25.9)#86413
Fix logs_to_keep=0 causing perpetual replica loss in DatabaseReplicateddata-loss — Changes logs_to_keep setting type from UInt32 to NonZeroUInt64 to reject zero, preventing a bug where setting logs_to_keep=0 would cause a replica to be permanently lost. Prevents data loss and administrative overhead from misconfiguration. (introduced in 25.9)#86142
Fix optimize_skip_unused_shards with new analyzer for distributed tables in IN subqueriessilent-wrong-result — Fixes shard pruning for Distributed tables used inside IN subqueries when the new analyzer is active, ensuring optimize_skip_unused_shards works correctly. Prevents incorrect UNABLE_TO_SKIP_UNUSED_SHARDS errors and allows proper shard skipping in complex distributed queries. (introduced in 26.3)#99436
Fix comparison between Time[64] and DateTime[64] typessilent-wrong-result — Promotes Time[64] values to DateTime[64] by adding the date part 1970-01-01 when comparing with DateTime[64] types, aligning with existing Date/DateTime comparison behavior. Ensures correct and intuitive comparison results between time and datetime types. (introduced in 26.3)#99267
Fix incorrect ANY LEFT JOIN to SEMI JOIN conversionsilent-wrong-result — Prevents the query plan optimizer from incorrectly converting an ANY LEFT JOIN with an IN subquery into a SEMI JOIN when the subquery set is not yet built, which could return missing rows. Ensures correct query results for joins involving subqueries, fixing a silent wrong-result bug. (introduced in 25.12)#99214
Fix insert_deduplication_token ignored for INSERT SELECT without ORDER BY ALLsilent-wrong-result — Makes insert_deduplication_token sufficient to enable deduplication for INSERT SELECT queries even without ORDER BY ALL, preventing duplicate rows when a token is provided. Ensures that explicitly set deduplication tokens are respected, avoiding data duplication in unsorted INSERT SELECT operations. (introduced in 26.3)#99206
e.g. SET insert_deduplication_token = 'my_token'; INSERT INTO target SELECT * FROM source;
Fix incorrect ANY LEFT JOIN to SEMI JOIN conversion with unbuilt IN subquery setsilent-wrong-result — Fixes an optimizer bug that incorrectly converted ANY LEFT JOIN to SEMI JOIN when the IN subquery set was not yet built, causing missing rows in results. Prevents incorrect query results for queries using ANY LEFT JOIN with IN subqueries. (introduced in 26.3)#99112
Fix error when reading Delta Lake structs with dotted field namessilent-wrong-result — Fixes a bug where reading Delta Lake tables using column mapping ’name’ mode with struct fields containing dots in their names caused DUPLICATE_COLUMN exceptions or silent NULLs. Ensures correct data retrieval from Delta Lake tables with complex struct field names. (introduced in 26.2)#99072
Fix windowFunnel strict_deduplication returning incorrect levelsilent-wrong-result — Fixes a bug where windowFunnel with strict_deduplication returned the previous event’s index instead of the actual maximum matched level when encountering duplicate events. Ensures correct funnel analysis results in strict_deduplication mode. (introduced in 26.3)#99003
Fix wrong results in LEFT ANTI JOIN with multiple join keys and runtime filterssilent-wrong-result — Uses tuple-based NOT IN filter instead of per-column AND-combined filters for LEFT ANTI JOIN with runtime filters, and adds NULL bypass to avoid filtering out NULL keys. Ensures correct results for LEFT ANTI JOIN with multiple join key columns when enable_join_runtime_filters=1 (default). (introduced in 26.3)#98871
Fix set skipping-index detection with OR false constantsilent-wrong-result — Fixes a bug where a set skipping-index was incorrectly considered usable when an OR condition included a constant false, leading to missed optimizations. Ensures that set skip indexes are only applied when they can actually filter rows, improving query performance and correctness. (introduced in 25.12, 26.1, 26.2)#98834#98836#98838
Fix sumCount aggregate function compatibility with older serialized statessilent-wrong-result — Fixes sumCount aggregate function to correctly read older serialized states that were written before the introduction of Nullable(Tuple). Prevents errors or incorrect results when upgrading and querying tables with pre-existing sumCount aggregate states. (introduced in 26.1, 26.2)#98818#98820
Fix set skipping-index detection for OR with constant falsesilent-wrong-result — Correctly ignores constant false children in OR predicates when evaluating set skip index applicability. Prevents incorrect index selection that could lead to wrong results or performance degradation. (introduced in 26.3)#98776
Fix zombie data resurrection after TRUNCATE/DETACH/ATTACHsilent-wrong-result — Fixes a race condition where outdated data parts could be resurrected after cleaning up empty covering parts. Prevents data inconsistency and potential return of stale data after TRUNCATE and DETACH/ATTACH operations. (introduced in 26.3)#98698
Fix filter push-down corrupting output with non-boolean WHERE expressionssilent-wrong-result — Fixes filter push-down optimization that caused BAD_GET and wrong results when non-boolean expressions appear in both WHERE and SELECT with a JOIN. Prevents silent wrong results and crashes in JOIN queries with complex expressions. (introduced in 26.3)#98681
Fix hasPartitionId returning true for non-existent partition IDssilent-wrong-result — Fixed a bug where hasPartitionId incorrectly returned true for partition IDs that did not exist but had a higher partition ID in the data part set. Prevents incorrect partition existence checks, which could lead to wrong query results or data operations. (introduced in 25.12, 26.1)#98565#98567
Fix wrong results when distributed index analysis and query condition cache are both enabledsilent-wrong-result — Fixed incorrect query results that occurred when using both distributed index analysis (experimental) and query condition cache, due to unsorted part ranges. Ensures correctness for users who enable both experimental features. (introduced in 26.2)#98563
Fix null-safe comparison with const Dynamic/Variant columns and NULLsilent-wrong-result — Fixes a Bad cast from type ColumnConst to ColumnDynamic exception in <=> / IS NOT DISTINCT FROM and incorrect 0 results in IS DISTINCT FROM when comparing const Dynamic or Variant columns with NULL. Corrects query results and eliminates crashes for null-safe comparisons involving Dynamic/Variant types. (introduced in 26.3)#98553
Fix incorrect partition pruning with Nullable partition keyssilent-wrong-result — Fixes min-max index merging for Nullable partition key columns by using accurate comparison instead of std::min/max, which inverted bounds and caused incorrect partition pruning. Prevents silently missing rows in query results when tables use Nullable partition keys, ensuring data correctness. (introduced in 26.3)#98405
Fix incorrect FINAL query results with mixed primary key and non-primary key skip indexessilent-wrong-result — Fix incorrect results of FINAL queries on ReplacingMergeTree when both primary key and non-primary key skip indexes are used; ensure deletion recovery is correctly handled. Prevents silent data loss or missing rows in FINAL queries with mixed skip indexes. (introduced in 26.1, 26.2)#98308#98310
Fix wrong results with distributed index analysis and query condition cachesilent-wrong-result — Fixes wrong results when using both distributed index analysis (experimental) and query condition cache, caused by unsorted part ranges. Ensures correct query results when both features are enabled. (introduced in 26.3)#98269
Fix incorrect FINAL results with mixed primary key and skip indexessilent-wrong-result — Fixes incorrect results in FINAL queries on ReplacingMergeTree when using both primary key and non-primary key minmax skip indexes, where the skip index could incorrectly disable deletion recovery. Ensures correct deduplication results when using skip indexes on non-primary key columns. (introduced in 25.12, 26.3)#98097#98201
Fix text index inconsistency for has/mapContains functionssilent-wrong-result — Fixes a bug where the has, mapContainsKey, and mapContainsValue functions could return different results when a text index was used versus without it, by correcting the index analysis logic. Prevents silent wrong results in text index queries, ensuring consistent behavior regardless of index usage. (introduced in 25.12)#98113
e.g. SELECT has(col, 'value') FROM table_with_text_index;
Remove incorrect replaceRegexpOne to extract rewritesilent-wrong-result — Removes the incorrect query rewrite that replaced replaceRegexpOne with extract, which produced wrong results when the regex didn’t match. Also fixes a LOGICAL_ERROR when used with GROUP BY … WITH CUBE and group_by_use_nulls=1. Ensures correct results for replaceRegexpOne queries and prevents crashes with CUBE. (introduced in 26.2)#98037
Remove incorrect replaceRegexpOne to extract rewrite causing wrong resultssilent-wrong-result — Removes an incorrect query rewrite that replaced replaceRegexpOne with extract, which produced wrong results when the regex didn’t match; also fixes a LOGICAL_ERROR when replaceRegexpOne is used with GROUP BY … WITH CUBE and group_by_use_nulls=1. Prevents silent wrong results and crashes in queries using replaceRegexpOne. (introduced in 25.12, 26.1, 26.3)#97546#98033#98035
Fix DUPLICATE_COLUMN and NULLs for Delta Lake struct fields with dotssilent-wrong-result — Fix a bug where Delta Lake struct fields containing dots in their names caused DUPLICATE_COLUMN errors or silent NULLs when using column mapping ’name’ mode, by replacing faulty dot-splitting logic with correct prefix stripping. Ensures correct reading of Delta Lake tables with complex struct field names that contain dots, preventing silent data corruption. (introduced in 26.3)#98013
Fix parseDateTimeBestEffort parsing words starting with month/weekday prefixessilent-wrong-result — Corrects the parsing of strings that begin with month or weekday names (e.g., ‘Married’) to avoid erroneously interpreting them as dates. Prevents incorrect DateTime conversions of non-date strings. (introduced in 26.3)#97965
Fix partition pruning with row policy/PREWHERE and FINALsilent-wrong-result — Prevents indexes from incorrectly pruning data when querying with FINAL combined with row policy or PREWHERE, ensuring correct deduplication. Fixes a silent wrong-result issue that could return incomplete data. (introduced in 25.12)#97964
Fix incorrect results in GraceHashJoin with non-equi joinssilent-wrong-result — Fixes a bug where leftover unprocessed blocks due to size constraints caused wrong join results when using the grace_hash algorithm with non-equi joins. Ensures correct query results for complex joins using the grace_hash algorithm. (introduced in 25.12, 26.1, 26.2)#97915#97917#97919
Fix incorrect results in grace_hash join with non-equi conditions and size limitssilent-wrong-result — Corrects a bug in the GraceHashJoin algorithm where left blocks could be partially processed due to max_joined_block_size_rows constraints, leading to wrong results in non-equi joins. Ensures correct join results when using the grace_hash algorithm with non-equi conditions and result size limits. (introduced in 26.3)#97866
Fix unexpected results with read_in_order_use_virtual_row and monotonic functionssilent-wrong-result — Fixes incorrect query results when the read_in_order_use_virtual_row setting is enabled and monotonic functions are used in ORDER BY or other contexts. Ensures correct query results in scenarios involving virtual row ordering with monotonic functions. (introduced in 26.3)#97837
Fix silent data corruption in INSERT SELECT with UNION ALL and JOINsilent-wrong-result — Fixes a regression where INSERT SELECT with UNION ALL and JOIN could produce incorrect string values in MergeTree tables due to ColumnConst not being materialized before squashing. Prevents silent data corruption that could occur in complex INSERT SELECT queries. (introduced in 25.12, 26.1, 26.2)#97019#97763#97765
Fix hasPartitionId returning false positive for non-existent partition IDssilent-wrong-result — Fixes hasPartitionId to return false when a partition with the requested ID does not exist, even if a higher partition ID exists in the data part set. Prevents incorrect detection of partition existence, which could affect queries and optimizations depending on partition info. (introduced in 26.3)#97748
Fix incorrect partition pruning for pre-epoch DateTime64 and Date32silent-wrong-result — Fixes incorrect partition pruning when using toDate() with pre-epoch DateTime64 values, which could cause missing rows due to overflow. Ensures correct query results for partitions containing dates before epoch, preventing silent data loss. (introduced in 26.3)#97746
Fix incorrect ROLLUP/CUBE results with nested nullable LowCardinalitysilent-wrong-result — Fixed a logical error when using GROUP BY ... WITH ROLLUP/CUBE with keys that include LowCardinality(Nullable(...)) inside Nullable(Tuple(...)). The error caused key deserialization corruption due to incorrect serialized size calculation. Ensures correct aggregation results for complex key types in ROLLUP and CUBE queries. (introduced in 26.1)#97689
Fix incorrect ROLLUP/CUBE results on LowCardinality nullable columns in Nullable(Tuple)silent-wrong-result — Adds proper serialized value size calculation for ColumnLowCardinality when containing Nullable dictionaries, preventing key deserialization corruption during GROUP BY with ROLLUP or CUBE. Prevents silent wrong results in aggregation queries on columns of type LowCardinality(Nullable(…)) inside Nullable(Tuple(…)). (introduced in 26.2)#97647
e.g. SELECT k, count() FROM t GROUP BY k WITH ROLLUP
Fix index interaction with row policy/PREWHERE and FINALsilent-wrong-result — Fixed a bug where partition pruning and skip indexes could incorrectly prune data needed by FINAL for correct deduplication when row policies or PREWHERE are used. Prevents incorrect query results when using FINAL with row policies or PREWHERE. (introduced in 26.1)#97409
Fix sumCount aggregate function reading older serialized statessilent-wrong-result — Fixed sumCount aggregate function to correctly read and finalize serialized states that were created prior to the introduction of Nullable(Tuple) format. Prevents incorrect NULL results when reading older sumCount states after upgrading. (introduced in 26.3)#97370
Fix min(timestamp) returning epoch after TTL merge when all rows filteredsilent-wrong-result — Prevents the minmax index from returning incorrect epoch values when a TTL merge produces an empty block, causing min(timestamp) to return 1970-01-01. Ensures correct results from min aggregate on timestamp columns after TTL merges. (introduced in 25.12, 26.1)#97206#97208
…and 746 more fixes in this range (see the changelog).
ALTER TABLE UPDATE freezes transitive MATERIALIZED columns at INSERT-time value (regression from #99281) — Description PR #99281 introduced && affected_materialized.contains(column.name) at line 863 of MutationsInterpreter.cpp to avoid recalculating MATERIALIZED columns that depend on EPHEMERAL columns (which cannot be read from disk during mutations). However, this guard also silently skips transitively-dependent MATERIALIZED columns, freezing them at their INSERT-time value permanently. (state: open)#100613
Performance regression with multiIf() + ARRAY JOIN in new analyzer (25.8) — Company or project name No response ### Describe the situation ## Description After upgrading from ClickHouse 23.4 to 25.8, queries using complex multiIf() expressions in GROUP BY combined with ARRAY JOIN became 3x slower (from 3 seconds to 9 seconds in production). The issue is caused by the new experimental analyzer (allow_experimental_analyzer=1, which is enabled by defau (state: open)#91430
s3Cluster table function: Performance regression after upgrading from 23.8 to 25.10 — Company or project name No response ### Describe the situation The s3Cluster table function query execution time increased from over 700s to 1300s. ### Which ClickHouse versions are affected? 25.10 ### How to reproduce ~200k Parquet files on object storage (total size around 3TB) are queried using the s3Cluster table function. The cluster consists of 4 nodes, each with 8 CPUs. The que (state: open)#90722
s3() tar archive reader silently drops column data with schema_inference_mode=union on heterogeneous parquet schemas (26.3 regression) — Company or project name Nominal (https://nominal.io) ### Describe the unexpected behaviour When reading multiple parquet files with different schemas from a tar archive via s3() with schema_inference_mode=union, columns that only exist in some files are silently returned as all null — even for files that do contain that column. For example, test_1.parquet has columns (timestamp, a)(state: closed)#101543
Bugfix
Vertical merge of Nested arrays corrupts data — Vertical merge of nested arrays causes silent data corruption in ReplacingMergeTree. Data can be lost or replaced with data from another order key. Horizontal merge works correctly. (state: open)#86123
Can’t roll back to v25.3 after upgrading to v25.8 — Upgrading to v25.8 and then downgrading to v25.3 fails due to a backward incompatible change in the default value of write_marks_for_substreams_in_compact_parts for MergeTree tables. Users cannot roll back without manually setting the compatibility setting. (state: abandoned)#86837
Cherry pick #100537 to 26.1: Fix heap-buffer-overflow in usearch — A heap-buffer-overflow in usearch when using an extremely large LIMIT with vector similarity search was fixed in master (#100537), but the cherry-pick to the 26.1 release branch was abandoned. Users on 26.1 remain vulnerable until the fix is manually backported or they upgrade to a newer version. (state: abandoned)#101686
Different stored/displayed DateTime for same INSERT between 26.2.3 and 26.2.4 with session_timezone — The same INSERT into a DateTime column with session_timezone set produces different stored values in 26.2.4 compared to 26.2.3, due to the default change of async_insert to 1. Setting async_insert=0 restores the old behavior. The issue was reported but not fixed. (state: abandoned)#100614
forward compatibility 26.3 -> 26.2 JSON / propagate_types_serialization_versions_to_nested_types — A JSON serialization change in ClickHouse 26.3 (propagate_types_serialization_versions_to_nested_types) makes parts unreadable by 26.2, causing complete data loss on downgrade. The issue was reported as unexpected but acknowledged as an intended break in forward compatibility. (state: abandoned)#101429
CREATE OR REPLACE statement replaces {table} macro in zk path with a random string — CREATE OR REPLACE on replicated tables corrupts the {table} macro in ZooKeeper path, causing silent data replication inconsistencies across nodes. (state: open)#55611
ANY JOIN returns wrong result with WHERE clause — ANY JOIN returns inconsistent results when a WHERE clause filters on a column from the right table; the projection optimization creates an extra column leading to an incorrect count. (state: open)#79189
DateTime64 with timezone is incorrectly constant-folded in PREWHERE by analyzer — The new analyzer incorrectly constant-folds DateTime64 comparisons in PREWHERE when querying a Distributed table, leading to wrong results around DST transitions. (state: open)#92208
parallel_distributed_insert_select default value of 2 is a silent source of errors — An issue reports that the default value of 2 for parallel_distributed_insert_select in 25.7+ causes silent data distribution errors when the sharding keys of source and target distributed tables differ. It is suggested to either revert to default 1 or implement a fallback to 1 when sharding keys differ. The issue remains open. (state: open)#100788
boost::program_options::split_unix throws on backslash escapes that boost::split handled as literals — The executable table function’s argument parsing was changed to support shell-style quotes, but the new parsing using boost::program_options::split_unix rejects unrecognized backslash escapes, causing previously valid queries with literal backslashes to fail with STD_EXCEPTION. (state: open)#101565
WITH FILL … INTERPOLATE is lost inside subquery/CTE when analyzer is enabled — When ORDER BY … WITH FILL … INTERPOLATE is used inside a subquery or CTE with the new analyzer enabled, the filled rows disappear. The issue is that the analyzer loses the INTERPOLATE clause when it is applied without explicitly naming columns. (state: open)#86151
Fix compatibility of some aggregate function states with String argument — A bug where aggregate function states containing strings changed serialization format in 25.8, breaking cross-version compatibility. A PR attempted to fix by adding a trailing zero byte for compatibility, but was abandoned in favor of a different approach. (state: abandoned)#86969
Part larger than max_bytes_to_merge_at_max_space_in_pool can not be deleted by ttl — Parts larger than max_bytes_to_merge_at_max_space_in_pool (default 150GB) cannot be deleted by background TTL merges, causing TTL to stall for those large parts. The issue is confirmed on recent versions from 24.8 onward, but no fix has been merged. (state: abandoned)#80681
[CI crash] HashJoin transform failed during block structure check — A crash (LOGICAL_ERROR) in HashJoin::addBlockToJoin occurs when query plan optimizations (outer-to-inner join conversion with join_use_nulls, filter push-down) change the right pipeline header after HashJoin creation. A fix was proposed but not merged due to concerns about the approach. (state: abandoned)#85459
‘SELECT EXISTS’ query incorrectly produces 0 on ClickHouse 25.8.1 — SELECT EXISTS query incorrectly returns 0 on ClickHouse 25.8 due to a regression in subquery execution. The workaround is to disable the analyzer. No fix has been merged yet. (state: abandoned)#86415
ClickHouse 25.8.1.5101 Keeper exception — Issue reports that in ClickHouse 25.8.1.5101, all cluster nodes try to acquire the same ephemeral Keeper node for DDL task queues, causing LOGICAL_ERROR and timeouts. The problem may be due to improper handling of loopback host identifiers, but no fix PR is attached to this issue. (state: abandoned)#86434
approx_top_sum state format changed between 25.7 and 25.8 - null bytes appear in finalized strings — The aggregate state serialization format for approx_top_sum and similar functions changed in 25.8, causing null bytes to appear when finalizing states created in 25.7. This breaks cross-version compatibility. No fix has been merged yet. (state: abandoned)#86915
Incorrect results with GROUP BY WITH ROLLUP and uniqExact under specific column values — Issue reports that uniqExact with GROUP BY WITH ROLLUP produces incorrect results (blinking between correct and incorrect) under specific column values. The bug affects versions 25.6+. No fix has been merged; the issue appears abandoned. (state: abandoned)#86931
25.8.3.66,delete/update on cluster problem — Distributed DELETE and UPDATE with lightweight updates (lightweight_delete_mode=lightweight_update) only affect the connected node, ignoring other shards. Bug introduced in 25.8.3, fixed in 25.9 via PR #87043, not backported. (state: abandoned)#87221
**Assertion (n >= (static_cast<ssize_t>(pad_left_) ? -1 : 0)) && (n <= static_cast<ssize_t>(this->size()))' after upgrade** — A backward incompatible change in PR #87300 escaped filenames for Variant subcolumns, causing assertion failures and crashes when upgrading from older versions that have JSON columns in MergeTree parts. Users must disable the escape_variant_subcolumn_filenames` setting before upgrade to avoid crashes. (state: abandoned)#91668
replaceRegexpOne returns different results depending on the value of optimize_rewrite_regexp_functions. — The replaceRegexpOne function returns empty string instead of the unchanged string when the regex pattern with ^…$ is not matched and the replacement contains backreferences, due to a bug in the optimize_rewrite_regexp_functions optimization. This regression affects versions from 25.8 onward. (state: abandoned)#93434
CH 25.12.2.54 - Incorrect query result when using skip indexes — A bug was reported in ClickHouse 25.12.2.54 where skip indexes cause incorrect query results when the WHERE clause contains OR and NOT conditions. A workaround exists (use_skip_indexes_for_disjunctions = 0) but no fix has been merged in this cluster. (state: abandoned)#94020
file() and url() table functions broken in 25.12.3.21 and 25.11.1.1 — The file() and url() table functions produce incorrect results when used with views and SELECT with multiple columns, due to a regression in Parquet native reader v3 and prewhere optimization. The issue affects versions 25.11 and 25.12, and can be worked around by disabling the native reader or prewhere optimization. (state: abandoned)#94289
Logical error: Cannot modify size limits to A in size and B in elements: not enough space freed. Current size: C/D, elements: E/F (G) (STID: 4012-44fe) — A fuzz test revealed a logical error when dynamically resizing SLRU cache limits (s3_cache), causing a crash. PR #96142 attempted to fix this but a later comment suggests the fix may not be complete. (state: abandoned)#95983
Grace hash bad result since v25.8 — Bug report that grace hash join produces incorrect results when grace_hash_join_initial_buckets is changed, introduced in v25.8. No fix PR was created, issue abandoned. (state: abandoned)#96510
MAX()/MIN() on Decimal columns with GROUP BY returns incorrect results — MAX()/MIN() on Decimal columns with GROUP BY return incorrect results since v26.1, likely due to a regression in JIT-compilation of aggregate functions introduced in PR #88770. No fix has been merged. (state: abandoned)#100740
SIGSEGV in ColumnMap::takeOrCalculateStatisticsFrom during MergingSortedAlgorithm — Server crashes with SIGSEGV during merging of Map columns due to unconditional statistics path in ColumnMap::takeOrCalculateStatisticsFrom. The issue affects versions with the Map statistics feature (introduced by #99200, backported to 26.3). No fix has been merged yet. (state: abandoned)#102390
Refreshable MV does not save local data on shards. Possible bug in documentation or CH — Refreshable Materialized View on Replicated database does not preserve data on all shards; data appears only on one shard randomly, while other shards lose data after refresh. This may be a bug in documentation or ClickHouse itself. (state: open)#88329
Logical error: Wrong file position — Running SELECT with ORDER BY and LIMIT on MergeTree tables with encrypted storage causes a logical error ‘Wrong file position’. The issue is reproducible on version 25.8 and likely 25.3, and only occurs on encrypted disks. (state: open)#89280
Protobuf input_format_protobuf_oneof_presence duplicates rows causing LOGICAL_ERROR — Protobuf input with input_format_protobuf_oneof_presence=true crashes with a LOGICAL_ERROR when reading a file that contains multiple values in a oneof field (which ClickHouse can generate). The issue is open and a related PR attempts to handle this gracefully. (state: open)#90669
Parquet regression: Invalid array of tuples — A regression in Parquet native reader v3 (introduced in 25.11) causes a false ‘Invalid array of tuples’ error when reading deeply nested parquet files containing arrays of different lengths in separate columns. The workaround is to disable the native reader v3 via a setting. No fix has been merged yet. (state: open)#91580
Correlated EXISTS subquery on same table silently returns wrong result (0 instead of correct count) — Correlated EXISTS subquery that references the same table as the outer query returns 0 instead of the correct count. The subquery is not evaluated per-row as in standard SQL, causing incorrect results without error. (state: open)#99310
createLightweightDeleteCommand does not copy mutation_version from source command — An issue reports that createLightweightDeleteCommand does not copy mutation_version, causing incorrect evaluation of perform_alter_conversions when combining lightweight deletes with ALTER MODIFY COLUMN. No fix PR has been submitted yet. (state: open)#101874
MergeMutate pool permanently wedges on addFuturePartIfNotCoveredByThem — The MergeMutate background pool permanently wedges when background_merges_mutations_concurrency_ratio > 1, causing replication progress to stall with no CPU or memory pressure. The fix/workaround is to avoid that setting and use a lower ratio with increased pool size. (state: open)#103781
Discussion
ALTER USER RENAME applies changes even after throwing ACCESS_ENTITY_ALREADY_EXISTS, causing RBAC corruption — When renaming a user to an existing name, ALTER USER RENAME throws an error but still partially applies the rename, causing RBAC corruption. This leads to duplicate usernames in system.users and subsequent operations failing. The bug was introduced in version 25.11 and is not yet fixed. (state: abandoned)#90320
Losing Data After upgrade when using Ceph volumes and no replication — User reports data loss after upgrading from 25.3 to 25.4/25.8 when using Ceph volumes without replication. Error shows massive broken parts exceeding the default limit (1 GiB), causing table load failure. Requires investigation to determine if a code change introduced stricter handling of broken parts. (state: open)#92086
Parquet native reader v3 returns incorrect results when filtering nullable string columns — Parquet native reader v3 returns incorrect results (zero rows) when filtering on nullable string columns with bloom filters enabled, compared to correct results with v2. This bug is reproducible in versions 26.2-26.4 and can lead to silent wrong query results. (state: abandoned)#102231
Please contact us at info@altinity.com if you experience any issues with the upgrade.
4.3.2 - Altinity Stable® Build for ClickHouse® 25.8
Here are the detailed release notes for version 25.8.
Release history
Version 25.8.16.10002 is the latest release. We recommend that you use this version. But read the detailed release notes and upgrade instructions for version 25.8 first. Once you’ve done that, review the details for each release for known issues and changes between the Altinity Stable Build and the upstream release.
Enable the MergeTree setting write_marks_for_substreams_in_compact_parts by default. This significantly improves performance of reading subcolumns from newly created Compact parts. Servers with versions earlier than 25.5 will not be able to read these new Compact parts. #84171. Disable this setting if you need to preserve downgrade compatibility.
NOTE: This change has been reverted in Altinity Stable 25.8.16 via #1407. Altinity Stable 25.8.16 disables this setting by default.
output_format_json_quote_64bit_integers is disabled by default. If your client code expects to see long integers quoted in ClickHouse json output - please enable it back.
metric_log now has more than 1.5K columns, which often causes high memory usage during merges (also check old tables such as metric_log_X).
Enable sending crash reports by default. This can be turned off in the server configuration file. #79838
Enable compile_expressions (JIT compiler for fragments of ordinary expressions) by default. This closes #51264, #56386, and #66486. #79907
Enable the query condition cache by default. #79080.
All allocations made by external libraries are now visible to ClickHouse’s memory tracker and properly accounted for. This may result in “increased” reported memory usage for certain queries or failures with MEMORY_LIMIT_EXCEEDED. #84082.
Reduce logging verbosity: some log levels were downgraded. #79322
Distributed INSERT SELECT is now enabled by default.
Add the condition field to the system table system.query_condition_cache. It stores the plaintext condition whose hash is used as the key in the query condition cache. #78671.
The toTime function now returns the new Time data type. The setting use_legacy_to_time can be enabled to preserve the old behavior for now.
ClickHouse, Inc. is gradually phasing out zero_copy due to architectural limitations in its implementation.
They have a better-designed internal alternative (SharedMergeTree), but it is not available in the open-source version.
At the moment, this mostly translates into removing unstable tests related to the feature from the codebase, as well as deprecating some less commonly used parts:
Remove experimental send_metadata logic related to experimental zero-copy replication. It was never actually used and nobody maintains this code. Since there were no tests for it, there is a high chance it has been broken for a long time. #82508.
The Keeper flags create_if_not_exists, check_not_exists, and remove_recursive are enabled by default. Be aware that if you enable these flags, you cannot downgrade to any version of Keeper prior to 25.7.#83488
Function geoToH3() now accepts arguments in the order (lat, lon, res). To keep the legacy order (lon, lat, res), enable geotoh3_lon_lat_input_order = true. #78852.
Removed server setting format_alter_commands_with_parentheses. Note: ALTER commands may not work correctly in mixed-version replication setups (25.4+ with replicas older than 24.2) until all replicas are upgraded. #79970.
Default expressions now require backticks around identifiers containing dots. #83162.
Heredoc (dollar-quoted) tags are now restricted to word characters only to avoid parsing ambiguity. #84846.
Table engine setting allow_dynamic_metadata_for_data_lakes is now enabled by default. #85044.
Parquet output now writes Enum values as BYTE_ARRAY with ENUM logical type by default. #84169.
JSON formats no longer quote 64-bit integers by default. #74079.
DeltaLake storage now uses the delta-kernel-rs implementation by default. #79541.
Removed legacy index types annoy and usearch. If present, they must be dropped. #79802.
Experimental index full_text was renamed to gin, then to text. #79024#80855.
Materialized views are now validated against the target table when allow_materialized_view_with_bad_select is disabled. #74481.
SummingMergeTree validation now skips aggregation for columns used in partition or sort keys. #78022.
Fixed dateTrunc behavior with negative date/datetime values. #77622.
Removed legacy MongoDB integration. Setting use_legacy_mongodb_integration is now obsolete. #77895.
Added filesystem cache setting allow_dynamic_cache_resize (default false). Older versions allowed dynamic resizing without an explicit setting. #79148.
URL reads now apply enable_url_encoding consistently across redirect chains. Default value of enable_url_encoding is now false. #79563 #80088.
Server settings backup_threads and restore_threads are now enforced to be non-zero. #80224.
bitNot() for String now returns a zero-terminated string. #80791.
extractKeyValuePairs now supports a 5th argument: unexpected_quoting_character_strategy.
countMatches now continues counting after empty matches. To keep legacy behavior, enable count_matches_stop_at_empty_match. #81676.
BACKUP queries, merges, and mutations now use both server-wide throttlers and dedicated throttlers simultaneously. #81753.
Creating tables without insertable columns is now forbidden. #81835.
Cluster functions with archives can now process archives on multiple nodes using cluster_function_process_archive_on_multiple_nodes (default true). Set it to false for compatibility when upgrading to 25.7+ from earlier versions. #82355.
SYSTEM RESTART REPLICAS now only affects databases where the user has SHOW TABLES permission. #83321.
JSON input now infers Array(Dynamic) instead of unnamed Tuple for mixed-type arrays. To keep legacy behavior, disable input_format_json_infer_array_of_dynamic_from_array_of_different_types. #80859.
S3 latency metrics were moved to histograms. #82305.
Lazy materialization is now enabled only when the analyzer is enabled. #83791.
Default concurrent_threads_scheduler changed from round_robin to fair_round_robin. #84747.
(Beta) Lightweight updates for MergeTree-family tables via patch parts, using UPDATE ... SET ... WHERE .... Lightweight deletes are implemented via lightweight updates and can be enabled with lightweight_delete_mode = 'lightweight_update' (requires enable_block_number_column, enable_block_offset_column, allow_experimental_lightweight_update). #82004#85952
Added table setting max_uncompressed_bytes_in_patches to limit total uncompressed patch-part size and avoid SELECT slowdowns / misuse. #85641
On-the-fly lightweight deletes are supported with lightweight_deletes_sync = 0 and apply_mutations_on_fly = 1. #79281
(Beta) Correlated subqueries (EXISTS, IN, scalar) are enabled by default. #85107
Approximate vector search with vector similarity indexes is now GA (see also vector_search_filter_strategy). #85888
Data Lakes & catalogs are promoted to Beta (see below).
FINAL query improvements:
Fixed cases where FINAL could be lost for Distributed tables. #78428
Settings use_skip_indexes_if_final and use_skip_indexes_if_final_exact_mode now default to true, enabling skip indexes for FINAL queries (set use_skip_indexes_if_final_exact_mode = false to keep legacy approximate behavior). #81331
Added NumericIndexedVector (bit-sliced + Roaring-compressed numeric vectors) and 20+ related functions (groupNumericIndexedVectorState, numericIndexedVector*) for building/analysis/arithmetic. Improves joins, filters, and aggregations on sparse data and can significantly reduce storage. #74193
Major areas with active development and notable improvements:
hasAll() can use tokenbf_v1 / ngrambf_v1 full-text skipping indices. #77662
Added mapContainsKey, mapContainsValue, mapContainsValueLike, mapExtractValueLike functions and bloomfilter-index support for filtering map values. #78171 (UnamedRus).
Added experimental functions searchAny and searchAll which are general purpose tools to search text indexes. #80641.
Added setting cast_string_to_date_time_mode to control DateTime parsing mode when casting from String. #80210
Allow filtering query-selected parts by the disk they reside on. #80650
filterPartsByQueryConditionCache now respects merge_tree_min_{rows,bytes}_for_seek to align with other index-based filtering methods. #80312
Secondary index performance improvements:
Speed up secondary indexes by evaluating expressions on multiple granules at once. #64109
Process indexes in increasing order of size (prioritizing minmax and vector indexes, then smaller indexes). #84094
Process higher-granularity min-max indexes first. #83798
Added MergeTree virtual columns:
_part_granule_offset: zero-based granule/mark index of each row within its part. #82341
_part_starting_offset: cumulative row count of all preceding parts, computed at query time and preserved through execution (even after pruning). #79417
Projections: allow using _part_offset in normal projections (first step towards projection indexes). #78429
Added setting max_merge_delayed_streams_for_parallel_write to control how many columns merges can flush in parallel (analogous to max_insert_delayed_streams_for_parallel_write). Helps reduce memory usage for vertical merges (notably for wide tables such as system.metric_log dumped to S3).
Added query plan optimization for lazy column materialization (read columns only after ORDER BY/LIMIT), controlled by query_plan_optimize_lazy_materialization. #55518
Filtering by multiple projections.
JOIN optimizations:
Merge equality conditions from filter step into JOIN condition to use them as hash keys. #78877
Added parallel_hash_join_threshold to fall back to hash algorithm when the right table is small. #76185
Added min_joined_block_size_rows (default 65409) to squash small JOIN blocks (when supported by algorithm). #81886
Added query-plan optimizations: merge WHERE into ON when possible (query_plan_merge_filter_into_join_condition), and shard joins by PK ranges for similarly ordered large tables (query_plan_join_shard_by_pk_ranges=1).
Low-level hash JOIN optimizations.
User-defined functions: UDFs can be marked as deterministic in XML; query cache now checks UDF determinism and caches results when applicable. #77769
Bloom filter index optimizations.
Distributed query optimizations:
Added enable_parallel_blocks_marshalling to offload (de)compression and (de)serialization of network blocks into pipeline threads, improving performance of large distributed queries. #78694
Added enable_producing_buckets_out_of_order_in_aggregation (enabled by default) to send aggregation buckets out-of-order during memory-efficient aggregation, improving performance when some buckets merge slower (may slightly increase memory usage). #80179
Compressed logs and profile events in the native protocol to reduce bandwidth usage and improve responsiveness on large clusters. #82535
Avoid substituting table functions with *-cluster variants when a query contains JOINs or subqueries. #84335
Improved cache locality using rendezvous hashing. #82511
Fixed incorrect use of distributed_depth for cluster-function detection (could lead to data duplication); use client_info.collaborate_with_initiator instead. #85734
JSON data type is production-ready (see https://jsonbench.com/ ). Dynamic and Variant data types are also production-ready. #77785
Improved performance of reading JSON subcolumns from shared MergeTree data by introducing new shared-data serializations. #83777
Compact parts: store marks per substream to allow reading individual subcolumns. The new format is controlled by write_marks_for_substreams_in_compact_parts (old format is still supported for reads). #77940
write_marks_for_substreams_in_compact_parts is now enabled by default, significantly improving subcolumn reads from newly created Compact parts. Note: servers older than 25.5 cannot read these new Compact parts (disable the setting to preserve downgrade compatibility). #84171
Added MergeTree setting merge_max_dynamic_subcolumns_in_wide_part to limit the number of dynamic subcolumns in Wide parts after merges. #87646
Marked settings allow_experimental_variant/dynamic/json and enable_variant/dynamic/json as obsolete; Variant, Dynamic, and JSON are now enabled unconditionally. #85934
MergeTree shared-data serialization is controlled by object_shared_data_serialization_version and object_shared_data_serialization_version_for_zero_level_parts. Default will remain map for the next few releases, then switch to advanced (zero-level parts: map or map_with_buckets). Note: changing shared-data serialization is supported only for object_serialization_version = v3 (currently default is v2, planned to switch to v3 in future releases).
Fixed potential thread pool starvation when reading JSON column samples with many subcolumns by respecting merge_tree_use_prefixes_deserialization_thread_pool. #91208
Azure Blob Storage: replace Curl HTTP client with Poco client (enabled by default). Added multiple Azure client settings mirroring S3, introduced aggressive connect timeouts for both Azure and S3, improved Azure profile events/metrics introspection, and significantly improved cold-query latencies. Revert to Curl via azure_sdk_use_native_client=false. #83294
S3Queue/AzureQueue: improved resilience to ZooKeeper connection loss without potential duplicates. Requires enabling use_persistent_processing_nodes (modifiable via ALTER TABLE MODIFY SETTING). #85995
azureBlobStorage table engine: cache and reuse managed identity auth tokens to reduce throttling. #79860
Permissions: azureBlobStorage, deltaLakeAzure, and icebergAzure now properly validate AZURE permissions; all *-Cluster variants validate permissions via their non-clustered counterparts; icebergLocal and deltaLakeLocal now require FILE permissions. #84938
Azure Blob Storage: added extra_credentials authentication with client_id and tenant_id. #84235
Object storage auth: added AWS S3 authentication with explicitly provided IAM role; added OAuth for GCS; synchronized object storage connection parameter serialization interfaces (previously Cloud-only, now open-sourced). #84011
gcs function now requires GRANT READ ON S3 permission. #83503
Object removals: collect all removed objects and execute a single object storage remove operation. #85316
Data Lake Catalogs (Unity, REST, Glue, Hive Metastore) are promoted from Experimental to Beta. #85848
Added _data_lake_snapshot_version to Data Lake table engines. #84659
Implemented file pruning in Data Lake engines by virtual columns. #84520
Added show_data_lake_catalogs_in_system_tables to control exposing Data Lake tables in system.tables. #85411
Iceberg
Writes & catalogs: CREATE TABLE can create a new Iceberg table; INSERT into Iceberg is supported (controlled by allow_experimental_insert_into_iceberg), incl. compatibility for PyIceberg; REST and Glue catalogs are supported for writes; DROP TABLE removes from REST/Glue catalogs and deletes metadata. #83983#82692#84466#84684#84136#85395
Partitioning & pruning: Hive-style partitioned writes; partition columns are no longer virtual; bucket partitioning helpers icebergHash / icebergBucketTransform; partition pruning is enabled by default. #76802#79262
Time travel & metadata resolution: time travel via iceberg_timestamp_ms / iceberg_snapshot_id; snapshot version is not cached between SELECTs anymore (fixes time-travel issues); REST catalog metadata resolution fixes; version-hint.text support (read via iceberg_enable_version_hint, write support added). system.iceberg_history (availability/behavior to verify). #85038#85531#78594#85130
Metadata caching/observability & scaling: Iceberg metadata files cache via use_iceberg_metadata_files_cache; async iteration of Iceberg objects without materializing per-file object lists; system.iceberg_metadata_log records metadata files used during SELECT. #85369#86152
Schema evolution & column IDs: schema evolution support incl. complex types (plus add/drop/modify for simple types); read data files by field/column IDs to support renamed columns. #85769#83653
Statistics & optimizations: write more Iceberg stats (column sizes, lower/upper bounds) for pruning; pruning by bounds; faster count() without filters. #85746#78242#78090
Deletes & maintenance: equality deletes and position deletes; ALTER DELETE for merge-on-read; reduced RAM usage for large position-delete files (keep only last Parquet row group in RAM); OPTIMIZE TABLE merges position-delete files into data files to reduce Parquet count/size; Spark compatibility fix for position-delete files. #85843#83094#80237#85549#85329#85250#85762
Iceberg metadata format & write fixes: compressed metadata.json via iceberg_metadata_compression_method (all ClickHouse compression methods); fixes for complex-type writes; update metadata timestamp in writes. #85196#85330#85711
Catalog-specific: Glue catalog supports reading after schema evolution and TimestampTZ; Hive Metastore catalog supported for Iceberg. #82301#83132#77677
Since 25.7, ClickHouse works with Databricks-managed Iceberg tables.
Delta Lake
Delta-kernel-based implementation enabled by default; local storage support; deltaLakeLocal table function for filesystem-mounted tables; deltaAzure for Azure; time travel via delta_lake_snapshot_version; experimental writes gate allow_experimental_delta_lake_writes + write support for DeltaLake. #79541#79416#79781#85295#86180#85564
MergeTree as a Data Lake
Readonly MergeTree tables support refresh for the one-writer / many-readers pattern. #76467
Experimental: Ytsaurus table engine and table function. #77606
Arrow Flight: ClickHouse can expose an Arrow Flight RPC endpoint via arrowflight_port and can also query Arrow Flight servers using the arrowflight() table function (SELECT * FROM arrowflight('host:port', 'dataset_name')). #74184
Kafka:
Added inline SASL credentials support (kafka_sasl_username, kafka_sasl_password).
Fixed cases where a materialized view could start too late (after the Kafka table that streams into it). #72123
Implemented Keeper-based rebalance logic for StorageKafka2 with permanent/temporary partition locks and dynamic redistribution across replicas. #78726
Added a system table to store erroneous incoming messages from Kafka-like engines. #68873
Added SCRAM-SHA256 support and updated Postgres wire authentication.
Use FixedString for PostgreSQL CHARACTER, CHAR, and BPCHAR. #77304
Force secure connections for mysql_port and postgresql_port. #82962
MySQL protocol: implemented information schema tables to support C# MySQL clients. #84397
PromQL: added basic PromQL dialect support (dialect='promql') for TimeSeries tables (promql_table_name). Supports rate, delta, increase, and prometheusQuery() wrapper; no operators and no HTTP API yet. #75036
Added per-table overrides for MV insert settings: min_insert_block_size_rows_for_materialized_views and min_insert_block_size_bytes_for_materialized_views (override profile-level settings). #83971
Improved S3Queue/AzureQueue performance by enabling parallel INSERT pipeline via parallel_inserts=true (scales close to linearly with processing_threads_num). #77671
Added Hash output format, which computes a single hash value over all rows and columns of the result (useful as a lightweight result fingerprint when data transfer is a bottleneck). Example: SELECT arrayJoin(['abc', 'def']), 42 FORMAT Hash returns e5f9e676db098fdb9530d2059d8c23ef. #84607
Parquet:
Added experimental Parquet Reader v3 (new faster implementation with page-level filter pushdown and PREWHERE), enabled via input_format_parquet_use_native_reader_v3. #82789
Geo types: WKB-encoded geometry data is remapped to corresponding ClickHouse types.
Added JSON support: write ClickHouse JSON columns to Parquet and read Parquet JSON columns as ClickHouse JSON. #79649
Enum values are now written as BYTE_ARRAY with ENUM logical type by default. #84169
Added ParquetReadRowGroups and ParquetPrunedRowGroups counters.
ORC: added settings for compression block size and changed the default from 64KB to 256KB (Spark/Hive compatible). #80602
Added format_schema_source setting to define the source of format_schema. #80874
Database engines Atomic and Ordinary now support disk setting to store table metadata files on a specified disk. #80546
Settings constraints now support explicitly disallowed values. #78499
Tweaked jemalloc configuration for improved performance. #81807
Memory tracking improvements:
External library allocations are now accounted by ClickHouse memory tracker (may increase reported memory usage / trigger MEMORY_LIMIT_EXCEEDED). #84082
Added MemoryResidentWithoutPageCache metric for more accurate memory usage reporting when userspace page cache is enabled. #81233
Memory tracker can be corrected using cgroup data via memory_worker_correct_memory_tracker (when cgroups are available and memory_worker_use_cgroup is enabled). #83981
Improved cgroup v2 detection on systems with both v1 and v2 enabled. #78566
Backups: allow backing up PostgreSQL, MySQL, and DataLake databases (definition only, without data). #79982
ODBC/JDBC: allow using named collections and unify parameter names. #80334#83410
Views created by ephemeral users now store a copy of the user and are not invalidated after the user is deleted. #84763
AWS ECS credentials: added token expiration so it can be reloaded. #82422
Added bind_host setting in clusters configuration to force distributed connections through a specific network. #74741
Logging: introduced async logging and enabled it by default (<logger><async>false</async></logger> disables it). Added tunable limits and introspection, per-channel JSON logging via logger.formatting.channel, and fixed send_logs_source_regexp after refactoring. #82516#80125#85105#86331#85797
Added schema_type setting for system.metric_log with schema options wide, transposed, and transposed_with_wide_view (note: transposed_with_wide_view does not support subsecond resolution; event_time_microseconds remains as alias for compatibility). #78412
Set remote_filesystem_read_method default to threadpool. #77368
Allow specifying http_response_headers in any http_handlers. #79975
system.zookeeper now exposes auxiliary_zookeepers data. #80146
CI/CD can now use FIPS-permissive mode. #82415#83418
Fixed passing external roles in interserver queries. #79099
Parameterized CREATE USER query.
External authentication: match forward_headers case-insensitively. #84737
Added setting access_control_improvements.enable_user_name_access_type to enable/disable precise user/role grants (introduced in #72246). Should be disabled for compatibility with replicas older than 25.1. #79842
Added new source access types READ and WRITE, deprecating previous source-related access types (e.g. GRANT READ, WRITE ON S3 TO user). Controlled by access_control_improvements.enable_read_write_grants (disabled by default). #73659
Azure/FILE permissions: azureBlobStorage, deltaLakeAzure, and icebergAzure now properly validate AZURE permissions; *-Cluster variants validate against their non-clustered counterparts; icebergLocal and deltaLakeLocal now require FILE permissions. #84938
Added new syntax for scoped S3 grants: GRANT READ ON S3('s3://foo/.*') TO user. #84503
Mask credentials in deltaLakeAzure, deltaLakeCluster, icebergS3Cluster, and icebergAzureCluster. #85889
Query masking rules can now throw LOGICAL_ERROR on match to detect credential leaks in logs. #78094
Drop TCP connections after a configured number of queries or after a time threshold. #81472
HTTP buffers: embed proxy configuration using builder-based setup. #77693
Server bandwidth throttling: allow reloading max_local_read_bandwidth_for_server and max_local_write_bandwidth_for_server without server restart. #82083
Improved resolution of compound identifiers (notably better ARRAY JOIN compatibility). To keep the old behavior, enable analyzer_compatibility_allow_compound_identifiers_in_unflatten_nested. #85492
Distributed queries: experimental query plan distribution via serialize_query_plan / process_query_plan_packet.
Added logs_to_keep setting for Replicated databases to control how many log entries are kept in ZooKeeper (lower values reduce ZNodes; higher values allow replicas to catch up after longer downtime). #84183
Added database_replicated settings to define default values for DatabaseReplicatedSettings when they are not explicitly specified in CREATE DATABASE ... ENGINE=Replicated. #85127
Enabled backoff logic for replicated tasks to reduce CPU/memory usage and log volume. Added settings max_postpone_time_for_failed_replicated_fetches_ms, max_postpone_time_for_failed_replicated_merges_ms, and max_postpone_time_for_failed_replicated_tasks_ms. #74576
Added projection support for parallel replicas (controlled by parallel_replicas_support_projection, requires parallel_replicas_local_plan). #82807
Parallel replicas no longer wait for slow unused replicas once all read tasks are already assigned to other replicas. #80199
Distributed INSERT SELECT into replicated MergeTree now uses parallel replicas more efficiently by selecting different data on different nodes and inserting independently. #78041
Move changelog files between disks in a background thread to avoid blocking Keeper (e.g. when moving to S3 disk). #82485
Added limits for log entry cache size via latest_logs_cache_entry_count_threshold and commit_logs_cache_entry_count_threshold. #84877
ACL improvements:
Added keeper_server.cleanup_old_and_ignore_new_acl to clear existing ACLs and ignore new ACL requests (should remain enabled until a new snapshot is created). #82496
Added support for specific permissions in world:anyone ACL. #82755
Add setting allow_local_data_lakes. Turned off by default (#1530 by @zvonand).
Let’s Install!
Linux packages for both AMD64 and Aarch64 can be found at builds.altinity.cloud as either .deb, .rpm, or .tgz. Linux packages for upstream builds are at packages.clickhouse.com.
ALTER MODIFY COLUMN now requires explicit DEFAULT when converting nullable columns to non-nullable types. Previously such ALTERs could get stuck with cannot convert null to not null errors, now NULLs are replaced with column’s default expression (ClickHouse#84770 by @vdimir via #1344)
Bug Fixes (user-visible misbehavior in an official stable release)
Now datalakes catalogs will be shown in system introspection tables only if show_data_lake_catalogs_in_system_tables explicitly enabled (ClickHouse#88341 by @alesapin via #1331)
Now ClickHouse will show data lake catalog database in SHOW DATABASES query by default (ClickHouse#89914 by @alesapin via #1331)
Possible crash/undefined behavior in IN function where primary key column types are different from IN function right side column types (ClickHouse#89367 by @ilejn via #1339)
Fixes a bug where certain distributed queries with ORDER BY could return ALIAS columns with swapped values (i.e., column a showing column b’s data and vice versa) (ClickHouse#94644 by @filimonov via #1346)
Split part ranges by volume characteristics to enable TTL drop merges for cold volumes. After this patch, parts with a max TTL < now will be removed from cold storage. The algorithm will schedule only single part drops. (ClickHouse#90059 by @Michicosun via #1363)
SELECT query with FINAL clause on a ReplacingMergeTree table with the is_deleted column now executes faster because of improved parallelization from 2 existing optimizations (ClickHouse#88090 by @shankar-iyer via #1332)
Reduce INSERT/merges memory usage with wide parts for very wide tables by enabling adaptive write buffers. Add support of adaptive write buffers for encrypted disks (ClickHouse#92250 by @azat via #1341)
Let’s Install!
Linux packages for both AMD64 and Aarch64 can be found at builds.altinity.cloud as either .deb, .rpm, or .tgz. Linux packages for upstream builds are at packages.clickhouse.com.
Please contact us at info@altinity.com if you experience any issues with the upgrade.
4.3.3 - Altinity Stable® Build for ClickHouse® 25.3
Here are the detailed release notes for version 25.3.
Release history
Version 25.3.8.10042 is the latest release. We recommend that you upgrade to one of these versions. But read the detailed release notes and upgrade instructions for version 25.3 first. Once you’ve done that, review the details for each release for known issues and changes between the Altinity Stable Build and the upstream release.
BFloat16 (16-bit brain floating point) Data Type 16-bit float with 8-bit exponent + 7-bit mantissa. Includes support in cosineDistance, dotProduct, L1/L2/LinfDistance. #73840
Upgrade caution (24.8 → 24.9+) – Pending mutation tasks can block server start. Ensure all mutations are complete before upgrading. #74528
Cluster version mismatch warning – Don’t mix pre-24.3 with 25.3 in the same cluster. Ensure all DDLs complete before upgrading/downgrading. Clean queue if needed. #75302
ZooKeeper compatibility enforcement – Removed metadata_version node creation on restart. Upgrades skipping 20.4 → 24.10 will throw an exception; update in supported steps. #71385
More introspection metrics/tables – Additional columns and metrics may increase memory usage; configure TTLs or disable unused tables.
Metrics behavior change – system.cpu_usage now uses cgroup-specific metrics (instead of system-wide). #62003
Malformed HTTP responses – HTTP errors that occur after query start may result in malformed chunked encoding. Some clients may report protocol issues. #68800
Increased network traffic with progress formats
JSONEachRowWithProgress now streams updates continuously.
This may require tuning for sensitive networks. #73834
enable_job_stack_trace is now enabled by default. #71039, #71625
Kafka consumer lifecycle – Dropping Kafka table no longer exits consumer group immediately; it times out after session_timeout_ms. #76621
async_load_databases is now enabled by default, even without explicit config changes. #74772
Wildcard GRANT syntax – support for granting privileges to wildcard table names, e.g. GRANT SELECT ON db.table_prefix_* TO user and GRANT SELECT ON db*.table TO user. #65311
Multiple credentials per user – each auth method can now have its own expiration date; credentials removed from the user entity. #70090 (Altinity)
TLS for PostgreSQL wire protocol – adds encryption support to Postgres-compatible interface. #73812
SSL for MySQL with named collections – adds support for SSL auth using named collections. Closes #59111, #59452
Storage encryption for named collections – encrypts storage used by named collection configs. #68615
Push external roles to cluster nodes – query originator can push external user roles to other nodes (e.g., LDAP scenarios). #70332 (Altinity)
CHECK GRANT query – verifies whether current user/role has privileges and if target table/column exists. #68885
Extended encryption support in config files – encrypted_by XML attribute can now be used in any config file (config.xml, users.xml, or nested). Previously limited to top-level config. #75911 (Mikhail Gorshkov)
Thousand-group highlighting and readable number tooltips. #71630
Column name shortening via output_format_pretty_max_column_name_width_cut_to and ..._min_chars_to_cut. #73851
Trailing spaces highlighting in terminal via output_format_pretty_highlight_trailing_spaces. #73847
Block squashing if emitted within short intervals. Controlled via output_format_pretty_squash_consecutive_ms (default: 50ms) and output_format_pretty_squash_max_wait_ms (default: 1000ms). #73852
Mid-row cutting if output exceeds output_format_pretty_max_rows. #73929
Support for multi-line values: output_format_pretty_multiline_fields
Fallback to vertical format: output_format_pretty_fallback_to_vertical_max_rows_per_chunk=10, ..._min_columns=5
JSON
Pretty-print by default – controlled via output_format_json_pretty_print. #72148
Other format-related settings:
input_format_json_empty_as_default
schema_inference_make_columns_nullable = 0 / 1 / auto
Transitive condition inference – improved filtering, e.g. WHERE start_time >= '2025-08-01' AND end_time > start_time
TTL recalculation now respects ttl_only_drop_parts – reads only necessary columns. #65488 (Altinity)
ThreadPool improvements – optimized thread creation to avoid contention; improves performance under high load. #68694 (Altinity)
ALTER TABLE ... REPLACE PARTITION no longer waits for unrelated mutations/merges. #59138 (Altinity)
Short-circuit eval for Nullable columns – new settings: short_circuit_function_evaluation_for_nulls and its _threshold version. Functions that return NULL for NULL args will skip evaluation if NULL ratio is high. #60129
ReplacingMergeTree merge algorithm optimized for non-intersecting parts. #70977
JIT compilation enabled for more expressions: abs, bitCount, sign, modulo, pmod, isNull, isNotNull, assumeNotNull, casts to Int/UInt/Float, comparisons, logical ops. #70598 (李扬)
Distributed INSERT … SELECT – respects prefer_localhost_replica when building query plan. #72190 (Altinity)
Predicate pushdown for distributed queries – setting allow_push_predicate_ast_for_distributed_subqueries enables temporary AST-based pushdown until query plan serialization is ready. Closes #66878, #69472, #65638, #68030, #73718; implemented in #74085 (Nikolai Kochetov)
ALTER TABLE FETCH PARTITION now fetches parts in parallel; pool size set via max_fetch_partition_thread_pool_size. #74978
New MergeTree setting materialize_skip_indexes_on_merge – disables index materialization during merge, allowing explicit control via ALTER TABLE ... MATERIALIZE INDEX .... #74401
MergeTree optimizations for petabyte-scale workloads
Memory optimization for index granularity – new setting use_const_adaptive_granularity ensures efficient metadata memory use in large workloads. #71786 (Anton Popov)
Primary key caching – setting use_primary_key_cache enables LRU cache for PKs; prewarm_primary_key_cache warms it on insert/merge/fetch/startup. #72102 (Anton Popov)
Caches
use_query_condition_cache – remembers data ranges that don’t match repeated query conditions as temporary in-memory index. Closes #67768, implemented in #69236 (zhongyuankai)
Active eviction – cache no longer grows unnecessarily when data volume is smaller. #76641
Skipping index granule cache – in-memory cache improves repeated query performance. Controlled by skipping_index_cache_size and _max_entries. Motivated by vector similarity indexes. #70102 (Robert Schulze)
prewarm_mark_cache setting – loads mark cache on insert, merge, fetch, and table startup. #71053 (Anton Popov). Example: SYSTEM PREWARM MARK CACHE t
Userspace Page Cache – control with page_cache_max_size and use_page_cache_for_disks_without_file_cache
These are the most important changes to ClickHouse operations. For a complete list, see the Operations tab in the Appendix below.
Configuration
allowed_feature_tier – global switch to disable all experimental/beta features. #71841
Limit number of replicated tables, dictionaries, and views. #71179 (Kirill)
User-level disk space checks: min_free_disk_bytes_to_perform_insert and min_free_disk_ratio_to_perform_insert. #69755 (Marco Vilas Boas)
IP family filtering with dns_allow_resolve_names_to_ipv4 and dns_allow_resolve_names_to_ipv6. #66895
Add users to startup scripts; allows controlling DEFINER, etc. #74894
Usability
Embedded documentation for settings is now richer and will become the source for website docs (always accurate, versioned, and offline-capable). #70289
print_pretty_type_names – improves Tuple display.
Automatic disk spilling in GROUP BY / ORDER BY based on memory use. Controlled via max_bytes_ratio_before_external_group_by and ..._sort. #71406, #73422
Monitoring
New per-host dashboards: Overview (host) and Cloud overview (host) in advanced dashboard. #71422
Cluster
Dynamic cluster autodiscovery via <multicluster_root_path>. Extends node autodiscovery. #76001 (Altinity)
Uses auxiliary keepers for autodiscovery. #71911 (Altinity)
Disks: plain_rewritable
Allow ALTER TABLE DROP PARTITION on plain_rewritable disk. #77138
Can combine read-only and writable disks in storage policies (for Copy-on-Write). #75862
Shared disk metadata across server instances; tolerate object-not-found errors. #74059
Userspace Page Cache
New implementation caches in-process (useful for remote VFS without local FS cache). #70509
External Tables
Support for attaching external tables without databases: table_disk = 1
CPU Scheduling
New setting concurrent_threads_scheduler = round_robin | fair_round_robin – improves CPU fairness across INSERT/SELECT. #75949
HTML merge visualizer: available at http://localhost:8123/merges. #70821
Custom HTTP response headers: via http_response_headers. Enables e.g. image rendering in browser. Closes #59620, #72656
Support for user/password in http_handlers for dynamic_query_handler / predefined_query_handler. #70725
Username-only authentication in HTTP handlers now allowed (password optional). #74221
Better handling of streaming errors – generate malformed chunked encoding when exceptions occur. #68800
CLI (clickhouse-client & clickhouse-local)
--progress-table – new mode shows live query metrics as a table; can toggle using Ctrl+Space if --enable-progress-table-toggle is set. #63689
clickhouse-local supports --copy mode as shortcut for format conversion. #68503, #68583
CLI tools now auto-detect stdin compression. Closes #70865, implemented in #73848
Implicit command-line mode: ch "SELECT 1" or ch script.sql
clickhouse-compressor now supports --threads for parallel compression. #70860
Logs now include script_query_number and script_line_number in system.query_log and native protocol. #74477
Replaced send_settings_to_client (server-side) with client-side apply_settings_from_server to control client behavior (only applies to native protocol). #75478, #75648
Set custom prompt via:
--prompt CLI option
<prompt> in config
<connections_credentials><prompt> in config #74168
Secure connection auto-detect: recognizes port 9440 as TLS. #74212
Automatic parallelization for external data queries using parallel_replicas_for_cluster_engines and cluster_for_parallel_replicas
Hive-style partition pruning supported
Note: Starting with version 25.4, icebergCatalog, UnityCatalog, and Delta were unified under the DataLakeCatalog umbrella (with subtypes). Altinity builds support that remapping in 25.3 for convenience.
These are the most important backward incompatible changes in ClickHouse 25.3. For a complete list, see the Backward Incompatible Changes tab in the Appendix below.
Docker default user – Passwordless default user is now disabled. Restore via CLICKHOUSE_SKIP_USER_SETUP=1 (unsafe!). #77212
Functions greatest / least now ignore NULLs – behavior matches PostgreSQL. Use least_greatest_legacy_null_behavior = true to restore old behavior. #65519, #73389, #73344
MongoDB legacy integration removed – use_legacy_mongodb_integration is obsolete. #71997
Dictionary validation – added validation when ClickHouse is used as a dictionary source. #72548
ORDER BY/comparisons – disallow non-comparable types (JSON, Object, AggregateFunction) by default. #73276
MaterializedMySQL engine removed – deprecated and no longer available. #73879
MySQL dictionary optimization – no longer executes SHOW TABLE STATUS (was irrelevant for InnoDB). #73914
Merge table type inference – now unifies structure across tables using union of columns. May break in cases where type coercion was implicit. Restore old behavior with merge_table_max_tables_to_look_for_schema_inference = 1 or compatibility = 24.12. #73956
h3ToGeo() now returns (lat, lon) (standard order). Restore legacy (lon, lat) via h3togeo_lon_lat_result_order = true. #74719
Forced merges ignore max bytes when both min_age_to_force_merge_seconds and min_age_to_force_merge_on_partition_only are enabled. #73656
TRUNCATE DATABASE is now disallowed for replicated DBs. #76651 (Bharat Nallan)
Parallel replicas disabled by default if analyzer is off. Can override via parallel_replicas_only_with_analyzer = false. #77115
Disallow NaN/inf as values in float-type settings. #77546 (Yarik Briukhovetskyi)
New mergetree constraint – enforce_index_structure_match_on_partition_manipulation allows attaching partitions only when projections/secondary indices of source ⊆ target.
Closes #70602, #70603
lightweight_mutation_projection_mode moved to merge_tree_settings
Here is your cleaned-up and clearly formatted Known Issues section. Each item has been tightened for clarity, grouped by topic when possible, and all GitHub issue links are inlined and deduplicated.
PostgreSQL Certificate Errors
Certificate error – workaround: set PGSSLCERT env var.
#70365, #83611
Table Creation & Dependency Check Regression
CREATE TABLE significantly slower in 25.3 vs 24.3 due to O(n²) performance in dynamic workloads. #82883, #79366
Bloom Filter Issues
Not triggered for arrayMap(v -> lowerUTF8(v), arr)#81963, #79586
Segmentation fault in 25.3+ with Bloom Filter indexes. Possibly related: #80025, #78485
Kafka Metrics
Incorrect KafkaAssignedPartitions metric since 25.3. #81950
Azure Blob Crashes
Segfault when creating tables against Azure Blob with getCombinedIndicesExpression. #79504
Analyzer & Query Planner
Short-circuiting disrupted by query_plan_merge_filters. #83611
Analyzer not fully controlled by initiator. #65777
There are a number of new fields in system tables, particularly in system.metric_log, which now has more than 1200 fields, and system.query_metric_log, which now has more than 850. You can run DESCRIBE system.metric_log or DESCRIBE system.query_metric_log for a complete list of all the fields, including short descriptions of each.
Transitive condition inference – improved filtering, e.g. WHERE start_time >= '2025-08-01' AND end_time > start_time
TTL recalculation now respects ttl_only_drop_parts – reads only necessary columns. #65488 (Altinity)
ThreadPool improvements – optimized thread creation to avoid contention; improves performance under high load. #68694 (Altinity)
ALTER TABLE ... REPLACE PARTITION no longer waits for unrelated mutations/merges. #59138 (Altinity)
Short-circuit eval for Nullable columns – new settings: short_circuit_function_evaluation_for_nulls and its _threshold version. Functions that return NULL for NULL args will skip evaluation if NULL ratio is high. #60129
ReplacingMergeTree merge algorithm optimized for non-intersecting parts. #70977
JIT compilation enabled for more expressions: abs, bitCount, sign, modulo, pmod, isNull, isNotNull, assumeNotNull, casts to Int/UInt/Float, comparisons, logical ops. #70598 (李扬)
Distributed INSERT … SELECT – respects prefer_localhost_replica when building query plan. #72190 (Altinity)
Predicate pushdown for distributed queries – setting allow_push_predicate_ast_for_distributed_subqueries enables temporary AST-based pushdown until query plan serialization is ready. Closes #66878, #69472, #65638, #68030, #73718; implemented in #74085 (Nikolai Kochetov)
ALTER TABLE FETCH PARTITION now fetches parts in parallel; pool size set via max_fetch_partition_thread_pool_size. #74978
New MergeTree setting materialize_skip_indexes_on_merge – disables index materialization during merge, allowing explicit control via ALTER TABLE ... MATERIALIZE INDEX .... #74401
MergeTree optimizations for petabyte-scale workloads
Memory optimization for index granularity – new setting use_const_adaptive_granularity ensures efficient metadata memory use in large workloads. #71786 (Anton Popov)
Primary key caching – setting use_primary_key_cache enables LRU cache for PKs; prewarm_primary_key_cache warms it on insert/merge/fetch/startup. #72102 (Anton Popov)
Caches
use_query_condition_cache – remembers data ranges that don’t match repeated query conditions as temporary in-memory index. Closes #67768, implemented in #69236 (zhongyuankai)
Active eviction – cache no longer grows unnecessarily when data volume is smaller. #76641
Skipping index granule cache – in-memory cache improves repeated query performance. Controlled by skipping_index_cache_size and _max_entries. Motivated by vector similarity indexes. #70102 (Robert Schulze)
prewarm_mark_cache setting – loads mark cache on insert, merge, fetch, and table startup. #71053 (Anton Popov). Example: SYSTEM PREWARM MARK CACHE t
Userspace Page Cache – control with page_cache_max_size and use_page_cache_for_disks_without_file_cache
allowed_feature_tier – global switch to disable all experimental/beta features. #71841
Limit number of replicated tables, dictionaries, and views. #71179 (Kirill)
User-level disk space checks: min_free_disk_bytes_to_perform_insert and min_free_disk_ratio_to_perform_insert. #69755 (Marco Vilas Boas)
IP family filtering with dns_allow_resolve_names_to_ipv4 and dns_allow_resolve_names_to_ipv6. #66895
Add users to startup scripts; allows controlling DEFINER, etc. #74894
Usability
Embedded documentation for settings is now richer and will become the source for website docs (always accurate, versioned, and offline-capable). #70289
print_pretty_type_names – improves Tuple display.
Automatic disk spilling in GROUP BY / ORDER BY based on memory use. Controlled via max_bytes_ratio_before_external_group_by and ..._sort. #71406, #73422
Monitoring
New per-host dashboards: Overview (host) and Cloud overview (host) in advanced dashboard. #71422
Cluster
Dynamic cluster autodiscovery via <multicluster_root_path>. Extends node autodiscovery. #76001 (Altinity)
Uses auxiliary keepers for autodiscovery. #71911 (Altinity)
Disks: plain_rewritable
Allow ALTER TABLE DROP PARTITION on plain_rewritable disk. #77138
Can combine read-only and writable disks in storage policies (for Copy-on-Write). #75862
Shared disk metadata across server instances; tolerate object-not-found errors. #74059
Userspace Page Cache
New implementation caches in-process (useful for remote VFS without local FS cache). #70509
External Tables
Support for attaching external tables without databases: table_disk = 1
CPU Scheduling
New setting concurrent_threads_scheduler = round_robin | fair_round_robin – improves CPU fairness across INSERT/SELECT. #75949
HTML merge visualizer: available at http://localhost:8123/merges. #70821
Custom HTTP response headers: via http_response_headers. Enables e.g. image rendering in browser. Closes #59620, #72656
Support for user/password in http_handlers for dynamic_query_handler / predefined_query_handler. #70725
Username-only authentication in HTTP handlers now allowed (password optional). #74221
Better handling of streaming errors – generate malformed chunked encoding when exceptions occur. #68800
CLI (clickhouse-client & clickhouse-local)
--progress-table – new mode shows live query metrics as a table; can toggle using Ctrl+Space if --enable-progress-table-toggle is set. #63689
clickhouse-local supports --copy mode as shortcut for format conversion. #68503, #68583
CLI tools now auto-detect stdin compression. Closes #70865, implemented in #73848
Implicit command-line mode: ch "SELECT 1" or ch script.sql
clickhouse-compressor now supports --threads for parallel compression. #70860
Logs now include script_query_number and script_line_number in system.query_log and native protocol. #74477
Replaced send_settings_to_client (server-side) with client-side apply_settings_from_server to control client behavior (only applies to native protocol). #75478, #75648
Set custom prompt via:
--prompt CLI option
<prompt> in config
<connections_credentials><prompt> in config #74168
Secure connection auto-detect: recognizes port 9440 as TLS. #74212
Automatic parallelization for external data queries using parallel_replicas_for_cluster_engines and cluster_for_parallel_replicas
Hive-style partition pruning supported
Note: Starting with version 25.4, icebergCatalog, UnityCatalog, and Delta were unified under the DataLakeCatalog umbrella (with subtypes). Altinity builds support that remapping in 25.3 for convenience.
Functions greatest / least now ignore NULLs – behavior matches PostgreSQL. Use least_greatest_legacy_null_behavior = true to restore old behavior. #65519, #73389, #73344
MongoDB legacy integration removed – use_legacy_mongodb_integration is obsolete. #71997
Dictionary validation – added validation when ClickHouse is used as a dictionary source. #72548
ORDER BY/comparisons – disallow non-comparable types (JSON, Object, AggregateFunction) by default. #73276
MaterializedMySQL engine removed – deprecated and no longer available. #73879
MySQL dictionary optimization – no longer executes SHOW TABLE STATUS (was irrelevant for InnoDB). #73914
Merge table type inference – now unifies structure across tables using union of columns. May break in cases where type coercion was implicit. Restore old behavior with merge_table_max_tables_to_look_for_schema_inference = 1 or compatibility = 24.12. #73956
h3ToGeo() now returns (lat, lon) (standard order). Restore legacy (lon, lat) via h3togeo_lon_lat_result_order = true. #74719
Forced merges ignore max bytes when both min_age_to_force_merge_seconds and min_age_to_force_merge_on_partition_only are enabled. #73656
TRUNCATE DATABASE is now disallowed for replicated DBs. #76651 (Bharat Nallan)
Parallel replicas disabled by default if analyzer is off. Can override via parallel_replicas_only_with_analyzer = false. #77115
Disallow NaN/inf as values in float-type settings. #77546 (Yarik Briukhovetskyi)
New mergetree constraint – enforce_index_structure_match_on_partition_manipulation allows attaching partitions only when projections/secondary indices of source ⊆ target.
Closes #70602, #70603
lightweight_mutation_projection_mode moved to merge_tree_settings
Linux packages for both AMD64 and Aarch64 can be found at builds.altinity.cloud as either .deb, .rpm, or .tgz. Linux packages for upstream builds are at packages.clickhouse.com.
Fixes handling of users with a dot in the name when added via config file (ClickHouse#86633 by @mkmkme via #1121)
Performance Improvement
SELECT query with FINAL clause on a ReplacingMergeTree table with the is_deleted column now executes faster because of improved parallelization from 2 existing optimizations : 1) do_not_merge_across_partitions_select_final optimization for partitions of the table that have only a single part 2) Split other selected ranges of the table into intersecting / non-intersecting and only intersecting ranges have to pass through FINAL merging transform (ClickHouse#88090 by @shankar-iyer via #1126)
Critical Bug Fix (crash, data loss, RBAC) or LOGICAL_ERROR
Fixed incorrect query results and out-of-memory crashes when using match(column, ‘^…’) with backslash-escaped characters (ClickHouse#79969 by @filimonov via #1122)
Linux packages for both AMD64 and Aarch64 can be found at builds.altinity.cloud as either .deb, .rpm, or .tgz. Linux packages for upstream builds are at packages.clickhouse.com.
Please contact us at info@altinity.com if you experience any issues with the upgrade.
4.3.4 - Altinity Stable® Build for ClickHouse® 24.8
Here are the detailed release notes for version 24.8.
Release history
Version 24.8.14.10546 is the latest release. We recommend that you upgrade to this version. But read the detailed release notes and upgrade instructions for version 24.8 first. Once you’ve done that, review the details for each release for known issues and changes between the Altinity Stable Build and the upstream release.
Major new features in 24.8 since the previous Altinity Stable release 24.3
A new release introduces a lot of changes and new functions. Please refer to the full list in the following sections. The following major features are worth mentioning on the front page:
replace_long_file_name_to_hash now enabled by default. If you need to preserve compatibility with versions before 23.9 - consider disabling that.
Analyzer
Analyzer is a huge refactoring of the query interpreting engine, enabled by default since 24.3. For new projects you should opt for using analyzer as a default choice.
There are a lot of queries which may work better with analyzer enabled.
But there are also risks that it can have some negative impact on different legacy queries. So if you upgrade, please give a run of your tests at staging with analyzer enabled first. If you run into some issues, you can disable the flag (enable_analyzer=0) for particular queries or for user profiles (or globally in default user profile).
Also check the list of reported issues related to analyzer, including those which are considered important. If you find something which is absent in those lists - please report it.
If you decide to disable the analyzer before the upgrade, use the setting allow_experimental_analyzer during a rolling upgrade, since older versions are not aware of enable_analyzer. But please remember that in future versions the old (before analyzer) code will be removed, and eventually the analyzer will be the only choice.
text_log & error_log is now enabled by default, consider configuring TTL for it.
S3Queue was reworked significantly (setting s3queue_total_shards_num removed,s3queue_buckets introduced, s3queue_allow_experimental_sharded_mode deprecated). In 24.8 the feature is more mature, but some issues still exist.
async_load_databases now enabled, it may increase the chances of the issues with the engine=Kafka and other streaming tables to flush data only to some subset of tables, and some of MV may miss the data.
JSON datatype is not ready for production on 24.8 (consider newer releases.)
Backward incompatible changes
Async Loading: The async_load_databases setting now defaults to true, allowing the server to accept connections before all tables are loaded. Set async_load_databases=false to revert to the previous behavior.
Deprecated Functions: Functions neighbor, runningAccumulate, runningDifferenceStartingWithFirstValue, and runningDifference are deprecated. Use window functions instead. Set allow_deprecated_functions=1 to enable them temporarily.
Access Changes: Faster system.columns queries, but stricter access rules may skip tables without SHOW TABLES permissions.
Index Renaming: “Inverted indexes” are renamed to “full-text indexes,” breaking compatibility with existing indexes. Drop and recreate them after the upgrade.
Removed Features:
Support for INSERT WATCH queries is removed.
The setting optimize_monotonous_functions_in_order_by is no longer available.
max_parallel_replicas Restriction: Setting max_parallel_replicas to 0 is no longer allowed to prevent logical errors.
Separate Packages: clickhouse-odbc-bridge and clickhouse-library-bridge are now distributed as separate packages.
Query Parsing: Invalid queries fail earlier. Experimental KQL expressions in kql table functions now require string literals.
Snowflake Functions: New SnowflakeID functions replace older ones. To enable deprecated versions, set allow_deprecated_snowflake_conversion_functions=1.
Appendix: New features
SQL features
Recursive CTEs: Enables recursive queries for tree and graph traversal, fully compatible with standard SQL.
QUALIFY Clause: Filters data after window functions.
JOINS:
Enable allow_experimental_join_condition=1 for joins with inequalities, e.g., t1.y < t2.y.
Better CROSS (comma) JOIN
Faster Parallel Hash Join
Merge Join Algorithm For ASOF JOIN (join_algorithm = ‘full_sorting_merge’)
Collect hash table sizes statistics in ConcurrentHashJoin (max_entries_for_hash_table_stats)
SQL usability:
DROP Multiple Tables: Supports dropping multiple tables in one command:
TRUNCATE ALL TABLES: New command to truncate all tables in one query.
DROP DETACHED PARTITION ALL for removing all detached partitions.
trailing commas support
Replicated Database Engine: Removed the experimental tag; now in Beta.
Datalakes & object storage
S3 Enhancements:
Introduces s3_plain_rewritable for S3 disks without metadata storage.
Enables reading from archive files in S3 storage.
Improved performance for glob selection ({} patterns).
a lot of performance optimizations
Supports AWS Private Link Interface endpoints.
Hive-Style Partitioning: Adds support for Hive-style partitioning in file storage engines like S3 and HDFS.
Azure Blob Storage:
production ready since 24.6
Adds plain_rewritable metadata support.
Adds a queue-based storage engine for Azure.
use_workload_identity parameter for authentication via Azure Workload Identity.
Multicopy support for backups using Azure Blob Storage.
Enabled native copy for Azure, including across containers.
Added support for plain_rewritable metadata for Azure and local object storages.
Hive Table Parsing: Resolves mismatches between the number of input fields and defined table columns.
Experimental features
TimeSeries Engine (Experimental): Optimized for time-series data, enabled with allow_experimental_time_series_table.
New Kafka Engine (Experimental): Enables exactly-once message processing with kafka_keeper_path and deduplication.
Dynamic Data Type and JSON Data Type: both experimental in 24.8.
new (experimental) index type vector_similarity (replacing annoy and usearch)
Experimental per column statistics allow_experimental_statistics + allow_statistics_optimize
Native Parquet Reader: Enabled with input_format_parquet_use_native_reader, directly reads binary Parquet files to ClickHouse columns.
Security and access control
GRANT for Table Engines: Allows granting specific permissions on table engines.
Certificate Reload: Certificates reload correctly with the entire chain.
Quota Key Flexibility: Allows quota keys with different auth schemes in HTTP requests.
Role in HTTP Queries: The role parameter in HTTP queries applies roles, e.g., ?role=x&role=y is equivalent to SET ROLE x, y.
Migration BoringSSL -> OpenSSL
Operations
Named Collections in Keeper:
Startup Scripts: Allows running preconfigured queries at startup.
Limits on Tables: max_database_num_to_throw, max_table_num_to_throw.
Query Cache Tagging: Use query_cache_tag to control cache entries for specific queries.
Added limits for MOVE PARTITION TO TABLE queries (e.g., max_parts_in_total).
HTTP Enhancements: Introduced http_response_headers for custom HTTP handler responses.
Error Logging: Introduces system.error_log, a persistent log of errors from system.errors.
system.detached_tables
system.error_log
new setting disable_insertion_and_mutation
global_profiler_cpu_time_period_ns / global_profiler_real_time_period_ns - to profile all threads of the clickhouse globally.
MergeTree
Optimized Table Sorting: Use optimize_row_order=true to improve compression by optimizing data order.
Reduce Disk I/O: Skips merging newly created projection blocks during INSERT.
Unload Primary Index: Saves memory by unloading outdated parts’ primary indices: SYSTEM UNLOAD PRIMARY KEY
ORDER BY Optimization: Buffering improves performance for high-selectivity filters, controlled by read_in_order_use_buffering.
New Virtual Columns: Adds _block_offset, _block_number, and _part_data_version.
TTL Information: Added to the system.parts_columns table for better tracking.
| merge_tree_settings | deduplicate_merge_projection_mode | | throw | Whether to allow create projection for the table with non-classic MergeTree, if allowed, what is the action when merge, drop or rebuild. |
Functions
date_diff and age and date_trunc to subsecond units.
new format Form - HTML forms (x-www-form-urlencoded MIME type),
Raw handy shortcut for TSVRaw
TSV with CRLF Support: TSV files with CRLF line endings are supported via input_format_tsv_crlf_end_of_line.
Apache Arrow Schema: Nullable types are now inferred automatically.
Other
Four File-Based Storage options: Adds _etag, _path, _size, and _timestamp.
Compression Based on STDOUT: Automatically applies compression for STDOUT if the output file has a compression extension.
2 new WKT (Well-known text representation of geometry) types: LineString & MultiLineString
Compile Expressions: JIT compiler for expression fragments (compile_expressions) enabled by default.
( see also compiled_expression_cache_sizecompiled_expression_cache_elements_size)
Linux packages for both AMD64 and Aarch64 can be found at builds.altinity.cloud as either .deb, .rpm, or .tgz. Linux packages for upstream builds are at packages.clickhouse.com.
ALTER MODIFY COLUMN now requires explicit DEFAULT when converting nullable columns to non-nullable types. Previously such ALTERs could get stuck with cannot convert null to not null errors, now NULLs are replaced with column’s default expression. (ClickHouse#84770 by @vdimir via #1370)
Fix nullptr dereference with disabled send_profile_events. This feature was introduced recently for the ClickHouse Python driver (ClickHouse#94466 by @alexey-milovidov via #1515)
Bug Fixes (user-visible misbehavior in an official stable release)
Possible crash/undefined behavior in IN function where primary key column types are different from IN function right side column types (ClickHouse#89367 by @ilejn via #1146)
Fix aggregation of sparse columns for sum and timeseries when group_by_overflow_mode is set to any (ClickHouse#95301 by @mkmkme via #1372)
Fix aggregation of sparse columns when group_by_overflow_mode is set to any (ClickHouse#88440 by @korowa via #1389)
Fixed a crash in SimpleSquashingChunksTransform that occurred in rare cases when processing sparse columns (ClickHouse#72226 by @vdimir via #1399)
Reintroduce fix for a crash when ClickHouse is used in AWS ECS to connect to AWS S3 (ClickHouse#65362 by @Avogar via #1449)
Performance Improvement
SELECT query with FINAL clause on a ReplacingMergeTree table with the is_deleted column now executes faster because of improved parallelization (ClickHouse#88090 by @shankar-iyer via #1373)
Improvement
Allow a user to have multiple authentication methods instead of only one. Allow authentication methods to be reset to most recently added method. (ClickHouse#65277 by @arthurpassos via #1371)
Packages
Available for both AMD64 and Aarch64 from builds.altinity.cloud as either .deb, .rpm, or .tgz
Linux packages for both AMD64 and Aarch64 can be found at builds.altinity.cloud as either .deb, .rpm, or .tgz. Linux packages for upstream builds are at packages.clickhouse.com.
New MergeTree setting search_orphaned_parts_drives to limit scope to look for parts e.g. by disks with local metadata (ClickHouse#84710 by @ilejn via #977)
Refreshable materialized view improvements: append mode (… REFRESH EVERY 1 MINUTE APPEND …) to add rows to existing table instead of overwriting the whole table, retries (disabled by default, configured in SETTINGS section of the query), SYSTEM WAIT VIEW <name> query that waits for the currently running refresh, some fixes (ClickHouse#68249, ClickHouse#58934 by @al13n321 via #1066)
Fixes handling of users with a dot in the name when added via config file (ClickHouse#86633 by @mkmkme via #1089)
Linux packages for both AMD64 and Aarch64 can be found at builds.altinity.cloud as either .deb, .rpm, or .tgz. Linux packages for upstream builds are at packages.clickhouse.com.
Smarter pr number fetching for grype and report and update report action (#845 by @strtgbb)
Let’s Install!
Linux packages for both AMD64 and Aarch64 can be found at builds.altinity.cloud as either .deb, .rpm, or .tgz. Linux packages for upstream builds are at packages.clickhouse.com.
Bug Fixes (user-visible misbehavior in an official stable release)
To avoid spamming the server logs, failing authentication attempts are now logged at level DEBUG instead of ERROR. (#71405 by @rschu1ze via #651)
Fix an exception of TOO_LARGE_ARRAY_SIZE caused when a column of arrayWithConstant evaluation is mistaken to cross the array size limit. (#71894 by @udiz via #650)
Cross port of the fix to avoid reusing connections that had been left in the intermediate state. (#74749 by @azat via #678)
Improvements
ALTER TABLE .. REPLACE PARTITION doesn’t wait anymore for mutations/merges that happen in other partitions (#59138 by @Enmk & @zvonand via #638)
Respect prefer_locahost_replica when building plan for distributed INSERT ... SELECT. (#72190 by @filimonov via #657)
Support parquet integer logical types on native reader. (#72105 by @arthurpassos via #680)
Evaluate parquet bloom filters and min/max indexes together. (#71383 by @arthurpassos via #681)
Improve query_plan_merge_filters optimization (#71539 by @KochetovNicolai via #640)
Let’s Install!
Linux packages for both AMD64 and Aarch64 can be found at builds.altinity.cloud as either .deb, .rpm, or .tgz. Linux packages for upstream builds are at packages.clickhouse.com.
Please contact us at info@altinity.com if you experience any issues with the upgrade.
4.3.5 - Altinity Stable® Build for ClickHouse® 24.3
Here are the detailed release notes and upgrade instructions for version 24.3.
Release history
Version 24.3.18.10426 is the latest release. We recommend that you upgrade to this version. But read the detailed release notes and upgrade instructions for version 24.3 first. Once you’ve done that, review the details for each release for known issues and changes between the Altinity Stable Build and the upstream release.
Major new features in 24.3 since the previous Altinity Stable release 23.8
A new release introduces a lot of changes and new functions. Please refer to the full list in the following sections. The following major features are worth mentioning on the front page:
Analyzer is enabled by default:
Many complex queries start to work properly.
Brings consistency and completeness of features.
Multiple ARRAY JOIN in a single query.
SAMPLE can be specified for any table expression in JOIN.
FINAL can be specified for any table expression in JOIN.
Up to 5x faster for complex queries with joins.
As of version 24.3, the analyzer does not support the following experimental features: window views, annoy and usearch indices, and hypothesis constraints.
If you experience failed queries that worked in earlier versions, try disabling the analyzer with the allow_experimental_analyzer=0 setting.
Refreshable Materialized Views: Run the SELECT query in the background and atomically replace the table with its result #56946.
Features that are not marked as experimental anymore:
Variant Data Type: See allow_experimental_variant_type & #58047.
Major Changes that Require Attention
Analyzer is enabled by default
If you experience failed queries that used to work in earlier versions, try disabling the analyzer with allow_experimental_analyzer=0 setting.
Server settings changed their defaults
max_concurrent_queries is now 1000 (previously 100). We highly recommend keeping the old value if it worked well before, as the new default can impact server responsiveness and stability if the limit was often reached.
concurrent_threads_soft_limit_ratio_to_cores is now 2. While the new value is generally better, some queries may suffer from reduced parallelism.
background_schedule_pool_size increased from 128 to 512. This new value is generally better, especially when the number of replicated tables is high. But you can observe more thread working in the system.
background_fetches_pool_size increased from 8 to 16.
The new default can work better, especially for scenarios with a high
number of replicated tables and inserts. However, it can create more
pressure on the network card if it has poor bandwidth.
index_mark_cache_size is now enabled and set to 5GB. This change
greatly impacts query speed performance if you use skipping indexes, but it may increase ClickHouse memory usage.
MergeTree settings changed their defaults
replicated_deduplication_window increased from 100 to
1000. This may lead to some growth in the Zookeeper data size,
especially if there are many replicated tables. You can keep the old
default.
Backward Incompatible Changes
avgWeighted aggregate function no longer supports Decimal type arguments. Convert them to Float.
IPv6 bloom filter indexes created prior to March 2023 are incompatible with the current version and must be rebuilt.
Support for experimental Meilisearch was removed due to protocol changes.
Non-deterministic functions in TTL expressions are now forbidden by default (see allow_suspicious_ttl_expressions = 1).
ReplacingMergeTree with is_deleted flag: clean_deleted_rows is deprecated. The CLEANUP keyword for OPTIMIZE is not allowed by default (unless allow_experimental_replacing_merge_with_cleanup is enabled).
Support for in-memory data parts was fully dropped. If you have used this before, you may need to perform extra steps before the upgrade (check #61127).
extract_kvp_max_pairs_per_row renamed to extract_key_value_pairs_max_pairs_per_row.
The order of arguments for the locate function changed to match MySQL (see function_locate_has_mysql_compatible_argument_order = 0).
SimpleAggregateFunction is now forbidden in the table ORDER BY (see allow_suspicious_primary_key).
geoDistance, greatCircleDistance, and greatCircleAngle now return Float64 instead of Float32 (see geo_distance_returns_float64_on_float64_arguments).
query_cache_store_results_of_queries_with_nondeterministic_functions marked obsolete and replaced by query_cache_nondeterministic_function_handling#56519.
Upgrade Notes
It is always a good idea to test a new release in a dedicated environment, or at least to carefully check the list of backward incompatibilities before installing the new release.
For a rolling upgrade, consider disabling the new analyzer (set allow_experimental_analyzer=0) to prevent distributed queries from failing .
Other Important Changes
The default user now has access_management (user manipulation by SQL queries) and named_collection_control (manipulation of named collections by SQL queries) settings enabled by default. The new values are more user-friendly, but consider the
security effects.
Some safety limits have been introduced (see also Altinity KB):
max_projections in merge_tree_settings - default 25
max_database_num_to_warn in server_settings - default 1000
max_materialized_views_count_for_table in server_settings - default 0 (i.e., disabled)
Utility clickhouse-copier has been moved to a separate repository on GitHub: ClickHouse/copier. It is no longer included in the bundle but is still available as a separate download.
output_format_orc_compression_method and output_format_parquet_compression_method changed from lz4 to zstd#61817.
output_format_orc_string_as_string, output_format_parquet_string_as_string, and output_format_arrow_string_as_string are enabled #61817.
input_format_parquet_allow_missing_columns, input_format_orc_allow_missing_columns, and input_format_arrow_allow_missing_columns are enabled.
log_processors_profiles can create some extra data in system.query_log.
Safer named collections. It is now possible to define which fields can not be overwritten in function calls #55782.
MergeTree-Related Features & Improvements
primary_key_lazy_load=1 enabled by default; loads the primary key on first access. It speeds up server startup #60093.
Memory usage for primary key is reduced. Avoid loading in RAM the columns after a cardinal one (primary_key_ratio_of_unique_prefix_values_to_skip_suffix_columns=0.9) #60255.
Long column names can be used now. In part Avoid ‘File name too long,’ especially for projections (replace_long_file_name_to_hash = 1).
Automatic conversion of merge tree tables of different kinds to replicated engine #57798.
Columns statistics (allow_statistic_optimize = 1) to order prewhere conditions better #53240.
Projections: SET force_optimize_projection_name = 'foo', preferred_optimize_projection_name = 'bar'.
Table function mergeTreeIndex to inspect indexes.
New virtual columns _part_offset and _block_number.
Indices on ALIAS columns.
Optimizations for FINAL.
Mutations
ATTACH PARTITION from a different disk: Similar to MOVE PARTITION TO DISK/VOLUME, but works between tables.
apply_deleted_mask=0: Allows seeing the rows deleted by light-weight delete.
APPLY DELETED MASK: Remove deleted records without OPTIMIZE query.
Exponential backoff logic for mutation retries #58036.
min_compress_block_size and max_compress_block_size can now be specified at the column level CREATE TABLE ... (col String SETTINGS (min_compress_block_size = 81920, max_compress_block_size = 163840). #55201.
Support for LZ4HC(2) (previously worked as LZ4HC(3)).
ZSTD_QAT codec for Intel QuickAssist Technology hardware acceleration.
Aggregate Functions
groupArraySorted(n)(value): Useful for “top N” queries without full sorting.
quantileDD (+ quantilesDD, medianDD): Based on the DDSketch #56342.
groupArrayIntersect.
approx_top_count, approx_top_k, approx_top_sum: Similar to topK/topKWeighed functions but include count/error statistics #54508.
ArgMin, ArgMax as combinators: Apply aggregate function to the set of values where another value is the maximum in a group #54947.
Several improvements in (experimental) s3 zero copy feature.
Distributed Queries
distributed_insert_skip_read_only_replicas: Skip read-only replicas for INSERT into Distributed engine.
Settings for the Distributed table engine can now be specified in the server configuration file (similar to MergeTree settings), e.g., <distributed> <flush_on_detach>false</flush_on_detach> </distributed>.
Ability to override initial INSERT settings via SYSTEM FLUSH DISTRIBUTED#61832.
HTTP Protocol
Speed up HTTP output.
Separate metrics of network traffic for each server interface: InterfaceHTTPSendBytes, InterfaceHTTPReceiveBytes, InterfaceNativeSendBytes.
getClientHTTPHeader function.
Refactoring of the code around HTTP/HTTPS connections (+ introducing some limits), making HTTP connections reusable #58845.
Allow disabling of HEAD request before GET request #54602.
Operational / Maintenance
Allow overwriting max_partition_size_to_drop and max_table_size_to_drop server settings in query time #57452.
Asynchronous loading of tables: async_load_databases for asynchronous loading of databases and tables. See also system.async_loader, max_waiting_queries#49351#61053.
Adding new disk to storage configuration without restart.
alter_move_to_space_execute_async allow to start moves in the background
key_template option to adjust data layout inside the bucket.
Introspection table system.blob_storage_log.
S3 Express One Zone support.
SQL & MySQL Compatibility
MySQL Binlog Client for MaterializedMySQL: One binlog connection for many databases #57323.
Allow skipping engine (default_table_engine=MergeTree), Zookeeper
path & replicas (default_replica_name, default_replica_path), or ORDER BY (create_table_empty_primary_key_by_default, no index will be used).
Default parameters for Decimal: DECIMAL(P), DECIMAL. New functions: TO_DAYS (
toDaysSinceYearZero), addDate, subDate. Function aliases: STD (stddevPop), current_user.
Minimal support for prepared statements (for Tableau).
String arguments for add/subtract date/time and toDayOfWeek.
date_trunc supports case-insensitive unit names.
Enums and strings are cast to a common type if needed (+ substring supports the Enum data type).
Enable group of settings when clients are connected via MySQL protocol (prefer_column_name_to_alias = 1, mysql_map_string_to_text_in_show_columns, and mysql_map_fixed_string_to_text_in_show_columns). Helps BI tools like QuickSight to work.
Formats
NumPy as input format: SELECT * FROM 'data.npy'.
Autodetect JSON/JSONEachRow.
Valid JSON/XML on exceptions for some formats (especially HTTP).
Regularly check if merges and mutations were cancelled even in case when the operation doesn’t produce any blocks to write. (ClickHouse#77766 by @antaljanosbenjamin via #729)
Improvements
ALTER TABLE .. REPLACE PARTITION doesn’t wait anymore for mutations/merges that happen in other partitions (ClickHouse#59138 by @Enmk and @zvonand via #729)
Linux packages can be found at packages.clickhouse.com for upstream builds, and at builds.altinity.cloud for Altinity Stable builds. The Altinity Stable build for this release is available for both AMD64 and Aarch64 as either .deb, .rpm, or .tgz.
Docker images for the upstream version should be referenced as clickhouse/clickhouse-server:24.3.18.7.
Altinity Stable build images are available for AMD64 and Aarch64 at DockerHub as 24.3.18.10426.altinitystable.
Fix the crash loop when restoring from backup is blocked by creating an MV with a definer that hasn’t been restored yet. (ClickHouse#64595 by @pufit via #412)
Fix detection of number of CPUs in containers. In the case when the ‘root’ cgroup was used (i.e. name of cgroup was empty, which is common for containers ) ClickHouse was ignoring the CPU limits set for the container. (ClickHouse#66237 by @filimonov via #420)
🆕 Set input_format_parquet_filter_push_down default value to false#511
Build/Testing/Packaging Improvement
🆕 ubuntu:22.04 as a base image for clickhouse-server docker image #497
🆕 alpine:3.20.3 as clickhouse-keeper base image to (lowest number of CVEs) #517
🆕 — new in 24.3.12.76.altinitystable compared to 24.3.5.47.altinitystable
Let’s Install!
Linux packages can be found at packages.clickhouse.com for upstream builds, and at builds.altinity.cloud for Altinity Stable builds. The Altinity Stable build for this release is available for both AMD64 and Aarch64 as either .deb, .rpm, or .tgz.
Docker images for the upstream version should be referenced as clickhouse/clickhouse-server:24.3.12.75.
The following problems are known to exist in 24.3.5:
S3Queue (+ parallel and distributed processing) - This was marked as non-experimental in 24.3, but we don’t recommend using it on this version due to a memory leak and other stability issues. Consider using 24.8 or newer if you need S3Queue functionality.
If you experience failed queries that used to work in earlier versions, try disabling the new analyzer with the allow_experimental_analyzer=0 setting.
Changes in Altinity Stable build Compared to Upstream Build
Altinity Stable builds for ClickHouse are open source and are based on the upstream LTS versions. Altinity.Stable 24.3.5 is based on upstream 24.3.5.46-lts, but we have additionally backported several fixes:
Fix the crash loop when restoring from backup is blocked by creating an MV with a definer that hasn’t been restored yet. (#64595 by @pufit)
Fix moving partition to itself #62459 (#62524 by @helifu)
Fix detection of number of CPUs in containers. In the case when the ‘root’ cgroup was used (i.e. name of cgroup was empty, which is common for containers) ClickHouse was ignoring the CPU limits set for the container. (#66237 by @filimonov)
Also, please refer to the interim release notes from the development team available at the following urls:
Please contact us at info@altinity.com if you experience any issues with the upgrade.
4.3.6 - Altinity Stable® Build for ClickHouse® 23.8
Here are the detailed release notes and upgrade instructions for version 23.8.8.21. There are a lot of new features, but also many things that changed their behavior. Read these carefully before upgrading.
23.8.16.43 2024-12-17 - This is the latest release. We recommend that you upgrade to this version. (But read the detailed release notes and upgrade instructions first.)
A new release introduces a lot of changes and new functions. It is very hard to pick the most essential ones, so refer to the full list in the Appendix. The following major features are worth mentioning on the front page:
Few features that were experimental are now graduated as production ready:
Plus and minus operations for arrays: SELECT [1, 2, 3] + [4, 5, 6]#52625. Multiplication and division comes in later releases.
Direct import from archives (files only):
SELECT * FROM file('path/to/archive.zip :: path/inside/archive.csv')
MergeTree improvements:
There were a lot of improvements in order to reduce memory usage for merges, loading parts. FINAL, index analysis and others.
Added setting async_insert for MergeTree tables. It has the same meaning as query-level setting async_insert and enables asynchronous inserts for a specific table. #49122.
Replication improvements:
Improve insert retries on keeper session expiration. #52688.
Reduced number ZooKeeper requests when selecting parts to merge and a lot of partitions do not have anything to merge. #49637. – in general, users would observe lower ZooKeeper load when upgrading from 23.3 to 23.8
Security & access control
ROW POLICY can be applied to all tables in a database. #47640. a)
Add server and format settings display_secrets_in_show_and_select for displaying secrets of tables, databases, table functions, and dictionaries. Add privilege displaySecretsInShowAndSelect controlling which users can view secrets. #46528.
Adding the grants field in the users.xml file, which allows specifying grants for users. #49381.
GRANT CURRENT GRANTS
Object storage
Support proxy for S3 access a) – read our article for more detail
Native support for GCP via gcs table function
Native support for Azure via azureBlobStorage and azureBlobStorageCluster table functions
Operational:
New tables for introspection:
system.zookeeper_connection
system.kafka_consumers
Server and query level IO throttling for different operations (#48242):
server settings: max_remote_read_network_bandwidth_for_server, max_remote_write_network_bandwidth_for_server, max_local_read_bandwidth_for_server, max_local_write_bandwidth_for_server, max_backup_bandwidth_for_server
As usual with ClickHouse, there are many performance and operational improvements in different server components.
a) Contributed by Altinity developers.
Major changes that require attention
use_environment_credentials is enabled by default since 23.4. That blocks access to anonymous S3 buckets. The recommended way accessing public buckets is NOSIGN keyword supported for both S3 table function and engine.
Compression of mark files and primary keys is enabled by default. It produces different binary representations of those files. This is controlled by compress_marks and compress_primary_key merge tree settings.
It is not possible to downgrade from 23.8 to 22.8 or earlier
If you upgrade from versions prior to 22.9, you should either upgrade all replicas at once or disable the compression before upgrade, or upgrade through an intermediate version, where the compressed marks are supported but not enabled by default, such as 23.3.
sparse columns enabled by default. It produces different binary representation, so if used downgrade to versions older than 22.1 might not be possible.. This can be disabled by ratio_of_defaults_for_sparse_serialization=1.
max_concurrent_queries default value has been increased from 100 to 1000. It may be too high in same cases, max_concurrent_queries * max_threads should be lower than ~8000.
Maximum number of parts per partition restriction (“too many parts” error) has been relaxed:
parts_to_delay_insert=1000 (was: 150)
parts_to_throw_insert=3000 (was: 300)
There is a new setting max_avg_part_size_for_too_many_parts=1073741824, so ‘parts_to_throw’ restriction is applied only for partitions of 1TB size or above. This may result in slower performance, so changing ‘parts_to_throw’ to smaller values is recommended.
Metadata cache has been removed
The new feature system.kafka_consumers enables collecting librdkafka statistics every 3 seconds by default. If you have Kafka tables which you don’t read from, that can lead to collecting those unprocessed stat messages in memory. Collection is disabled in Altinity.Stable Build 23.8.8 and upstream build 23.8.9. You may turn it on and off using server level Kafka setting:
<kafka>
<statistics_interval_ms> <!-- Set non-zero value to enable -->
0
</statistics_interval_ms>
</kafka>
Backward Incompatible Changes
The following changes are backward incompatible and require user attention during an upgrade:
Using named collections requires to have USE NAMED COLLECTION grant, otherwise Not enough privileges. To execute this query it's necessary to have grant NAMED COLLECTION ON exception will be raised.
allow_experimental_query_cache profile setting has been removed (the feature is production ready) #52685. ClickHouse will not start if it is defined, so please removed it before an upgrade
The microseconds column is removed from the system.text_log, and from the system.metric_log, because they are redundant in the presence of the event_time_microseconds column. #53601
Upgrade Notes
There were several changes between versions that may affect the rolling upgrade of big clusters. Upgrading only part of the cluster is not recommended.
Upgrading from 20.3 and older to 22.9 and newer should be done through an intermediate version if there are any ReplicatedMergeTree tables; otherwise, the server with the new version will not start. #40641. Here is a possible upgrade path if you are upgrading from 20.3: 20.3 -> 22.8 -> 23.3 -> 23.8
If you upgrade from versions prior to 22.9, you should either upgrade all replicas at once or disable compress_marks and compress_primary_key merge tree settings before upgrade, or upgrade through an intermediate version, where the compressed marks are supported but not enabled by default, such as 23.3.
Downgrading from 23.8 to version 23.5 or below may fail due to changes in sparse columns serialization, see #55153 for possible workaround.
Known Issues in 23.8.x
The development team continues to improve the quality of the 23.8 release. The following issues still exist in the 23.8.8 version and may affect ClickHouse operation. Please inspect them carefully to decide if those are applicable to your applications.
Some new ClickHouse features and optimizations are now enabled by default. It may lead to a change in behavior, so review those carefully and disable features that may affect your system:
enable_memory_bound_merging_of_aggregation_results – if you upgrade from version prior to 22.12, we recommend setting this flag to false until the upgrade is finished.
system.query_views_log now collects information about MVs that are pushed from background threads, like Kafka / Rabbit etc. #46668. You can have more (useful!) data there after the upgrade.
LZ4 & ZSTD compression libraries were upgraded, checksum mismatch when having replicas with older versions are possible
In the previous releases we recommended disabling optimize_on_insert. This recommendation stays for 23.8 as well as inserts into Summing and AggregatingMergeTree can slow down.
Changes in Altinity Stable build Compared to Upstream Build
ClickHouse Altinity Stable builds are open source and are based on the upstream LTS versions. Altinity.Stable 23.8.8 is based on upstream 23.8.8.20-lts, but we have additionally backported several fixes:
Fix key analysis (with set) for Merge engine #54905 via #341
Fix partition pruning of extra columns in set #55172 via #342
Fix FINAL produces invalid read ranges in a rare case #54934 via #343
Fix incorrect free space accounting for least_used JBOD policy #56030 via #344
Fix ALTER COLUMN with ALIAS #56493 via #345(backported into 23.8.9 upstream)
Disable system.kafka_consumers by default due to possible live memory leak #57822 via #346(backported into 23.8.9 upstream)
Please contact us at info@altinity.com if you experience any issues with the upgrade.
Appendix
New table functions
azureBlobStorage, azureBlobStorageCluster
gcs
redis
urlCluster
New table engines
AzureBlobStorage
Redis
S3Queue
New functions
COMING SOON
New formats
One – doesn’t read any data and always returns a single row with column dummy with type UInt8 and value 0 like system.one. It can be used together with _file/_path virtual columns to list files in file/s3/url/hdfs/etc table functions without reading any data
ParquetMetadata – providers introspection into Parquet files, see this excellent blog article for detail
PrettyJSONEachRow
PrettyJSONLines
PrettyNDJSON
RowBinaryWithDefaults
New system tables
system.jemalloc_bins
system.kafka_consumers
system.user_processes – query statistics grouped by user
merge_tree_metadata_cache was removed
New columns in system tables
system.clusters: database_shard_name, database_replica_name, is_active, name (alias to cluster)
system.functions: syntax, arguments, returned_value, examples, categories – those are populated for new functions only, but eventually may be filled in for all
Fixed rare bug when we produced invalid read ranges for queries with FINAL. Resulted in Cannot read out of marks range exception. (ClickHouse#54934 by @nickitat via #343)
Projection analysis now comes after partition pruning, resulting in better plan efficiency and better statistic log (ClickHouse#56502 by @amosbird via #391)
Fix broken partition key analysis when doing projection optimization with force_index_by_date = 1 (ClickHouse#58638 by @amosbird via #391)
Pinned version of pip packet requests==2.31.0 in attempt to fix: ‘Error while fetching server API version: Not supported URL scheme http+docker’ (#409 by @Enmk)
Aarch64 builds with better introspection (-no-pie) (#396 by @Enmk)
Fixed the docker tag for docker server test image (#463 by @MyroTk)
Add SignAarch64 job to match SignRelease (#462 by @MyroTk)
Fix test_distributed_directory_monitor_split_batch_on_failure_OFF (#464 by @Enmk)
Projection analysis now comes after partition pruning, resulting in better plan efficiency and better statistic log (ClickHouse#56502 by @amosbird via #391)
Fix broken partition key analysis when doing projection optimization with force_index_by_date = 1 (ClickHouse#58638 by @amosbird via #391)*new
Fixed rare bug when we produced invalid read ranges for queries with FINAL. Resulted in Cannot read out of marks range exception. (ClickHouse#54934 by @nickitat via #343)
Pinned version of pip packet requests==2.31.0 in attempt to fix: ‘Error while fetching server API version: Not supported URL scheme http+docker’ (#409 by @Enmk)
Aarch64 builds with better introspection (-no-pie) (#396 by @Enmk)
Fixed the docker tag for docker server test image (#463 by @MyroTk)
Add SignAarch64 job to match SignRelease (#462 by @MyroTk)
Fix test_distributed_directory_monitor_split_batch_on_failure_OFF (#464 by @Enmk)
Bug Fix (user-visible misbehavior in an official stable release))
The query cache now denies access to entries when the user is re-created or assumes another role. This improves prevents attacks where 1. a user with the same name as a dropped user may access the old user’s cache entries or 2. a user with a different role may access cache entries of a role with a different row policy. (#58611 by Robert Schulze via #61439)
Fix string search with constant start position which previously could lead to memory corruption. (#61547 by Antonio Andelic via #61572)
Fix crash in multiSearchAllPositionsCaseInsensitiveUTF8 when specifying incorrect UTF-8 sequence. Example: #61714. (#61749 by pufit via #61854)
Fixed a bug in zero-copy replication (an experimental feature) that could cause The specified key does not exist errors and data loss after REPLACE/MOVE PARTITION. A similar issue might happen with TTL-moves between disks. (#54193 by Alexander Tokmakov via #62898)
Fix the ATTACH query with the ON CLUSTER clause when the database does not exist on the initiator node. Closes #55009. (#61365 by Nikolay Degterinsky via #61964)
Fix data race between MOVE PARTITION query and merges resulting in intersecting parts. (#61610 by János Benjamin Antal via #62527)
Fix skipping escape sequence parsing errors during JSON data parsing while using input_format_allow_errors_num/ratio settings. (#61883 by Kruglov Pavel via #62238)
Setting server_name might help with recently reported SSL handshake error when connecting to MongoDB Atlas: Poco::Exception. Code: 1000, e.code() = 0, SSL Exception: error:10000438:SSL routines:OPENSSL_internal:TLSV1_ALERT_INTERNAL_ERROR. (#63122 by Alexander Gololobov via #63172)
The wire protocol version check for MongoDB used to try accessing “config” database, but this can fail if the user doesn’t have permissions for it. The fix is to use the database name provided by user. (#63126 by Alexander Gololobov via #63164)
Fixes #59989: runs init scripts when force-enabled or when no database exists, rather than the inverse. (#59991 by jktng via #64422)
Fix “Invalid storage definition in metadata file” for parameterized views. (#60708 by Azat Khuzhin via #64016)
Fix the issue where the function addDays (and similar functions) reports an error when the first parameter is DateTime64. (#61561 by Shuai li via #63456)
Fix X-ClickHouse-Timezone header returning wrong timezone when using session_timezone as query level setting. (#63377 by Andrey Zvonov via #63512)
query_plan_remove_redundant_distinct can break queries with WINDOW FUNCTIONS (with allow_experimental_analyzer is on). Fixes #62820. (#63776 by Igor Nikonov via #63902)
Prevent LOGICAL_ERROR on CREATE TABLE as MaterializedView. (#64174 by Raúl Marín via #64265)
Fixed memory possible incorrect memory tracking in several kinds of queries: queries that read any data from S3, queries via http protocol, asynchronous inserts. (#64844 by Anton Popov via #64867)
Fix possible abort on uncaught exception in ~WriteBufferFromFileDescriptor in StatusFile. (#64206 by Kruglov Pavel via #65351)
Fixed bug in MergeJoin. Column in sparse serialisation might be treated as a column of its nested type though the required conversion wasn’t performed. (#65632 by Nikita Taranov via #65782)
For queries that read from PostgreSQL, cancel the internal PostgreSQL query if the ClickHouse query is finished. Otherwise, ClickHouse query cannot be canceled until the internal PostgreSQL query is finished. (#65771 by Maksim Kita via #65926)
Fix a bug in short circuit logic when old analyzer and dictGetOrDefault is used. (#65802 by jsc0218 via #65822)
Fixed a bug in ZooKeeper client: a session could get stuck in unusable state after receiving a hardware error from ZooKeeper. For example, this might happen due to “soft memory limit” in ClickHouse Keeper. (#66140 by Alexander Tokmakov via #66449)
Fixed accounting of memory allocated before attaching thread to a query or a user. (#56089 by Nikita Taranov via #61930)
Added support for parameterized view with analyzer to not analyze create parameterized view. Refactor existing parameterized view logic to not analyze create parameterized view. (#54211 by SmitaRKulkarni via #66962)
Fixes partition pruning for extra columns in a set. (#55172 by @amosbird via #342)
Fixed rare bug when we produced invalid read ranges for queries with FINAL. Resulted in Cannot read out of marks range exception. (#54934 by @nickitat via #343)
Fix incorrect free space accounting for least_used JBOD policy (#56030 by @azat via #344)
Fix ALTER COLUMN with ALIAS that previously threw the NO_SUCH_COLUMN_IN_TABLE exception. (#57395 by @evillique via #345)
Disable system.kafka_consumers by default (due to possible live memory leak) (#57822 by @azat via #346)
Performance improvements
Fixed filtering by IN(...) condition for Merge table engine. (#54905 by @nickitat via #341)
Build/Testing/Packaging Improvements
Make builds possible on Altinity’s infrastructure
clickhouse-regression test suite (#338 by @MyroTk)
Remove hostile “non-official” log message on failure. (#369 by @Enmk)
Fix kerberized_hadoop docker image build issue (#394 by @ilejn)
Improvements
Support S3 access through AWS Private Link Interface endpoints. (#62208 by @arthurpassos via #389)
Fixed accounting of memory allocated before attaching thread to a query or a user (#56089 by @nickitat via #388)
Output valid JSON/XML on exception during HTTP query execution. Add setting http_write_exception_in_output_format to enable/disable this behaviour (enabled by default). #52853
Fetching a part waits when that part is fully committed on remote replica. It is better not send part in PreActive state. In case of zero copy this is mandatory restriction. #56808
Handle sigabrt case when getting PostgreSQl table structure with empty array. #57618
Add SYSTEM JEMALLOC PURGE for purging unused jemalloc pages, SYSTEM JEMALLOC [ ENABLE | DISABLE | FLUSH ] PROFILE for controlling jemalloc profile if the profiler is enabled. Add jemalloc-related 4LW command in Keeper: jmst for dumping jemalloc stats, jmfp, jmep, jmdp for controlling jemalloc profile if the profiler is enabled. #58665
Copy S3 file GCP fallback to buffer copy in case GCP returned Internal Error with GATEWAY_TIMEOUT HTTP error code. #60164
If you want to run initdb scripts every time when ClickHouse container is starting you should initialize environment variable CLICKHOUSE_ALWAYS_RUN_INITDB_SCRIPTS. #59808
Bug Fixes (user-visible misbehavior in an official stable release)
Flatten only true Nested type if flatten_nested=1, not all Array(Tuple) #56132
4.3.7 - Altinity Stable® Build for ClickHouse® 23.3
It has been a while since we have certified the Altinity.Stable ClickHouse 22.8 release. It was delivered together with the Altinity Stable build for ClickHouse. Since then many things have happened to ClickHouse. More than 300 ClickHouse contributors from companies all around the world submitted 3000 pull requests with new features and improvements. Unfortunately, some changes affected the stability of new releases. That is why it took us 4 long months to get enough confidence in order to recommend 23.3 for production use and make sure upgrades go smoothly. As of 23.3.8 we are confident in certifying 23.3 as an Altinity Stable release.
Here are the detailed release notes and upgrade instructions for version 23.3.8.22. There are a lot of new features, but also many things that changed their behavior. Read these carefully before upgrading. There are additional notes for point releases.
23.3.19 2024-03-05 - This is the latest release. We recommend that you upgrade to this version. (But read the detailed release notes and upgrade instructions first.)
A new release introduces a lot of changes and new functions. It is very hard to pick the most essential ones, so refer to the full list in the Appendix.
The following major features are worth mentioning on the front page:
SQL features:
grace_hash JOIN algorithm
Manipulating named collections via DDL commands: SHOW/CREATE/ALTER/DROP named collection
Parameterized views: CREATE VIEW test AS SELECT ... WHERE user_id = {user:UInt64} and then SELECT * FROM test(user = 123)
Lightweight DELETEs are not marked as experimental anymore. There are still performance limitations, so do not consider them as a drop-in replacement for SQL DELETE statements
Regexp operator: SELECT ... WHERE col1 REGEXP 'a.*b'
final setting to implicitly apply the FINAL modifier to every table. See the blog article describing these new features of ReplacingMergeTree. a)
Control of scheduling merges using min_age_to_force_merge_seconds and min_age_to_force_merge_on_partition_only settings
Compressed marks and primary key on disk (disabled by default in 23.3)
Compressed marks in memory
Replication improvements:
insert_quorum = 'auto' to use the majority number
Automatic retries of inserts into replicated tables if (Zoo)Keeper is temporarily not available. Number of retries is controlled by insert_keeper_max_retries setting
Support for replication of user-defined SQL functions via (Zoo)Keeper
General performance and stability improvements when using Keeper
Security & access control
Certificate-based user authentication on the native protocol
Password complexity rules and checks
Automatically mask sensitive information like credentials in logs (without query masking rules)
Exposed applied row-level policies to system.query_log a)
Storage management
Allow to assign disks on the table level instead of storage policy: SETTINGS disk = '<disk_name>' (instead of storage_policy)
Explicit disk creation SETTINGS disk = disk(type=s3, ...)
Allow nested custom disks
Added S3 as a new type of destination for embedded backups. Supports BACKUP to S3 with as-is path/data structure.
Server-side copies for embedded S3 backups
Object storage
** glob (recursive directory traversal) for s3 table function
Possibility to control S3 storage class (STANDARD/INTELLIGENT_TIERING)
s3_plain disk type for write-once-read-many operations
StorageIceberg, Hudi and DeltaLake (with corresponding table functions iceberg, hudi and deltaLake) to access data stored on S3
OSS / oss (Alibaba Cloud Object Storage Service)
A lot of improvements to Parquet performance and compatibility a), but even more comes in 23.4 and later releases
Operational:
Ability to reset settings: SET max_block_size = DEFAULT
Partial result on query cancellation: partial_result_on_first_cancel=1
Allow recording errors to a specified file while reading text formats (CSV, TSV): input_format_record_errors_file_path=parse_errors
Allow to ignore errors while pushing to MATERIALIZED VIEW: materialized_views_ignore_errors=1
Composable protocol configuration: allows adjusting different listen hosts and wrapping any protocol into PROXYv1
As usual with ClickHouse, there are many performance and operational improvements in different server components.
a) Contributed by Altinity developers.
New Experimental Features (use with care)
Added new infrastructure for query analysis and planning. Enable with allow_experimental_analyzer=1
Added experimental query result cache. Enable with enable_experimental_query_result_cache=1
New ANN index (approximate nearest neighbor) based on Annoy for vector searches (supporting L2Distance or cosineDistance lookups). Enable with allow_experimental_annoy_index=1
Added an experimental inverted index as a new secondary index type for efficient text search. Enable with allow_experimental_inverted_index=1
New experimental parallel replicas feature. Enable with allow_experimental_parallel_reading_from_replicas=1
New mode for splitting the work on replicas using settings parallel_replicas_custom_key and parallel_replicas_custom_key_filter_type
Added a new storage engine KeeperMap, which uses ClickHouse Keeper or ZooKeeper as a key-value store. Example: CREATE TABLE map (key String, value UInt32) ENGINE = KeeperMap('/path/in/zk') PRIMARY KEY (key); It also supports for DELETE / UPDATE operations
Support deduplication for asynchronous inserts
UNDROP TABLE. Enable with allow_experimental_undrop_table_query=1
Initial implementation of Kusto Query Language
Major changes that require attention
max_threads default value has been changed. In all previous versions it was half of the available VM cores. In 23.3 it matches the number of cores. E.g. for 8 vCore VM it is now auto(8), while it was auto(4) before. That also affected other ‘max_*_threads’ settings: max_alter_threads, max_final_threads, max_part_loading_threads and max_part_removal_threads
In version 23.3, the default value of max_replicated_merges_in_queue for ReplicatedMergeTree tables increased from 16 to 1000. We recommend keeping it equal to the background_pool_size unless you have a very high number of replicas
With a high number of tables the number of ZooKeeper requests can be much higher after the upgrade (number of LIST operations). You may improve that by tuning cleanup_delay_period, merge_selecting_sleep_ms, background_schedule_pool_size
Backward Incompatible Changes
The following changes are backward incompatible and require user attention during an upgrade:
The following combinations of data types & codecs are forbidden now by default (you can allow them by setting allow_suspicious_codecs = true):
Gorilla codec on columns of non-Float32 or non-Float64 type
Codecs Delta or DoubleDelta followed by codecs Gorilla or FPC
The command GRANT ALL issued by the default user will not work anymore because the ‘default’ user does not have the grant to manage NAMED COLLECTION by default. You can allow them by extra user-level settings, e.g. for ‘default’ user:
Catboost models are now evaluated via an external process called clickhouse-library-bridge. modelEvaluate was renamed to catboostEvaluate
Parallel quorum inserts are not supported anymore for MergeTree tables created with old syntax.
The WITH TIMEOUT clause for LIVE VIEW is not supported anymore
JOIN with constant expressions is not allowed anymore. E.g. this one will fail: JOIN ON t1.x = t2.x AND 1 = 1. However, JOIN ON 1=1 works, it is converted to FULL OUTER JOIN
Support for Decimal256 was added to some functions, meaning that their resulting type can now change (if the argument was also wide Decimal)
Kafka tables with DEFAULT/EPHEMERAL/MATERIALIZED columns are forbidden now. They used to be allowed before but never worked
toDayOfWeek now can accept 3 arguments, and the meaning of the second argument was changed from timezone to the marker of the weekstart day
secondary indices with constant or non-deterministic expressions are now forbidden
The following commands/syntaxes are abandoned (no-op now):
SYSTEM RESTART DISK
PREALLOCATE option for HASHED/SPARSE_HASHED dictionaries
Some commands and settings changed their names:
function filesystemFree was renamed to filesystemUnreserved
setting max_query_cache_size was renamed to filesystem_cache_max_download_size
table function MeiliSearch was renamed to meilisearch
JSONExtract family of functions will now attempt to coerce to the requested type. In case of long integers in the JSON, the result can be different from the older version. For example:
22.8: JSONExtractInt('{"a":"5"}', 'a') = 0
23.3: JSONExtractInt('{"a":"5"}', 'a') = 5
Upgrade Notes
There were several changes between versions that may affect the rolling upgrade of big clusters. Upgrading only part of the cluster is not recommended.
Upgrading from 20.3 and older to 22.9 and newer should be done through an intermediate version if there are any ReplicatedMergeTree tables; otherwise, the server with the new version will not start. Here is a possible upgrade path if you are upgrading from 20.3: 20.3 -> 22.8 -> 23.3
Known Issues in 23.3.x
The development team continues to improve the quality of the 23.3 release. The following issues still exist in the 23.3.8 version and may affect ClickHouse operation. Please inspect them carefully to decide if those are applicable to your applications.
General stability issues:
Problems with JIT can lead to incorrect query results and various exceptions. We recommend disabling compile_expressions and compile_aggregate_expressions settings completely. See ClickHouse/ClickHouse#51368ClickHouse/ClickHouse#51090
Some queries that worked in 22.8 may fail in 23.3:
Nulls wrapped in tuples / arrays with Nulls inside used to work in older versions, but it was giving non-deterministic results. Now such rows are ignored by aggregate functions, and may return exceptions when passed to functions which expect scalars ClickHouse/ClickHouse#41595ClickHouse/ClickHouse#51541ClickHouse/ClickHouse#48623
Some queries may start working slower due to changes in the optimize_move_to_prewhere strategy. If it impacts you, you can try to set up PREWHERE manually, or use new settings move_all_conditions_to_prewhere and enable_multiple_prewhere_read_stepsClickHouse/ClickHouse#49735ClickHouse/ClickHouse#50399ClickHouse/ClickHouse#51849
Some scenarios of using projection don’t work as expected. If you use projections - please check if the queries are still working as expected
ClickHouse/ClickHouse#51173ClickHouse/ClickHouse#49150 – fixed in 23.5, but not backported
You may also look into a GitHub issues using v23.3-affected label.
Other Important Changes
Several settings have changed their defaults:
max_suspicious_broken_parts has changed from 10 to 100
async_insert_max_data_size has changed from 100000 to 1000000
optimize_distinct_in_order, optimize_duplicate_order_by_and_distinct, optimize_monotonous_functions_in_order_by, optimize_rewrite_sum_if_to_count_if were disabled
s3_upload_part_size_multiply_parts_count_threshold has been changed from 1000 to 500
Some new ClickHouse features and optimizations are now enabled by default. It may lead to a change in behavior, so review those carefully and disable features that may affect your system:
ClickHouse embedded monitoring is since 21.8. It now collects host level metrics, and stores them every second in the table system.asynchronious_metric_log. This can be visible as an increase of background writes, storage usage, etc. To return to the old rate of metrics refresh / flush, adjust those settings in config.xml:
In the previous releases we recommended disabling optimize_on_insert. This recommendation stays for 22.8 as well as inserts into Summing and AggregatingMergeTree can slow down.
Changes in Altinity Stable build Compared to Community Build
ClickHouse Altinity Stable builds are based on the upstream LTS versions. Altinity.Stable 23.3.8.22 is based on upstream 23.3.8.21-lts, but we have additionally backported several fixes:
Fixed rare bug when we produced invalid read ranges for queries with FINAL. Resulted in Cannot read out of marks range exception (ClickHouse#54934 by @nickitat via #313)
Fixed reading from sparse columns after changing setting ratio_of_defaults_for_sparse_serialization back to 1.0 and restarting the server. (ClickHouse#49660 by @CurtizJ via #314)
There was a potential vulnerability in previous ClickHouse versions: if a user has connected and unsuccessfully tried to authenticate with the “interserver secret” method, the server didn’t terminate the connection immediately but continued to receive and ignore the leftover packets from the client. While these packets are ignored, they are still parsed, and if they use a compression method with another known vulnerability, it will lead to exploitation of it without authentication. This issue was found with [ClickHouse Bug Bounty Program] by https://twitter.com/malacupa. (ClickHouse#56794 by Alexey Milovidov via ClickHouse#56928).
If the database is already initialized, it doesn’t need to be initialized again upon subsequent launches. This can potentially fix the issue of infinite container restarts when the database fails to load within 1000 attempts (relevant for very large databases and multi-node setups). (ClickHouse#50724 by Alexander Nikolaev via ClickHouse#55671).
Resource with source code including submodules is built in Darwin special build task. It may be used to build ClickHouse without checkouting submodules. (ClickHouse#51435 by Ilya Yatsishin via ClickHouse#55391).
Fixed rare bug when we produced invalid read ranges for queries with FINAL. Resulted in Cannot read out of marks range exception (ClickHouse#54934 by @nickitat via #313)
Fixed reading from sparse columns after changing setting ratio_of_defaults_for_sparse_serialization back to 1.0 and restarting the server. (ClickHouse#49660 by @CurtizJ via #314)
Backported in #52213: Do not store blocks in ANY hash join if nothing is inserted. #48633 (vdimir).
Backported in #52826: Fixed incorrect projection analysis which invalidates primary keys. This issue only exists when query_plan_optimize_primary_key = 1, query_plan_optimize_projection = 1 . This fixes #48823, #51173, and #52308 (Amos Bird).
Build/Testing/Packaging Improvements
Backported in #53019: Packing inline cache into docker images sometimes causes strange special effects. Since we don’t use it at all, it’s good to go. #53008 (Mikhail f. Shiryaev).
Backported in #53288: The compiler’s profile data (-ftime-trace) is uploaded to ClickHouse Cloud., the second attempt after #53100. #53213 (Alexey Milovidov).
A few months ago, we certified the ClickHouse 22.3 release. It was delivered together with the Altinity Stable build for ClickHouse. Since then many things have happened to ClickHouse. On the Altinity side we continued to put in features but really focused on build process and testing. We started testing the new ClickHouse LTS release 22.8 as soon as it was out in late August. It took us several months to confirm 22.8 is ready for production use and to make sure upgrades go smoothly. As of 22.8.13.21 we are confident in certifying 22.8 as an Altinity Stable release.
This release is a significant upgrade since the previous Altinity Stable release. It includes more than 2000 pull requests from 280 contributors. Please look below for detailed release notes; read these carefully before upgrading. There are additional notes for point releases.
22.8.20 - This is the latest release of version 22.8. We recommend that you upgrade to this version. (But read the detailed release notes and upgrade instructions first.)
22.8.15 FIPS - A FIPS-compatible version of 22.8.15.
A new release introduces a lot of changes and new functions. It is very hard to pick the most essential ones, so refer to the full list in the Appendix. The following major features are worth mentioning on the front page:
Caches management commands: DESCRIBE CACHE, SHOW CACHES, SYSTEM DROP FILESYSTEM CACHE
Other:
Store metadata cache in RocksDB for faster startup times
Add simple chart visualization to the built-in Play interface
system.settings_changes table to track changes between versions (incomplete)
As usual with ClickHouse, there are many performance and operational improvements in different server components.
a) Contributed by Altinity developers.
Major changes that require attention
Ordinary database deprecation
The Ordinary database engine and the old storage definition syntax for *MergeTree tables are deprecated. It has following consequences:
If the system database has the Ordinary engine it will be automatically converted to Atomic on server startup.
default_database_engine setting is deprecated and does nothing. New databases are always created as Atomic ones if the engine is not specified.
By default it’s not possible to create new databases with the Ordinary engine. There is a setting to keep old behavior: allow_deprecated_database_ordinary=1.
Setting allow_deprecated_syntax_for_merge_tree allows to create MergeTree tables in old syntax, but these settings may be removed in future releases.
There is a way to convert existing databases from Ordinary to Atomic. In order to do that, create an empty convert_ordinary_to_atomic file in the flags directory and all Ordinary databases will be converted automatically on the next server start.
Background pools
Configuration of background pools have been moved from profile to server settings. However, due to the ClickHouse bug, pools need to be defined in both config.xml and users.xml.
If pools were modified in your ClickHouse cluster, you need to add a section in config.xml.
If you need to adjust pools in 22.8, you need to do in two places now
Zero-copy replication was incidentally turned on by default in 22.3. In 22.8 it is turned off. So if you were using Disk S3 on a replicated cluster, you will see an increase in S3 storage, double writes and double merges. This is still an experimental feature, it can be enabled with allow_remote_fs_zero_copy_replication setting.
Changes in s3 multipart upload
Since 22.6 uploads to s3 are executed in more threads and in more aggressive manner, which can create a higher pressure on the network and saturate some s3-compatible storages (e.g. Minio). Better control of that was added only in 22.9.
Backward Incompatible Changes
The following changes are backward incompatible and require user attention during an upgrade:
Extended range of Date32 and DateTime64 to support dates from the year 1900 to 2299. In previous versions, the supported interval was only from the year 1925 to 2283. The implementation is using the proleptic Gregorian calendar (which is conformant with ISO 8601:2004 (clause 3.2.1 The Gregorian calendar)) instead of accounting for historical transitions from the Julian to the Gregorian calendar. This change affects implementation-specific behavior for out-of-range arguments. E.g. if in previous versions the value of 1899-01-01 was clamped to 1925-01-01, in the new version it will be clamped to 1900-01-01. It changes the behavior of rounding with toStartOfInterval if you pass INTERVAL 3 QUARTER up to one quarter because the intervals are counted from an implementation-specific point of time.
Now, all relevant dictionary sources respect the remote_url_allow_hosts setting. It was already done for HTTP, Cassandra, Redis. Added ClickHouse, MongoDB, MySQL, PostgreSQL. Host is checked only for dictionaries created from DDL.
ClickHouse x86 binaries now require support for AVX instructions, i.e. a CPU not older than Intel Sandy Bridge / AMD Bulldozer, both released in 2011.
Make the remote filesystem cache composable, allow not to evict certain files (regarding idx, mrk, ..), delete the old cache version. Now it is possible to configure cache over Azure blob storage disk, over Local disk, over StaticWeb disk, etc. This PR is marked backward incompatible because cache configuration changes and in order for cache to work need to update the config file. Old cache will still be used with new configuration. The server will startup fine with the old cache configuration.
Remove support for octal number literals in SQL. In previous versions they were parsed as Float64.
Changes how settings using seconds as type are parsed to support floating point values (for example: max_execution_time=0.5). Infinity or NaN values will throw an exception.
Changed format of binary serialization of columns of experimental type Object. New format is more convenient to implement by third-party clients.
LIKE patterns with trailing escape symbol (’') are now disallowed (as mandated by the SQL standard).
Do not allow SETTINGS after FORMAT for INSERT queries. There is compatibility setting parser_settings_after_format_compact to accept such queries, but it is turned OFF by default.
Function yandexConsistentHash (consistent hashing algorithm by Konstantin “kostik” Oblakov) is renamed to kostikConsistentHash. The old name is left as an alias for compatibility. Although this change is backward compatible, we may remove the alias in subsequent releases, that’s why it’s recommended to update the usages of this function in your apps.
Upgrade Notes
There were several changes between versions that may affect the rolling upgrade of big clusters. Upgrading only part of the cluster is not recommended.
If you run different ClickHouse versions on a cluster with AArch64 CPU or mix AArch64 and amd64 on a cluster, and use distributed queries with GROUP BY multiple keys of fixed-size type that fit in 256 bits but don’t fit in 64 bits, and the size of the result is huge, the data will not be fully aggregated in the result of these queries during upgrade. Workaround: upgrade with downtime instead of a rolling upgrade.
Rolling upgrade from 20.4 and older is impossible because the “leader election” mechanism is removed from ReplicatedMergeTree.
Known Issues in 22.8.x
The development team continues to improve the quality of the 22.8 release. The following issues still exist in the 22.8.13 version and may affect ClickHouse operation. Please inspect them carefully to decide if those are applicable to your applications.
General stability issues (fixed in Altinity.Stable build 22.8.13):
allow_remote_fs_zero_copy_replication is now 0 (was 1)
format_csv_allow_single_quotes is now 0 (was 1) – if it is set to true, allow strings in single quotes.
distributed_ddl_entry_format_version is now 3 (was 1)
log_query_threads is now 0 (was 1)
join_algorithm is now ‘default’ (was ‘hash’) – ‘default’ means ‘hash’ or ‘direct’ if possible, so this change only applies to new ‘direct’ joins.
max_download_threads is now 4 – that affects number of parallel threads for URL and S3 table engines and table functions
Some new ClickHouse features and optimizations are now enabled by default. It may lead to a change in behavior, so review those carefully and disable features that may affect your system:
allow_experimental_geo_types – allow geo data types such as Point, Ring, Polygon, MultiPolygon
output_format_json_named_tuples_as_objects – it allows to serialize named tuples as JSON objects in JSON formats.
collect_hash_table_stats_during_aggregation – enable collecting hash table statistics to optimize memory allocation, this may lead to performance degradation
enable_positional_arguments – enable positional arguments in ORDER BY, GROUP BY and LIMIT BY
input_format_skip_unknown_fields – skip columns with unknown names from input data (it works for JSONEachRow, -WithNames, -WithNamesAndTypes and TSKV formats). Previously, ClickHouse threw an exception.
odbc_bridge_use_connection_pooling – use connection pooling in ODBC bridge. If set to false, a new connection is created every time
optimize_distinct_in_order – enable DISTINCT optimization if some columns in DISTINCT form a prefix of sorting. For example, prefix of sorting key in merge tree or ORDER BY statement
optimize_multiif_to_if – replace ‘multiIf’ with only one condition to ‘if’.
optimize_read_in_window_order – enable ORDER BY optimization in window clause for reading data in corresponding order in MergeTree tables.
optimize_sorting_by_input_stream_properties – optimize sorting by sorting properties of input stream
output_format_json_named_tuples_as_objects – serialize named tuple columns as JSON objects.
ClickHouse embedded monitoring is since 21.8. It now collects host level metrics, and stores them every second in the table system.asynchronious_metric_log. This can be visible as an increase of background writes, storage usage, etc. To return to the old rate of metrics refresh / flush, adjust those settings in config.xml:
In the previous releases we recommended disabling optimize_on_insert. This recommendation stays for 22.8 as well as inserts into Summing and AggregatingMergeTree can slow down.
Changes in Altinity Stable build Compared to Community Build
ClickHouse Altinity Stable builds are based on the community LTS versions. Altinity.Stable 22.8.13.21 is based on community 22.8.13.20-lts, but we have additionally backported several fixes:
Note: naming schema for Altinity.Stable build packages has been changed since 21.8.x.
21.8.x
22.3.x and later versions
<package>_<ver>.altinitystable_all.deb
<package>_<ver>.altinitystable_amd64.deb
<package>-<ver>.altinitystable-2.noarch.rpm
<package>-<ver>.altinitystable.x86_64.rpm
Docker images for community versions have been moved from ‘yandex’ to ‘clickhouse’ organization, and should be referenced as ‘clickhouse/clickhouse-server:22.8’.
Altinity Stable build images are available as ‘altinity/clickhouse-server:22.8.13.21.altinitystable’.
Mac users are welcome to use Homebrew Formulae. Ready-to-use bottles are available for both M1 and Intel Macs running Monterey.
Backported in #48157: Fixed UNKNOWN_TABLE exception when attaching to a materialized view that has dependent tables that are not available. This might be useful when trying to restore state from a backup. #47975 (MikhailBurdukov).
Backported in #45845: Fixed performance of short SELECT queries that read from tables with large number ofArray/Map/Nested columns. #45630 (Anton Popov).
Backported in #46374: Fix too big memory usage for vertical merges on non-remote disk. Respect max_insert_delayed_streams_for_parallel_write for the remote disk. #46275 (Nikolai Kochetov).
Backported in #46358: Allow using Vertical merge algorithm with parts in Compact format. This will allow ClickHouse server to use much less memory for background operations. This closes #46084. #46282 (Anton Popov).
Build/Testing/Packaging Improvement
Backported in #46112: Remove the dependency on the adduser tool from the packages, because we don’t use it. This fixes #44934. #45011 (Alexey Milovidov).
Backported in #46505: Some time ago the ccache compression was changed to zst, but gz archives are downloaded by default. It fixes it by prioritizing zst archive. #46490 (Mikhail f. Shiryaev).
Improvement
Backported in #46981: Apply ALTER TABLE table_name ON CLUSTER cluster MOVE PARTITION|PART partition_expr TO DISK|VOLUME 'disk_name' to all replicas. Because ALTER TABLE t MOVE is not replicated. #46402 (lizhuoyu5).
Bug Fix
Backported in #45908: Fixed bug with non-parsable default value for EPHEMERAL column in table metadata. #44026 (Yakov Olkhovskiy).
Backported in #46238: A couple of seg faults have been reported around c-ares. #45629 (Arthur Passos).
Backported in #45727: Fix key description when encountering duplicate primary keys. This can happen in projections. See #45590 for details. #45686 (Amos Bird).
Backported in #46394: Fix SYSTEM UNFREEZE queries failing with the exception CANNOT_PARSE_INPUT_ASSERTION_FAILED. #46325 (Aleksei Filatov).
Backported in #46442: Fix possible LOGICAL_ERROR in asynchronous inserts with invalid data sent in format VALUES. #46350 (Anton Popov).
Backported in #46674: Fix an invalid processing of constant LowCardinality argument in function arrayMap. This bug could lead to a segfault in release, and logical error Bad cast in debug build. #46569 (Alexey Milovidov).
Backported in #47336: Sometimes after changing a role that could be not reflected on the access rights of a user who uses that role. This PR fixes that. #46772 (Vitaly Baranov).
Backported in #46901: Fix incorrect alias recursion in QueryNormalizer. #46609 (Raúl Marín).
Backported in #47156: Fix arithmetic operations in aggregate optimization with min and max. #46705 (Duc Canh Le).
Backported in #46987: Fix result of LIKE predicates which translate to substring searches and contain quoted non-LIKE metacharacters. #46875 (Robert Schulze).
Backported in #47357: Fix possible deadlock on distributed query cancellation. #47161 (Kruglov Pavel).
V22.3 Build
A few months ago we certified 21.8 as an Altinity Stable release. It was delivered together with the Altinity Stable build for ClickHouse. Since then many things have happened to ClickHouse. In Altinity we continued to work on newer releases and run them in-house. We completed several new features, and many more have been added by community contributors. We started testing the new ClickHouse LTS release 22.3 as soon as it was out in late March. It took us more than three months to confirm 22.3 is ready for production use and to make sure upgrades go smoothly. As of 22.3.8.40 we are confident in certifying 22.3 as an Altinity Stable release.
This release is a significant upgrade since the previous Altinity Stable release. It includes more than 3000 pull requests from 415 contributors. Please look below for detailed release notes; read these carefully before upgrading. There are additional notes for point releases.
22.3.15 - This is the latest release of version 22.3. We recommend that you upgrade to this release. (But read the detailed release notes and upgrade instructions first.)
A new release introduces a lot of changes and new functions. It is very hard to pick the most essential ones, so refer to the full list in the Appendix. The following major features are worth mentioning on the front page:
SQL features:
User defined functions as lambda expressions.
User defined functions as external executables.
Schema inference for INSERT and SELECT from external data sources.
-Map combinator for Map data type.
WINDOW VIEW for stream processing (experimental). See our blog article “Battle of Views” comparing it to LIVE VIEW.
INTERSECT, EXCEPT, ANY, ALL, EXISTS operators.
EPHEMERAL columns.
Asynchronous inserts.
Support expressions in JOIN ON.
OPTIMIZE DEDUPLICATE on a subset of columns a).
COMMENT on schema objects a).
Security features:
Predefined named connections (or named collections) for external data sources. Can be used in table functions, dictionaries, table engines.
system.session_log table that tracks connections and login attempts a).
Disk-level encryption. See the meetup presentation for many interesting details.
Support server-side encryption keys for S3 a).
Support authentication of users connected via SSL by their X.509 certificate.
Replication and Cluster improvements:
ClickHouse Keeper – in-process ZooKeeper replacement – has been graduated to production-ready by the ClickHouse team. We also keep testing it on our side: the core functionality looks good and stable, some operational issues and edge cases still exist.
Automatic replica discovery – no need to alter remote_servers anymore.
Parallel reading from multiple replicas (experimental).
Dictionary features:
Array attributes, Nullable attributes.
New hashed_array dictionary layout that reduces RAM usage for big dictionaries (idea proposed by Altinity).
Executable function, storage engine and dictionary source.
FileLog table engine.
Huawei OBS storage support.
Aliyun OSS storage support.
Remote file system and object storage features:
Zero-copy replication for HDFS.
Partitioned writes into S3 a), File, URL and HDFS storages.
Local data cache for remote filesystems.
Other:
Store user access management data in ZooKeeper.
Production ready ARM support.
Significant rework of clickhouse-local that is now as advanced as clickhouse-client .
Projections and window functions are graduated and not experimental anymore.
As usual with ClickHouse, there are many performance and operational improvements in different server components.
a) Contributed by Altinity developers.
Backward Incompatible Changes
The following changes are backward incompatible and require user attention during an upgrade:
Do not output trailing zeros in text representation of Decimal types. Example: 1.23 will be printed instead of 1.230000 for decimal with scale 6. Serialization in output formats can be controlled with the setting output_format_decimal_trailing_zeros.
Now, scalar subquery always returns a Nullable result if its type can be Nullable.
Introduce syntax for here documents. Example: SELECT $doc$ VALUE $doc$. This change is backward incompatible if there are identifiers that contain $.
Now indices can handle Nullable types, including isNull and isNotNull functions. This required index file format change – idx2 file extension. ClickHouse 21.8 can not read those files, so a correct downgrade may not be possible.
MergeTree table-level settings replicated_max_parallel_sends, replicated_max_parallel_sends_for_table, replicated_max_parallel_fetches, replicated_max_parallel_fetches_for_table were replaced with max_replicated_fetches_network_bandwidth, max_replicated_sends_network_bandwidth and background_fetches_pool_size.
Change the order of json_path and json arguments in SQL/JSON functions to be consistent with the standard.
A “leader election” mechanism is removed from ReplicatedMergeTree, because multiple leaders have been supported since 20.6. If you are upgrading from ClickHouse version older than 20.6, and some replica with an old version is a leader, then the server will fail to start after upgrade. Stop replicas with the old version to make the new version start. Downgrading to versions older than 20.6 is not possible.
Change implementation specific behavior on overflow of the function toDateTime. It will be saturated to the nearest min/max supported instant of datetime instead of wraparound. This change is highlighted as “backward incompatible” because someone may unintentionally rely on the old behavior.
Upgrade Notes
There were several changes between versions that may affect the rolling upgrade of big clusters. Upgrading only part of the cluster is not recommended.
Data after merge is not byte-identical for tables with MINMAX indexes.
Data after merge is not byte-identical for tables created with the old syntax - count.txt is added in 22.1
Rolling upgrade from 20.4 and older is impossible because the “leader election” mechanism is removed from ReplicatedMergeTree.
Known Issues in 22.3.x
The development team continues to improve the quality of the 22.3 release. The following issues still exist in the 22.3.8 version and may affect ClickHouse operation. Please inspect them carefully to decide if those are applicable to your applications.
Some queries that worked in 21.8 may fail in 22.3:
If you started using 22.3 from the earlier versions, please note that following important bugs have been fixed, especially related to PREWHERE functionality:
Behavior of some metrics has been changed. For example written_rows / result_rows may be reported differently, see https://gist.github.com/filimonov/c83fdf988398c062f6fe5b3344c35e80BackgroundPoolTask was split into BackgroundMergesAndMutationsPoolTask and BackgroundCommonPoolTask.
New setting background_merges_mutations_concurrency_ratio=2 – that means ClickHouse can schedule two times more merges/mutations than background_pool_size, which is still 16 by default. For some scenarios with stale replicas the behavior may be harder to predict / explain. If needed, you can return the old behavior by setting background_merges_mutations_concurrency_ratio=1.
Pool sizes should be now configured in config.xml (Fallback reading that from default profile of users.xml is still exists) .
In queries like SELECT a, b, … GROUP BY (a, b, …) ClickHouse does not untuple the GROUP BY expression anymore. The same is true for ORDER BY and PARTITION BY.
When dropping and renaming schema objects ClickHouse now checks dependencies and throws an Exception if the operation may break the dependency:
Code: 630. DB::Exception: Cannot drop or rename X because some tables depend on it: Y
It may be disabled by setting:
check_table_dependencies=0
ClickHouse embedded monitoring is since 21.8. It now collects host level metrics, and stores them every second in the table system.asynchronious_metric_log. This can be visible as an increase of background writes, storage usage, etc. To return to the old rate of metrics refresh / flush, adjust those settings in config.xml:
Some new ClickHouse features are now enabled by default. It may lead to a change in behavior, so review those carefully and disable features that may affect your system:
In the previous releases we recommended disabling optimize_on_insert. This recommendation stays for 22.3 as well as inserts into Summing and AggregatingMergeTree can slow down.
Changes Compared to Community Build
ClickHouse Altinity Stable builds are based on the community LTS versions. Altinity.Stable 22.3.8.40 is based on community 22.3.8.39-lts, but we have additionally backported several features we were working on for our clients:
Note: The naming schema for Altinity.Stable build packages has been changed since 21.8.x.
21.8.x
22.3.x
<package>_<ver>.altinitystable_all.deb
<package>_<ver>.altinitystable_amd64.deb
<package>-<ver>.altinitystable-2.noarch.rpm
<package>-<ver>.altinitystable.x86_64.rpm
Docker images for community versions have been moved from ‘yandex’ to ‘clickhouse’ organization, and should be referenced as ‘clickhouse/clickhouse-server:22.3’. Altinity stable build images are available as ‘altinity/clickhouse-server:22.3’.
Mac users are welcome to use Homebrew Formulae. Ready-to-use bottles are available for both M1 and Intel Macs running Monterey.
Choose correct aggregation method for LowCardinality with BigInt. #42342 (Duc Canh Le).
Fix a bug with projections and the aggregate_functions_null_for_empty setting. This bug is very rare and appears only if you enable the aggregate_functions_null_for_empty setting in the server’s config. This closes #41647. #42198 (Alexey Milovidov).
Fix possible crash in SELECT from Merge table with enabled optimize_monotonous_functions_in_order_by setting. Fixes #41269. #41740 (Nikolai Kochetov).
Fix possible pipeline stuck exception for queries with OFFSET. The error was found with enable_optimize_predicate_expression = 0 and always false condition in WHERE. Fixes #41383. #41588 (Nikolai Kochetov).
Writing data in Apache ORC format might lead to a buffer overrun. #41458 (Alexey Milovidov).
The aggregate function categorialInformationValue was having incorrectly defined properties, which might cause a null pointer dereferencing at runtime. This closes #41443. #41449 (Alexey Milovidov).
Add column type check before UUID insertion in MsgPack format. #41309 (Kruglov Pavel).
Queries with OFFSET clause in subquery and WHERE clause in outer query might return incorrect result, it’s fixed. Fixes #40416. #41280 (Alexander Tokmakov).
Fix possible segfaults, use-heap-after-free and memory leak in aggregate function combinators. Closes #40848. #41083 (Kruglov Pavel).
Fix memory leak while pushing to MVs w/o query context (from Kafka/…). #40732 (Azat Khuzhin).
Proxy resolver stop on first successful request to endpoint. #40353 (Maksim Kita).
Fix rare bug with column TTL for MergeTree engines family: In case of repeated vertical merge the error Cannot unlink file ColumnName.bin ... No such file or directory. could happen. #40346 (alesapin).
Fix potential deadlock in WriteBufferFromS3 during task scheduling failure. #40070 (Maksim Kita).
21.8.15 - This is the latest release of version 21.8. We recommend that you upgrade to this release. (But read the detailed release notes and upgrade instructions first.)
A new release introduces a lot of changes and new functions. The full list is available in the Appendix, so refer to this section for more detail. The following new features are worth mentioning on the front page:
SQL features:
DISTINCT ON a subset of columns
Partial support of SQL/JSON standard
Arrays in dictionaries are now supported
Arrays and nested data types are now supported for Parquet and Arrow formats
DateTime64 extended range, Now dates between 1925 to 2283 years are supported. a)
Security features:
Disk level encryption
Kerberos authentication for HTTP protocol a)
Active Directory groups mapping for LDAP user directory a)
MaterializedPostgreSQL database engine for replication from PostgreSQL
HDFS disk support (experimental)
Allow to catch Kafka errors into a separate stream (see the KB article on this)
Other:
YAML configuration format as an alternative to XML
As usual with ClickHouse, there are many performance and operational improvements in different server components.
a) Contributed by Altinity developers.
Backward Incompatible Changes
The following changes are backward incompatible and require user attention during an upgrade:
Users of LowCardinality(Nullable(...)) can not safely downgrade to versions older than 21.4. Data in tables with columns of those types inserted / merged by 21.8 will be lost after the downgrade.
Values of UUID type cannot be compared with integers. For example, instead of writing uuid != 0 type uuid != '00000000-0000-0000-0000-000000000000'
The toStartOfIntervalFunction will align hour intervals to midnight (in previous versions they were aligned to the start of unix epoch). For example, toStartOfInterval(x, INTERVAL 11 HOUR) will split every day into three intervals: 00:00:00..10:59:59, 11:00:00..21:59:59 and 22:00:00..23:59:59.
It’s not possible to rollback to the older ClickHouse version after executing ALTER ... ATTACH query as the old servers would fail to process the new command entry ATTACH_PART in the replicated log.
The behaviour of remote_url_allow_hosts has changed. In previous versions the empty section did nothing, in 21.8 it will block access to all external hosts. Remove this section from the configuration files after an upgrade if you experience issues with url() or s3() functions.
If you will downgrade to version before 21.1 clickhouse will not be able to start automatically – you will need to remove the system.*_log tables manually to downgrade
There is an issue with uniqueState(UUID) in AggregatingMergeTree tables, and can be corrected by replacing uniqState(uuid)in MATERIALIZED VIEWswith uniqState(sipHash64(uuid)) and change data type for already saved data from AggregateFunction(uniq, UUID) to AggregateFunction(uniq, UInt64). For more information see the following:
There were several changes between versions that may affect the rolling upgrade of big clusters. Upgrading only part of the cluster is not recommended.
Distributed queries with explicitly defined large sets are now executed differently. Compatibility setting legacy_column_name_of_tuple_literal may be enabled during the rolling upgrade of the cluster. Otherwise distributed queries with explicitly defined sets at IN clause may fail during upgrade.
ATTACH PART[ITION] queries may not work during cluster upgrade
Other Important Changes
ClickHouse embedded monitoring has become a bit more aggressive. It now collects several system stats, and stores them in the table system.asynchronious_metric_log. This can be visible as an increase of background writes, storage usage, etc. To return to the old rate of metrics refresh / flush, adjust those settings in config.xml:
Some new ClickHouse features are now enabled by default. It may lead to a change in behaviour, so review those carefully and disable features that may affect your system:
async_socket_for_remote
compile_aggregate_expressions
compile_expressions
cross_to_inner_join_rewrite
insert_null_as_default
optimize_skip_unused_shards_rewrite_in
query_plan_enable_optimizations
query_plan_filter_push_down
In the previous releases we recommended disabling optimize_on_insert. This recommendation stays for 21.8 as well as inserts into Summing and AggregatingMergeTree can slow down.
Known issues in 21.8.8
The development team continues to improve the quality of the 21.8 release. The following issues still exist in the 21.8.8 version and may affect ClickHouse operation. Please inspect them carefully to decide if those are applicable to your applications:
system.events for event = 'Merge' are overstated. ClickHouse incorrectly increments this counter.
Timeout exceeded: elapsed 18446744073.709553 seconds error that might happen in extremely rare cases, presumably due to some bug in kernel.
You may also look into a GitHub issues using a special v21.8-affected label.
ClickHouse Altinity Stable Releases are based on the community versions. For more information on installing ClickHouse from either the Altinity Stable builds or the community builds, see the ClickHouse Altinity Stable Builds Install Guide.
Please contact us at info@altinity.com if you experience any issues with the upgrade.
When greater than zero only a single replica starts the merge immediately when merged part on shared storage and ‘allow_remote_fs_zero_copy_replication’ is enabled.
system.settings added/changed
Type
Name
Old value
New value
Description
settings
allow_experimental_bigint_types
0
1
Obsolete setting, does nothing.
settings
allow_experimental_codecs
0
If it is set to true, allow to specify experimental compression codecs (but we don't have those yet and this option does nothing).
Should StorageDistributed DirectoryMonitors try to split batch into smaller in case of failures.
settings
distributed_push_down_limit
0
If 1, LIMIT will be applied on each shard separately. Usually you don't need to use it, since this will be done automatically if it is possible, i.e. for simple query SELECT FROM LIMIT.
If false only part UUIDs for currently moving parts are sent. If true all read part UUIDs are sent (useful only for testing).
settings
external_storage_max_read_bytes
0
Limit maximum number of bytes when table with external engine should flush history data. Now supported only for MySQL table engine, database engine, dictionary and MaterializeMySQL. If equal to 0, this setting is disabled
settings
external_storage_max_read_rows
0
Limit maximum number of rows when table with external engine should flush history data. Now supported only for MySQL table engine, database engine, dictionary and MaterializeMySQL. If equal to 0, this setting is disabled
settings
force_optimize_projection
0
If projection optimization is enabled, SELECT queries need to use projection
settings
glob_expansion_max_elements
1000
Maximum number of allowed addresses (For external storages, table functions, etc).
settings
group_by_two_level_threshold_bytes
100000000
50000000
From what size of the aggregation state in bytes, a two-level aggregation begins to be used. 0 - the threshold is not set. Two-level aggregation is used when at least one of the thresholds is triggered.
settings
handle_kafka_error_mode
default
Obsolete setting, does nothing.
settings
http_max_field_name_size
1048576
Maximum length of field name in HTTP header
settings
http_max_field_value_size
1048576
Maximum length of field value in HTTP header
settings
http_max_fields
1000000
Maximum number of fields in HTTP header
settings
http_max_uri_size
1048576
Maximum URI length of HTTP request
settings
insert_null_as_default
1
Insert DEFAULT values instead of NULL in INSERT SELECT (UNION ALL)
settings
legacy_column_name_of_tuple_literal
0
List all names of element of large tuple literals in their column names instead of hash. This settings exists only for compatibility reasons. It makes sense to set to 'true', while doing rolling update of cluster from version lower than 21.7 to higher.
The maximum speed of data exchange over the network in bytes per second for replicated fetches. Zero means unlimited. Only has meaning at server startup.
settings
max_replicated_sends_network_bandwidth_for_server
0
The maximum speed of data exchange over the network in bytes per second for replicated sends. Zero means unlimited. Only has meaning at server startup.
settings
min_count_to_compile_aggregate_expression
3
The number of identical aggregate expressions before they are JIT-compiled
settings
normalize_function_names
1
0
Normalize function names to their canonical names
settings
odbc_bridge_connection_pool_size
16
Connection pool size for each connection settings string in ODBC bridge.
settings
optimize_functions_to_subcolumns
0
Transform functions to subcolumns, if possible, to reduce amount of read data. E.g. 'length(arr)' -> 'arr.size0', 'col IS NULL' -> 'col.null'
settings
optimize_fuse_sum_count_avg
0
Fuse aggregate functions sum(), avg(), count() with identical arguments into one sumCount() call, if the query has at least two different functions
settings
optimize_move_to_prewhere_if_final
0
If query has FINAL, the optimization move_to_prewhere is not always correct and it is enabled only if both settings optimize_move_to_prewhere and optimize_move_to_prewhere_if_final are turned on
settings
optimize_skip_unused_shards_limit
1000
Limit for number of sharding key values, turns off optimize_skip_unused_shards if the limit is reached
settings
optimize_skip_unused_shards_rewrite_in
1
Rewrite IN in query for remote shards to exclude values that does not belong to the shard (requires optimize_skip_unused_shards)
settings
output_format_arrow_low_cardinality_as_dictionary
0
Enable output LowCardinality type as Dictionary Arrow type
settings
postgresql_connection_pool_size
16
Connection pool size for PostgreSQL table engine and database engine.
settings
postgresql_connection_pool_wait_timeout
5000
Connection pool push/pop timeout on empty pool for PostgreSQL table engine and database engine. By default it will block on empty pool.
settings
prefer_column_name_to_alias
0
Prefer using column names instead of aliases if possible.
settings
prefer_global_in_and_join
0
If enabled, all IN/JOIN operators will be rewritten as GLOBAL IN/JOIN. It's useful when the to-be-joined tables are only available on the initiator and we need to always scatter their data on-the-fly during distributed processing with the GLOBAL keyword. It's also useful to reduce the need to access the external sources joining external tables.
settings
query_plan_enable_optimizations
1
Apply optimizations to query plan
settings
query_plan_filter_push_down
1
Allow to push down filter by predicate query plan step
settings
s3_max_single_read_retries
4
The maximum number of retries during single S3 read.
settings
sleep_in_send_data
0
settings
sleep_in_send_data_ms
0
Time to sleep in sending data in TCPHandler
settings
sleep_in_send_tables_status
0
settings
sleep_in_send_tables_status_ms
0
Time to sleep in sending tables status response in TCPHandler
settings
use_antlr_parser
0
Also, please refer to the release notes from the development team available at the following URLs:
Fix usage of functions array and tuple with literal arguments in distributed queries. Previously it could lead to Not found columns exception. ClickHouse#33938 (Anton Popov).
ClickHouse release v21.8.13.1-altinitystable as compared to v21.8.12.29-altinitystable:
Bug Fixes
Fixed Apache Avro Union type index out of boundary issue in Apache Avro binary format. #33022 (Harry Lee).
Quota limit was not reached, but the limit was exceeded. This PR fixes #31174. #31656 (sunny).
NO CL ENTRY: ‘fix json error after downgrade’. #33166 (bullet1337).
Integer overflow to resize the arrays causes heap corrupt. #33024 (varadarajkumar).
fix crash when used fuzzBits with multiply same FixedString, Close #32737. #32755 (SuperDJY).
Fix possible exception at RabbitMQ storage startup by delaying channel creation. #32584 (Kseniia Sumarokova).
Fixed crash with SIGFPE in aggregate function avgWeighted with Decimal argument. Fixes #32053. #32303 (tavplubix).
Some replication queue entries might hang for temporary_directories_lifetime (1 day by default) with Directory tmp_merge_<part_name> or Part ... (state Deleting) already exists, but it will be deleted soon or similar error. It’s fixed. Fixes #29616. #32201 (tavplubix).
XML dictionaries identifiers, used in table create query, can be qualified to default_database during upgrade to newer version. Closes #31963. #32187 (Maksim Kita).
Number of active replicas might be determined incorrectly when inserting with quorum if setting replicated_can_become_leader is disabled on some replicas. It’s fixed. #32157 (tavplubix).
Fixed Directory ... already exists and is not empty error when detaching part. #32063 (tavplubix).
Some GET_PART entry might hang in replication queue if part is lost on all replicas and there are no other parts in the same partition. It’s fixed in cases when partition key contains only columns of integer types or Date[Time]. Fixes #31485. #31887 (tavplubix).
Change configuration path from keeper_server.session_timeout_ms to keeper_server.coordination_settings.session_timeout_ms when constructing a KeeperTCPHandler - Same with operation_timeout. #31859 (JackyWoo).
Fix a bug about function transform with decimal args. #31839 (李帅).
Fix crash when function dictGet with type is used for dictionary attribute when type is Nullable. Fixes #30980. #31800 (Maksim Kita).
Fix possible crash (or incorrect result) in case of LowCardinality arguments of window function. Fixes #31114. #31888 (Nikolai Kochetov).
Changes compared to the Community Build
Fix invalid cast of Nullable type when nullable primary key is used. (Nullable primary key is a discouraged feature - please do not use). This fixes #31075#31823Amos Bird).
Fixed race in JSONEachRowWithProgress output format when data and lines with progress are mixed in output. #31736 (Kruglov Pavel).
Fixed there are no such cluster here error on execution of ON CLUSTER query if specified cluster name is name of Replicated database. #31723 (tavplubix).
Settings input_format_allow_errors_num and input_format_allow_errors_ratio did not work for parsing of domain types, such as IPv4, it’s fixed. Fixes #31686. #31697 (tavplubix).
RENAME TABLE query worked incorrectly on attempt to rename an DDL dictionary in Ordinary database, it’s fixed. #31638 (tavplubix).
Fix invalid generated JSON when only column names contain invalid UTF-8 sequences. #31534 (Kevin Michel).
Remove not like function into RPNElement. #31169 (sundyli).
Fixed bug in Keeper which can lead to inability to start when some coordination logs was lost and we have more fresh snapshot than our latest log. #31150 (alesapin).
Fixed abort in debug server and DB::Exception: std::out_of_range: basic_string error in release server in case of bad hdfs url by adding additional check of hdfs url structure. #31042 (Kruglov Pavel).
21.8.11
Released 2021-11-19
ClickHouse release v21.8.11.1-altinitystable FIXME as compared to v21.8.10.1-altinitystable
New Features
CompiledExpressionCache limit elements size using compiled_expression_cache_elements_size setting. #30667 (Maksim Kita).
Improvements
Made query which fetched table structure for PostgreSQL database more reliable. #30477 (Kseniia Sumarokova).
Fixed JSONValue/Query with quoted identifiers. This allows to have spaces in json path. Closes #30971. #31003 (Kseniia Sumarokova).
Using formatRow function with not row formats led to segfault. Don’t allow to use this function with such formats (because it doesn’t make sense). #31001 (Kruglov Pavel).
Skip max_partition_size_to_drop check in case of ATTACH PARTITION ... FROM and MOVE PARTITION ...#30995 (Amr Alaa).
Fixed set index not used in AND/OR expressions when there are more than two operands. This fixes #30416 . #30887 (Amos Bird).
Fixed ambiguity when extracting auxiliary ZooKeeper name from ZooKeeper path in ReplicatedMergeTree. Previously server might fail to start with Unknown auxiliary ZooKeeper name if ZooKeeper path contains a colon. Fixes #29052. Also it was allowed to specify ZooKeeper path that does not start with slash, but now it’s deprecated and creation of new tables with such path is not allowed. Slashes and colons in auxiliary ZooKeeper names are not allowed too. #30822 (tavplubix).
Fixed a race condition between REPLACE/MOVE PARTITION and background merge in non-replicated MergeTree that might cause a part of moved/replaced data to remain in partition. Fixes #29327. #30717 (tavplubix).
Fixed PREWHERE with WHERE in case of always true PREWHERE. #30668 (Azat Khuzhin).
Functions for case-insensitive search in UTF8 strings like positionCaseInsensitiveUTF8 and countSubstringsCaseInsensitiveUTF8 might find substrings that actually does not match is fixed. #30663 (tavplubix).
Fixed exception handling in parallel_view_processing. This resolves issues / prevents crashes in some rare corner cases when that feature is enabled and exception (like Memory limit exceeded ...) happened in the middle of materialized view processing. #30472 (filimonov).
Fixed segfault which might happen if session expired during execution of REPLACE PARTITION. #30432 (tavplubix).
Fixed queries to external databases (i.e. MySQL) with multiple columns in IN ( i.e. (k,v) IN ((1, 2)) ) (but note that this has some backward incompatibility for the clickhouse-copier since it uses alias for tuple element). #28888 (Azat Khuzhin).
Fixed “Column is not under aggregate function and not in GROUP BY” with PREWHERE (Fixes: #28461). #28502 (Azat Khuzhin).
Fixed NOT-IN index optimization when not all key columns are used. This fixes #28120. #28315 (Amos Bird).
Bug Fixes (user-visible misbehaviour in official stable or prestable release
Fixed ORDER BY ... WITH FILL with set TO and FROM and no rows in result set. #30888 (Anton Popov).
Allow symlinks to files in user_files directory for file table function. #30309 (Kseniia Sumarokova).
Bug Fixes
Fix shutdown of AccessControlManager. Now there can’t be reloading of the configuration after AccessControlManager has been destroyed. This PR fixes the flaky test test_user_directories/test.py::test_relative_path. #29951 (Vitaly Baranov).
Allow using a materialized column as the sharding key in a distributed table even if insert_allow_materialized_columns=0:. #28637 (Vitaly Baranov).
Dropped Memory database might reappear after server restart, it’s fixed (#29795). Also added force_remove_data_recursively_on_drop setting as a workaround for Directory not empty error when dropping Ordinary database (because it’s not possible to remove data leftovers manually in cloud environment). #30054 (tavplubix).
Fix possible data-race between FileChecker and StorageLog/StorageStripeLog. #29959 (Azat Khuzhin).
Fix system tables recreation check (fails to detect changes in enum values). #29857 (Azat Khuzhin).
Avoid Timeout exceeded: elapsed 18446744073.709553 seconds error that might happen in extremely rare cases, presumably due to some bug in kernel. Fixes #29154. #29811 (tavplubix).
Fix bad cast in ATTACH TABLE ... FROM 'path' query when non-string literal is used instead of path. It may lead to reading of uninitialized memory. #29790 (alexey-milovidov).
Fix concurrent access to LowCardinality during GROUP BY (leads to SIGSEGV). #29782 (Azat Khuzhin).
Fixed incorrect behaviour of setting materialized_postgresql_tables_list at server restart. Found in #28529. #29686 (Kseniia Sumarokova).
Condition in filter predicate could be lost after push-down optimisation. #29625 (Nikolai Kochetov).
Fix rare segfault in ALTER MODIFY query when using incorrect table identifier in DEFAULT expression like x.y.z... Fixes #29184. #29573 (alesapin).
Fix bug in check pathStartsWith because there was bug with the usage of std::mismatch: The behavior is undefined if the second range is shorter than the first range.. #29531 (Kseniia Sumarokova).
In ODBC bridge add retries for error Invalid cursor state. It is a retriable error. Closes #29473. #29518 (Kseniia Sumarokova).
Fix possible Block structure mismatch for subqueries with pushed-down HAVING predicate. Fixes #29010. #29475 (Nikolai Kochetov).
Avoid deadlocks when reading and writing on JOIN Engine tables at the same time. #30187 (Raúl Marín).
Fix INSERT SELECT incorrectly fills MATERIALIZED column based of Nullable column. #30189 (Azat Khuzhin).
Fix null deference for GROUP BY WITH TOTALS HAVING (when the column from HAVING wasn’t selected). #29553 (Azat Khuzhin).
21.3.20.2 - This is the latest release of version 21.3. We recommend that you upgrade to this release. (But read the detailed release notes and upgrade instructions first.)
Major new features since the previous stable release 21.1.x
Released 2021-06-29
A new release introduces a lot of changes and new features. These are organized by feature in the Appendix, so refer to this section for more detail. The following new features are worth mentioning on the front page:
SQL features:
Window functions! See our blog article for an introduction.
Support multiple levels nesting in the Nested datatype.
Security features:
LDAP roles mapping a).
Apply row-level security as a separate PREWHERE step a).
Server side keys support for S3 table function a)>.
Cluster improvements:
Hedged requests! That allows to reduce tail latencies on large clusters by running the same query at different replicas. This is controlled by use_hedged_requests and max_parallel_replicas settings.
Allow inserts into a specific shard via a distributed table. This is controlled by the insert_shard_id setting.
Allow inserts into cluster() table function and specify a sharding key.
Replicated database engine (experimental). Allows to replicate DDL statements across the cluster. It is not production ready in this release.
MergeTree features:
Table level concurrency control. Can be controlled by the max_concurrent_queries merge tree setting.
Integrations:
PostgreSQL table engine, table function and dictionary source.
As usual with ClickHouse, there are many performance and operational improvements in different server components.
a) Contributed by Altinity developers.
Backward Incompatible Changes
The following changes are backward incompatible and require user attention during an upgrade:
It is no longer allowed to create MergeTree tables in the old syntax with table TTL; this syntax is now ignored. Attaching old tables is still possible.
Floating point columns and values are disallowed in:
Partitioning key – these can be turned back on with the allow_floating_point_partition_key merge tree setting.
Bitwise functions.
Excessive parenthesis in type definitions are no longer supported, example: Array((UInt8)).
Upgrade Notes
There were several changes between versions that may affect the rolling upgrade of big clusters. Upgrading only part of the cluster is not recommended.
Now replicas that are processing the ALTER TABLE ATTACH PART[ITION] command search their detached/ folders before fetching the data from other replicas. As an implementation detail, a new command ATTACH_PART is introduced in the replicated log. Parts are searched and compared by their checksums. ATTACH PART[ITION] queries may not work during cluster upgrade.
Notice
It’s not possible to rollback to an older ClickHouse version after executing ALTER ... ATTACH query in the new version as the old servers would fail to pass the ATTACH_PART entry in the replicated log.
In the release notes for 21.1 we recommended disabling optimize_on_insert.This recommendation stays for 21.3 as well as inserts into Replacing, Summing, Collapsing and AggregatingMergeTree can produce empty parts.
Other Important Changes
Some new ClickHouse features are now enabled by default. It may lead to a change in behaviour, so review those carefully and disable features that may affect your system:
distributed_aggregation_memory_efficient
enable_global_with_statement
optimize_normalize_count_variants
optimize_respect_aliases
optimize_rewrite_sum_if_to_count_if
Known issues in 21.3.13.9
The development team continues to improve the quality of the 21.3 release. The following issues still exist in the 21.3.13.9 version and may affect ClickHouse operation. Please inspect them carefully to decide if those are applicable to your applications:
Queries to a Merge engine table with a JOIN may be very slow due to not respected partition and primary keys. The bug existed in 20.8 and 21.1 versions as well: https://github.com/ClickHouse/ClickHouse/issues/22226 (fixed in 21.5).
If table contains at least that many inactive parts in single partition, artificially slow down insert into table.
inactive_parts_to_throw_insert
0
If more than this number of inactive parts are in a single partition, throw the ‘Too many inactive parts …’ exception.
max_concurrent_queries
0
Max number of concurrently executed queries related to the MergeTree table (0 - disabled). Queries will still be limited by other max_concurrent_queries settings.
min_marks_to_honor_max_concurrent_queries
0
Minimal number of marks to honor the MergeTree-level’s max_concurrent_queries (0 - disabled). Queries will still be limited by other max_concurrent_queries settings.
system.settings added/changed
Name
Old value
New value
Description
allow_changing_replica_until_first_data_packet
0
Allow HedgedConnections to change the replica until receiving the first data packet.
allow_experimental_database_replicated
0
Allows creating databases with the Replicated engine.
allow_experimental_query_deduplication
0
Allows sending parts’ UUIDs for a query in order to deduplicate data parts, if any.
async_socket_for_remote
1
0
Asynchronously read from socket executing remote query.
background_fetches_pool_size
3
8
Number of threads performing background fetches for replicated tables. Only has meaning at server startup.
checksum_on_read
1
Validates checksums on reading. It is enabled by default and should be always enabled in production. Please do not expect any benefits in disabling this setting. It may only be used for experiments and benchmarks. These settings are only applicable for tables of the MergeTree family. Checksums are always validated for other table engines and when receiving data over the network.
database_replicated_ddl_output
1
Returns table with query execution status as a result of a DDL query.
database_replicated_initial_query_timeout_sec
300
How long an initial DDL query should wait for a Replicated database to process previous DDL queue entries.
distributed_aggregation_memory_efficient
0
1
The memory-saving mode of distributed aggregation is enabled.
enable_global_with_statement
0
1
Propagate WITH statements to UNION queries and all subqueries.
engine_file_empty_if_not_exists
0
Allows selecting data from a file engine table without a file.
engine_file_truncate_on_insert
0
Enables or disables truncate before insert in file engine tables.
flatten_nested
1
If true, columns of type Nested will be flatten to separate array columns instead of one array of tuples.
hedged_connection_timeout_ms
100
Connection timeout for establishing connection with replica for Hedged requests.
insert_in_memory_parts_timeout
600000
REMOVED.
insert_shard_id
0
If non zero, when inserting into a distributed table, the data will be inserted into the shard insert_shard_id synchronously. Possible values range from 1 to shards_number of the corresponding distributed table.
log_comment
Log comment into system.query_log table and server log. It can be set to an arbitrary string no longer than max_query_size.
normalize_function_names
0
Normalize function names to their canonical names.
optimize_normalize_count_variants
1
Rewrite aggregate functions that semantically equals count() as count().
optimize_respect_aliases
1
If it is set to true, it will respect aliases in WHERE/GROUP BY/ORDER BY, that will help with partition pruning/secondary indexes/optimize_aggregation_in_order/optimize_read_in_order/optimize_trivial_count.
optimize_rewrite_sum_if_to_count_if
1
Rewrite sumIf() and sum(if())function countIf() function when logically equivalent.
periodic_live_view_refresh
60
Interval after which a periodically refreshed live view is forced to refresh.
query_plan_max_optimizations_to_apply
10000
Limit the total number of optimizations applied to the query plan. If zero, ignored. If the limit is reached, throw an exception.
receive_data_timeout_ms
2000
Connection timeout for receiving the first packet of data or packet with positive progress from replica.
s3_max_connections
1024
The maximum number of connections per server.
sleep_in_send_data
0
Time to sleep in sending data in TCPHandler.
sleep_in_send_tables_status
0
Time to sleep in sending tables the status response in TCPHandler.
unknown_packet_in_send_data
0
Sends unknown packet instead of N-th data packet.
use_hedged_requests
0
Use hedged requests for distributed queries.
Also, please refer to the release notes from the development team available at the following URLs:
Changes Compared to Altinity Stable Build 21.3.17.3
Bug Fixes
Integer overflow to resize the arrays causes heap corrupt. #33024 (Rajkumar Varada).
fix crash when used fuzzBits with multiply same FixedString, Close #32737. #32755 (SuperDJY).
Number of active replicas might be determined incorrectly when inserting with quorum if setting replicated_can_become_leader is disabled on some replicas. It’s fixed. #32157 (tavplubix).
Fix possible assertion ../src/IO/ReadBuffer.h:58: bool DB::ReadBuffer::next(): Assertion '!hasPendingData()' failed. in TSKV format. #31804 (Kruglov Pavel).
Fix crash when function dictGet with type is used for dictionary attribute when type is Nullable. Fixes #30980. #31800 (Maksim Kita).
Fix race in JSONEachRowWithProgress output format when data and lines with progress are mixed in output. #31736 (Kruglov Pavel).
Settings input_format_allow_errors_num and input_format_allow_errors_ratio did not work for parsing of domain types, such as IPv4, it’s fixed. Fixes #31686. #31697 (tavplubix).
Remove not like function into RPNElement. #31169 (sundyli).
Using formatRow function with not row formats led to segfault. Don’t allow to use this function with such formats (because it doesn’t make sense). #31001 (Kruglov Pavel).
Functions for case-insensitive search in UTF8 strings like positionCaseInsensitiveUTF8 and countSubstringsCaseInsensitiveUTF8 might find substrings that actually does not match, it’s fixed. #30663 (tavplubix).
Fixed segfault which might happen if session expired during execution of REPLACE PARTITION. #30432 (tavplubix).
Fix possible Table columns structure in ZooKeeper is different from local table structure exception while recreating or creating new replicas of ReplicatedMergeTree, when one of table columns have default expressions with case-insensitive functions. #29266 (Anton Popov).
Fix segfault while inserting into column with type LowCardinality(Nullable) in Avro input format. #29132 (Kruglov Pavel).
Fix the number of threads used in GLOBAL IN subquery (it was executed in single threads since #19414 bugfix). #28997 (Nikolai Kochetov).
Fix invalid constant type conversion when nullable or lowcardinality primary key is used. #28636 (Amos Bird).
Fix ORDER BY ... WITH FILL with set TO and FROM and no rows in result set. #30888 (Anton Popov).
Fixed Apache Avro Union type index out of boundary issue in Apache Avro binary format. #33022 (Harry Lee).
Fix null pointer dereference in low cardinality data when deserializing LowCardinality data in the Native format. #33021 (Harry Lee).
Quota limit was not reached, but the limit was exceeded. This PR fixes #31174. #31656 (sunny).
Quota limit was not reached, but the limit was exceeded. This PR fixes #31174. #31337 (sunny).
Fix shutdown of AccessControlManager. Now there can’t be reloading of the configuration after AccessControlManager has been destroyed. This PR fixes the flaky test test_user_directories/test.py::test_relative_path. #29951 (Vitaly Baranov).
Use real tmp file instead of predefined “rows_sources” for vertical merges. This avoids generating garbage directories in tmp disks. #28299 (Amos Bird).
Use separate clickhouse-bridge group and user for bridge processes. Set oom_score_adj so the bridges will be first subjects for OOM killer. Set set maximum RSS to 1 GiB. Closes #23861. #25280 (Kseniia Sumarokova).
Changes compared to Community Build 21.3.20.1-lts
Applying 21.3 customizations for 21.3.20 release #113 (Vasily Nemkov).
Improvement: Retries on HTTP connection drops in S3 (ClickHouse#22988)
21.1.11.3 - This is the latest release of version 21.3. We recommend that you upgrade to this release. (But read the detailed release notes and upgrade instructions first.)
Major new features since the previous stable release 20.8.x
Released 2021-04-13
A new release introduces a lot of changes and new features. These are organized by feature in the Appendix, so refer to this section for more detail. The following new features are worth mentioning on the front page:
Support SNI in https connections to remote resources
Support SNI in ClickHouse server TLS endpoint a)
Security context propagation in distributed queries
MergeTree features:
New TTL extension: TTL RECOMPRESS.
ALTER UPDATE/DELETE IN PARTITION for replicated MergeTree tables a)
DETACH TABLE/VIEW PERMANENTLYa)
[OPTIMIZE DEDUPLICATE BY](https://clickhouse.com/docs/en/sql-reference/statements/optimize/#by-expression) – deduplicate MergeTree tables by a subset of columns a)
SimpleAggregateFunction in SummingMergeTree
Option to disable merges for a cold storage in tiered storage configuration a)
Integrations:
gRPC protocol
zstd and xz compression for file-based engines
EmbeddedRocksDB engine
SQL compatibility:
UNION DISTINCT (previously only UNION ALL was supported). The default can be altered by union_default_mode setting.
Improved CTE compatibility
REPLACE TABLE and CREATE OR REPLACE TABLE DDL statements for Atomic database engine.
As usual with ClickHouse, there are many performance and operational improvements in different server components.
a) Contributed by Altinity developers.
Backward Incompatible Changes
The following changes are backward incompatible and require user attention during an upgrade:
Atomic database engine is enabled by default. It does not affect existing databases but new databases will be created with Engine = Atomic. The engine can not be modified for the database once created. Database Atomic has been used for system tables since 20.5, and it is a good feature in the long term. We recommend disabling it for now, however, especially if you use some backup tools, including ClickHouse Backup 0.6.4 or earlier. The data layout on the storage has been changed. In order to disable it by default, add a following configuration section for a default profile:
toUUID(N) is no longer supported. If there is a DEFAULT column with this expression ClickHouse won’t start.
Following functions where removed: sumburConsistentHash, timeSeriesGroupSum, timeSeriesGroupRateSum.
avg and avgWeighted functions now always return Float64. In previous versions they returned Decimal for Decimal arguments.
Accept user settings related to file formats (e.g. format_csv_delimiter) in the SETTINGS clause when creating a table that uses File engine, and use these settings in all INSERTs and SELECTs. Session level settings are ignored in this case.
Upgrade Notes
There were several changes between versions that may affect the rolling upgrade of big clusters. Upgrading only part of the cluster is not recommended.
Replication protocol has been changed in 20.10 in order to improve reliability of TTL merges. Replication between versions prior to 20.10 and 20.10+ is incompatible if ReplicatedMergeTree tables with TTL are used. See https://github.com/ClickHouse/ClickHouse/pull/14490 for more information.
For a safe upgrade all replicas should be upgraded at once.
Alternatively, SYSTEM STOP TTL MERGES should be used during the upgrade.
Other Important Changes
Some new ClickHouse features are now enabled by default. It may lead to a change in behaviour, so review those carefully and disable features that may affect your system:
Insert quorum behaviour has been changed. insert_quorum_parallel is enabled by default. It breaks sequential consistency and may have other side effects. We recommend disabling this feature if you are using quorum inserts on previous versions.
optimize_on_insert is enabled by default. This is a new feature that applies a logic of Replacing, Summing, Collapsing and AggregatingMergeTree on the inserted block. Unfortunately, it still has some issues so we recommend disabling this after upgrading.
use_compact_format_in_distributed_parts_names is enabled by default.
input_format_null_as_default is enabled by default.
Background fetches are now limited by background_fetches_pool_size setting. The default value is 3 that may be low in some cases. In previous versions the common background pool has been used for merges and fetches with the default size 16.
Compact MergeTree parts are enabled by default for parts below 10MB of size uncompressed. See min_bytes_for_wide_part setting.
Known issues in 21.1.7.1
Development team continues to improve the quality of the 21.1 release. Following issues still exist in the 21.1.7.1 version and may affect ClickHouse operation. Please inspect them carefully in order to decide if those are applicable to your applications:
‘/etc/init.d/clickhouse-server restart’ cannot restart ClickHouse server if shutdown did not complete in 3 seconds timeout: https://github.com/ClickHouse/ClickHouse/issues/20214
The timeout can be increased with shutdown_wait_unfinished server setting
Distributed queries may fail sometimes with ‘Unknown packet n from server’ error message. Disable async_socket_for_remote setting if you experience this issue: https://github.com/ClickHouse/ClickHouse/issues/21588
ClickHouse Altinity Stable release is based on community version. It can be downloaded from repo.clickhouse.com, and RPM packages are available from the Altinity Stable Repository.
Please contact us at info@altinity.com if you experience any issues with the upgrade.
Generate UUIDs for parts. Before enabling check that all replicas support the new format.
execute_merges_on_single_replica_time_threshold
0
When greater than zero only a single replica starts the merge immediately, others wait up to that amount of time to download the result instead of doing merges locally. If the chosen replica doesn’t finish the merge during that amount of time, fallback to standard behavior happens.
fsync_after_insert
0
Do fsync for every inserted part. Significantly decreases performance of inserts, not recommended to use with wide parts.
fsync_part_directory
0
Do fsync for part directory after all part operations (writes, renames, etc.).
in_memory_parts_insert_sync
0
If true insert of part with in-memory format will wait for fsync of WAL
max_compress_block_size
0
Compress the pending uncompressed data in a buffer if its size is larger or equal than the specified threshold. Block of data will be compressed even if the current granule is not finished. If this setting is not set, the corresponding global setting is used.
max_number_of_merges_with_ttl_in_pool
2
When there is more than a specified number of merges with TTL entries in the pool, do not assign a new merge with TTL. This is to leave free threads for regular merges and avoid “Too many parts”
max_partitions_to_read
-1
Limit the max number of partitions that can be accessed in one query. <= 0 means unlimited. This setting is the default that can be overridden by the query-level setting with the same name.
max_replicated_merges_with_ttl_in_queue
1
How many tasks of merging parts with TTL are allowed simultaneously in the ReplicatedMergeTree queue.
merge_with_recompression_ttl_timeout
14400
Minimal time in seconds, when merge with recompression TTL can be repeated.
merge_with_ttl_timeout
86400
14400
Minimal time in seconds, when merge with delete TTL can be repeated.
min_bytes_for_wide_part
0
10485760
Minimal uncompressed size in bytes to create part in wide format instead of compact
min_compress_block_size
0
When granule is written, compress the data in a buffer if the size of pending uncompressed data is larger or equal than the specified threshold. If this setting is not set, the corresponding global setting is used.
min_compressed_bytes_to_fsync_after_fetch
0
Minimal number of compressed bytes to do fsync for part after fetch (0 - disabled)
min_compressed_bytes_to_fsync_after_merge
0
Minimal number of compressed bytes to do fsync for part after merge (0 - disabled)
min_rows_to_fsync_after_merge
0
Minimal number of rows to do fsync for part after merge (0 - disabled)
remove_empty_parts
1
Remove empty parts after they were pruned by TTL, mutation, or collapsing merge algorithm
try_fetch_recompressed_part_timeout
7200
Recompression works slowly in most cases. We don’t start a merge with recompression until this timeout and try to fetch the recompressed part from the replica which assigned this merge with recompression.
write_ahead_log_bytes_to_fsync
104857600
Amount of bytes, accumulated in WAL to do fsync.
write_ahead_log_interval_ms_to_fsync
100
Interval in milliseconds after which fsync for WAL is being done.
system.settings added/changed
Name
Old value
New value
Description
aggregate_functions_null_for_empty
0
Rewrite all aggregate functions in a query, adding -OrNull suffix to them
allow_experimental_cross_to_join_conversion
1
allow_experimental_data_skipping_indices
1
allow_experimental_low_cardinality_type
1
allow_experimental_map_type
0
Allow data type Map
allow_experimental_multiple_joins_emulation
1
allow_experimental_window_functions
0
Allow experimental window functions
asterisk_include_alias_columns
0
Include ALIAS columns for wildcard query
asterisk_include_materialized_columns
0
Include MATERIALIZED columns for wildcard query
async_socket_for_remote
1
Asynchronously read from socket executing remote query
background_fetches_pool_size
3
Number of threads performing background fetches for replicated tables. Only has meaning at server startup.
background_message_broker_schedule_pool_size
16
Number of threads performing background tasks for message streaming. Only has meaning at server startup.
When executing DROP or DETACH TABLE in Atomic database, wait for table data to be finally dropped or detached.
date_time_output_format
simple
Method to write DateTime to text output. Possible values: ‘simple’, ‘iso’, ‘unix_timestamp’.
default_database_engine
Ordinary
Atomic
Default database engine.
do_not_merge_across_partitions_select_final
0
Merge parts only in one partition in select final
enable_global_with_statement
0
Propagate WITH statements to UNION queries and all subqueries
experimental_use_processors
1
force_data_skipping_indices
Comma separated list of strings or literals with the name of the data skipping indices that should be used during query execution, otherwise an exception will be thrown.
force_optimize_skip_unused_shards_no_nested
0
format_regexp_escaping_rule
Escaped
Raw
Field escaping rule (for Regexp format)
input_format_csv_arrays_as_nested_csv
0
When reading Array from CSV, expect that its elements were serialized in nested CSV and then put into string. Example: “[““Hello””, ““world””, ““42"””” TV""]". Braces around an array can be omitted.
input_format_csv_enum_as_number
0
Treat inserted enum values in CSV formats as enum indices
input_format_null_as_default
0
1
For text input formats initialize null fields with default values if data type of this field is not nullable
input_format_tsv_enum_as_number
0
Treat inserted enum values in TSV formats as enum indices
insert_distributed_one_random_shard
0
If setting is enabled, inserting into distributed table will choose a random shard to write when there is no sharding key
insert_quorum_parallel
1
For quorum INSERT queries - enable to make parallel inserts without linearizability
limit
0
Limit on read rows from the most ’end’ result for select query, default 0 means no limit length
load_balancing_first_offset
0
Which replica to preferably send a query when FIRST_OR_RANDOM load balancing strategy is used.
log_queries_min_query_duration_ms
0
Minimal time for the query to run, to get to the query_log/query_thread_log.
mark_cache_min_lifetime
0
max_bytes_to_read_leaf
0
Limit on read bytes (after decompression) on the leaf nodes for distributed queries. Limit is applied for local reads only excluding the final merge stage on the root node.
max_concurrent_queries_for_all_users
0
The maximum number of concurrent requests for all users.
max_partitions_to_read
-1
Limit the max number of partitions that can be accessed in one query. <= 0 means unlimited.
max_rows_to_read_leaf
0
Limit on read rows on the leaf nodes for distributed queries. Limit is applied for local reads only excluding the final merge stage on the root node.
merge_tree_uniform_read_distribution
1
min_count_to_compile
0
multiple_joins_rewriter_version
2
0
Obsolete setting, does nothing. Will be removed after 2021-03-31
mysql_datatypes_support_level
Which MySQL types should be converted to corresponding ClickHouse types (rather than being represented as String). Can be empty or any combination of ‘decimal’ or ‘datetime64’. When empty MySQL’s DECIMAL and DATETIME/TIMESTAMP with non-zero precision are seen as String on ClickHouse’s side.
offset
0
Offset on read rows from the most ’end’ result for select query
opentelemetry_start_trace_probability
0
Probability to start an OpenTelemetry trace for an incoming query.
optimize_move_functions_out_of_any
1
0
Move functions out of aggregate functions ‘any’, ‘anyLast’.
optimize_on_insert
1
Do the same transformation for inserted block of data as if merge was done on this block.
optimize_skip_merged_partitions
0
Skip partitions with one part with level > 0 in optimize final
output_format_json_array_of_rows
0
Output a JSON array of all rows in JSONEachRow(Compact) format.
output_format_json_named_tuples_as_objects
0
Serialize named tuple columns as JSON objects.
output_format_parallel_formatting
1
Enable parallel formatting for some data formats.
output_format_pretty_row_numbers
0
Add row numbers before each row for pretty output format
output_format_tsv_null_representation
Custom NULL representation in TSV format
partial_merge_join
0
read_backoff_min_concurrency
1
Settings to try keeping the minimal number of threads in case of slow reads.
read_overflow_mode_leaf
throw
What to do when the leaf limit is exceeded.
remerge_sort_lowered_memory_bytes_ratio
2
If memory usage after remerge does not reduced by this ratio, remerge will be disabled.
s3_max_redirects
10
Max number of S3 redirects hops allowed.
s3_max_single_part_upload_size
67108864
The maximum size of object to upload using singlepart upload to S3.
special_sort
not_specified
system_events_show_zero_values
0
Include all metrics, even with zero values
union_default_mode
Set default Union Mode in SelectWithUnion query. Possible values: empty string, ‘ALL’, ‘DISTINCT’. If empty, query without Union Mode will throw exception.
use_antlr_parser
0
Parse incoming queries using ANTLR-generated experimental parser
use_compact_format_in_distributed_parts_names
0
1
Changes format of directories names for distributed table insert parts.
Also, please refer to the release notes from the development team available at the following URLs:
As we discussed in a recent Altinity Blog article, JFrog discovered these CVEs and reported them to the Yandex team in 2021. The CVEs have been already included in 21.3.19 and 21.8.11 and Altinity.Stable and ClickHouse builds and all ClickHouse builds after 21.10.
We have now backported the fixes to 21.1 as part of our long-term maintenance policy for Altinity Stable builds. We recommend all users running ClickHouse 21.1 upgrade to this new release.
Highly experimental MaterializeMySQL engine that implements MySQL replica in ClickHouse
SQL compatibility:
New Int128, (U)Int256, Decimal256 extended precision data types
Aliases for standard SQL types
EXPLAIN statement!
Merge join improvements
Custom HTTP handlers
clickhouse-copier underwent extensive updates and improvements
Upgrade Notes
Backward Incompatible Changes
The following changes are backward incompatible and require user attention during an upgrade:
Aggregate functions states with Nullable arguments may produce different / incompatible types.
Gorilla, Delta and DoubleDelta codecs can not be used anymore on data types of variable size (like strings).
System tables (e.g. system.query_log, system.trace_log, system.metric_log) are using compact data part format for parts smaller than 10 MiB in size (this is almost always the case). Compact data part format is supported since version 20.3.
WARNING: If you have to downgrade to version prior 20.3, you should manually delete table data for system logs in /var/lib/clickhouse/data/system/.
The setting input_format_with_names_use_header is enabled by default. It will affect parsing of input formats -WithNames and -WithNamesAndTypes.
Deprecate special printing of zero Date/DateTime values as '0000-00-00’ and '0000-00-00 00:00:00’. Now it is printed as ‘1970-01-01’ and '1970-01-01 00:00:00’ respectively.
There were several changes between versions that may affect the rolling upgrade of big clusters. Upgrading only part of the cluster is not recommended. Note the following:
20.3 two-level aggregation is not compatible with 20.4+.
Data will not be fully aggregated for queries that are processed using the two-level aggregation algorithm. This algorithm should be disabled before upgrading if the risk is high in your environment. See group_by_two_level_threshold and group_by_two_level_threshold_bytes settings.
zstd library has been updated in 20.5. While it is not a problem for ClickHouse in general, it may result in inconsistent parts when several replicas merge parts independently, and will force ClickHouse to download merged parts to make sure they are byte-identical (which will lead to extra traffic between nodes). The first node to complete the merge will register the part in ZooKeeper, and the other nodes will download the part if their checksums are different. There will be no data loss; conflicts will disappear once all replicas are upgraded.
The following settings lead to incompatibility in distributed queries when only a subset of shards are upgraded and others are not:
When pre-20.5 and 20.5+ versions run as replicas “Part ... intersects previous part" errors are possible due to change in leadership selection protocol. If you need to run pre-20.5 and 20.5+ versions in the same cluster make sure the old version can not become a leader. This can be configured via replicated_can_become_leader merge tree setting globally or on a table level.
Changes
All replicas are now ’leaders’. This allows multiple replicas to assign merges, mutations, partition drop, move and replace concurrently. Now system.replicas.is_leader is 1 for all tables on all nodes. If you rely on this value for some operations, your processes must be revised. The LeaderElection and LeaderReplica metrics were removed.
New setting max_server_memory_usage limits total memory usage of the server. The setting max_memory_usage_for_all_queries is now obsolete and does nothing. You might see an exception ‘Memory limit (total) exceeded‘.Increasing the limit requires a restart.
The log_queries setting is now enabled by default. You might want to disable this setting for some profiles if you don’t want their queries logged into the system.query_log table.
Several new optimizations are enabled by default. While they typically improve performance sometimes regressions are possible in corner cases:
If true, replicas never merge parts and always download merged parts from other replicas.
disable_background_merges
0
REMOVED
enable_mixed_granularity_parts
0
1
Enable parts with adaptive and non-adaptive granularity at the same time
in_memory_parts_enable_wal
1
Whether to write blocks in Native format to write-ahead-log before creation in-memory part
lock_acquire_timeout_for_background_operations
120
For background operations like merges, mutations etc. How many seconds before failing to acquire table locks.
max_part_loading_threads
auto
max_part_loading_threads
max_part_removal_threads
auto
The number of threads for concurrent removal of inactive data parts. One is usually enough, but in ‘Google Compute Environment SSD Persistent Disks’ file removal (unlink) operation is extraordinarily slow and you probably have to increase this number (recommended is up to 16).
max_replicated_logs_to_keep
10000
1000
How many records may be in log, if there is an inactive replica.
min_replicated_logs_to_keep
100
10
Keep about this number of last records in ZooKeeper log, even if they are obsolete. It doesn’t affect work of tables: used only to diagnose ZooKeeper log before cleaning.
min_bytes_for_compact_part
0
Minimal uncompressed size in bytes to create part in compact format instead of saving it in RAM. If non-zero enables in-memory parts.
min_rows_for_compact_part
0
Minimal number of rows to create part in compact format instead of saving it in RAM. If non-zero enables in-memory parts.
min_index_granularity_bytes
1024
Minimum amount of bytes in single granule.
min_relative_delay_to_measure
120
Calculate relative replica delay only if absolute delay is not less than this value.
write_ahead_log_max_bytes
1073741824
Rotate WAL, if it exceeds that amount of bytes
system.settings added/changed
Setting
Old value
New value
Description
allow_experimental_bigint_types
0
Allow Int128, Int256, UInt256 and Decimal256 types
allow_experimental_database_materialize_mysql
1
Allow database creation with Engine=MaterializeMySQL(…) (Highly experimental yet)
allow_experimental_geo_types
0
Allow geo data types such as Point, Ring, Polygon, MultiPolygon
allow_non_metadata_alters
1
Allow to execute alters which affects table’s metadata and data on disk.
allow_push_predicate_when_subquery_contains_with
1
Allows push predicate when subquery contains WITH clause
allow_suspicious_codecs
0
If it is set to true, allow specifying meaningless compression codecs.
alter_partition_verbose_result
0
Output information about affected parts. Currently works only for FREEZE and ATTACH commands.
background_buffer_flush_schedule_pool_size
16
Number of threads performing background flush for tables with Buffer engine. Only has meaning at server startup.
background_distributed_schedule_pool_size
16
Number of threads performing background tasks for distributed sends. Only has meaning at server startup.
cast_keep_nullable
0
CAST operator keep Nullable for result data type
data_type_default_nullable
0
Data types without NULL or NOT NULL will make Nullable
default_database_engine
Ordinary
Default database engine
distributed_replica_max_ignored_errors
0
Number of errors that will be ignored while choosing replicas
force_optimize_skip_unused_shards_nesting
0
Same as force_optimize_skip_unused_shards, but accept nesting level until which it will work
format_regexp
Regular expression (for Regexp format)
format_regexp_escaping_rule
Escaped
Field escaping rule (for Regexp format)
format_regexp_skip_unmatched
0
Skip lines unmatched by regular expression (for Regexp format)
function_implementation
Choose function implementation for specific target or variant (experimental). If empty, enable all of them.
input_format_avro_allow_missing_fields
0
For Avro/AvroConfluent format: when field is not found in schema use default value instead of error
input_format_with_names_use_header
0
1
For TSVWithNames and CSVWithNames input formats this controls whether the format parser is to assume that column data appear in the input exactly as they are specified in the header.
insert_in_memory_parts_timeout
600000
join_on_disk_max_files_to_merge
64
For MergeJoin on disk, set how many files are allowed to sort simultaneously. The larger the value the more memory is used and less disk I/O needed. Minimum is 2.
lock_acquire_timeout
120
How long locking request should wait before failing
log_queries_min_type
QUERY_START
Minimal type in query_log to log, possible values (from low to high): QUERY_START, QUERY_FINISH, EXCEPTION_BEFORE_START, EXCEPTION_WHILE_PROCESSING.
materialize_ttl_after_modify
1
Apply TTL for old data, after ALTER MODIFY TTL query
max_block_size
65536
65505
Maximum block size for reading
max_final_threads
16
The maximum number of threads to read from the table with FINAL.
max_insert_block_size
1048576
1048545
The maximum block size for insertion, if we control the creation of blocks for insertion
max_joined_block_size_rows
65536
65505
Maximum block size for JOIN result (if join algorithm supports it). 0 means unlimited.
max_untracked_memory
4194304
Small allocations and deallocations are grouped in thread local variables and tracked or profiled only when the amount (in absolute value) becomes larger than specified value. If the value is higher than ‘memory_profiler_step’ it will be effectively lowered to ‘memory_profiler_step’.
memory_profiler_sample_probability
0
Collect random allocations and deallocations and write them into system.trace_log with 'MemorySample' trace_type. The probability is for every alloc/free regardless to the size of the allocation. Note that sampling happens only when the amount of untracked memory exceeds ‘max_untracked_memory’. You may want to set ‘max_untracked_memory’ to 0 for extra fine grained sampling.
metrics_perf_events_enabled
0
If enabled, some of the perf events will be measured throughout queries’ execution.
metrics_perf_events_list
Comma separated list of perf metrics that will be measured throughout queries’ execution. Empty means all events.
min_chunk_bytes_for_parallel_parsing
1048576
10485760
The minimum chunk size in bytes, which each thread will parse in parallel.
min_insert_block_size_bytes
268435456
268427520
Squash blocks passed to INSERT query to specified size in bytes, if blocks are not big enough.
Move arithmetic operations out of aggregation functions
optimize_distributed_group_by_sharding_key
0
Optimize GROUP BY sharding_key queries (by avoiding costly aggregation on the initiator server)
optimize_duplicate_order_by_and_distinct
1
Remove duplicate ORDER BY and DISTINCT if it’s possible
optimize_group_by_function_keys
1
Eliminates functions of other keys in GROUP BY section
optimize_if_chain_to_multiif
0
Replace if(cond1, then1, if(cond2, …)) chains to multiIf. Currently it’s not beneficial for numeric types.
optimize_if_transform_strings_to_enum
0
Replaces string-type arguments in If and Transform to enum. Disabled by default cause it could make inconsistent change in distributed query that would lead to its fail
optimize_injective_functions_inside_uniq
1
Delete injective functions of one argument inside uniq*() functions
optimize_monotonous_functions_in_order_by
1
Replace monotonous function with its argument in ORDER BY
optimize_move_functions_out_of_any
1
Move functions out of aggregate functions ‘any’, ‘anyLast’
optimize_redundant_functions_in_order_by
1
Remove functions from ORDER BY if its argument is also in ORDER BY
optimize_skip_unused_shards_nesting
0
Same as optimize_skip_unused_shards, but accept nesting level until which it will work
optimize_trivial_insert_select
1
Optimize trivial ‘INSERT INTO table SELECT … FROM TABLES’ query
output_format_enable_streaming
0
Enable streaming in output formats that supports it
output_format_pretty_grid_charset
UTF-8
Charset for printing grid borders. Available charsets: ASCII, UTF-8 (default)
output_format_pretty_max_value_width
10000
Maximum width of value to display in Pretty formats. If greater - it will be cut.
parallel_distributed_insert_select
0
Process distributed INSERT SELECT query in the same cluster on local tables on every shard, if 1 SELECT is executed on each shard, if 2 SELECT and INSERT is executed on each shard
partial_merge_join_left_table_buffer_bytes
32000000
If not 0, group left table blocks in bigger ones for the left-side table in partial merge join. It uses up to 2x of specified memory per joining thread. The current version works only with ‘partial_merge_join_optimizations = 1’.
partial_merge_join_optimizations
0
1
Enable optimizations in partial merge join
partial_merge_join_rows_in_right_blocks
10000
65536
Split right-hand joining data in blocks of specified size. It’s a portion of data indexed by min-max values and possibly unloaded on disk.
rabbitmq_max_wait_ms
5000
The wait time for reading from RabbitMQ before retry.
read_in_order_two_level_merge_threshold
100
Minimal number of parts to read to run preliminary merge step during multithread reading in order of primary key.
send_logs_level
none
fatal
Send server text logs with specified minimum level to client. Valid values: ’trace’, ‘debug’, ‘information’, ‘warning’, ’error’, ‘fatal’, ’none’
show_table_uuid_in_table_create_query_if_not_nil
0
For tables in databases with Engine=Atomic show UUID of the table in its CREATE query.
temporary_files_codec
LZ4
Set compression codec for temporary files (sort and join on disk). I.e. LZ4, NONE.
transform_null_in
0
If enabled, NULL values will be matched with ‘IN’ operator as if they are considered equal.
validate_polygons
1
Throw exception if polygon is invalid in function pointInPolygon (e.g. self-tangent, self-intersecting). If the setting is false, the function will accept invalid polygons but may silently return wrong result.
References
ClickHouse Altinity Stable release is based on community version. It can be downloaded from repo.clickhouse.com, and RPM packages are available from the Altinity Stable Repository.
Fixed a rare bug that may result in corrupted data when merging from wide to compact parts. We recommend upgrading to this release all 20.8 users who are using compact parts.
Altinity Stable Release for ClickHouse 20.8.11.17
Released 2020-12-25
Description
This release provides bug fixes and general stability improvements.
Altinity Stable Release for ClickHouse 20.3.12.112
Released 2020-06-24
Description
This release is a significant step forward since the previous Altinity Stable release 19.16.19.85. It includes 1203 pull requests from 171 contributors.
New DateTime64 datatype with configurable precision up to nanoseconds. The feature is in beta state and more functions for usability will follow in next releases. It has also been developed by Altinity.
Joins have been improved a lot, including SEMI/ANTI JOIN, experimental merge join and other changes. See the join_algorithm setting below for more info on merge joins.
A new compact format for MergeTree tables that store all columns in one file. It improves performance of small inserts. The usual format where every column is stored separately is now called “wide.” Compact format is disabled by default. See the min_bytes_for_wide_part and min_rows_for_wide_part settings.
A built-in Prometheus exporter endpoint for ClickHouse monitoring statistics
Porting some functionality of the H3 library — A Hexagonal Hierarchical Geospatial Indexing System
ALTER MODIFY/DROP are currently implemented as mutations for ReplicatedMergeTree* engine family. Now ALTER commands block only at the metadata update stage, and don’t block after that.
Import/export gzip-compressed files directly for file based storage engines and table functions: File, URL, HDFS and S3.
Server improvements across different server functions. For example, performance of the Kafka Engine has been improved, parallel INSERT is now possible (see max_insert_threads setting), etc.
Upgrade Notes
Replication fetch protocol has been changed in this release. If only one replica is upgraded in a shard, replication may get stuck with unknown protocol version error until all replicas are upgraded. 19.16.17.80 and 19.16.19.85 contain a special compatibility fix that allows smooth upgrade without replication downtime.
If enable_optimize_predicate_expression is turned on, it may result in incorrect data when only part of the cluster is upgraded. Please turn it off before the upgrade, and turn it back on afterwards.
There were some optimizations that are incompatible between versions, so we recommend disabling enable_scalar_subquery_optimization before the upgrade. This setting turns off new scalar subquery optimizations and was backported specifically in order to facilitate smooth upgrades.
There were some optimizations around distributed query execution that may result in incorrect data if part of the cluster is upgraded. We recommend disabling distributed_aggregation_memory_efficient while upgrading, and turn it on afterwards.
Backward Incompatible Changes
The following changes are backward incompatible and require user attention.
ALTER on ReplicatedMergeTree is not compatible with previous versions.20.3 creates a different metadata structure in ZooKeeper for ALTERs. Earlier versions do not understand the format and cannot proceed with their replication queue.
The format of replication log entries for mutation commands has changed. You have to wait for old mutations to process before installing the new version.
20.3 requires an alias for every subquery participating in a join by default. Set joined_subquery_requires_alias=0 in order to keep the previous behavior.
ANY JOIN logic has been changed. To upgrade without changes in behavior, you need to add SETTINGS any_join_distinct_right_table_keys = 1 to Engine Join tables metadata or recreate these tables after upgrade.
Functions indexHint, findClusterValue, findClusterIndex were removed
Settings merge_tree_uniform_read_distribution, allow_experimental_cross_to_join_conversion, allow_experimental_multiple_joins_emulation are deprecated and ignored
Other Important Notes
If you encounter [Argument at index 0 for function dictGetDateTime must be a constant](https://github.com/ClickHouse/ClickHouse/issues/7798) or a similar error message after upgrading, set enable_early_constant_folding=0.
The new release adds a parallel parsing of input formats. While it should improve the performance of data loading in text formats, sometimes it may result in a slower load. Set input_format_parallel_parsing=0 if you experience insert performance degradation.
The check that a query is performed fast enough is enabled by default. Queries can get an exception like this: DB::Exception: Estimated query execution time (N seconds) is too long. Maximum: 12334.. Set timeout_before_checking_execution_speed=0 to fix this problem.
Mutations containing non-deterministic functions, e.g. dictGet or joinGet are disabled by default. Set allow_nondeterministic_mutations=1 to enable.
Also note that this release has a new query pipeline enabled by default (codename — Processors). This was a significant internal refactoring, and we believe all issues have been fixed. However, in the rare case that you face some weird query behavior or performance degradation, try disabling experimental_use_processors and check if the problem goes away.
Changes
New formats
Avro
AvroConfluent
JSONCompactEachRow
JSONCompactEachRowWithNamesAndTypes
New or Improved Functions
CRC32IEEE, CRC64
New JSON functions.
isValidJSON
JSONExtractArrayRaw — very useful for parsing nested JSON structures
How many rows in blocks should be formed for merge operations
min_bytes_for_wide_part
0
Minimal uncompressed size in bytes to create part in wide format instead of compact
min_rows_for_wide_part
0
Minimal number of rows to create part in wide format instead of compact
use_minimalistic_part_header_in_zookeeper
0
1
Store part header (checksums and columns) in a compact format and a single part znode instead of separate znodes. This setting was available for a year already, and many users have it enabled.
For Values format: if the field could not be parsed by streaming parser, run SQL parser, deduce template of the SQL expression, try to parse all rows using template and then interpret expression for all rows
join_algorithm
hash
Specify join algorithm: auto, hash, partial_merge, prefer_partial_merge. auto tries to change HashJoin to MergeJoin on the fly to avoid out of memory
joined_subquery_requires_alias
0
1
Force joined subqueries and table functions to have aliases for correct name qualification
max_insert_threads
0
The maximum number of threads to execute the INSERT SELECT query. Values 0 or 1 means that INSERT SELECT is not run in parallel. Higher values will lead to higher memory usage. Parallel INSERT SELECT has effect only if the SELECT part is run on parallel, see max_threads setting
max_joined_block_size_rows
65536
Maximum block size for JOIN result (if join algorithm supports it). 0 means unlimited
max_parser_depth
1000
Maximum parser depth
memory_profiler_step
0
Every number of bytes the memory profiler will collect the allocating stack trace. The minimal effective step is 4 MiB (less values will work as clamped to 4 MiB). Zero means disabled memory profiler
min_bytes_to_use_mmap_io
0
The minimum number of bytes for reading the data with the mmap option during SELECT queries execution. 0 – disabled
min_chunk_bytes_for_parallel_parsing
1048576
The minimum chunk size in bytes, which each thread will parse in parallel
mutations_sync
0
Wait for synchronous execution of ALTER TABLE UPDATE/DELETE queries (mutations). 0 – execute asynchronously. 1 – wait current server. 2 – wait all replicas if they exist
optimize_if_chain_to_miltiif
0
Replace if(cond1, then1, if(cond2, …)) chains to multiIf
optimize_trivial_count_query
1
Process trivial SELECT count() FROM table query from metadata
output_format_avro_codec
Compression codec used for output. Possible values: null, deflate, snappy
output_format_avro_sync_interval
16384
Sync interval in bytes
output_format_csv_crlf_end_of_line
If it is set true, end of line in CSV format will be \r\n instead of \n
output_format_tsv_crlf_end_of_line
If it is set true, end of line in TSV format will be \r\n instead of \n
timeout_before_checking_execution_speed
0
10
Check that the speed is not too low after the specified time has elapsed
use_compact_format_in_distributed_parts_names
0
Changes format of directories names for distributed table insert parts
The release includes several dozen bug fixes from the previous release.
Major New Features
Server startup time has been reduced by parsing metadata in parallel.
Improved performance of primary key analysis for LowCardinality columns. That was a performance regression introduced in 20.3.
Improved performance of queries with large tuples and tuples used in primary key.
Bug Fixes
Fixed a bug that prevented attaching Materialized Views to system tables.
Fixed incorrect behavior of if function with NULLs.
Fixed segfaults in rare cases.
Fixed a bug that prevented predicate pushdown for queries using WITH clause.
Fixed SIGSEGV in Kafka engine when broker is unavailable.
Fixed a bug leading to block structure mismatch error for queries with UNION and JOIN.
Fixed TTL processing logic to process all partitions in one run.
Fixed a bug of parsing of row policies from configuration files that could result in missing policies sometimes.
Fixed a bug with ALTER TABLE UPDATE could produce incorrect results when updating Nullable columns.
Fixed a bug with codecs not working properly for MergeTree compact parts.
References
Updated RPM packages for Altinity Stable Release can be found in the Altinity Stable Repository. The ClickHouse repository can be used for DEB packages but check version numbers carefully.
Altinity Stable Release for ClickHouse 19.16.10.44
Released 2020-01-20
Description
This release has major updates:: 2744 commits in 528 pull-requests from 113 contributors.
Major New Features
Tiered storage: multiple storage volumes for MergeTree tables. It’s possible to store fresh data on SSD and automatically move old data to HDD. We already discussed this functionality in our blog.
LIVE VIEW tables that we also described in our blog. The support in this release is not complete, but new improvements are coming quickly. Feel free to try it out.
WITH FILL modifier of ORDER BY for data gap filling. It allows to fill missing data to provide uniform reports. For example, you can fill missing dates for time series so that every day is shown even if some days have no data. This feature is not documented yet, so here is an example how missing dates can be filled:
SELECT arrayJoin([today()-10, today()]) AS d ORDER BY d ASC WITH FILL
Sensitive data masking for query_log, server logs, process list with regexp-based rules.
Table function input() for reading incoming data in INSERT SELECT query. A very useful feature when you need to preprocess data just before inserting. We are going to showcase it in our planned articles around log processing use cases.
Cascaded materialized views. It is an important feature for many use cases including Kafka integration. In particular, it allows you to have load raw data from Kafka using MV and then aggregate it using another MV. That was not possible in previous ClickHouse releases.
Kafka: Altinity took over support for the Kafka engine a few months ago. Kafka functionality and stability has been improved in this release, in particular:
ClickHouse can act as Kafka producer, and not just to read from Kafka, but also send data back with an insert statement.
Atomic parsing of each message: kafka_row_delimiter is now obsolete (ignored)
More reliable commit logic
Virtual columns _partition and _timestamp for Kafka engine table.
Parsing of most of the formats is working properly now
complicated where conditions involving fields of UInt8 type with values > 1 can return unexpected results. (workaround: instead of a and b and c use a <> 0 and b <> 0 and c <> 0) https://github.com/ClickHouse/ClickHouse/issues/7772.
If you want to preserve old ANY JOIN behavior while upgrading from a version before 19.13, you may need to install 19.13.7 first, change any_join_distinct_right_table_keys setting there and after that you can upgrade to 19.16. But we recommend to review your queries and rewrite them without this join type. In future releases it will be available, but with a different name (SEMI JOIN).
Upgrade Notes
Backward Incompatible Changes
count() supports only a single argument.
Legacy asterisk_left_columns_only setting has been removed (it was disabled by default).
Numeric values for Enums can now be used directly in IN section of the query.
Changed serialization format of bitmap* aggregate function states to improve performance. Serialized states of bitmap* from previous versions cannot be read. If you happen to use bitmap aggregate functions, please contact us before upgrading.
system.query_log column type was changed from UInt8 to Enum8.
ANY RIGHT/FULL/INNER JOIN is disabled by default. Set any_join_distinct_right_table_keys setting to enable them.
Changes
New Formats
ORC format.
Template/TemplateIgnoreSpaces format. It allows to parse / generate data in custom text formats. So you can for example generate HTML directly from ClickHouse thus turning ClickHouse to the web server.
CustomSeparated/CustomSeparatedIgnoreSpaces format. Supports custom escaping and delimiter rules.
JSONEachRowWithProgress
Parse unquoted NULL literal as NULL (enabled by setting format_csv_unquoted_null_literal_as_null).
Initialize null fields with default values if the data type of this field is not nullable (enabled by setting input_format_null_as_default).
New or improved functions
Aggregate function combinators which fill null or default value when there is nothing to aggregate: -OrDefault, -OrNull
Introduce uniqCombined64() to get sane results for cardinality > UINT_MAX
QuantileExactExclusive and Inclusive aggregate functions
hasToken/hasTokenCaseInsensitive (look for the token in string the same way as token_bf secondary index)
multiFuzzyMatchAllIndices, multiMatchAllIndices (return the Array of all matched indices in multiMatch family functions)
repeat function for strings
sigmoid and tanh functions for ML applications
Roaring Bitmaps:
Changes CRoaring serialization functions (you will not be able to read Bitmaps created by earlier versions)
bitmapSubsetInRange,
bitmapMin, bitmapMax,
bitmapSubsetLimit(bitmap, range_start, limit),
groupBitmapAnd, groupBitmapOr, groupBitmapXor
geohashesInBox(longitude_min, latitude_min, longitude_max, latitude_max, precision) which creates an array of precision-long strings of geohash boxes covering the provided area.
Support for wildcards in paths of table functions file and hdfs. If the path contains wildcards, the table will be readonly:
SELECT * FROM hdfs('hdfs://hdfs1:9000/some_dir/another_dir/*/file', 'Parquet', 'col1 String')
New function neighbour(value, offset[, default_value]). Allows to reach prev/next row within the column.
Optimize queries with ORDER BY expressions clause, where expressions have coinciding prefix with sorting key in MergeTree tables. This optimization is controlled by optimize_read_in_order ‘setting
New function arraySplit and arrayReverseSplit which can split an array by “cut off” conditions. They are useful in time sequence handling.
Table function values (the name is case-insensitive). It allows to create table with some data inline.
SELECT * FROM VALUES('a UInt64, s String', (1, 'one'), (2, 'two'), (3, 'three'))
fullHostName (alias FQDN)
numbers_mt() — multithreaded version of numbers().
currentUser() (and alias user()), returning login of authorized user.
S3 engine and table function. Partial support in this release (no authentication), complete version is expected in 19.18.x and later
<sparse_hashed> dictionary layout, that is functionally equivalent to the <hashed> layout, but is more memory efficient. It uses about twice as less memory at the cost of slower value retrieval.
allow_dictionaries user setting that works similar to allow_databases.
HTTP source new attributes: credentials and http-headers.
Operations / Monitoring
system.metric_log table which stores values of system.events and system.metrics with specified time interval.
system.text_log in order to store ClickHouse logs to itself
Support for detached parts removal:
ALTER TABLE <table_name> DROP DETACHED PART '<part_id>'
MergeTree now has an additional option ttl_only_drop_parts (disabled by default) to avoid partial pruning of parts, so that they dropped completely when all the rows in a part are expired.
Added miscellaneous function getMacro(name) that returns String with the value of corresponding <macros> from configuration file on current server where the function is executed.
Activate concurrent part removal (see ‘max_part_removal_threads’) only if the number of inactive data parts is at least this.
max_part_loading_threads
auto(6)
The number of threads to load data parts at startup.
max_part_removal_threads
auto(6)
The number of threads for concurrent removal of inactive data parts. One is usually enough, but in ‘Google Compute Environment SSD Persistent Disks’ file removal (unlink) operation is extraordinarily slow and you probably have to increase this number (recommended is up to 16).
storage_policy
default
Name of storage disk policy
ttl_only_drop_parts
0
Only drop altogether the expired parts and not partially prune them.
system.settings changed/added
Name
Default
Description
allow_drop_detached
0
Allow ALTER TABLE … DROP DETACHED PARTITION … queries
allow_experimental_live_view
0
Enable LIVE VIEW. Not mature enough.
allow_introspection_functions
0
Allow functions for introspection of ELF and DWARF for query profiling. These functions are slow and may impose security considerations.
any_join_distinct_right_table_keys
0 (was 1)
Enable old ANY JOIN logic with many-to-one left-to-right table keys mapping for all ANY JOINs. It leads to confusing not equal results for ’t1 ANY LEFT JOIN t2’ and ’t2 ANY RIGHT JOIN t1’. ANY RIGHT JOIN needs one-to-many keys mapping to be consistent with LEFT one.
asterisk_left_columns_only
removed
connection_pool_max_wait_ms
0
The wait time when connection pool is full.
default_max_bytes_in_join
100000000
Maximum size of right-side table if limit’s required but max_bytes_in_join is not set.
distributed_directory_monitor_max_sleep_time_ms
30000
Maximum sleep time for StorageDistributed DirectoryMonitors, it limits exponential growth too.
distributed_replica_error_cap
1000
Max number of errors per replica, prevents piling up incredible amount of errors if replica was offline for some time and allows it to be reconsidered in a shorter amount of time.
distributed_replica_error_half_life
60
Time period reduces replica error counter by 2 times.
format_custom_escaping_rule
Escaped
Field escaping rule (for CustomSeparated format)
format_custom_field_delimiter
Delimiter between fields (for CustomSeparated format)
format_custom_result_after_delimiter
Suffix after result set (for CustomSeparated format)
format_custom_result_before_delimiter
Prefix before result set (for CustomSeparated format)
format_custom_row_after_delimiter
Delimiter after field of the last column (for CustomSeparated format)
format_template_resultset
Path to file which contains format string for result set (for Template format)
format_template_row
Path to file which contains format string for rows (for Template format)
format_template_rows_between_delimiter
Delimiter between rows (for Template format)
input_format_csv_unquoted_null_literal_as_null
0
Consider unquoted NULL literal as N
input_format_null_as_default
0
For text input formats initialize null fields with default values if data type of this field is not nullable
input_format_tsv_empty_as_default
0
Treat empty fields in TSV input as default values.
input_format_values_accurate_types_of_literals
1
For Values format: when parsing and interpreting expressions using template, check actual type of literal to avoid possible overflow and precision issues.
For Values format: if field could not be parsed by streaming parser, run SQL parser, deduce template of the SQL expression, try to parse all rows using template and then interpret expression for all rows.
joined_subquery_requires_alias
0
Force joined subqueries to have aliases for correct name qualification.
kafka_max_wait_ms
5000
The wait time for reading from Kafka before retry.
live_view_heartbeat_interval
15
The heartbeat interval in seconds to indicate live query is alive.
max_http_get_redirects
0
Max number of http GET redirects hops allowed. Make sure additional security measures are in place to prevent a malicious server to redirect your requests to unexpected services.
max_live_view_insert_blocks_before_refresh
64
Limit maximum number of inserted blocks after which mergeable blocks are dropped and query is re-executed.
min_free_disk_space_for_temporary_data
0
The minimum disk space to keep while writing temporary data used in external sorting and aggregation.
optimize_read_in_order
1
Enable ORDER BY optimization for reading data in corresponding order in MergeTree tables.
partial_merge_join
0
Use partial merge join instead of hash join for LEFT and INNER JOINs.
partial_merge_join_optimizations
0
Enable optimizations in partial merge join
partial_merge_join_rows_in_left_blocks
10000
Group left-hand joining data in bigger blocks. Setting it to a bigger value increase JOIN performance and memory usage.
partial_merge_join_rows_in_right_blocks
10000
Split right-hand joining data in blocks of specified size. It’s a portion of data indexed by min-max values and possibly unloaded on disk.
query_profiler_cpu_time_period_ns
1000000000 (was 0)
Highly experimental. Period for CPU clock timer of query profiler (in nanoseconds). Set 0 value to turn off CPU clock query profiler. Recommended value is at least 10000000 (100 times a second) for single queries or 1000000000 (once a second) for cluster-wide profiling.
query_profiler_real_time_period_ns
1000000000 (was 0)
Highly experimental. Period for real clock timer of query profiler (in nanoseconds). Set 0 value to turn off real clock query profiler. Recommended value is at least 10000000 (100 times a second) for single queries or 1000000000 (once a second) for cluster-wide profiling.
replace_running_query_max_wait_ms
5000
The wait time for running query with the same query_id to finish when setting ‘replace_running_query’ is active.
s3_min_upload_part_size
536870912
The minimum size of part to upload during multipart upload to S3.
temporary_live_view_timeout
5
Timeout after which temporary live view is deleted.
Altinity Stable Release for ClickHouse 19.16.19.85
Released 2020-04-20
Description
This is a combined release of 19.16.19.65, upgraded to 19.16.19.85 after review.
Major New Features
enable_scalar_subquery_optimization setting is disabled by default. It is required in order to perform rolling upgrades to 20.x versions.
Bug Fixes
Fixed a bug with non-Date/DateTime columns not being allowed in TTL expressions
Fixed a bug in the Kafka engine that sometimes prevented committing a message back to the broker if the broker was temporarily unavailable
Fixed a bug in which the boolean functions ‘or’ and ‘and’ might return incorrect results when called on more than 10 arguments if some of them are NULL
Fixed server side certificates in docker image
Fixed a possible race condition between insert quorum and drop partition
Volume selection in merge process could move data back to the first volume in storage policy in some cases
Mutations that did not work if insert_quorum has been used for the table
Deduplication logic that ignored dependent materialized views if a duplicate for the main table has been detected. The fix is turned off by default and can be enabled with a new deduplicate_blocks_in_dependent_materialized_views setting.
Kafka engine could result in data losses when ZooKeeper is temporarily not available
Kafka engine did not allow users to drop a table with incorrect Kafka topic
Kafka engine did not allow users to use subqueries in attached materialized views
ALTER TABLE MODIFY CODEC default expression and a codec are specified
Altinity Stable Release for ClickHouse 19.16.12.49
Released 2020-02-07
Description
Improved Kafka engine reliability, performance and usability.
Bug Fixes
When there is a rebalance of partitions between consumers, occasional data duplicates and losses were possible.
When data was polled from several partitions with one poll and committed partially, occasional data losses were possible.
Block size threshold (‘kafka_max_block_size’ setting) now triggers block flush correctly that reduces the chance of data loss under high load.
When new columns are added to the Kafka pipeline (Kafka engine -> Materialized View -> Table) it was previously not possible to alter the destination tables first with default value and then alter MV in order to minimize downtime. The problem was not related directly to Kafka, but general implementation of materialized views. It is fixed now.
Few other minor problems have been addressed as well.
Since ClickHouse now respects the ‘kafka_max_block_size’ setting that defaults to 65535, we recommend increasing it to the bigger values for high volume streaming. Setting it to 524288 or 1048576 may increase consumer throughput up to 20%.
Known Issues
The ‘kafka_max_block_size’ defaults to 65535. We recommend increasing it to the bigger values for high volume streaming. Setting it to 524288 or 1048576 may increase consumer throughput up to 20%.
V19.13 Release
Altinity Stable Release for ClickHouse 19.13.7.57
Released 2019-11-28
Description
This is a minor upgrade over the previous release.
Major New Features
CREATE TABLE AS TABLE FUNCTION statement that allows to create tables from external data automatically, e.g. from mysql table.
COLUMN('regexp') macro function as a generalization of SELECT * queries.
Bug Fixes
Fixed security vulnerability in url() function.
Fixed security vulnerability related to Zookeeper.
Fixed vulnerabilities in compression codecs.
Fixed corner case overflows in DoubleDelta codec.
Known Issues
ANY INNER|RIGHT|FULL JOIN is deprecated! While we like how it worked before, there are plans to change the behavior completely. We are still discussing with the development team how we can preserve the old behavior. For now, in order to preserve the old behavior and safely upgrade to newer versions in the future one needs to enable any_join_distinct_right_table_keys setting!
The setting input_format_defaults_for_omitted_fields is on by default. It enables calculation of complex default expressions for omitted fields in JSONEachRow and CSV* formats. Inserts to Distributed tables need this setting to be the same across the cluster.
You need to set input_format_defaults_for_omitted_fields across the cluster before the upgrade if rolling upgrade is performed.
Fuzzy regex match (hyperscan-powered): multiFuzzyMatch(Any|AnyIndex)
N-gram distance for fuzzy string comparison and search (similar to q-gram metrics in R language): ngramDistance(CaseInsensitive)?(UTF8)?, ngramSearch(CaseInsensitive)?(UTF8)?
HDFS read/write access
New JSON processing functions - high performance & compliant with JSON standard
IPv4 and IPv6 data types
New formats
Protobuf — now fully supported with input and output plus nested data structures
Parquet
RowBinaryWithNamesAndTypes
JSONEachRow and TSKV - now support default expressions for missing fields (Check input_format_defaults_for_omitted_fields)
TSVWithNames/CSVWithNames - column order can now be determined from file header (Check input_format_with_names_use_header parameter).
SQL statements with bind parameters
Improved MySQL integration:
new database engine to access all the tables in remote MySQL server
support for MySQL wire protocol, allowing to connect to ClickHouse using MySQL clients.
Known issues
All released 19.x versions have had some problems with Kafka engine implementation due to a full re-write of Kafka support. In 19.11.8 Kafka is working much better than previous 19.x releases. However, there are still some corner cases that can lead to data duplication in certain scenarios, for example, in the event of ClickHouse server restart. Those issues will be addressed soon.
Adaptive granularity is enabled by default, and index_granularity_bytes is set to 10Mb. This feature uses a different data format, and interoperability between old and new format has some issues. So if you’re upgrading your cluster from an older version, consider disabling it before the upgrade by putting the following fragment in your config.xml:
After upgrade, you can choose any convenient time to turn adaptive granularity on. In general, it’s a cool feature and especially useful when you have rows of size > 1Kb in your tables. If you are doing a new installation, please leave the default setting value as is. The adaptive granularity feature is very nice and useful.
enable_optimize_predicate_expression is now enabled by default. It`s possible you may have some issues when a condition passed to subselect leads to some suboptimal / undesired effects. If this happens please report the issue and disable the feature for that select (or globally).
Secondary indices are maturing but still considered as experimental. There is at least one severe bug: when a mutation is executed with a condition on the column with secondary index - it can affect more rows than expected. Please be careful with DELETE, or upgrade to 19.13 (see issue #6224).
Some users have reported problems with ODBC data sources after upgrade. In most cases these were misconfigurations. Nevertheless, please do canary/staging updates and check how your ODBC connections work before moving to production.
Upgrade Notes
Backward compatibility issues
Due to update of LZ4 library the new ClickHouse version writes parts which are not binary equivalent to those written with older versions. That makes it problematic to update only one replica. Leaving the cluster in such a state for a long period of time time will work but may lead to excessive parts copying between nodes due to checksum mismatches.
There is a new setting max_partitions_per_insert_block with default value 100. If the inserted block contains a larger number of partitions, an exception is thrown. Set it to 0 if you want to remove the limit (not recommended).
If you are using unexpected low cardinality combinations like LowCardinality(UInt8), the new version will prevent you from doing so. if you really know what you are doing check allow_suspicious_low_cardinality_types and set it to 1.
This release adds max_parts_in_total setting for MergeTree family of tables (default: 100 000). We hope your number of partitions is much lower than this limit. If necessary you can raise the value.
The system.dictionaries table has been changed. If you used it for monitoring purposes, you may need to change your scripts.
Dictionaries are loaded lazily by default. It means they have status NOT_LOADED until the first access.
Changes
New functions
New hash functions: xxHash32, xxHash64, gccMurmurHash, hiveHash, javaHash, CRC32
Setting constraints which limit the possible range of setting value per user profile.
KILL MUTATION added
New aggregate function combinators: -Resample
Added new data type SimpleAggregateFunction - light aggregation for simple functions like any, anyLast, sum, min, max
Ability to use different sorting key (ORDER BY) and index (PRIMARY KEY). The sorting key can be longer than the index. You can alter ORDER BY at the moment of adding / removing the column
HTTP interface: brotli compression support, X-ClickHouse-Query-Id and X-ClickHouse-Summary headers in response, ability to cancel query on disconnect (check cancel_http_readonly_queries_on_client_close)
DFA-based implementation for functions sequenceMatch and sequenceCount in case the pattern doesn’t contain time
Back up all partitions at once with ALTER TABLE … FREEZE
Comments for a column in the table description
Join engine: new options join_use_nulls, max_rows_in_join, max_bytes_in_join, join_any_take_last_row and join_overflow_mode + joinGet function that allows you to use a Join type table like a dictionary.
/docker-entrypoint-initdb.d for database initialization in docker
Graphite rollup rules reworked.
Query settings in asynchronous INSERTs into Distributed tables are respected now
Hints when while user make a typo in function name or type in command line client
system.detached_parts table containing information about detached parts of MergeTree tables
Table function remoteSecure
Ability to write zookeeper part data in more compact form (use_minimalistic_part_header_in_zookeeper)
Ability to close MySQL connections after their usage in external dictionaries
Support RENAME operation for Materialized View
Non-blocking loading of external dictionaries
Kafka now supports SASL SCRAM authentication, new virtual columns _topic, _offset, _key are available, and a lot of other improvements.
Settings changed/added
Name
Default
Description
allow_experimental_cross_to_join_conversion
1
Convert CROSS JOIN to INNER JOIN if possible
allow_experimental_data_skipping_indices
0
If it is set to true, data skipping indices can be used in CREATE TABLE/ALTER TABLE queries.
allow_experimental_low_cardinality_type
1 (was 0)
Obsolete setting, does nothing. Will be removed after 2019-08-13
allow_experimental_multiple_joins_emulation
1
Emulate multiple joins using subselects
allow_hyperscan
1
Allow functions that use Hyperscan library. Disable to avoid potentially long compilation times and excessive resource usage.
allow_simdjson
1
Allow using simdjson library in ‘JSON*’ functions if AVX2 instructions are available. If disabled rapidjson will be used.
allow_suspicious_low_cardinality_types
0
In CREATE TABLE statement allows specifying LowCardinality modifier for types of small fixed size (8 or less). Enabling this may increase merge times and memory consumption.
cancel_http_readonly_queries_on_client_close
0
Cancel HTTP readonly queries when a client closes the connection without waiting for response.
check_query_single_value_result
1
Return check query result as single 1/0 value
enable_conditional_computation
(was 0)
DELETED
enable_optimize_predicate_expression
1 (was 0)
If it is set to true, optimize predicates to subqueries.
enable_unaligned_array_join
0
Allow ARRAY JOIN with multiple arrays that have different sizes. When this setting is enabled, arrays will be resized to the longest one.
external_table_functions_use_nulls
1
If it is set to true, external table functions will implicitly use Nullable type if needed. Otherwise NULLs will be substituted with default values. Currently supported only for ‘mysql’ table function.
idle_connection_timeout
3600
Close idle TCP connections after specified number of seconds.
input_format_defaults_for_omitted_fields
0
For input data calculate default expressions for omitted fields (it works for JSONEachRow format).
input_format_with_names_use_header
0
For TSVWithNames and CSVWithNames input formats this controls whether format parser is to assume that column data appear in the input exactly as they are specified in the header.
join_any_take_last_row
0
When disabled (default) ANY JOIN will take the first found row for a key. When enabled, it will take the last row seen if there are multiple rows for the same key. Allows you to overwrite old values in table with Engine=Join.
join_default_strictness
ALL
Set default strictness in JOIN query. Possible values: empty string, ‘ANY’, ‘ALL’. If empty, query without strictness will throw exception.
low_cardinality_allow_in_native_format
1
Use LowCardinality type in Native format. Otherwise, convert LowCardinality columns to ordinary for select query, and convert ordinary columns to required LowCardinality for insert query.
max_alter_threads
auto
The maximum number of threads to execute the ALTER requests. By default, it is determined automatically.
max_execution_speed
0
Maximum number of execution rows per second.
max_execution_speed_bytes
0
Maximum number of execution bytes per second.
max_partitions_per_insert_block
100
Limit maximum number of partitions in single INSERTed block. Zero means unlimited. Throw exception if the block contains too many partitions. This setting is a safety threshold, because using large number of partitions is a common misconception.
max_streams_multiplier_for_merge_tables
5
Request more streams when reading from Merge table. Streams will be spread across tables that Merge table will use. This allows more even distribution of work across threads and is especially helpful when merged tables differ in size.
max_threads
auto
The maximum number of threads to execute the request. By default, it is determined automatically.
merge_tree_max_bytes_to_use_cache
2013265920
The maximum number of rows per request, to use the cache of uncompressed data. If the request is large, the cache is not used. (For large queries not to flush out the cache.)
merge_tree_min_bytes_for_concurrent_read
251658240
If at least as many bytes are read from one file, the reading can be parallelized.
merge_tree_min_bytes_for_seek
0
You can skip reading more than that number of bytes at the price of one seek per file.
min_count_to_compile_expression
3
The number of identical expressions before they are JIT-compiled
min_execution_speed_bytes
0
Minimum number of execution bytes per second.
network_compression_method
LZ4
Allows you to select the method of data compression when writing.
optimize_skip_unused_shards
0
Assumes that data is distributed by sharding_key. Optimization to skip unused shards if SELECT query filters by sharding_key.
os_thread_priority
0
If non zero - set corresponding ‘nice’ value for query processing threads. Can be used to adjust query priority for OS scheduler.
output_format_parquet_row_group_size
1000000
Row group size in rows.
stream_poll_timeout_ms
500
Timeout for polling data from streaming storages.
tcp_keep_alive_timeout
0
The time (in seconds) the connection needs to remain idle before TCP starts sending keepalive probes
MergeTree settings
Name
Default
Description
enable_mixed_granularity_parts
0
Enable parts with adaptive and non adaptive granularity
index_granularity_bytes
10485760
Approximate amount of bytes in single granule (0 - disabled).
write_final_mark
1
Write final mark after end of column (0 - disabled, do nothing if index_granularity_bytes=0)
max_parts_in_total
100000
If more than this number active parts in all partitions in total, throw ‘Too many parts …’ exception.
merge_with_ttl_timeout
86400
Minimal time in seconds, when merge with TTL can be repeated.
min_merge_bytes_to_use_direct_io
10737418240 (was 0)
Minimal amount of bytes to enable O_DIRECT in merge (0 - disabled).
replicated_max_parallel_fetches_for_host
15
Limit parallel fetches from endpoint (actually pool size).
use_minimalistic_part_header_in_zookeeper
0
Store part header (checksums and columns) in a compact format and a single part znode instead of separate znodes (/columns and /checksums). This can dramatically reduce snapshot size in ZooKeeper. Before enabling check that all replicas support new format.
V18.14 Release
Altinity Stable Release for ClickHouse 18.14.19
Released 2018-12-31
Description
Altinity Stable Release 18.14.19 is a minor bug-fixing release to the previous 18.14.15. ClickHouse memory consumption in general is decreased with this release.
Bug fixes
Fixed a bug with range_hashed dictionaries returning wrong results.
Fixed an error that caused messages “netlink: ‘…’: attribute type 1 has an invalid length” to be printed in Linux kernel log in some recent versions of Linux kernel.
Fixed segfault in function ’empty’ for FixedString arguments.
Fixed excessive memory allocation when using a large value of max_query_size.
Fixed cases when the ODBC bridge process did not terminate with the main server process.
Fixed synchronous insertion into the Distributed table with a columns list that differs from the column list of the remote table.
Fixed a rare race condition that could lead to a crash when dropping a MergeTree table.
Fixed a query deadlock in a case when query thread creation fails with the ‘Resource temporarily unavailable’ error.
Fixed parsing of the ENGINE clause when the CREATE AS table syntax was used and the ENGINE clause was specified before the AS table (the error resulted in ignoring the specified engine).
Fixed a segfault if the ‘max_temporary_non_const_columns’ limit was exceeded
Fixed a bug with databases being not correctly specified when executing DDL ON CLUSTER queries
This release delivers a build of ClickHouse based on Altinity Stable release v25.3.8.10042, with changes to cryptography, packaging, and feature availability to ensure compliance with the FIPS 140-3 standard. Key changes include:
Replacing the cryptographic foundation with a validated module
Enforcing strict security defaults
Removing non-compliant features
Providing operational transparency and validation tooling
⚠️ Due to encryption format changes and removed features, careful migration planning is required when upgrading from non-FIPS builds.
This is a FIPS-compatible release of version 24.3.5.
Changes compared to 24.3.5.47.altinitystable
Improvement
Building BoringSSL ver fips-20210429 (853ca1ea1168dff08011e5d42d94609cc0ca2e27) according to FIPS-140-2 Security Policy 4407, based on build scripts from Golang version go1.22.5
Added FIPS_CLICKHOUSE to system.build_options
Modified ClickHouse keeper to use full range of openSSL options (same as ClickHouse does) for Raft connections using ubuntu:22.04 as a base for clickhouse-server docker images instead of ubuntu:20.04
Linux packages can be found at packages.clickhouse.com for upstream builds, and at builds.altinity.cloud/#altinityfips for Altinity Stable builds. The Altinity Stable build for this release is available for AMD64 as either .deb, .rpm, or .tgz.
Docker images for the upstream version should be referenced as clickhouse/clickhouse-server:24.3.5.46.
Now operator automatically restarts aborted reconcile if failed pod goes online after abort
Restart operator on operator configuration change #1960. Closes #1930.
Allow to exclude certain metrics from exporting. Noisy OS/CPU metrics are now excluded by default #1975. Closes #1876. Exclusion rules are applied by default and can be changed in operator configuration:
Fixed a race condition when updating ClickHouse configuration and version altogether with a configuration setting that did not exist in the old version. Closes #1926
Fixed a bug when some Keeper nodes could be left offline after configuration changes
Fixed a bug when operator did not respect watched namespaces for Keeper. Closes #1923
Fixed potential races in configuration hash calculation. May close #1907
IMPORTANT: Due to ClickHouse upstream regression ClickHouse/ClickHouse#89693 DDL queries may not work on newly created ClickHouse pods. It affects Kubernetes deployments only in some new ClickHouse versions (25.8.10+ and above). The workaround is to restart ClickHouse pods. The problem is fixed by ClickHouse/ClickHouse#92339, see backports for different release branches. The fix is backported to Altinity Stable 25.8.16.10001 as well.
Closes #1883 and #1913
Added
Added an option to abort reconcile if STS needs to be recreated. It can be configured in operator configuration or CHI.
# Reconcile StatefulSet scenario
reconcile:
statefulSet:
recreate:
# What to do in case operator is in need to recreate StatefulSet?
# Possible options:
# 1. abort - abort the process, do nothing with the problematic StatefulSet, leave it as it is,
# do not try to fix or delete or update it, just abort reconcile cycle.
# Do not proceed to the next StatefulSet(s) and wait for an admin to assist.
# 2. recreate - proceed and recreate StatefulSet.
# Triggered when StatefulSet update fails or StatefulSet is not ready
onUpdateFailure: recreate
Added an option to configure system tables for metrics scrapping. The default is system.metrics and system.custom_metrics tables, but those can be changed with a regular expression if needed:
tablesRegexp: "^(metrics|custom_metrics)$"
Changed
The suspend flag now immediately aborts a running reconcile. Previously, it did not affect the one that was running
When suspend flag is set, any reconcile attempt automatically sets CHI/CHK status to aborted.
Add optional registry prefix for operator and metrics images in Helm chart by @lesandie in #1928
Improve ClickHouse Keeper Grafana Dashboard by @discostur in #1872
Fixed stop and suspend attributes for CHK that were previously ignored
Fix distributed_ddl.replicas_path mismatch that could prevent sharing (Zoo)Keeper between multiple clusters @Elmo33 in #1922
Fixed a bug when defaults.storageManagement.reclaimPolicy was not respected
Fixed slow initial connectivity to newly created pods caused by DNS search list exhaustion (ndots:5). Added trailing dot to FQDN and increased connect timeout
Fixed a bug where reconcile settings specified at CHI level (e.g. spec.reconcile.statefulSet.recreate.onUpdateFailure) were not inherited by cluster-level reconcile configuration
Other
stdlib has been upgraded to 1.25.6 to address CVEs
Operator has been certified for 25.8.16.10001 Altinity.Stable.
Hosts are not excluded from remote_servers anymore if restart is not needed. Previously, replicas in replicated cluster might be removed for a short time even if restart was not needed.
configuration.zookeeper section changes do not require restart anymore
Last reconciliation error and list of errors are now stored in CHI status
Fixed
actionPlan is now optional in status. That fixes operator upgrade problems that might happen in some environments.
Fixed excessive reconciles triggered by endpoint slices. Closes #1873
Fixed crash in CHK that might happen sometimes. Closes #1863
Fixed an issue with handling fractional requests/limits that would result in excessive reconcile. Closes #1849#1821
Fixed a bug with operator crash in Terminating namespace. Closes #1871
stdlib was upgraded in order to address CVEs in dependent libraries
NOTE: Due to regression in upstream ClickHouse ClickHouse/ClickHouse#89693 schema propagation and DDL statements do not work with ClickHouse versions 25.8.10+ and newer until it is resolved.
Added
The latest applied ActionPlan is now stored in chi-storage ConfigMap
reconcile:host:drop:replicas:# Whether the operator during reconcile procedure should drop replicas when replica is deletedonDelete:yes# Whether the operator during reconcile procedure should drop replicas when replica volume is lostonLostVolume:yes# Whether the operator during reconcile procedure should drop active replicas when replica is deleted or recreatedactive:no
Now active replicas are never dropped. That solves a potential bug when a replica could be dropped on a multi-volume node if a newly added volume is not yet available.
Operator configuration ‘reconcile’ section is now fully supported at CHI level under both ‘reconcile’ and old ‘reconciling’ name. Previously, only selected settings were available at CHI level.
Allow to exclude namespaces that operator watches. by @AdheipSingh in #1770
Option to choose which probe should operator wait for during reconcile. Previously, it always waited for pod to be ready. This can now be configured in ‘reconcile’ section of operator or CHI:
system.custom_metrics table is currently scrapped for monitoring in addition to metrics and asynchronous_metrics. That allows to inject custom monitoring data from ClickHouse side.
Deprecated Endpoints API has been replaced with EndpointSlice. Closes #1801
Fixed
Fixed a bug with long environment variables used for secrets being truncated. Closes #1804
Fixed a bug that operator did not respect watched namespaces for CHK
Operator can now inject version-specific ClickHouse configuration, it is configured in the addons section of the operator configuration. This closes #1603 but can be used for other use cases as well
Added an option to specify reconciling.runtime.reconcileShardsThreadsNumber and reconcilingShardsMaxConcurrencyPercent on the CHI level
[Helm] ServiceMonitor additional configuration by @nlamirault in #1624
[Helm] Add namespace override capability for multi-namespace deployments by @bwdmr in #1640
[Helm] Add common labels and annotations to all resources by @dashashutosh80 in #1692
When a new cluster is started with reconcilingShardsMaxConcurrencyPercent=100, all shards are created in parallel. Previously, the first shard was always created alone.
The new option to wait for replication to catch up when adding a new replica is enabled by default. It can be configured in operator reconcile settings:
Follow-up to the previous release. CLICKHOUSE_SKIP_USER_SETUP is not added if default entrypoint is not used.
Fixed a bug when ClickHouseOperatorConfiguration was not correctly merged sometimes
Adjusted default configuration so configuration files with ’no_restart’ in the file name would not cause ClickHouse restarts
Changed how operator handles remote_servers.xml when doing rolling updates. Now instead of removing/adding a replica, it sets low priority to make sure replica does not get any traffic from distributed queries
Bumped dependencies to address CVE-2025-22868 and CVE-2025-22870
Fixed a typo in Keeper Prometheus alert by @morkalfon in #1657
Fixed Keeper dashboard - Ephemeral Node count by @Slach in #1656
NormalizedCHI that is used to plan reconciliation was moved from CHI status to a separate configmap object. Closes #1444.
Changed a way ClickHouse is restarted in order to pickup server configuration change. Instead of pod re-creation it tries SYSTEM SHUTDOWN first. That speeds things up on nodes with big volumes, since those should not be re-attached.
Unused fields ‘HostsUnchanged’ and ‘HostsDelete’ were removed from extended status output
Upgrade prometheus-operator to 0.79.0 (alerts tested with prometheus 3.0.1) by @Slach in #1599
Interserver secret is now used for ‘all-sharded’ cluster if it is defined for the main cluster
Fixed
Custom ZK path creation is not retried anymore for stopped CHI
ClickHouseKeeper support has been fully re-written. It is now fully compatible with CHI in syntax and supported functionality that closes multiple issues discovered by early adopters. The downside is that CHK resources created by operator 0.23.x will loose the storage and change service name due to different naming conventions. See CHK upgrade instructions from 0.23 to 0.24 for the details. This closes #1504, #1497, #1469, #1465, #1459, #1408, #1362, #1296
Details of all releases, including older releases, are available through the Releases page.
5 - Altinity Kubernetes Operator for ClickHouse®
Running ClickHouse® on Kubernetes
Running ClickHouse on Kubernetes is easy with the open-source Altinity Kubernetes Operator for ClickHouse. This documentation will get you up and running as quickly as possible.
We’ll also be careful with the word “cluster.” When you have everything up and running, you’ll have a ClickHouse cluster running inside a Kubernetes cluster. Most of the time it’ll be obvious what the word “cluster” refers to, but if there’s any chance it’s not clear, we’ll say “ClickHouse cluster” or “Kubernetes cluster.”
As of this time (June 4, 2026), the current version of the Altinity Kubernetes Operator is 0.27.1. You can always find the latest released version on the project’s releases page. The operator is released under the Apache 2.0 license.
5.1 - Installing the Operator
Getting the operator installed
Installing the operator is simple. You can install it with Helm or install it with a shell script (which in turn uses kubectl), whichever you prefer.
NOTE: This procedure only installs the operator, it does not create a ClickHouse cluster.The Quick Start Guide shows you how to do that.
Helm bills itself as “the package manager for Kubernetes.” It makes it easy to install resources in your Kubernetes cluster. See the Installing Helm page to install Helm on your system.
To install the operator with Helm, add the helm.altinity.com repo if you haven’t already:
helm repo add altinity https://helm.altinity.com
This adds the repository to your list of repos under the name altinity:
"altinity" has been added to your repositories
(If you’ve already added the repo, you’ll be told that Helm skipped the command.)
DEPRECATION WARNING
The correct Helm repo to use is now https://helm.altinity.com. The previous repo, https://docs.altinity.com/clickhouse-operator, is deprecated and at some point will be deleted. Any changes or updates to the Helm charts will be applied to the old repo until it's removed.
If you’ve previously installed the old repo, you should uninstall it and install the correct repo at helm.altinity.com now. First, use the helm repo list command to see which repos you have installed:
> helm repo list
NAME URL
devtron https://helm.devtron.ai
harness-delegate https://app.harness.io/storage/harness-download/delegate-helm-chart/
superset https://apache.github.io/superset
eks https://aws.github.io/eks-charts
altinity-docs https://docs.altinity.com/clickhouse-operator
In this example, the old repo was installed with the name altinity-docs. (The name could be anything.) These commands delete the old repo named altinity-docs and install the correct one under the name altinity:
Before installing the operator’s Helm chart, it never hurts to make sure you’ve got the latest version (especially if it’s been a while since you added the repo):
helm repo update altinity
This refreshes the local cache of chart repositories on your machine. Helm will send its best wishes:
Hang tight while we grab the latest from your chart repositories...
...Successfully got an update from the "altinity" chart repository
Update Complete. ⎈Happy Helming!⎈
Now you’re ready to install the chart. We’ll do this with the helm upgrade command, telling Helm to create the clickhouse namespace if it doesn’t exist already, then upgrade or install version 0.26.3 of the operator into that namespace. (It’s not installed yet, of course, so this will just do an install. We’ll see the helm upgrade command again later.)
Release "clickhouse-operator" does not exist. Installing it now.
NAME: clickhouse-operator
LAST DEPLOYED: Fri Apr 24 02:38:03 2026NAMESPACE: clickhouse
STATUS: deployed
REVISION: 1TEST SUITE: None
Before we go on, see what version of the chart you’re working with:
helm list --output yaml -n clickhouse | grep app_version
If you ran helm repo update, you’ll have the latest version:
- app_version: 0.26.3
To verify that the installation worked, run this command:
kubectl get deployment.apps -n clickhouse
Keep checking this command until you see clickhouse-operator-altinity-clickhouse-operator and Ready 1/1 in the output:
NAME READY UP-TO-DATE AVAILABLE AGE
clickhouse-operator-altinity-clickhouse-operator 1/1 11 54s
So it’s just that simple - you’ve installed the operator in your Kubernetes cluster!
Going beyond the basics, there are a number of parameters you can pass to the Helm chart. See the Operator's Artifact Hub page for complete details.
NOTE: The Helm repo has older versions of the operator chart if you need them. The command helm search repo altinity-clickhouse-operator --versions will list all versions of the operator chart.
The Quick Start Guide and other resources
If you’d like to go through a tutorial to create a ClickHouse cluster with persistent storage and replication, move on to the Quick Start Guide. If you want to see the details of the Kubernetes resources created when you install the operator, see the Operator details section below.
The script uses kubectl to create the clickhouse namespace and then install and configure the operator. You’ll see something like this:
Setup ClickHouse Operator into 'clickhouse' namespace.
No 'clickhouse' namespace found. Going to create.
namespace/clickhouse created
Namespace 'clickhouse' exists.
Looks like clickhouse-operator is not installed in 'clickhouse' namespace.
Install operator from template https://raw.githubusercontent.com/Altinity/clickhouse-operator/0.26.3/deploy/operator/clickhouse-operator-install-template.yaml into clickhouse namespace
customresourcedefinition.apiextensions.k8s.io/clickhouseinstallations.clickhouse.altinity.com created
customresourcedefinition.apiextensions.k8s.io/clickhouseinstallationtemplates.clickhouse.altinity.com created
customresourcedefinition.apiextensions.k8s.io/clickhouseoperatorconfigurations.clickhouse.altinity.com created
customresourcedefinition.apiextensions.k8s.io/clickhousekeeperinstallations.clickhouse-keeper.altinity.com created
serviceaccount/clickhouse-operator created
clusterrole.rbac.authorization.k8s.io/clickhouse-operator-clickhouse created
clusterrolebinding.rbac.authorization.k8s.io/clickhouse-operator-clickhouse created
configmap/etc-clickhouse-operator-files created
configmap/etc-clickhouse-operator-confd-files created
configmap/etc-clickhouse-operator-configd-files created
configmap/etc-clickhouse-operator-templatesd-files created
configmap/etc-clickhouse-operator-usersd-files created
configmap/etc-keeper-operator-confd-files created
configmap/etc-keeper-operator-configd-files created
configmap/etc-keeper-operator-templatesd-files created
configmap/etc-keeper-operator-usersd-files created
secret/clickhouse-operator created
deployment.apps/clickhouse-operator created
service/clickhouse-operator-metrics created
You can install a different version of the operator by selecting a different shell script from the Operator's repo and ending the command above with something like OPERATOR_NAMESPACE=clickhouse OPERATOR_VERSION=0.24.2 bash. For complete details of all installation options, see the ClickHouse Operator installation page in the repo.
This set of piped commands shows you the full name of the image behind the operator:
NOTE: We recommend that you always specify a particular version of any container image or YAML file. In our examples here, we’ll use a tag on every image and a version number on every YAML file. That makes our examples slightly longer, but it can prevent all sorts of errors and strange behaviors later.
To verify that the installation worked, run this command:
kubectl get deployment.apps -n clickhouse
Keep checking this command until you see clickhouse-operator and Ready 1/1 in the output:
NAME READY UP-TO-DATE AVAILABLE AGE
clickhouse-operator 1/1 11 25s
The Quick Start Guide and other resources
If you’d like to go through a tutorial to create a ClickHouse cluster with persistent storage and replication, move on to the Quick Start Guide. If you want to see the details of the Kubernetes resources created when you install the operator, see the Operator details section below.
Setting up a ClickHouse® cluster quickly with the Altinity Kubernetes Operator for ClickHouse
If you’re running the Altinity Kubernetes Operator for ClickHouse® for the first time, or just want to get it up and running as quickly as possible, the Quick Start Guide is for you.
As the name “Quick Start” implies, we’re not building anything that you should put into production. The section Configuring the Operator covers some of the operator’s most used options. But we’ll keep it simple here. Get things up and running first, then add more features to your cluster once the basics are in place.
Requirements
A Kubernetes cluster (v1.33.0 or later), with kubectl configured to access it and the operator installed
That’s all! It doesn’t matter where or how your Kubernetes cluster is running. (See the operator install instructions if you haven’t installed the operator already.)
This guide has been tested with clusters hosted on several platforms:
That being said, the instructions in this tutorial should work with any Kubernetes provider.
You probably also want to install the clickhouse-client utility. You can use the copy of clickhouse-client that’s included in the ClickHouse server’s container image, but it’s handy to install it directly on your machine. Full instructions for installing clickhouse-client are on the ClickHouse Client installation page.
Our starting point
We’ll start with a running Kubernetes cluster that has the operator installed and kubectl configured to talk to it. With those steps behind you, you’re ready to go!
5.2.1 - Creating your first ClickHouse® cluster
How to create a cluster and make sure it’s running
At this point, you’ve got the Altinity Kubernetes Operator for ClickHouse® installed. Now let’s give it something to work with. We’ll start with a simple ClickHouse cluster here: no persistent storage, one replica, and one shard. (We’ll cover those topics over the next couple of steps.)
Creating your first cluster
Now that we have our namespace, we’ll create a simple cluster: one shard, one replica. Copy the following text and save it as firstCluster.yaml:
When you installed the operator, it defined a custom resource type called a ClickHouseInstallation; that’s what we’re creating here. A ClickHouseInstallation contains a ClickHouse server and lots of other useful things. Here we’re creating a ClickHouseInstallation named cluster01, and that cluster has one shard and one replica.
NOTE: The YAML above would be simpler if we didn’t specify a particular version of the altinity/clickhouse-server container image. By the time we go through all the exercises in this tutorial, however, things will be simpler because we were specific here. (Hopefully you’re just cutting and pasting anyway.)
Use kubectl apply to create your ClickHouseInstallation:
kubectl apply -f firstCluster.yaml -n clickhouse
You’ll see this:
clickhouseinstallation.clickhouse.altinity.com/cluster01 created
Verify that your new cluster is running:
kubectl get clickhouseinstallation -n clickhouse
The status of your cluster will be In Progress for a minute or two. (BTW, the operator defines chi as an abbreviation for clickhouseinstallation. We’ll use chi from now on.) When everything is ready, its status will be Completed:
NAME CLUSTERS HOSTS STATUS HOSTS-COMPLETED AGE SUSPEND
cluster01 1 1 Completed 2m20s
PRO TIP: You can use the awesome kubens tool to set the default namespace for all kubectl commands. Type kubens clickhouse, and kubectl will use the clickhouse namespace until you tell it otherwise. See the kubens / kubectx repo to get started. You’re welcome.
Now that we’ve got a ClickHouse cluster up and running, we’ll connect to it and run some basic commands.
Connecting to your cluster with kubectl exec
Let’s talk to our cluster and run a simple ClickHouse query. We can hop in directly through Kubernetes and run the clickhouse-client that’s part of the image. First, we have to get the name of the pod:
kubectl get pods -n clickhouse | grep cluster01
You’ll see this:
chi-cluster01-cluster01-0-0-0 1/1 Running 0 2m28s
So chi-cluster01-cluster01-0-0-0 is the name of the pod running ClickHouse. We’ll connect to it with kubectl exec and run clickhouse-client on it:
ClickHouse client version 25.8.16.10002.altinitystable (altinity build).
Connecting to localhost:9000 as user default.
Connected to ClickHouse server version 25.8.16.
chi-cluster01-cluster01-0-0-0.chi-cluster01-cluster01-0-0.operator.svc.cluster.local :)
Now that we’re in ClickHouse, let’s run a query and look at some system data:
Not so fast! At this point, you’d expect a tutorial to show you how to create a database and put some data into it. However, we haven’t defined any persistent storage for our cluster. If a pod fails, any data it had will be gone when the pod restarts. So we’ll add persistent storage to our cluster next.
Most of the time when you’re working with ClickHouse, you connect directly to the cluster with clickhouse-connect. To do that, you’ll need to set up network access for your cluster. The easiest way to do that is with kubectl port-forward. First, look at the services in your namespace:
kubectl get svc -n clickhouse
You’ll see the ports used by each service:
NAME TYPE CLUSTER-IP EXTERNAL-IP PORT(S) AGE
chi-cluster01-cluster01-0-0 ClusterIP None <none> 9000/TCP,8123/TCP,9009/TCP 3m53s
clickhouse-cluster01 ClusterIP None <none> 8123/TCP,9000/TCP 3m42s
clickhouse-operator-metrics ClusterIP 10.102.147.251 <none> 8888/TCP,9999/TCP 22m
So to connect directly to the first pod, use this command:
Be sure to put the & at the end to keep this running in the background.
You’ll see the PID for the process and the ports you can access directly:
[1] 72202
Forwarding from 127.0.0.1:9000 -> 9000
Forwarding from [::1]:9000 -> 9000
Forwarding from 127.0.0.1:8123 -> 8123
Forwarding from [::1]:8123 -> 8123
Forwarding from 127.0.0.1:9009 -> 9009
Forwarding from [::1]:9009 -> 9009
Without a hostname or port, clickhouse-client uses localhost:9000. That makes it easy to connect to our ClickHouse cluster. Just type clickhouse-client at the command line:
> clickhouse-client
ClickHouse client version 23.5.3.1.
Connecting to localhost:9000 as user default.
Handling connection for 9000
Connected to ClickHouse server version 25.8.16 revision 54479.
ClickHouse client version is older than ClickHouse server. It may lack support for new features.
Handling connection for 9000
chi-cluster01-cluster01-0-0-0.chi-cluster01-cluster01-0-0.operator.svc.cluster.local :)
Now you can run SQL statements to your heart’s content, such as the query of system data we ran above:
SELECTcluster,host_name,portFROMsystem.clusters
👉 Type exit to end the clickhouse-client session. Be sure to stop port forwarding before you go on (kill 72202, in this example).
Depending on your Kubernetes setup and provider, you may be able to use a LoadBalancer to access the cluster directly, but this method, clumsy as it is, will always work. See the documentation for your Kubernetes provider for details.
Also be aware that when we’re using the clickhouse-client that’s included in the clickhouse-server container, the version of the client and the server are in sync. If you install clickhouse-client directly on your machine, there’s no guarantee that the client and server will be the same version. (See the warning message above.) That’s unlikely to cause problems, but it’s something to be aware of if the system starts behaving strangely.
We added persistent storage (volumeMounts) to the podTemplate for our ClickHouse cluster. The storage is defined in a template named clickhouse-storage, and it is mounted at /var/lib/clickhouse on each pod.
We have a volumeClaimTemplats section that defines the parameters of the storage our pods will use. The storage will have five gigabytes of space, and its storageClass is standard. (More on storage classes in a minute.)
The persistent volume has a reclaimPolicy of Retain. With this setting, you can delete everything (including any chis you’ve created and even the operator itself), but the storage will remain. If you then reinstall the operator and recreate your chi objects, that persistent storage will still be there. (The Kubernetes site has a good discussion of reclaim policies and how they work.)
At the end of the file, the definition of our cluster hasn’t changed. But clickhouse-pod-template now includes persistent storage.
One thing to keep in mind: the values for storageClassName can vary from one platform to the next. The command kubectl get storageclasses will show you what’s available in your current environment.
Running kubectl get storageclasses on AWS gives us two options:
NAME PROVISIONER RECLAIMPOLICY VOLUMEBINDINGMODE ALLOWVOLUMEEXPANSION AGE
gp2 kubernetes.io/aws-ebs Delete WaitForFirstConsumer false 3h12m
gp3-encrypted (default) ebs.csi.aws.com Delete WaitForFirstConsumer true 3h4m
This redeploys your ClickHouse cluster with the new settings. You can look at the chi to see how things are progressing:
kubectl get chi -o wide -n clickhouse
You’ll likely see a status of InProgress for a while, but eventually you’ll see Completed:
NAME STATUS VERSION CLUSTERS SHARDS HOSTS TASKID HOSTS-COMPLETED HOSTS-UPDATED HOSTS-ADDED HOSTS-DELETED ENDPOINT AGE SUSPEND
cluster01 Completed 0.26.3 1 1 1 auto-65497e37-1418-4a5c-af23-8def46416d59 clickhouse-cluster01.clickhouse.svc.cluster.local 5m42s
(You may need to scroll to the right to see the status because we used the -o wide option.)
And now for some data
Now let’s give our ClickHouse cluster some data to work with. We’ll create a database, then create a table in that database, then put data in the table. First, connect to the cluster:
Okay, we’ve got everything set up, so let’s make sure it’s actually working before we move on to replication. Delete the pod. It will be restarted, of course, and if persistent storage is working, our data should still be there. Here we go:
kubectl delete pod chi-cluster01-cluster01-0-0-0 -n clickhouse
You’ll get a message that the pod has been deleted. Check kubectl get pods -n clickhouse until it says the pod is running and ready. Now connect to the restarted pod and query the analytics.page_views table to see if our data is still there:
2025-01-02 15:30:00 105 /home direct desktop Germany
2025-01-03 11:45:00 107 /contact direct desktop India
2025-01-04 18:00:00 102 /products google.com tablet Canada
2025-01-05 21:30:00 109 /checkout facebook.com mobile USA
2025-01-09 17:20:00 110 /cart direct desktop Australia
Having persistent storage for our data is great, but any highly available system will have multiple copies (replicas) of important data. Which brings us to our next topic….
There are two ways to add replication support to your ClickHouse cluster: ClickHouse Keeper and Zookeeper. Here are the installation instructions for both:
When you install the operator, it creates four custom resource definitions (CRDs). We’ve already worked with the ClickHouseInstallation, but we also have a ClickHouseKeeperInstallation (abbreviation chk) that makes it easy to install ClickHouse Keeper.
Copy and paste the following into clickHouseKeeper.yaml:
apiVersion:"clickhouse-keeper.altinity.com/v1"kind:"ClickHouseKeeperInstallation"metadata:name:clickhouse-keeperspec:configuration:clusters:- name:"chk01"layout:replicasCount:3defaults:templates:# Templates are specified as default for all clusterspodTemplate:defaultvolumeClaimTemplate:keeper-storagetemplates:podTemplates:- name:defaultmetadata:labels:app:clickhouse-keepercontainers:- name:clickhouse-keeperimagePullPolicy:IfNotPresentimage:"altinity/clickhouse-keeper:25.8.16.10002.altinitystable"resources:requests:memory:"256M"cpu:"1"limits:memory:"4Gi"cpu:"2"securityContext:fsGroup:101volumeClaimTemplates:- name:keeper-storagereclaimPolicy:Retainspec:accessModes:- ReadWriteOnceresources:requests:storage:10GistorageClassName:standard
As with the YAML file you used to create your cluster, make sure the storageClassName is correct for your cloud provider. Now use kubectl apply to create the ClickHouseKeeperInstallation:
We’ll reference the chk resource in a YAML file to enable replication in our ClickHouse cluster.
Adding a replica to our cluster
The spec for a ClickHouse Installation includes a zookeeper parameter. (Yes, we’re using ClickHouse Keeper, but the zookeeper parameter works for both.) Copy this text and save it in the file clusterWithReplication.yaml:
Notice that we’re increasing the number of replicas (replicasCount) from the clusterWithPersistentStorage.yaml file on the Adding persistent storage to your cluster page.
We’re updating the definition of our chi object to point to a chk object. To get the object’s endpoint, use this command:
kubectl get chk -n clickhouse -o custom-columns="NAME:.metadata.name,ENDPOINT:.status.endpoint"
You’ll see something like this:
NAME ENDPOINT
clickhouse-keeper keeper-clickhouse-keeper.clickhouse.svc.cluster.local
Take a look at clusterWithReplication.yaml. Make sure the endpoint of the chk object is the value of the configuration\zookeeper\nodes\host field. Also be sure the storageClass is set correctly for your cloud provider, then apply the new configuration file:
Wait until the status of the chi is Completed. Here we can see that we have one cluster, one shard, and two hosts.
NAME STATUS VERSION CLUSTERS SHARDS HOSTS TASKID HOSTS-COMPLETED HOSTS-UPDATED HOSTS-ADDED HOSTS-DELETED ENDPOINT AGE SUSPEND
cluster01 Completed 0.26.3 1 1 2 auto-4e4e559c-aded-4672-bdc6-1d9a991eb18e clickhouse-cluster01.clickhouse.svc.cluster.local 17m
If we log into any of the two hosts in our cluster and look at the system.clusters table, we can show the updated results and that we have a total of two hosts for cluster01 - one each of the two replicas.
Now that we’ve got ClickHouse Keeper in place, we’re ready to create a table that uses the ReplicatedMergeTree engine, and that engine will keep all our replicas synchronized. So let’s move on….
Replication with Zookeeper
Zookeeper is easy to install and enable. (Although we should say that if you’re using the operator on minikube, it may be difficult to get Zookeeper’s PersistentVolumeClaims configured correctly. Proceed with caution. Or use ClickHouse Keeper instead.)
We’ll use kubectl apply to create a three-node Zookeeper deployment:
service/zookeeper created
service/zookeepers created
poddisruptionbudget.policy/zookeeper-pod-disruption-budget created
statefulset.apps/zookeeper created
Now make sure things are running. Run this command:
kubectl get all -n clickhouse
Wait until you see READY 1/1 and Running for the three Zookeeper pods and READY 3/3 for its statefulset:
NAME READY STATUS RESTARTS AGE
pod/chi-cluster01-cluster01-0-0-0 1/1 Running 0 4m45s
pod/clickhouse-operator-6b68448ff6-ltpln 2/2 Running 0 9m35s
pod/zookeeper-0 1/1 Running 0 3m56s
pod/zookeeper-1 1/1 Running 0 2m
pod/zookeeper-2 1/1 Running 0 77s
NAME TYPE CLUSTER-IP EXTERNAL-IP PORT(S) AGE
service/chi-cluster01-cluster01-0-0 ClusterIP None <none> 9000/TCP,8123/TCP,9009/TCP 8m47s
service/clickhouse-cluster01 ClusterIP None <none> 8123/TCP,9000/TCP 8m20s
service/clickhouse-operator-metrics ClusterIP 10.0.38.39 <none> 8888/TCP,9999/TCP 9m35s
service/zookeeper ClusterIP 10.0.148.248 <none> 2181/TCP,7000/TCP 3m57s
service/zookeepers ClusterIP None <none> 2888/TCP,3888/TCP 3m57s
NAME READY UP-TO-DATE AVAILABLE AGE
deployment.apps/clickhouse-operator 1/1 1 1 9m36s
NAME DESIRED CURRENT READY AGE
replicaset.apps/clickhouse-operator-6b68448ff6 1 1 1 9m36s
NAME READY AGE
statefulset.apps/chi-cluster01-cluster01-0-0 1/1 6m22s
statefulset.apps/zookeeper 3/3 3m56s
Now we’ve got a running Zookeeper, so we can tell our ClickHouse cluster how to connect to it…and add a second replica.
Adding a replica to our cluster
The spec for a ClickHouseInstallation includes a zookeeper parameter. Copy the following text and save it as clusterWithReplication.yaml:
Notice that we’re increasing the number of replicas from the clusterWithPersistentStorage.yaml file on the Adding persistent storage to your cluster page. The hostname for Zookeeper is the name of the service (zookeeper), its namespace (clickhouse), followed by .svc.cluster.local.
Be sure you’re using the correct storageClassName for your Kubernetes provider. With that done, apply the new configuration file:
If we log into either of the hosts in our cluster (chi-cluster01-cluster01-0-0 or chi-cluster01-cluster01-0-1) and look at the system.clusters table, we can show the updated results and that we have a total of two hosts for cluster01 - one for each of the two replicas.
Now that we’ve got Zookeeper in place, we’re ready to work with our replicas. We’ll set up tables with the ReplicatedMergeTree engine, and that engine will keep all our replicas synchronized. So let’s move on….
At this point our ClickHouse® cluster has replication enabled. Whether you used Zookeeper or ClickHouse Keeper, we can now create ReplicatedMergeTree tables that automatically keep our replicas in sync.
Current database structure
The analytics database currently has a table on each of our two hosts. We can take a look from any of the pods:
┌─name───────┬─engine────┐
1. │ page_views │ MergeTree │
└────────────┴───────────┘
1 row in set. Elapsed: 0.003 sec.
👉 Type exit to end the clickhouse-client session.
We set up page_views to hold our data. Let’s run SELECT * FROM analytics.page_views against all of the pods:
for pod in 0-0-0 0-1-0;doecho"Running query on chi-cluster01-cluster01-$pod..." kubectl exec -it chi-cluster01-cluster01-$pod -n clickhouse \
-- clickhouse-client -q "SELECT * from analytics.page_views;"done
Running query on chi-cluster01-cluster01-0-0-0...
2025-01-01 12:00:00 101 /home google.com mobile USA
2025-01-01 12:05:00 102 /products facebook.com desktop Canada
2025-01-01 12:10:00 103 /cart twitter.com tablet UK
2025-01-02 14:00:00 101 /checkout google.com mobile USA
2025-01-06 08:20:00 110 /blog twitter.com desktop Australia
Running query on chi-cluster01-cluster01-0-1-0...
As you can see, host chi-cluster01-cluster01-0-0-0 has data, but its replica, chi-cluster01-cluster01-0-1-0, doesn’t have any.
(By the way, we’ll use this for...do technique to execute a single command on multiple nodes. If we need to do something more in-depth, we’ll connect to a node and use clickhouse-connect interactively.)
What we need is a new table with a ReplicatedMergeTree engine. When we insert data into that table, the new data is written to the replicas. (It replicates updates and deletes as well.) Having multiple synchronized copies of data is one of the basic principles of highly available systems, and the ReplicatedMergeTree gives us that.
So let’s create the table. We’ll do this using ON CLUSTER to put a new table with that engine on both hosts:
Our ReplicatedMergeTree table has the same schema as our MergeTree table, but it isn’t initialized with any data. We’ll have to do that ourselves. It’s easy enough; we’ll just connect to one of our pods and insert everything from analytics.page_views into analytics.page_views_replicated. The data added to one pod will be replicated to the other. Run this INSERT statement:
kubectl exec -it chi-cluster01-cluster01-0-0-0 -n clickhouse \
-- clickhouse-client -q "INSERT INTO analytics.page_views_replicated SELECT * FROM analytics.page_views;"
Now we should get the same results when we query each of the two hosts:
forpodin0-0-00-1-0;doecho"Running query on chi-cluster01-cluster01-$pod..."kubectlexec-itchi-cluster01-cluster01-$pod-nclickhouse\-- clickhouse-client -q "SELECT * from analytics.page_views_replicated;"
done
That’s the first record we’ve inserted with a user from Nigeria. Let’s query all our hosts to see where that data is:
forpodin0-0-00-1-0;doecho"Running query on chi-cluster01-cluster01-$pod..."kubectlexec-itchi-cluster01-cluster01-$pod-nclickhouse\-- clickhouse-client -q "SELECT * FROM analytics.page_views_replicated where country = 'Nigeria';"
done
We added data to chi-cluster01-cluster01-0-0-0 but nowhere else. As you can see from the output, however, that value was also copied to its replica, chi-cluster01-cluster01-0-1-0. That’s what we want from replication: whenever we make a change to our data, it’s automatically synchronized with all of our replicas.
For housekeeping, now that we’ve got all of our data into the analytics.page_views_replicated table, we can drop the original analytics.page_views table:
kubectlexec-itchi-cluster01-cluster01-0-0-0-nclickhouse\-- clickhouse-client -q "DROP TABLE analytics.page_views ON CLUSTER cluster01;"
The last thing we’ll do with replication is create a new Distributed table that works with our replicated data. Whenever we do a QUERY, UPDATE, or DELETE, we’ll do that against the Distributed table. Connect to one of the nodes in our cluster:
Now querying our new Distributed table should show the same results from every host:
forpodin0-0-00-1-0;doecho"Running query on chi-cluster01-cluster01-$pod..."kubectlexec-itchi-cluster01-cluster01-$pod-nclickhouse\-- clickhouse-client -q "SELECT * FROM analytics.page_views_distributed where country = 'Nigeria';"
done
Separate settingsTemplates for different shards or teplicas
Distribution of shards and replicas across your Kubernetes cluster
Templates for services (names, pods, cloud annotations)
Defining the HostNetwork
Templates and auto-templates for chi
5.2.5 - Bonus: Adding a Shard to your ClickHouse® Cluster
Enabling horizontal scaling once you’ve got 5 TB of data or so
As a final topic, we’ll talk a bit about shards. But before we do, here’s something to keep in mind:
Don’t use shards unless you have at least 5 TB of data. If that doesn’t apply to you, feel free to ignore this section and get on with your day.
Shards give you horizontal scaling in ClickHouse®. When your cluster has multiple shards, data is distributed across them, which means queries against your data can be done in parallel on each shard. But ClickHouse is so powerful, the overhead of shards won’t give you any benefits until you’ve got a substantial amount of data.
So if you’re still here, we assume you want to add a shard to your cluster. Adding a second shard is easy. Make a copy of clusterWithReplication.yaml and name it clusterWithShards.yaml. Now edit the file and change shardsCount to 2:
(We’re starting with clusterWithReplication.yaml because it’s configured to use either ClickHouse Keeper or Zookeeper, and it specifies the right storageClass for your Kubernetes environment.)
Run the following command to see what we have on the second shard:
SHOWdatabases;
You’ll see something like this:
┌─name───────────────┐
1. │ INFORMATION_SCHEMA │
2. │ analytics │
3. │ default │
4. │ information_schema │
5. │ system │
└────────────────────┘
5 rows in set. Elapsed: 0.002 sec.
Our database is in there, as we’d expect. And the two tables we created earlier should be here:
USEanalytics;SHOWTABLES;
There they are:
┌─name───────────────────┐
1. │ page_views_distributed │
2. │ page_views_replicated │
└────────────────────────┘
2 rows in set. Elapsed: 0.002 sec.
Seems legit…let’s take a look at our data:
SELECT*FROMpage_views_replicated;
We’ve got nothing:
Ok.
0 rows in set. Elapsed: 0.001 sec.
Wait, our data isn’t here? Well, it isn’t supposed to be. Remember, we’re distributing our data across multiple shards, so no data should be in more than one shard. Our data on the first shard is still alive and well, but we’ve got nothing here. The important thing is that our new shard has the same databases and tables as our original shard.
We’ll talk about how to work across all our shards in a second, but first, let’s add some new data into the table on this shard:
And we can run SELECT to see our new (and different) data:
SELECT*FROMpage_views_replicated
Our new data is there:
┌──────────event_time─┬─user_id─┬─page_url──┬─referrer_url─┬─device──┬─country───┐
1. │ 2025-01-02 15:30:00 │ 105 │ /home │ direct │ desktop │ Germany │
2. │ 2025-01-03 11:45:00 │ 107 │ /contact │ direct │ desktop │ India │
3. │ 2025-01-04 18:00:00 │ 102 │ /products │ google.com │ tablet │ Canada │
4. │ 2025-01-05 21:30:00 │ 109 │ /checkout │ facebook.com │ mobile │ USA │
5. │ 2025-01-09 17:20:00 │ 110 │ /cart │ direct │ desktop │ Australia │
└─────────────────────┴─────────┴───────────┴──────────────┴─────────┴───────────┘
5 rows in set. Elapsed: 0.007 sec.
So now the data in page_views_replicated is spread across two shards. That’s what we want for horizontal scaling, but we’d like our queries (and other SQL statements, for that matter) to run across all shards. That’s where the Distributed table we created earlier comes into play. Here’s the same query against page_views_distributed:
To exhaust the topic, let’s query all shards and replicas. We should see the same data on all replicas of each shard. Try this command:
for pod in 0-0-0 0-1-0 1-0-0 1-1-0;doecho"Running query on chi-cluster01-cluster01-$pod..." kubectl exec -it chi-cluster01-cluster01-$pod -n clickhouse \
-- clickhouse-client -q "SELECT * from analytics.page_views_replicated;"done
Sure enough, the same data is on each shard / replica pair:
Running query on chi-cluster01-cluster01-0-0-0...
2025-01-01 12:00:00 106 /home google.com mobile Nigeria
2025-01-01 12:00:00 101 /home google.com mobile USA
2025-01-01 12:05:00 102 /products facebook.com desktop Canada
2025-01-01 12:10:00 103 /cart twitter.com tablet UK
2025-01-02 14:00:00 101 /checkout google.com mobile USA
2025-01-06 08:20:00 110 /blog twitter.com desktop Australia
Running query on chi-cluster01-cluster01-0-1-0...
2025-01-01 12:00:00 106 /home google.com mobile Nigeria
2025-01-01 12:00:00 101 /home google.com mobile USA
2025-01-01 12:05:00 102 /products facebook.com desktop Canada
2025-01-01 12:10:00 103 /cart twitter.com tablet UK
2025-01-02 14:00:00 101 /checkout google.com mobile USA
2025-01-06 08:20:00 110 /blog twitter.com desktop Australia
Running query on chi-cluster01-cluster01-1-0-0...
2025-01-02 15:30:00 105 /home direct desktop Germany
2025-01-03 11:45:00 107 /contact direct desktop India
2025-01-04 18:00:00 102 /products google.com tablet Canada
2025-01-05 21:30:00 109 /checkout facebook.com mobile USA
2025-01-09 17:20:00 110 /cart direct desktop Australia
Running query on chi-cluster01-cluster01-1-1-0...
2025-01-02 15:30:00 105 /home direct desktop Germany
2025-01-03 11:45:00 107 /contact direct desktop India
2025-01-04 18:00:00 102 /products google.com tablet Canada
2025-01-05 21:30:00 109 /checkout facebook.com mobile USA
2025-01-09 17:20:00 110 /cart direct desktop Australia
So that’s how you work with shards and replication. When new data is added, it goes to a randomly selected shard, then the new data is copied to the shard’s replica. (We connected to a particular host to make a point, but you normally don’t specify a shard.)
Again, you shouldn’t use them until you’ve got a substantial amount of data, but now you know how to add a shard to your ClickHouse cluster, and how shards change the way you work with your data.
5.3 - Configuring the Operator
Installation and Management of the Altinity Kubernetes Operator for ClickHouse®
The Altinity Kubernetes Operator for ClickHouse® is an open source project managed and maintained by Altinity Inc. This Operator Guide is created to help users with installation, configuration, maintenance, and other important tasks.
5.3.1 - Altinity Kubernetes Operator for ClickHouse® Settings
Settings and configurations for the Altinity Kubernetes Operator for ClickHouse®
Operator settings can be modified through the clickhouse-operator-install-bundle.yaml file in the section etc-clickhouse-operator-files. This sets the config.yaml settings that are used to set the user configuration and other settings. For more information, see the operator's sample config.yaml file.
New User Settings
Setting
Default Value
Description
chConfigUserDefaultProfile
default
Sets the default profile used when creating new users.
chConfigUserDefaultQuota
default
Sets the default quota used when creating new users.
chConfigUserDefaultNetworksIP
::1 127.0.0.1 0.0.0.0
Specifies the networks that the user can connect from. Note that 0.0.0.0 allows access from all networks.
chConfigUserDefaultPassword
default
The initial password for new users.
Operator Settings
The clickhouse_operator role can connect to the ClickHouse database to perform the following:
Metrics requests
Schema Maintenance
Drop DNS Cache
Additional users can be created with this role by modifying the users.d XML files.
Setting
Default Value
Description
chUsername
clickhouse_operator
The username for the ClickHouse Operator user.
chPassword
clickhouse_operator_password
The default password for the ClickHouse Operator user.
chPort
8123
The IP port for the ClickHouse Operator user.
Log Parameters
The Log Parameters sections sets the options for log outputs and levels.
Setting
Default Value
Description
logtostderr
true
If set to true, submits logs to stderr instead of log files.
alsologtostderr
false
If true, submits logs to stderr as well as log files.
v
1
Sets V-leveled logging level.
stderrthreshold
""
The error threshold. Errors at or above this level will be submitted to stderr.
vmodule
""
A comma separated list of modules and their verbose level with {module name} = {log level}. For example: "module1=2,module2=3".
log_backtrace_at
""
Location to store the stack backtrace.
Runtime Parameters
The Runtime Parameters section sets the resources allocated for processes such as reconcile functions.
Setting
Default Value
Description
reconcileThreadsNumber
10
The number threads allocated to manage reconcile requests.
reconcileWaitExclude
false
???
reconcileWaitInclude
false
???
Template Parameters
Template Parameters sets the values for connection values, user default settings, and other values. These values are based on ClickHouse configurations. For full details, see the ClickHouse documentation page.
5.3.2 - ClickHouse® Cluster Settings
Settings and configurations for ClickHouse® clusters and nodes
ClickHouse® clusters that are configured on Kubernetes have several options based on the Kubernetes Custom Resources settings. Your cluster may have particular requirements to best fit your organizations needs.
.spec.configuration.zookeeper defines the zookeeper settings, and is expanded into the <yandex><zookeeper></zookeeper></yandex> configuration section. For more information, see ClickHouse Zookeeper settings.
.spec.configuration.profiles defines the ClickHouse profiles that are stored in <yandex><profiles></profiles></yandex>. For more information, see the ClickHouse Server Settings page.
.spec.configuration.files creates custom files used in the custer. These are used for custom configurations, such as the ClickHouse External Dictionary.
.spec.configuration.clusters defines the ClickHouse clusters to be installed.
clusters:
Clusters and Layouts
.clusters.layout defines the ClickHouse layout of a cluster. This can be general, or very granular depending on your requirements. For full information, see Cluster Deployment.
Templates
podTemplate is used to define the specific pods in the cluster, mainly the ones that will be running ClickHouse. The VolumeClaimTemplate defines the storage volumes. Both of these settings are applied per replica.
Basic Dimensions
Basic dimensions are used to define the cluster definitions without specifying particular details of the shards or nodes.
Parent
Setting
Type
Description
.clusters.layout
shardsCount
Number
The number of shards for the cluster.
.clusters.layout
replicasCount
Number
The number of replicas for the cluster.
Basic Dimensions Example
In this example, the podTemplates defines ClickHouses containers into a cluster called all-counts with three shards and two replicas.
The templates section can also be used to specify more than just the general layout. The exact definitions of the shards and replicas can be defined as well.
In this example, shard0 here has replicasCount specified, while shard1 has 3 replicas explicitly specified, with possibility to customized each replica.
.spec.templates.serviceTemplates represents Kubernetes Service templates, with additional fields.
At the top level is generateName which is used to explicitly specify service name to be created. generateName is able to understand macros for the service level of the object created. The service levels are defined as:
CHI
Cluster
Shard
Replica
The macro and service level where they apply are:
Setting
CHI
Cluster
Shard
Replica
Description
{chi}
X
X
X
X
ClickHouseInstallation name
{chiID}
X
X
X
X
short hashed ClickHouseInstallation name (Experimental)
{cluster}
X
X
X
The cluster name
{clusterID}
X
X
X
short hashed cluster name (BEWARE, this is an experimental feature)
{clusterIndex}
X
X
X
0-based index of the cluster in the CHI (BEWARE, this is an experimental feature)
{shard}
X
X
shard name
{shardID}
X
X
short hashed shard name (BEWARE, this is an experimental feature)
{shardIndex}
X
X
0-based index of the shard in the cluster (BEWARE, this is an experimental feature)
{replica}
X
replica name
{replicaID}
X
short hashed replica name (BEWARE, this is an experimental feature)
{replicaIndex}
X
0-based index of the replica in the shard (BEWARE, this is an experimental feature)
.spec.templates.serviceTemplates Example
templates:serviceTemplates:- name:chi-service-template# generateName understands different sets of macros,# depending on the level of the object, for which Service is being created:## For CHI-level Service:# 1. {chi} - ClickHouseInstallation name# 2. {chiID} - short hashed ClickHouseInstallation name (BEWARE, this is an experimental feature)## For Cluster-level Service:# 1. {chi} - ClickHouseInstallation name# 2. {chiID} - short hashed ClickHouseInstallation name (BEWARE, this is an experimental feature)# 3. {cluster} - cluster name# 4. {clusterID} - short hashed cluster name (BEWARE, this is an experimental feature)# 5. {clusterIndex} - 0-based index of the cluster in the CHI (BEWARE, this is an experimental feature)## For Shard-level Service:# 1. {chi} - ClickHouseInstallation name# 2. {chiID} - short hashed ClickHouseInstallation name (BEWARE, this is an experimental feature)# 3. {cluster} - cluster name# 4. {clusterID} - short hashed cluster name (BEWARE, this is an experimental feature)# 5. {clusterIndex} - 0-based index of the cluster in the CHI (BEWARE, this is an experimental feature)# 6. {shard} - shard name# 7. {shardID} - short hashed shard name (BEWARE, this is an experimental feature)# 8. {shardIndex} - 0-based index of the shard in the cluster (BEWARE, this is an experimental feature)## For Replica-level Service:# 1. {chi} - ClickHouseInstallation name# 2. {chiID} - short hashed ClickHouseInstallation name (BEWARE, this is an experimental feature)# 3. {cluster} - cluster name# 4. {clusterID} - short hashed cluster name (BEWARE, this is an experimental feature)# 5. {clusterIndex} - 0-based index of the cluster in the CHI (BEWARE, this is an experimental feature)# 6. {shard} - shard name# 7. {shardID} - short hashed shard name (BEWARE, this is an experimental feature)# 8. {shardIndex} - 0-based index of the shard in the cluster (BEWARE, this is an experimental feature)# 9. {replica} - replica name# 10. {replicaID} - short hashed replica name (BEWARE, this is an experimental feature)# 11. {replicaIndex} - 0-based index of the replica in the shard (BEWARE, this is an experimental feature)generateName:"service-{chi}"# type ObjectMeta struct from k8s.io/meta/v1metadata:labels:custom.label:"custom.value"annotations:cloud.google.com/load-balancer-type:"Internal"service.beta.kubernetes.io/aws-load-balancer-internal:0.0.0.0/0service.beta.kubernetes.io/azure-load-balancer-internal:"true"service.beta.kubernetes.io/openstack-internal-load-balancer:"true"service.beta.kubernetes.io/cce-load-balancer-internal-vpc:"true"# type ServiceSpec struct from k8s.io/core/v1spec:ports:- name:httpport:8123- name:clientport:9000type:LoadBalancer
.spec.templates.volumeClaimTemplates
.spec.templates.volumeClaimTemplates defines the PersistentVolumeClaims. For more information, see the Kubernetes PersistentVolumeClaim page.
.spec.templates.volumeClaimTemplates Example
templates:volumeClaimTemplates:- name:default-volume-claim# type PersistentVolumeClaimSpec struct from k8s.io/core/v1spec:# 1. If storageClassName is not specified, default StorageClass# (must be specified by cluster administrator) would be used for provisioning# 2. If storageClassName is set to an empty string (‘’), no storage class will be used# dynamic provisioning is disabled for this PVC. Existing, “Available”, PVs# (that do not have a specified storageClassName) will be considered for binding to the PVC#storageClassName: goldaccessModes:- ReadWriteOnceresources:requests:storage:1Gi
.spec.templates.podTemplates
.spec.templates.podTemplates defines the Pod Templates. For more information, see the Kubernetes Pod Templates.
The following additional sections have been defined for the ClickHouse cluster:
zone
distribution
zone and distribution together define zoned layout of ClickHouse instances over nodes. These ensure that the affinity.nodeAffinity and affinity.podAntiAffinity are set.
.spec.templates.podTemplates Example
To place a ClickHouse instances in AWS us-east-1a availability zone with one ClickHouse per host:
templates:podTemplates:# multiple pod templates makes possible to update version smoothly# pod template for ClickHouse v18.16.1- name:clickhouse-v18.16.1# We may need to label nodes with clickhouse=allow label for this example to run# See ./label_nodes.sh for this purposezone:key:"clickhouse"values:- "allow"# Shortcut version for AWS installations#zone:# values:# - "us-east-1a"# Possible values for distribution are:# Unspecified# OnePerHostdistribution:"Unspecified"# type PodSpec struct {} from k8s.io/core/v1spec:containers:- name:clickhouseimage:yandex/clickhouse-server:18.16.1volumeMounts:- name:default-volume-claimmountPath:/var/lib/clickhouseresources:requests:memory:"64Mi"cpu:"100m"limits:memory:"64Mi"cpu:"100m"
Deploying the Operator in a FIPS-compatible posture
This is a reference deployment of the ClickHouse Operator in a FIPS-compatible posture: FIPS-built images, secure ports only, and verified TLS between every component. It walks through the example manifests and highlights the main FIPS-related option in each. The cryptographic-module gate, image policy, and release evidence are covered in the FIPS security hardening documentation of the Operator repo; the general TLS knobs and certificate setup are covered in the general security hardening section.
Limitations
The FIPS boundary covers the operator and metrics-exporter binaries only, so a few paths stay outside it. The operator-to-metrics-exporter IPC and the Prometheus metrics endpoints (operator :9999, metrics-exporter :8888/metrics) remain plain HTTP. TLS is server-authentication only, not mutual TLS, because the operator has no client-certificate settings for its health and version connections to ClickHouse.
Shared prerequisites
Whether you run ClickHouse only or ClickHouse with the backup sidecar, you need to apply these first:
The CHIT (clickhouse-fips-backup-template) supplies pod template fips (clickhouse + clickhouse-backup containers, backup TLS env, and volumes). The CHI references it through useTemplates. The podTemplate name in defaults.templates must match templates.podTemplates[].name in the CHIT (both are fips).
Operator configuration
25-fips-01-chopconf.yaml turns on the operator’s FIPS posture. Setting policy: Enforced and fips.enforced: true makes the operator coerce every outbound TLS connection to verified mode and assert at startup that its binary is linked against the Go FIPS module.
spec:security:policy:Enforcedfips:enforced:"true"
ClickHouse TLS configuration
Both cluster manifests run ClickHouse on secure ports only. Plain-text ports are removed and replaced by TLS equivalents; the cluster trusts the shared CA through rootCASecretRef. See 25-fips-02-cluster.yaml and 25-fips-03-cluster-with-backup.yaml.
The CHI cluster uses secure: "yes" with insecure: "no". These settings enable secure ClickHouse network interfaces and service ports. In CHI, they do not automatically remove all plain-text ClickHouse interfaces; TLS-only deployments should explicitly configure the desired secure ports and disable any unused plain-text ports.
The openssl.xml file allows TLS 1.2 and 1.3 on both the server and client sides with FIPS-approved cipher suites. While external clients may connect using either protocol version, the operator enforces TLS 1.3 for its outbound connections, ensuring all operator-to-ClickHouse communication uses TLS 1.3 exclusively. The server presents its certificate without requesting one from clients (verificationMode: none), while the client side validates the server against the mounted CA in strict mode.
31-fips-secure-cluster.yaml runs ClickHouse Keeper on a FIPS-built image with TLS-only ports. Setting secure: "yes" and insecure: "no" drops the plain-text client port 2181, opens the secure client port 2281, and secures the Raft traffic between Keeper nodes.
Keeper uses the same openssl.xml server and client blocks as ClickHouse and pulls its image from altinity/clickhouse-keeper:<ver>.altinityfips.
Backup sidecar
107-fips-backup-sidecar.yaml is the ClickHouseInstallationTemplate used by 25-fips-03-cluster-with-backup.yaml. It defines pod template fips with the FIPS-built ClickHouse andclickhouse-backup images. The backup container serves its API over HTTPS and connects to ClickHouse over the secure native port with CA verification enabled.
How to move to a different version of the Altinity Kubernetes Operator for ClickHouse®
The Altinity Kubernetes Operator for ClickHouse® can be upgraded at any time by installing a new Helm chart from Altinity’s helm.altinity.com repo or applying a new YAML manifest from the operator's repository. Our examples here upgrade the operator from version 0.25.1 to 0.26.3. To upgrade to a different version, simply replace 0.26.3 with a different version number.
WARNING
As you upgrade the operator, do not, under any circumstances, delete the Custom Resource Definitions (CRDs). If you do, Kubernetes will attempt to delete any chi and chk resources you’ve created.
To sum up: Do not, under any circumstances, delete the CRDs.
These instructions assume you installed the operator into the clickhouse namespace. If you installed it somewhere else, obviously use that namespace instead.
The upgrade process varies significantly if you installed the operator via Helm or kubectl:
NOTE: We assume that you’re upgrading to version 0.26.3. If you need to upgrade to some other version, the command helm search repo altinity-clickhouse-operator --versions will list all available versions of the operator chart.
There are two ways you can upgrade the operator with Helm:
Upgrade the Helm chart, then upgrade the operator’s CRDs.
Uninstall the currently installed Helm chart, install the updated Helm chart, then upgrade the operator’s CRDs.
When you used a Helm chart to install the operator the first time, it included the CRDs as part of the installation. In keeping with Helm's standard practice for dealing with CRDs, the CRDs will not be modified if they already exist. That’s why you have to update the CRDs as a separate step.
ANOTHER NOTE: Our examples assume you installed the Helm repo under the name altinity. Obviously use the name you used when you installed the repo.
Choose your preferred way to upgrade your installation:
This method is straightforward. Here are the steps:
Step 1. Upgrade the existing chart
First, check the repo to be sure you get the latest version of the Helm chart:
helm repo update altinity
Helm will let you know you’re up-to-date:
Hang tight while we grab the latest from your chart repositories...
...Successfully got an update from the "altinity" chart repository
Update Complete. ⎈Happy Helming!⎈
This installs the latest version of the Helm chart. You should see something like this:
Release "clickhouse-operator" has been upgraded. Happy Helming!
NAME: clickhouse-operator
LAST DEPLOYED: Tue Jan 6 20:20:20 2026
NAMESPACE: clickhouse
STATUS: deployed
REVISION: 2
TEST SUITE: None
NOTE: If you need to install another version of the chart, use the version parameter. Adding --version 0.25.3 to the helm upgrade command will upgrade your ClickHouseInstallation to version 0.25.3.
You can verify the installed version with this command:
helm list --output yaml -n clickhouse | grep app_version
The new version should be installed:
- app_version: 0.26.3
Step 2. Update the CRDs
To update the CRDs, apply the YAML manifest from the repo…:
(If you’re not upgrading to version 0.26.3, replace the version number with whatever you’re using.)
You’ll see something like this:
Warning: resource customresourcedefinitions/clickhouseinstallations.clickhouse.altinity.com is missing the kubectl.kubernetes.io/last-applied-configuration annotation which is required by kubectl apply. kubectl apply should only be used on resources created declaratively by either kubectl create --save-config or kubectl apply. The missing annotation will be patched automatically.
customresourcedefinition.apiextensions.k8s.io/clickhouseinstallations.clickhouse.altinity.com configured
Warning: resource customresourcedefinitions/clickhouseinstallationtemplates.clickhouse.altinity.com is missing the kubectl.kubernetes.io/last-applied-configuration annotation which is required by kubectl apply. kubectl apply should only be used on resources created declaratively by either kubectl create --save-config or kubectl apply. The missing annotation will be patched automatically.
customresourcedefinition.apiextensions.k8s.io/clickhouseinstallationtemplates.clickhouse.altinity.com configured
Warning: resource customresourcedefinitions/clickhouseoperatorconfigurations.clickhouse.altinity.com is missing the kubectl.kubernetes.io/last-applied-configuration annotation which is required by kubectl apply. kubectl apply should only be used on resources created declaratively by either kubectl create --save-config or kubectl apply. The missing annotation will be patched automatically.
customresourcedefinition.apiextensions.k8s.io/clickhouseoperatorconfigurations.clickhouse.altinity.com configured
Warning: resource customresourcedefinitions/clickhousekeeperinstallations.clickhouse-keeper.altinity.com is missing the kubectl.kubernetes.io/last-applied-configuration annotation which is required by kubectl apply. kubectl apply should only be used on resources created declaratively by either kubectl create --save-config or kubectl apply. The missing annotation will be patched automatically.
customresourcedefinition.apiextensions.k8s.io/clickhousekeeperinstallations.clickhouse-keeper.altinity.com configured
You’ll probably get warning messages as shown above; it’s safe to ignore them. The CRDs still exist:
kubectl get crds
NAME CREATED AT
clickhouseinstallations.clickhouse.altinity.com 2026-01-07T00:54:07Z
clickhouseinstallationtemplates.clickhouse.altinity.com 2026-01-07T00:54:07Z
clickhousekeeperinstallations.clickhouse-keeper.altinity.com 2026-01-07T00:54:07Z
clickhouseoperatorconfigurations.clickhouse.altinity.com 2026-01-07T00:54:07Z
If you want, you can even check the versions of the CRDs. Run this command:
for crd in clickhouseinstallations.clickhouse.altinity.com clickhouseinstallationtemplates.clickhouse.altinity.com clickhousekeeperinstallations.clickhouse-keeper.altinity.com clickhouseoperatorconfigurations.clickhouse.altinity.com;doecho"Checking version of CRD $crd..." kubectl describe crd $crd| grep Labels
done
You’ll see something like this:
Checking version of CRD clickhouseinstallations.clickhouse.altinity.com...
Labels: clickhouse.altinity.com/chop=0.26.3
Checking version of CRD clickhouseinstallationtemplates.clickhouse.altinity.com...
Labels: clickhouse.altinity.com/chop=0.26.3
Checking version of CRD clickhousekeeperinstallations.clickhouse-keeper.altinity.com...
Labels: clickhouse-keeper.altinity.com/chop=0.26.3
Checking version of CRD clickhouseoperatorconfigurations.clickhouse.altinity.com...
Labels: clickhouse.altinity.com/chop=0.26.3
Labels:
Uninstall the old chart, then install the new one
Step 1. Uninstall the existing Helm chart
The first step is straightforward:
helm uninstall clickhouse-operator -n clickhouse
You’ll get feedback that the chart was uninstalled:
release "clickhouse-operator" uninstalled
As we mentioned above, the Helm chart doesn’t do anything with CRDs. They still exist:
kubectl get crds
NAME CREATED AT
clickhouseinstallations.clickhouse.altinity.com 2026-01-07T00:54:07Z
clickhouseinstallationtemplates.clickhouse.altinity.com 2026-01-07T00:54:07Z
clickhousekeeperinstallations.clickhouse-keeper.altinity.com 2026-01-07T00:54:07Z
clickhouseoperatorconfigurations.clickhouse.altinity.com 2026-01-07T00:54:07Z
Step 2. Install the new Helm chart
Before you install the new chart, check the repo to be sure you get the latest version:
helm repo update altinity
Helm will let you know you’re up-to-date:
Hang tight while we grab the latest from your chart repositories...
...Successfully got an update from the "altinity" chart repository
Update Complete. ⎈Happy Helming!⎈
NAME: clickhouse-operator
LAST DEPLOYED: Tue Jan 6 20:20:20 2026
NAMESPACE: clickhouse
STATUS: deployed
REVISION: 2
TEST SUITE: None
NOTE: If you need to install another version of the chart, use the version parameter. Adding --version 0.25.3 to the helm upgrade command will upgrade your ClickHouseInstallation to version 0.25.3.
Check the installed version of the operator with this command:
helm list --output yaml -n clickhouse | grep app_version
The operator should be at the latest version:
- app_version: 0.26.3
Step 3. Update the CRDs
To update the CRDs, apply the YAML manifest from the repo:
(If you’re not upgrading to version 0.26.3, replace the version number with whatever you’re using.)
You’ll see something like this:
Warning: resource customresourcedefinitions/clickhouseinstallations.clickhouse.altinity.com is missing the kubectl.kubernetes.io/last-applied-configuration annotation which is required by kubectl apply. kubectl apply should only be used on resources created declaratively by either kubectl create --save-config or kubectl apply. The missing annotation will be patched automatically.
customresourcedefinition.apiextensions.k8s.io/clickhouseinstallations.clickhouse.altinity.com configured
Warning: resource customresourcedefinitions/clickhouseinstallationtemplates.clickhouse.altinity.com is missing the kubectl.kubernetes.io/last-applied-configuration annotation which is required by kubectl apply. kubectl apply should only be used on resources created declaratively by either kubectl create --save-config or kubectl apply. The missing annotation will be patched automatically.
customresourcedefinition.apiextensions.k8s.io/clickhouseinstallationtemplates.clickhouse.altinity.com configured
Warning: resource customresourcedefinitions/clickhouseoperatorconfigurations.clickhouse.altinity.com is missing the kubectl.kubernetes.io/last-applied-configuration annotation which is required by kubectl apply. kubectl apply should only be used on resources created declaratively by either kubectl create --save-config or kubectl apply. The missing annotation will be patched automatically.
customresourcedefinition.apiextensions.k8s.io/clickhouseoperatorconfigurations.clickhouse.altinity.com configured
Warning: resource customresourcedefinitions/clickhousekeeperinstallations.clickhouse-keeper.altinity.com is missing the kubectl.kubernetes.io/last-applied-configuration annotation which is required by kubectl apply. kubectl apply should only be used on resources created declaratively by either kubectl create --save-config or kubectl apply. The missing annotation will be patched automatically.
customresourcedefinition.apiextensions.k8s.io/clickhousekeeperinstallations.clickhouse-keeper.altinity.com configured
You’ll probably get warning messages as shown above; it’s safe to ignore them. The CRDs still exist:
kubectl get crds
NAME CREATED AT
clickhouseinstallations.clickhouse.altinity.com 2026-01-07T00:54:07Z
clickhouseinstallationtemplates.clickhouse.altinity.com 2026-01-07T00:54:07Z
clickhousekeeperinstallations.clickhouse-keeper.altinity.com 2026-01-07T00:54:07Z
clickhouseoperatorconfigurations.clickhouse.altinity.com 2026-01-07T00:54:07Z
If you want, you can even check the versions of the CRDs. Run this command:
for crd in clickhouseinstallations.clickhouse.altinity.com clickhouseinstallationtemplates.clickhouse.altinity.com clickhousekeeperinstallations.clickhouse-keeper.altinity.com clickhouseoperatorconfigurations.clickhouse.altinity.com;doecho"Checking version of CRD $crd..." kubectl describe crd $crd| grep Labels
done
You’ll see something like this:
Checking version of CRD clickhouseinstallations.clickhouse.altinity.com...
Labels: clickhouse.altinity.com/chop=0.26.3
Checking version of CRD clickhouseinstallationtemplates.clickhouse.altinity.com...
Labels: clickhouse.altinity.com/chop=0.26.3
Checking version of CRD clickhousekeeperinstallations.clickhouse-keeper.altinity.com...
Labels: clickhouse-keeper.altinity.com/chop=0.26.3
Checking version of CRD clickhouseoperatorconfigurations.clickhouse.altinity.com...
Labels: clickhouse.altinity.com/chop=0.26.3
Labels:
Congratulations! The operator is now upgraded.
If you installed the operator with kubectl
Deploy the Altinity Kubernetes Operator for ClickHouse from the operator’s repo. This command upgrades the installed version to 0.26.3:
If you want to move to a different version, change the version number in the URL and end the command above with something like OPERATOR_NAMESPACE=clickhouse OPERATOR_VERSION=0.25.4 bash.
You’ll see something like this (there may be slight variations depending on the version you’re installing):
customresourcedefinition.apiextensions.k8s.io/clickhouseinstallations.clickhouse.altinity.com created
customresourcedefinition.apiextensions.k8s.io/clickhouseinstallationtemplates.clickhouse.altinity.com created
customresourcedefinition.apiextensions.k8s.io/clickhouseoperatorconfigurations.clickhouse.altinity.com created
customresourcedefinition.apiextensions.k8s.io/clickhousekeeperinstallations.clickhouse-keeper.altinity.com created
serviceaccount/clickhouse-operator created
clusterrole.rbac.authorization.k8s.io/clickhouse-operator-kube-system created
clusterrolebinding.rbac.authorization.k8s.io/clickhouse-operator-kube-system created
configmap/etc-clickhouse-operator-files created
configmap/etc-clickhouse-operator-confd-files created
configmap/etc-clickhouse-operator-configd-files created
configmap/etc-clickhouse-operator-templatesd-files created
configmap/etc-clickhouse-operator-usersd-files created
configmap/etc-keeper-operator-confd-files created
configmap/etc-keeper-operator-configd-files created
configmap/etc-keeper-operator-templatesd-files created
configmap/etc-keeper-operator-usersd-files created
secret/clickhouse-operator created
deployment.apps/clickhouse-operator created
service/clickhouse-operator-metrics created
As you can see from the first messages in the output, this command updates all of the CRDs.
This is because the previous version of the operator is terminating. After a short while, running this command will show only version 0.26.3.
If you want, you can also check the versions of the CRDs. Run this command:
for crd in clickhouseinstallations.clickhouse.altinity.com clickhouseinstallationtemplates.clickhouse.altinity.com clickhousekeeperinstallations.clickhouse-keeper.altinity.com clickhouseoperatorconfigurations.clickhouse.altinity.com;doecho"Checking version of CRD $crd..." kubectl describe crd $crd| grep Labels
done
You’ll see something like this:
Checking version of CRD clickhouseinstallations.clickhouse.altinity.com...
Labels: clickhouse.altinity.com/chop=0.26.3
Checking version of CRD clickhouseinstallationtemplates.clickhouse.altinity.com...
Labels: clickhouse.altinity.com/chop=0.26.3
Checking version of CRD clickhousekeeperinstallations.clickhouse-keeper.altinity.com...
Labels: clickhouse-keeper.altinity.com/chop=0.26.3
Checking version of CRD clickhouseoperatorconfigurations.clickhouse.altinity.com...
Labels: clickhouse.altinity.com/chop=0.26.3
Labels:
Congratulations! You’ve upgraded the operator to version 0.26.3.
5.5 - Uninstalling the Operator
How to uninstall the Altinity Kubernetes Operator for ClickHouse®
To remove the Altinity Kubernetes Operator for ClickHouse®, you first need to delete the ClickHouse resources you created with it. With that done, you can uninstall the operator.
(Use the same YAML file you used to install Zookeeper. If you installed version 0.25.3, change the URL accordingly.)
With the Keeper deleted, now delete the chi (named cluster01 in this example):
kubectl delete chi cluster01 -n clickhouse
This will take a few minutes. When the command is complete, you can delete any persistent volume claims that might still be around. (The YAML files we used defined reclaimPolicy: Retain, so that persistent storage will still exist.)
(The PVCs you’ll see depend on whether you used ClickHouse Keeper or Zookeeper and whether you created shards.)
Deleting the PVCs will destroy any data you’ve stored. If you’re sure that’s what you want to do, you can use this command to delete a particular PVC by name:
If you installed the operator with Helm, uninstalling it is trivial:
helm uninstall clickhouse-operator -n clickhouse
Now delete your namespace:
kubectl delete ns clickhouse
The last remnants of the operator are its CRDs. The kubectl get crds command will show you that the operator’s CustomResourceDefinitions weren’t deleted:
kubectl get crds | grep clickhouse
NAME CREATED AT
clickhouseinstallations.clickhouse.altinity.com 2025-08-08T14:16:34Z
clickhouseinstallationtemplates.clickhouse.altinity.com 2025-08-08T14:16:34Z
clickhousekeeperinstallations.clickhouse-keeper.altinity.com 2025-08-08T14:16:34Z
clickhouseoperatorconfigurations.clickhouse.altinity.com 2025-08-08T14:16:35Z
This section contains our collected wisdom and experience for running open-source ClickHouse® in your production environments.
6.1 - ClickHouse® Cluster with Zookeeper Production Configuration Guide
Best practices on a ClickHouse® on Kubernetes Production configuration.
Moving from a single ClickHouse® server to a clustered format provides several benefits:
Replication guarantees data integrity.
Provides redundancy.
Failover by being able to restart half of the nodes without encountering downtime.
Moving from an unsharded ClickHouse environment to a sharded cluster requires redesign of schema and queries. Starting with sharding from the beginning makes it easier in the future to scale the cluster up.
Setting up a ClickHouse cluster for a production environment requires the following stages:
Hardware Requirements
Network Configuration
Create Host Names
Monitoring Considerations
Configuration Steps
Setting Up Backups
Staging Plans
Upgrading The Cluster
Hardware Requirements
ClickHouse
ClickHouse will take everything from your hardware. So the more hardware - the better. As of this publication, the hardware requirements are:
Minimum Hardware: 4-core CPU with support of SSE4.2, 16 Gb RAM, 1Tb HDD.
Recommended for development and staging environments.
SSE4.2 is required, and going below 4 Gb of RAM is not recommended.
Recommended Hardware: =16-cores, >=64Gb RAM, HDD-raid or SSD.
For processing up to hundreds of millions of rows.
Zookeeper
Zookeeper requires separate servers from those used for ClickHouse. Zookeeper has poor performance when installed on the same node as ClickHouse.
Hardware Requirements for Zookeeper:
Fast disk speed (ideally NVMe, 128Gb should be enough).
Any modern CPU.
8Gb of RAM
The number of Zookeeper instances depends on the environment:
Production: 3 is an optimal number of zookeeper instances.
Development and Staging: 1 zookeeper instance is sufficient.
It’s better to find any performance issues before installing ClickHouse.
Network Configuration
Networking And Server Room Planning
It is recommended to use a fast network, ideally 10 Gbit. ClickHouse nodes generate a lot of traffic along with the Zookeeper connections and inter-Zookeeper communications.
Low latency is more important than bandwidth.
Keep the replicas isolated on hardware level. This allows for cluster failover from possible outages.
For Physical Environments: Avoid placing two ClickHouse replicas to the same server rack. Ideally they should be on isolated network switches and an isolated power supply.
For Cloud Environments: Use different availability zones between the ClickHouse replicas.
These settings are the same as the Zookeeper nodes.
For example:
Rack
Server
Server
Server
Server
Rack 1
CH_SHARD1_R1
CH_SHARD2_R1
CH_SHARD3_R1
ZOO_1
Rack 2
CH_SHARD1_R2
CH_SHARD2_R2
CH_SHARD3_R2
ZOO_2
Rack 3
ZOO3
Network Ports And Firewall
ClickHouse listens the following ports:
9000: clickhouse-client, native clients, other clickhouse-servers connect to here.
8123: HTTP clients
9009: Other replicas will connect here to download data.
Host names configured on the server should not change. If you do need to change the host name, one reference to use is How to Change Hostname on Ubuntu 18.04.
The server should be accessible to other servers in the cluster via its hostname. Otherwise you will need to configure interserver_hostname in your config.
Monitoring Considerations
External Monitoring
For external monitoring:
Graphite: Use the embedded exporter. See config.xml.
All CH clusters are available (i.e. every configured cluster has enough replicas to serve queries)
for cluster in `echo "select distinct cluster from system.clusters where host_name !='localhost'"
curl 'http://localhost:8123/' –silent –data-binary @-` ; do clickhouse-client –query="select '$cluster', 'OK' from cluster('$cluster', system, one)" ; done
There are files in 'detached' folders
$ find /var/lib/clickhouse/data///detached/* -type d
wc -l; 19.8+select count() from system.detached_parts
Too many parts: Number of parts is growing; Inserts are being delayed; Inserts are being rejected
select value from system.asynchronous_metrics where metric='MaxPartCountForPartition';select value from system.events/system.metrics where event/metric='DelayedInserts'; select value from system.events where event='RejectedInserts'
Critical
Dictionaries: exception
select concat(name,': ',last_exception) from system.dictionarieswhere last_exception != ''
Medium
ClickHouse has been restarted
select uptime();select value from system.asynchronous_metrics where metric='Uptime'
DistributedFilesToInsert should not be always increasing
select value from system.metrics where metric='DistributedFilesToInsert'
Medium
A data part was lost
select value from system.events where event='ReplicatedDataLoss'
High
Data parts are not the same on different replicas
select value from system.events where event='DataAfterMergeDiffersFromReplica'; select value from system.events where event='DataAfterMutationDiffersFromReplica'
Use ansible/puppet/salt or other system to control servers configuration.
Configure ClickHouse access to zookeeper by putting file zookeeper.xml in /etc/clickhouse-server/config.d/ folder. This file must be placed on all ClickHouse servers.
On each server put the file macros.xml in /etc/clickhouse-server/config.d/ folder.
<yandex><!--
That macros are defined per server,
and they can be used in DDL, to make the DB schema cluster/server neutral
--><macros><cluster>prod_cluster</cluster><shard>01</shard><replica>clickhouse-sh1r1</replica><!-- better - use the same as hostname --></macros></yandex>
On each server place the file cluster.xml in /etc/clickhouse-server/config.d/ folder.
</yandex><remote_servers><prod_cluster><!-- you need to give a some name for a cluster --><shard><internal_replication>true</internal_replication><replica><host>clickhouse-sh1r1</host><port>9000</port></replica><replica><host>clickhouse-sh1r2</host><port>9000</port></replica></shard><shard><internal_replication>true</internal_replication><replica><host>clickhouse-sh2r1</host><port>9000</port></replica><replica><host>clickhouse-sh2r2</host><port>9000</port></replica></shard><shard><internal_replication>true</internal_replication><replica><host>clickhouse-sh3r1</host><port>9000</port></replica><replica><host>clickhouse-sh3r2</host><port>9000</port></replica></shard></prod_cluster></remote_servers><yandex>
Create 2 extra cluster configurations with the following modified SQL query:
cluster
cluster_all_nodes_as_shards
clusters_all_nodes_as_replicas
Once this is complete, other queries that span nodes can be performed. For example:
That will create a table on all servers in the cluster. You can insert data into this table and it will be replicated automatically to the other shards.
To store the data or read the data from all shards at the same time, create a Distributed table that links to the replicatedMergeTree table.
Users
Disable or add password for the default users default and readonly if your server is accessible from non-trusted networks.
If you will add password to the default user, you will need to adjust cluster configuration, since the other servers need to know the default user’s should know the default user’s to connect to each other.
If you’re inside a trusted network, you can leave default user set to nothing to allow the ClickHouse nodes to communicate with each other.
The following are recommended Best Practices when it comes to setting up a ClickHouse Cluster with Zookeeper:
Don’t edit/overwrite default configuration files. Sometimes a newer version of ClickHouse introduces some new settings or changes the defaults in config.xml and users.xml.
Set configurations via the extra files in conf.d directory. For example, to overwrite the interface save the file conf.d/listen.xml, with the following:
Some parts of configuration will contain repeated elements (like allowed ips for all the users). To avoid repeating that - use substitutions file. By default its /etc/metrika.xml, but you can change it for example to /etc/clickhouse-server/substitutions.xml (<include_from> section of main config). Put that repeated parts into substitutions file, like this:
These files can be common for all the servers inside the cluster or can be individualized per server. If you choose to use one substitutions file per cluster, not per node, you will also need to generate the file with macros, if macros are used.
This way you have full flexibility; you’re not limited to the settings described in template. You can change any settings per server or data center just by assigning files with some settings to that server or server group. It becomes easy to navigate, edit, and assign files.
Other Configuration Recommendations
Other configurations that should be evaluated:
<listen> in config.xml: Determines which IP addresses and ports the ClickHouse servers listen for incoming communications.
<max_memory_..> and <max_bytes_before_external_...> in users.xml. These are part of the profile <default>.
<max_execution_time>
<log_queries>
The following extra debug logs should be considered:
part_log
text_log
Understanding The Configuration
ClickHouse configuration stores most of its information in two files:
config.xml: Stores Server configuration parameters. They are server wide, some are hierarchical , and most of them can’t be changed in runtime. Only 3 sections will be applied w/o restart:
macros
remote_servers
logging level
users.xml: Configure users, and user level / session level settings.
Each user can change these during their session by:
Using parameter in http query
By using parameter for clickhouse-client
Sending query like set allow_experimental_data_skipping_indices=1.
Those settings and their current values are visible in system.settings. You can make some settings global by editing default profile in users.xml, which does not need restart.
You can forbid users to change their settings by using readonly=2 for that user, or using setting constraints.
Changes in users.xml are applied w/o restart.
For both config.xml and users.xml, it’s preferable to put adjustments in the config.d and users.d subfolders instead of editing config.xml and users.xml directly.
Backups
ClickHouse is currently at the design stage of creating some universal backup solution.
Some custom backup strategies are:
Always add the full contents of metadata subfolder contain the current DB schema and clickhouse configs to your backup.
For a second replica, it’s enough to copy metadata & config.
This implementation follows a similar approach by clickhouse-backup.
We have not used this tool on production systems, and can make no recommendations for or against it. As of this time clickhouse-backup is not a complete backup solution, but it does simply some parts of the backup process.
Don’t try to compress backups; the data is already compressed in ClickHouse.
One other option is an extra passive replica. This is not recommended in the cases of power user issues.
Version Upgrades
Update itself is simple: update packages, restart clickhouse-server service afterwards.
Check if the version you want to upgrade to is stable. We highly recommend the Altinity Stable® Releases.
Review the changelog to ensure that no configuration changes are needed.
Update staging and test to verify all systems are working.
Prepare and test downgrade procedures so the server can be returned to the previous version if necessary.
Start with a “canary” update. This is one replica with one shard that is upgraded to make sure that the procedure works.
Test and verify that everything works properly. Check for any errors in the log files.
If everything is working well, update rest of the cluster.
format PrettyCompact + multithreading & streaming.
Either other format PrettyCompactMonoBlock either finish with one stream (for example by adding order by).
I Can’t Connect From Other Hosts
Check the <listen> settings in config.xml. Verify that the connection can connect on both IPV4 and IPV6.
Does clickhouse have stored procedures / UDF?
Not as of this time. PR can be sent with needed functionality.
How do I Store IPv4 and IPv6 Address In One Field?
There is a clean and simple solution for that. Any IPv4 has it’s unique IPv6 mapping:
IPv4 IP address: 191.239.213.197
IPv4-mapped IPv6 address: ::ffff:191.239.213.197
Eventual consistency & atomic insert
Warning
???
sequential = insert_quorum (no concurrent inserts currently :\ ) + select_sequential_consistency
How Do I Simulate Window Functions Using Arrays?
Group with groupArray.
Calculate the needed metrics.
Ungroup back using array join.
How to avoid bugs
ClickHouse is quite young product, but has already thousands of features and development process goes in a very high pace. All core features are well tested, and very stable.
Historically for all projects, new features can be less stable. Usually these are adopted by the community and stabilize quickly. And And of course all possible combinations of features just physically can’t be tested.
We recommend the following practices:
Check all the changes on the staging first, especially if some new features are used.
Check latest stable or test versions of ClickHouse on your staging environment regularly and pass the feedback to us or on the official ClickHouse github.
Ask for known issues report before updating production.
For production, versions with the 3rd digit should be as high as possible indicating they are the most recent big fix Release ID. For example, version 20.3.5:
20 is the year of release.
3 indicates a Feature Release. This is an increment where features are delivered.
5 is the bug fix Release Id. New Feature Releases typically have a 1 in the Release Id section and potentially more undiscovered bugs.
6.2 - Security
Security settings and best practices for ClickHouse®
ClickHouse® is known for its ability to scale with clusters, handle terabytes to petabytes of data, and return query results fast. It also has a plethora of built in security options and features that help keep that data safe from unauthorized users.
Hardening your individual ClickHouse system will depend on the situation, but the following processes are generally applicable in any environment. Each of these can be handled separately, and do not require being performed in any particular order.
Here are our recommended hardening procedures for your ClickHouse cluster:
Hardening the network communications for your ClickHouse environment is about reducing exposure of someone listening in on traffic and using that against you. Network hardening falls under the following major steps:
IMPORTANT NOTE: Configuration settings can be stored in the default /etc/clickhouse-server/config.xml file. However, this file can be overwritten during vendor upgrades. To preserve configuration settings it is recommended to store them in /etc/clickhouse-server/config.d as separate XML files with the same root element, typically <yandex>. For this guide, we will only refer to the configuration files in /etc/clickhouse-server/config.d for configuration settings.
Reduce Exposure
It’s easier to prevent entry into your system when there’s less points of access, so unused ports should be disabled.
ClickHouse has native support for MySQL client, PostgreSQL clients, and others. The enabled ports are set in the /etc/clickhouse-server/config.d files.
To reduce exposure to your ClickHouse environment:
Comment out any ports not required in the configuration files. For example, if there’s no need for the MySQL client port, then it can be commented out:
<!-- <mysql_port>9004</mysql_port> -->
Enable TLS
ClickHouse allows for both encrypted and unencrypted network communications. To harden network communications, unencrypted ports should be disabled and TLS enabled.
TLS encryption required a Certificate, and whether to use a public or private Certificate Authority (CA) is based on your needs.
Public CA: Recommended for external services or connections where you can not control where they will be connecting from.
Private CA: Best used when the ClickHouse services are internal only and you can control where hosts are connecting from.
Self-signed certificate: Only recommended for testing environments.
Whichever method is used, the following files will be required to enable TLS with CLickHouse:
Server X509 Certificate: Default name server.crt
Private Key: Default name server.key
Diffie-Hellman parameters: Default name dhparam.pem
Generate Files
No matter which approach is used, the Private Key and the Diffie-Hellman parameters file will be required. These instructions may need to be modified based on the Certificate Authority used to match its requirements. The instructions below require the use of openssl, and was tested against version OpenSSL 1.1.1j.
Generate the private key, and enter the pass phrase when required:
openssl genrsa -aes256 -out server.key 2048
IMPORTANT NOTE: The -aes256 switch will enforce encryption on generated private key. This ensures that the private key remains secure, even if the file is accessed by unauthorized individuals. To use the key, the passphrase must be provided to decrypt it. To enable ClickHouse to use the encrypted private key during startup, configure the privateKeyPassphraseHandler in the OpenSSL section of your ClickHouse configuration:
You can also skip the -aes256 switch if you do not need extra security. This will generate an unencrypted private key that does not require a passphrase.
Generate dhparam.pem to create a 4096 encrypted file. This will take some time but only has to be done once:
openssl dhparam -out dhparam.pem 4096
Create the Certificate Signing Request (CSR) from the generated private key. Complete the requested information such as Country, etc.
openssl req -new -key server.key -out server.csr
Store the files server.key, server.csr, and dhparam.pem in a secure location, typically /etc/clickhouse-server/.
Public CA
Retrieving the certificates from a Public CA or Internal CA performed by registering with a Public CA such as Let's Encrypt or Verisign or with an internal organizational CA service. This process involves:
Submit the CSR to the CA. The CA will sign the certificate and return it, typically as the file server.crt.
Store the file server.crt in a secure location, typically /etc/clickhouse-server/.
Create a Private CA
If you do not have an internal CA or do not need a Public CA, a private CA can be generated through the following process:
Create the Certificate Private Key:
openssl genrsa -aes256 -out internalCA.key 2048
Create the self-signed root certificate from the certificate key:
Store the file server.crt, typically /etc/clickhouse-server/.
Each clickhouse-client user that connects to the server with the self-signed certificate will have to allow invalidCertificateHandler by updating theirclickhouse-client configuration files at /etc/clickhouse-server/config.d:
Once the files server.crt, server.crt, and dhparam.dem have been generated and stored appropriately, update the ClickHouse Server configuration files located at /etc/clickhouse-server/config.d.
To enable TLS and disable unencrypted ports:
Review the /etc/clickhouse-server/config.d files. Comment out unencrypted ports, including http_port and tcp_port:
<openSSL><server><!-- Used for https server AND secure tcp port --><certificateFile>/etc/clickhouse-server/server.crt</certificateFile><privateKeyFile>/etc/clickhouse-server/server.key</privateKeyFile><dhParamsFile>/etc/clickhouse-server/dhparams.pem</dhParamsFile> ...
</server>...
</openSSL>
Encrypt Cluster Communications
If your organization runs ClickHouse as a cluster, then cluster-to-cluster communications should be encrypted. This includes distributed queries and interservice replication. To harden cluster communications:
Create a user for distributed queries. This user should only be able to connect within the cluster, so restrict it’s IP access to only the subnet or host names used for the network. For example, if the cluster is entirely contained in a subdomain named logos1,logos2, etc. This internal user be set with or without a password:
CREATE USER IF NOT EXISTS internal ON CLUSTER 'my_cluster'
IDENTIFIED WITH NO_PASSWORD
HOST REGEXP '^logos[1234]$'
Enable TLS for interservice replication and comment out the unencrypted interserver port by updating the /etc/clickhouse-server/config.d files:
Enable TLS for distributed queries by editing the file /etc/clickhouse-server/config.d/remote_servers.xml
For ClickHouse 20.10 and later versions, set a shared secret text and setting the port to secure for each shard:
<remote_servers><my_cluster><secret>shared secret text</secret><!-- Update here --><shard><internal_replication>true</internal_replication><replica><host>logos1</host><!-- Update here --><port>9440</port><!-- Secure Port --><secure>1</secure><!-- Update here, sets port to secure --></replica></shard>...
For previous versions of ClickHouse, set the internal user and enable secure communication:
<remote_servers><my_cluster><shard><internal_replication>true</internal_replication><replica><host>logos1</host><!-- Update here --><port>9440</port><!-- Secure Port --><secure>1</secure><!-- Update here --><user>internal</port><!-- Update here --></replica> ...
</shard>...
Storage Hardening
ClickHouse data is ultimately stored on file systems. Keeping that data protected when it is being used or “at rest” is necessary to prevent unauthorized entities from accessing your organization’s private information.
Hardening stored ClickHouse data is split into the following categories:
IMPORTANT NOTE: Configuration settings can be stored in the default /etc/clickhouse-server/config.xml file. However, this file can be overwritten during vendor upgrades. To preserve configuration settings it is recommended to store them in /etc/clickhouse-server/config.d as separate XML files with the same root element, typically <yandex>. For this guide, we will only refer to the configuration files in /etc/clickhouse-server/config.d for configuration settings.
Host-Level Security
The file level security for the files that ClickHouse uses to run should be restricted as much as possible.
ClickHouse does not require root access to the file system, and runs by default as the user clickhouse.
The following directories should be restricted to the minimum number of users:
/etc/clickhouse-server: Used for ClickHouse settings and account credentials created by default.
/var/lib/clickhouse: Used for ClickHouse data and new credentials.
/var/log/clickhouse-server: Log files that may display privileged information through queries. See Log File Protection for more information.
Volume Level Encryption
Encrypting data on the file system prevents unauthorized users who may have gained access to the file system that your ClickHouse database is stored on from being able to access the data itself. Depending on your environment, different encryption options may be required.
Cloud Storage
If your ClickHouse database is stored in a cloud service such as AWS or Azure, verify that the cloud supports encrypting the volume. For example, Amazon AWS provides a method to encrypt new Amazon EBS volumes by default.
The Altinity.Cloud service provides the ability to set the Volume Type to gp2-encrypted.
Local Storage
Organizations that host ClickHouse clusters on their own managed systems, LUKS is a recommended solution. Instructions for Linux distributions including Red Hat and Ubuntu are available. Check with the distribution your organization for instructions on how to encrypt those volumes.
Kubernetes Encryption
If your ClickHouse cluster is managed by Kubernetes, the StorageClass used may be encrypted. For more information, see the Kubernetes Storage Class documentation.
Applications are responsible for their own keys. Before enabling column level encryption, test to verify that encryption does not negatively impact performance.
The following functions are available:
Function
MySQL AES Compatible
encrypt(mode, plaintext, key, [iv, aad])
decrypt(mode, ciphertext, key, [iv, aad])
aes_encrypt_mysql(mode, plaintext, key, [iv])
*
aes_decrypt_mysql(mode, ciphertext, key, [iv])
*
Encryption function arguments:
Argument
Description
Type
mode
Encryption mode.
String
plaintext
Text that need to be encrypted.
String
key
Encryption key.
String
iv
Initialization vector. Required for -gcm modes, optional for others.
String
aad
Additional authenticated data. It isn’t encrypted, but it affects decryption. Works only in -gcm modes, for others would throw an exception
String
Column Encryption Examples
This example displays how to encrypt information using a hashed key.
Takes a hex value, unhexes it and stores it as key.
Select the value and encrypt it with the key, then displays the encrypted value.
The great thing about log files is they show what happened. The problem is when they show what happened, like the encryption key used to encrypt or decrypt data:
2021.01.26 19:11:23.526691 [ 1652 ] {4e196dfa-dd65-4cba-983b-d6bb2c3df7c8}
<Debug> executeQuery: (from [::ffff:127.0.0.1]:54536, using production
parser) WITH unhex('658bb26de6f8a069a3520293a572078f') AS key SELECT
decrypt(???), key) AS plaintext
These queries can be hidden through query masking rules, applying regular expressions to replace commands as required. For more information, see the ClickHouse.com Server Settings documentation.
To prevent certain queries from appearing in log files or to hide sensitive information:
Update the configuration files, located by default in /etc/clickhouse-server/config.d.
Add the element query_masking_rules.
3/ Set each rule with the following:
name: The name of the rule.
regexp: The regular expression to search for.
replace: The replacement value that matches the rule’s regular expression.
For example, the following will hide encryption and decryption functions in the log file:
<query_masking_rules><rule><name>hide encrypt/decrypt arguments</name><regexp> ((?:aes_)?(?:encrypt|decrypt)(?:_mysql)?)\s*\(\s*(?:'(?:\\'|.)+'|.*?)\s*\)
</regexp><!-- or more secure, but also more invasive:
(aes_\w+)\s*\(.*\)
--><replace>\1(???)</replace></rule></query_masking_rules>
User Hardening
Increasing ClickHouse security at the user level involves the following major steps:
User Configuration: Setup secure default users, roles and permissions through configuration or SQL.
Set Quotas: Limit how many resources users can use in given intervals.
Use Profiles: Use profiles to set common security settings across multiple accounts.
Database Restrictions: Narrow the databases, tables and rows that a user can access.
Enable Remote Authentication: Enable LDAP authentication or Kerberos authentication to prevent storing hashed password information, and enforce password standards.
IMPORTANT NOTE: Configuration settings can be stored in the default /etc/clickhouse-server/config.xml file. However, this file can be overwritten during vendor upgrades. To preserve configuration settings it is recommended to store them in /etc/clickhouse-server/config.d as separate XML files.
User Configuration
The hardening steps to apply to users are:
Remove the default user account
Restrict user access only to the specific host names or IP addresses when possible.
Store all passwords in SHA256 format.
Set quotas on user resources for users when possible.
Use profiles to set similar properties across multiple users, and restrict user to the lowest resources required.
Offload user authentication through LDAP or Kerberos.
Users can be configured through the XML based settings files, or through SQL based commands.
If no username is selected on login, ClickHouse uses the default user. It is recommended that you disable the default user. As an example, create a file named remove_default_user.xml and place it in the users.d directory, typically located in /etc/clickhouse-server/users.d. Use this markup:
Users are listed under the user.xml file under the users element. Each element under users is created as a separate user.
It is recommended that when creating users, rather than lumping them all into the user.xml file is to place them as separate XML files under the directory users.d, typically located in /etc/clickhouse-server/users.d/.
Note that if your ClickHouse environment is to be run as a cluster, then user configuration files must be replicated on each node with the relevant users information. We will discuss how to offload some settings into other systems such as LDAP later in the document.
Also note that ClickHouse user names are case sensitive: John is different than john. See the ClickHouse documentation site for full details.
IMPORTANT NOTE: If no user name is specified when a user attempts to login, then the account named default will be used.
For example, the following section will create two users:
clickhouse_operator: This user has the password clickhouse_operator_password stored in a sha256 hash, is assigned the profile clickhouse_operator, and can access the ClickHouse database from any network host.
John: This user can only access the database from localhost, has a basic password of John and is assigned to the default profile.
ClickHouse users can be managed by SQL commands from within ClickHouse. For complete details, see the ClickHouse User Account page.
Access management must be enabled at the user level with the access_management setting. In this example, Access Management is enabled for the user John:
The typical process for DCL(Data Control Language) queries is to have one user enabled with access_management, then have the other accounts generated through queries. See the ClickHouse Access Control and Account Management page for more details.
Once enabled, Access Management settings can be managed through SQL queries. For example, to create a new user called newJohn with their password set as a sha256 hash and restricted to a specific IP address subnet, the following SQL command can be used:
Access Management through SQL commands includes the ability to:
Set roles
Apply policies to users
Set user quotas
Restrict user access to databases, tables, or specific rows within tables.
User Network Settings
Users can have their access to the ClickHouse environment restricted by the network they are accessing the network from. Users can be restricted to only connect from:
IP: IP address or netmask.
For all IP addresses, use 0.0.0.0/0 for IPv4, ::/0 for IPv6
Host: The DNS resolved hostname the user is connecting from.
Host Regexp (Regular Expression): A regular expression of the hostname.
Accounts should be restricted to the networks that they connect from when possible.
User Network SQL Settings
User access from specific networks can be set through SQL commands. For complete details, see the ClickHouse.com CREATE USER page.
Network access is controlled through the HOST option when creating or altering users. Host options include:
ANY (default): Users can connect from any location
LOCAL: Users can only connect locally.
IP: A specific IP address or subnet.
NAME: A specific FQDN (Fully Qualified Domain Name)
REGEX: Filters hosts that match a regular expression.
LIKE: Filters hosts by the LIKE operator.
For example, to restrict the user john to only connect from the local subnet of ‘192.168.0.0/16’:
ALTERUSERjohnHOSTIP'192.168.0.0/16';
Or to restrict this user to only connecting from the specific host names awesomeplace1.com, awesomeplace2.com, etc:
ALTERUSERjohnHOSTREGEXP'awesomeplace[12345].com';
User Network XML Settings
User network settings are stored under the user configuration files /etc/clickhouse-server/config.d with the <networks> element controlling the sources that the user can connect from through the following settings:
<ip> : IP Address or subnet mask.
<host>: Hostname.
<host_regexp>: Regular expression of the host name.
For example, the following will allow only from localhost:
<networks><ip>127.0.0.1</ip></networks>
The following will restrict the user only to the site example.com or from supercool1.com, supercool2.com, etc:
If there are hosts or other settings that are applied across multiple accounts, one option is to use the Substitution feature as detailed in the ClickHouse Configuration Files page. For example, in the /etc/metrika.xml. file used for substitutions, a local_networks element can be made:
Passwords can be stored in plaintext or SHA256 (hex format).
SHA256 format passwords are labeled with the <password_sha256_hex> element. SHA256 password can be generated through the following command:
echo -n "secret"| sha256sum | tr -d '-'
OR:
echo -n "secret"| shasum -a 256| tr -d '-'
IMPORTANT NOTE: The -n option removes the newline from the output.
For example:
echo -n "clickhouse_operator_password"| shasum -a 256| tr -d '-'716b36073a90c6fe1d445ac1af85f4777c5b7a155cea359961826a030513e448
Secure Password SQL Settings
Passwords can be set when using the CREATE USER OR ALTER USER with the IDENTIFIED WITH option. For complete details, see the ClickHouse.com CREATE USER page. The following secure password options are available:
sha256password BY ‘STRING’: Converts the submitted STRING value to sha256 hash.
sha256_hash BY ‘HASH’ (best option): Stores the submitted HASH directly as the sha256 hash password value.
double_sha1_password BY ‘STRING’ (only used when allowing logins through mysql_port): Converts the submitted STRING value to double sha256 hash.
double_sha1_hash BY ‘HASH’(only used when allowing logins through mysql_port): Stores the submitted HASH directly as the double sha256 hash password value.
For example, to store the sha256 hashed value of “password” for the user John:
Passwords can be set as part of the user’s settings in the user configuration files in /etc/clickhouse-server/config.d. For complete details, see the ClickHouse User Settings page.
To set a user’s password with a sha256 hash, use the password_sha256_hex branch for the user. For example, to set the sha256 hashed value of “password” for the user John:
Quotas set how many resources can be accessed in a given time, limiting a user’s ability to tie up resources in the system. More details can be found on the ClickHouse.com Quotas page.
Quota SQL Settings
Quotas can be created or altered through SQL queries, then applied to users.
These are defined in the users.xml file under the element quotas. Each branch of the quota element is the name of the quota being defined.
Quotas are set by intervals, which can be set to different restrictions. For example, this quota named limited has one interval that sets maximum queries at 1000, and another interval that allows a total of 10000 queries over a 24 hour period.
Profiles are set in the users.xml file under the profiles element. Each branch of this element is the name of a profile. The profile restricted shown here only allows for eight threads to be used at a time for users with this profile:
<profiles><restricted><!-- The maximum number of threads when running a single query. --><max_threads>8</max_threads></restricted></profiles>
Recommended profile settings include the following:
readonly: This sets the profile to be applied to users but not to be changed.
max_execution_time: Limits the amount of time a process will run before being forced to time out.
max_bytes_before_external_group_by: Maximum RAM allocated for a single GROUP BY sort.
max_bytes_before_external_sort: Maximum RAM allocated for sort commands.
Database Restrictions
Restrict users to the databases they need, and when possible only the tables or rows within tables that they require access to.
One issue with user settings is that in a cluster environment, each node requires a separate copy of the user configuration files, which includes a copy of the sha256 encrypted password.
One method of reducing the exposure of user passwords, even in a hashed format in a restricted section of the file system, it to use external authentication sources. This prevents password data from being stored in local file systems and allows changes to user authentication to be managed from one source.
Enabling LDAP server support in ClickHouse allows you to have one authority on login credentials, set password policies, and other essential security considerations through your LDAP server. It also prevents password information being stored on your ClickHouse servers or cluster nodes, even in a SHA256 hashed form.
To add one or more LDAP servers to your ClickHouse environment, each node will require the ldap settings:
When the user attempts to authenticate to ClickHouse, their credentials will be verified against the LDAP server specified from the configuration files.
6.3 - Care and Feeding of Zookeeper with ClickHouse®
Installing, configuring, and recovering Zookeeper
ZooKeeper is required for ClickHouse® cluster replication. Keeping ZooKeeper properly maintained and fed provides the best performance and reduces the likelihood that your ZooKeeper nodes will become “sick”.
How to configure Zookeeper to work best with ClickHouse®
Prepare and Start Zookeeper
Preparation
Before beginning, determine whether Zookeeper will run in standalone or replicated mode.
Standalone mode: One Zookeeper server to service the entire ClickHouse® cluster. Best for evaluation, development, and testing.
Should never be used for production environments.
Replicated mode: Multiple Zookeeper servers in a group called an ensemble. Replicated mode is recommended for production systems.
A minimum of 3 Zookeeper servers are required.
3 servers is the optimal setup that functions even with heavily loaded systems with proper tuning.
5 servers is less likely to lose quorum entirely, but also results in longer quorum acquisition times.
Additional servers can be added, but should always be an odd number of servers.
Precautions
The following practices should be avoided:
Never deploy even numbers of Zookeeper servers in an ensemble.
Do not install Zookeeper on ClickHouse nodes.
Do not share Zookeeper with other applications like Kafka.
Place the Zookeeper dataDir and logDir on fast storage that will not be used for anything else.
Applications to Install
Install the following applications in your servers:
zookeeper (3.4.9 or later)
netcat
Configure Zookeeper
/etc/zookeeper/conf/myid
The myid file consists of a single line containing only the text of that machine’s id. So myid of server 1 would contain the text “1” and nothing else. The id must be unique within the ensemble and should have a value between 1 and 255.
/etc/zookeeper/conf/zoo.cfg
Every machine that is part of the Zookeeper ensemble should know about every other machine in the ensemble. You accomplish this with a series of lines of the form server.id=host:port:port
# specify all zookeeper servers# The first port is used by followers to connect to the leader# The second one is used for leader electionserver.1=zookeeper1:2888:3888server.2=zookeeper2:2888:3888server.3=zookeeper3:2888:3888
These lines must be the same on every Zookeeper node
/etc/zookeeper/conf/zoo.cfg
This setting MUST be added on every Zookeeper node:
# The time interval in hours for which the purge task has to be triggered.# Set to a positive integer (1 and above) to enable the auto purging. Defaults to 0.autopurge.purgeInterval=1autopurge.snapRetainCount=5
Check the following files and directories to verify Zookeeper is running and making updates:
Logs: /var/log/zookeeper/zookeeper.log
Snapshots: /var/lib/zookeeper/version-2/
Connect to Zookeeper
From the localhost, connect to Zookeeper with the following command to verify access (replace the IP address with your Zookeeper server):
bin/zkCli.sh -server 127.0.0.1:2181
Tune Zookeeper
The following optional settings can be used depending on your requirements.
Improve Node Communication Reliability
The following settings can be used to improve node communication reliability:
/etc/zookeeper/conf/zoo.cfg# The number of ticks that the initial synchronization phase can takeinitLimit=10# The number of ticks that can pass between sending a request and getting an acknowledgementsyncLimit=5
Reduce Snapshots
The following settings will create fewer snapshots which may reduce system requirements.
/etc/zookeeper/conf/zoo.cfg# To avoid seeks Zookeeper allocates space in the transaction log file in blocks of preAllocSize kilobytes.# The default block size is 64M. One reason for changing the size of the blocks is to reduce the block size# if snapshots are taken more often. (Also, see snapCount).preAllocSize=65536# Zookeeper logs transactions to a transaction log. After snapCount transactions are written to a log file a# snapshot is started and a new transaction log file is started. The default snapCount is 10,000.snapCount=10000
Once Zookeeper has been installed and configured, ClickHouse can be modified to use Zookeeper. After the following steps are completed, a restart of ClickHouse will be required.
To configure ClickHouse to use Zookeeper, follow the steps shown below. The recommended settings are located on ClickHouse.com zookeeper server settings.
Create a configuration file with the list of Zookeeper nodes. Best practice is to put the file in /etc/clickhouse-server/config.d/zookeeper.xml.
Check the distributed_ddl parameter in config.xml. This parameter can be defined in another configuration file, and can change the path to any value that you like. If you have several ClickHouse clusters using the same Zookeeper, distributed_ddl path should be unique for every ClickHouse cluster setup.
<!-- Allow to execute distributed DDL queries (CREATE, DROP, ALTER, RENAME) on cluster. --><!-- Works only if Zookeeper is enabled. Comment it out if such functionality isn't required. --><distributed_ddl><!-- Path in Zookeeper to queue with DDL queries --><path>/clickhouse/task_queue/ddl</path><!-- Settings from this profile will be used to execute DDL queries --><!-- <profile>default</profile> --></distributed_ddl>
Check /etc/clickhouse-server/preprocessed/config.xml. You should see your changes there.
Restart ClickHouse. Check ClickHouse connection to Zookeeper detailed in Zookeeper Monitoring.
Converting Tables to Replicated Tables
Creating a replicated table
Replicated tables use a replicated table engine, for example ReplicatedMergeTree. The following example shows how to create a simple replicated table.
This example assumes that you have defined appropriate macro values for cluster, shard, and replica in macros.xml to enable cluster replication using zookeeper. For details consult the ClickHouse Data Replication guide.
The ON CLUSTER clause ensures the table will be created on the nodes of {cluster} (a macro value). This example automatically creates a Zookeeper path for each replica table that looks like the following:
To remove a replicated table, use DROP TABLE as shown in the following example. The ON CLUSTER clause ensures the table will be deleted on all nodes. Omit it to delete the table on only a single node.
DROPTABLEtestONCLUSTER'{cluster}';
As each table is deleted the node is removed from replication and the information for the replica is cleaned up. When no more replicas exist, all Zookeeper data for the table will be cleared.
Cleaning up Zookeeper data for replicated tables
IMPORTANT NOTE: Cleaning up Zookeeper data manually can corrupt replication if you make a mistake. Raise a support ticket and ask for help if you have any doubt concerning the procedure.
New ClickHouse versions now support SYSTEM DROP REPLICA which is an easier command.
Zookeeper data for the table might not be cleared fully if there is an error when deleting the table, or the table becomes corrupted, or the replica is lost. You can clean up Zookeeper data in this case manually using the Zookeeper rmr command. Here is the procedure:
Login to Zookeeper server.
Run zkCli.sh command to connect to the server.
Locate the path to be deleted, e.g.: ls /clickhouse/tables/c1/0/default/test
Remove the path recursively, e.g., rmr /clickhouse/tables/c1/0/default/test
6.3.2 - Zookeeper Monitoring
Verifying Zookeeper and ClickHouse® are working together.
Zookeeper Monitoring
For organizations that already have Apache Zookeeper configured either manually, or with a Kubernetes operator such as the Altinity Kubernetes Operator for ClickHouse®, monitoring your Zookeeper nodes will help you recover from issues before they happen.
Checking ClickHouse connection to Zookeeper
To check connectivity between ClickHouse and Zookeeper:
Confirm that ClickHouse can connect to Zookeeper. You should be able to query the system.zookeeper table, and see the path for distributed DDL created in Zookeeper through that table. If something went wrong, check the ClickHouse logs.
$ clickhouse-client -q "select * from system.zookeeper where path='/clickhouse/task_queue/'"ddl 1718333454417183334544 2019-02-21 21:18:16 2019-02-21 21:18:16 08000817183370142 /clickhouse/task_queue/
Confirm Zookeeper accepts connections from ClickHouse. You can also see on Zookeeper nodes if a connection was established and the IP address of the ClickHouse server in the list of clients:
$ echo stat | nc localhost 2181ZooKeeper version: 3.4.9-3--1, built on Wed, 23 May 2018 22:34:43 +0200
Clients:
/10.25.171.52:37384[1](queued=0,recved=1589379,sent=1597897) /127.0.0.1:35110[0](queued=0,recved=1,sent=0)
Zookeeper Monitoring Quick List
The following commands are available to verify Zookeeper availability and highlight potential issues:
Check Name
Shell or SQL command
Severity
Zookeeper is available
select count() from system.zookeeper where path=’/’
Critical for writes
Zookeeper exceptions
select value from system.events where event=‘ZooKeeperHardwareExceptions’
Medium
Read only tables are unavailable for writes
select value from system.metrics where metric=‘ReadonlyReplica’
High
A data part was lost
select value from system.events where event=‘ReplicatedDataLoss’
High
Data parts are not the same on different replicas
select value from system.events where event=‘DataAfterMergeDiffersFromReplica’; select value from system.events where event=‘DataAfterMutationDiffersFromReplica’
Medium
6.3.3 - Zookeeper Recovery
How to recover when Zookeeper has issues.
If there are issues with your Zookeeper environment managing your ClickHouse® clusters, the following steps can resolve them. Altinity customers can contact Support if those issues persist.
Fault Diagnosis and Remediation
The following procedures can resolve issues.
IMPORTANT NOTE: Some procedures shown below may have a degree of risk depending on the underlying problem. For particularly dangerous procedures, we recommend that you contact Altinity Support as your first step.
Restarting a crashed ClickHouse server
ClickHouse servers are managed by systemd and normally restart following a crash. If a server does not restart automatically, follow these steps:
Access the ClickHouse error log for the failed server at /var/lib/clickhouse-server/clickhouse-server.err.log.
Examine the last log entry and look for a stack trace showing the cause of the failure.
If there is a stack trace:
If the problem is obvious, fix the problem and run systemctl restart clickhouse-server to restart. Confirm that the server restarts.
Wait until all tables are replicated. You can check progress using:
SELECT count(*) FROM system.replication_queue
Replacing a failed Zookeeper node
Configure Zookeeper on a new server.
Use the same hostname and myid as the failed node if possible.
Start Zookeeper on the new node.
Verify the new node can connect to the ensemble.
If the Zookeeper environment does not support dynamic confirmation changes:
If the new node has a different hostname or myid, modify zoo.cfg on the other nodes of the ensemble and restart them.
ClickHouse’s sessions will be interrupted during this process.
Make changes in ClickHouse configuration files if needed. A restart might be required for the changes to take effect.
Recovering from complete Zookeeper loss
Complete loss of Zookeeper is a serious event and should be avoided at all costs by proper ZooKeeper management. Contact Altinity Support before starting this procedure. Follow this procedure only if you have lost all data in Zookeeper as it is time-intensive and will cause affected tables to be unavailable.
ClickHouse will sync from the healthy table to all other tables.
Read-only tables
Read-only tables occur when ClickHouse cannot access Zookeeper to record inserts on a replicated table.
Login with clickhouse-client.
Execute the following query to confirm that ClickHouse can connect to Zookeeper:
$ clickhouse-client -q "select * from system.zookeeper where path='/'"
This query should return one or more ZNode directories.
Execute the following query to check the state of the table.
SELECT * from system.replicas where table='table_name'
If there are connectivity problems, check the following.
Ensure the <zookeeper> tag in ClickHouse configuration has the correct Zookeeper host names and ports.
Ensure that Zookeeper is running.
Ensure that Zookeeper is accepting connections. Login to the Zookeeper host and try to connect using zkClient.sh.
6.4 - High Availability and Disaster Recovery
Best Practices recovering a disaster and keeping ClickHouse® available.
Analytic systems are the eyes and ears of data-driven enterprises. It is critical to ensure they continue to work at all times despite failures small and large or users will be deprived of the ability to analyze and react to changes in the real world. Let’s start by defining two key terms.
High Availability: (HA) includes the mechanisms that allow computer systems to continue operating following the failure of individual components.
Disaster Recovery: (DR) includes the tools and procedures to enable computer systems to resume operation following a major catastrophe that affects many or all parts of a site.
These problems are closely related and depend on a small set of fungible technologies that include off-site backups and data replication..
The High Availability and Disaster Recovery guide provides an overview of the standard HA architecture for ClickHouse® and a draft design for DR.
6.4.1 - Classes of Failures
The types of failures that can occur.
Failures come in many shapes and sizes. HA and DR focuses on protecting against the following:
Loss of data due to human error or deliberate attack.
Example: Deleting a table by accident.
Failure of an individual server.
Example: Host goes down/becomes unavailable due to a power supply failure or loss of network connectivity in the top-of-rack switch.
Large-scale failure extending to an entire site or even a geographic region.
Example: Severe weather or widespread outages of underlying services like Amazon Elastic Block Storage (EBS).
Database systems manage these failures using a relatively small number of procedures that have proven themselves over time. ClickHouse® supports these.
Replication: Create live replicas of data on different servers. If one server fails, applications can switch to another replica. ClickHouse supports asynchronous, multi-master replication. It is flexible and works even on networks with high latency.
Backup: Create static snapshots of data that can be restored at will. Deleted tables, for instance, can be recovered from snapshots. ClickHouse has clickhouse-backup, an ecosystem project that handles static and incremental backups. It does not support point-in-time recovery.
Distance: It is important to separate copies of data by distance so that a failure cannot affect all of them. Placing replicas in different geographic regions protects against large scale failures. Both replication and backups work cross-region.
Regardless of the approach to protection, it is important to recover from failures as quickly as possible with minimum data loss. ClickHouse solutions meet these requirements to varying degrees. ClickHouse replicas are typically immediately accessible and fully up-to-date.
Backups, on the other hand may run only at intervals such as once a day, which means potential data loss since the last backup. They also can take hours or even days to restore fully.
6.4.2 - ClickHouse® High Availability Architecture
The best practices to keep ClickHouse® available.
The standard approach to ClickHouse® high availability combines replication, backup, and astute service placement to maximize protection against failure of single components and accidental deletion of data.
Best Practices for ClickHouse HA
Highly available ClickHouse clusters observe a number of standard practices to ensure the best possible resilience.
Keep at least 3 replicas for each shard
ClickHouse tables should always be replicated to ensure high availability. This means that you should use ReplicatedMergeTree or a similar engine for any table that contains data you want to persist. Cluster definitions for these tables should include at least three hosts per shard.
Having 3 replicas for each ClickHouse shard allows shards to continue processing queries after a replica failure while still maintaining capacity for recovery. When a new replica is attached to the shard it will need to fetch data from the remaining replicas, which adds load.
Use 3 replicas for Zookeeper
Zookeeper ensembles must have an odd number of replicas, and production deployments should always have at least three to avoid losing quorum if a Zookeeper server fails. Losing quorum can cause ClickHouse replicate tables to go into readonly mode, hence should be avoided at all costs. 3 is the most common number of replicas used.
It is possible to use 5 replicas but any additional availability benefit is typically canceled by higher latency to reach consensus on operations (3 vs. 2 servers). We do not recommend this unless there are extenuating circumstances specific to a particular site and the way it manages or uses Zookeeper.
Disperse replicas over availability zones connected by low-latency networks
ClickHouse replicas used for writes and Zookeeper nodes should run in separate availability zones. These are operating environments with separate power, Internet access, physical premises, and infrastructure services like storage arrays. (Most pubic clouds offer them as a feature.) Availability zones should be connected by highly reliable networking offering consistent round-trip latency of 20 milliseconds or less between all nodes. Higher values are likely to delay writes.
It is fine to locate read-only replicas at latencies greater than 20ms. It is important not to send writes to these replicas during normal operation, or they may experience performance problems due to the latency to Zookeeper as well as other ClickHouse replicas.
Locate servers on separate physical hardware
Within a single availability zone ClickHouse and Zookeeper servers should be located on separate physical hosts to avoid losing multiple servers from a single failure. Where practical the servers should also avoid sharing other hardware such as rack power supplies, top-of-rack switches, or other resources that might create a single point of failure.
Use clickhouse-backup to guard against data deletion and corruption
ClickHouse supports backup of tables using the clickhouse-backup utility, which can do both full and incremental backups of servers. Storage in S3 buckets is a popular option as it is relatively low cost and has options to replicate files automatically to buckets located in other regions.
Test regularly
HA procedures should be tested regularly to ensure they work and that you can perform them efficiently and without disturbing the operating environment. Try them out in a staging environment and automate as much as you can.
References for ClickHouse HA
The following links detail important procedures required to implement ClickHouse HA and recovery from failures.
Zookeeper Cluster Setup – Describes how to set up a multi-node Zookeeper ensemble. Replacing a failed node is relatively straightforward and similar to initial installation.
An optimal approach to disaster recovery builds on the resiliency conferred by the HA best practices detailed in the previous section. To increase the chance of surviving a large scale event that takes out multiple data centers or an entire region, we increase the distance between replicas for ClickHouse® and Zookeeper.
The DR architecture for ClickHouse accomplishes this goal with a primary/warm standby design with two independent clusters. Writes go to a single cluster (the primary site), while the other cluster receives replicated data and at most is used for reads (the warm standby site). The following diagram shows this design.
Best Practices for ClickHouse DR
Point all replicas to main Zookeeper ensemble
ClickHouse replicas on both the primary and warm standby sites should point to the main Zookeeper ensemble. Replicas in both locations can initiate merges. This is generally preferable to using cross-region transfer which can be costly and consumes bandwidth.
Send writes only to primary replicas
Applications should write data only to primary replicas, i.e., replicas with a latency of less than 20ms to the main Zookeeper ensemble. This is necessary to ensure good write performance, as it is dependent on Zookeeper latency.
Reads may be sent to any replica on any site. This is a good practice to ensure warm standby replicas are in good condition and ready in the event of a failover.
Run Zookeeper observers on the warm standby
Zookeeper observers receive events from the main Zookeeper ensemble but do not participate in quorum decisions. The observers ensure that Zookeeper state is available to create a new ensemble on the warm standby. Meanwhile they do not affect quorum on the primary site. ClickHouse replicas should connect to the main ensemble, not the observers, as this is more performant.
Depending on your appetite for risk, a single observer is sufficient for DR purposes. You can expand it to a cluster in the event of a failover..
Use independent cluster definitions for each site
Each site should use independent cluster definitions that share the cluster name and number of shards but use separate hosts from each site. Here is an example of the cluster definitions in remote_servers.xml on separate sites in Chicago and Dallas. First, the Chicago cluster definition, which refers to Chicago hosts only .
This definition ensures that distributed tables will only refer to tables within a single site. This avoids extra latency if subqueries go across sites. It also means the cluster definition does not require alteration in the event of a failover..
Use “Umbrella” cluster for DDL operations
For convenience to perform DDL operations against all nodes you can add one more cluster and include all ClickHouse nodes into this cluster. Run ON CLUSTER commands against this cluster. The following “all” cluster is used for DDL.
Assuming the ‘all’ cluster is present on all sites you can now issue DDL commands like the following.
CREATE TABLE IF NOT EXISTS events_local ON CLUSTER all
...
;
Use macros to enable replication across sites
It is a best practice to use macro definitions when defining tables to ensure consistent paths for replicated as distributed tables. Macros are conventionally defined in file macros.xml. The macro definitions should appear as shown in the following example. (Names may vary of course.)
<yandex>
<macros>
<!-- Shared across sites -->
<cluster>cluster1</cluster>
<!-- Shared across sites -->
<shard>0</shard>
<!-- Replica names are unique for each node on both sites. -->
<replica>chi-prod-01</replica>
</macros>
</yandex>
The following example illustrates usage of DDL commands with the previous macros. Note that the ON CLUSTER clause uses the ‘all’ umbrella cluster definition to ensure propagation of commands across all sites.
-- Use 'all' cluster for DDL.
CREATE TABLE IF NOT EXISTS events_local ON CLUSTER 'all' (
event_date Date,
event_type Int32,
article_id Int32,
title String
.
ENGINE = ReplicatedMergeTree('/clickhouse/{cluster}/tables/{shard}/{database}/events_local', '{replica}')
PARTITION BY toYYYYMM(event_date)
ORDER BY (event_type, article_id);
CREATE TABLE events ON CLUSTER 'all' AS events_local
ENGINE = Distributed('{cluster}', default, events_local, rand())
Using this pattern, tables will replicate across sites but distributed queries will be restricted to a single site due to the definitions for cluster1 being different on different sites.
Test regularly
It is critical to test that warm standby sites work fully. Here are three recommendations.
Maintain a constant, light application load on the warm standby cluster including a small number of writes and a larger number of reads. This ensures that all components work correctly and will be able to handle transactions if there is a failover.
Partition networks between sites regularly to ensure that the primary works properly.
Test failover on a regular basis to ensure that it works well and can be applied efficiently when needed.
Monitoring
Replication Lag
Monitor ClickHouse replication lag/state using HTTP REST commands.
*curl http://ch_host:8123/replicas_status.
Also, check the absolute_delay from **system.replication_status **table.
Zookeeper Status
You can monitor the ZK ensemble and observers using: **echo stat | nc <zookeeper ip> 2181
Ensure that servers have the expected leader/follower and observer roles. Further commands can be found in the Zookeeper administrative docs.
Heartbeat Table
Add a service heartbeat table and make inserts at one site and select at another. It gives an additional check of replication status / lag across systems.
create table heart_beat(
site_id String,
updated_at DateTime .
Engine = ReplicatedReplacingMergeTree(updated_at.
order by site_id;
-- insert local heartbeat
insert into heart_beat values('chicago', now()); .
-- check lag for other sites
select site_id.
now() - max(updated_at) lag_seconds
from heart_beat
where site_id <> 'chicago'
group by site_id
References for ClickHouse DR
The following links detail important information required to implement ClickHouse DR designs and implement disaster recovery procedures..
Failures in a DR event are different from HA. Switching to the warm standby site typically requires an explicit decision for the following reasons:
Moving applications to the standby site requires changes across the entire application stack from public facing DNS and load balancing downwards..
Disasters do not always affect all parts of the stack equally, so switching involves a cost-benefit decision. Depending on the circumstances, it may make sense to limp along on the primary.
It is generally a bad practice to try to automate the decision to switch sites due to the many factors that go into the decision as well as the chance of accidental failover. The actual steps to carry out disaster recovery should of course be automated, thoroughly documented, and tested.
Failover
Failover is the procedure for activating the warm standby site. For the ClickHouse DR architecture, this includes the following steps.
Ensure no writes are currently being processed by standby nodes.
Stop each Zookeeper server on the standby site and change the configuration to make them active members in the ensemble..
Restart Zookeeper servers.
Start additional Zookeeper servers as necessary to create a 3 node ensemble.
Configure ClickHouse servers to point to new Zookeeper ensemble.
Check monitoring to ensure ClickHouse is functioning properly and applications are able to connect.
Recovering the Primary
Recovery restores the primary site to a condition that allows it to receive load again. The following steps initiate recovery.
Configure the primary site Zookeepers as observers and add server addresses back into the configuration on the warm standby site.
Restart Zookeepers as needed to bring up the observer nodes. Ensure they are healthy and receiving transactions from the ensemble on the warm standby site.
Replace any failed ClickHouse servers and start them using the procedure for recovering a failed ClickHouse node after full data loss.
Check monitoring to ensure ClickHouse is functioning properly and applications are able to connect. Ensure replication is caught up for all tables on all replicas.
Add load (if possible) to test the primary site and ensure it is functioning fully.
Failback
Failback is the procedure for returning processing to the primary site. Use the failover procedure in reverse, followed by recovery on the warm standby to reverse replication.
Cost Considerations for DR
Disasters are rare, so many organizations balance the cost of maintaining a warm standby site with parameters like the time to recover or capacity of the warm standby site itself to bear transaction load. Here are suggestions to help cut costs.
Use fewer servers in the ClickHouse cluster
It is possible to reduce the number of replicas per shard to save on operating costs. This of course raises the chance that some part of the DR site may also fail during a failover, resulting in data loss.
Use cheaper hardware
Using less performant hardware is a time-honored way to reduce DR costs. ClickHouse operates perfectly well on slow disk, so storage is a good place to look for savings, followed by the hosts themselves.
Host DR in the public cloud
ClickHouse and Zookeeper both run well on VMs so this avoids costs associated with physical installations (assuming you have them). Another advantage of public clouds is that they have more options to run with low-capacity hardware, e.g., by choosing smaller VMs.
Use network attached storage to enable vertical scaling from minimal base
ClickHouse and Zookeeper run well on network attached storage, for example Amazon EBS. You can run the warm standby site using minimum-sized VMs that are sufficient to handle replication and keep storage updated. Upon failover you can allocate more powerful VMs and re-attach the storage..
Caveat: In a large-scale catastrophe it is quite possible many others will be trying to do the same thing, so the more powerful VMs may not be available when you need them.
Discussion of Alternative DR Architectures
Primary/warm standby is the recommended approach for ClickHouse DR. There are other approaches of course, so here is a short discussion.
Active-active DR architectures make both sites peers of each other and have them both running applications and full load. As a practical matter this means that you would extend the Zookeeper ensemble to multiple sites. The catch is that ClickHouse writes intensively to Zookeeper on insert, which would result in high insert latency as Zookeeper writes across sites. Products that take this approach put Zookeeper nodes in 3 locations, rather than just two. (See an illustration of this design from the Confluent documentation.)
Another option is storage-only replication. This approach replicates data across sites but does not activate database instances on the warm standby site until a disaster occurs. Unlike Oracle or PostgreSQL, ClickHouse does not have a built-in log that can be shipped to a remote location. It is possible to use file system replication, such as Linux DRBD, but this approach has not been tested. It looks feasible for single ClickHouse instances but does not seem practical for large clusters.
7 - Integrations
How to connect ClickHouse® to other services or replace them.
ClickHouse® doesn’t work in a vacuum, but in a connected world of services. These instructions demonstration how to integrate ClickHouse with your existing services, or replace other services with ClickHouse entirely.
7.1 - Integrating Superset with ClickHouse®
How to connect Apache Superset with ClickHouse®
Apache Superset is a powerful and convenient way to create dashboards to display information for your organization. \ This presents information that allows for quick visual understand of trends, where events are happening, and keeps your team on top of the massive amounts of data coming into your organization.
When combined with ClickHouse and its capacity to analyze terabytes of information in milliseconds, the integration of Superset and ClickHouse can reduce the sea of seemingly disconnected data flowing through into an understandable whole.
Integrating Superset with ClickHouse is broken down into three major steps:
Install Superset.
Connect Superset to ClickHouse.
Connect Superset dashboard elements to ClickHouse queries.
7.1.1 - Install Superset
Superset installation instructions
Three methods of installing Superset are provided here:
Direct installation: Directly download the Superset Python modules into an operating system.
Docker based installation: Use Docker containers to provide Superset, whether as stand alone containers or part of the Kubernetes environment.
Managed installation: Use managed services to provide Superset, and connect it to your ClickHouse® clusters.
Direct Installation
The following instructions are based an Ubuntu 20.04 environment. For information on how to install Superset on other operating systems or platforms like Docker or Kubernetes, see the Superset Introduction for links to different ways to install Superset.
Direct Installation Prerequisites
Before installing Superset on Ubuntu 20.04, the following packages must be installed, and will require administrative access on the machine.
Note that Superset requires Python, specifically Python 3.7.9 and above as of this document. These instructions are modified from the original to include installing python3-venv as part of the other prerequisites.
To install Superset directly into the Ubuntu 20.04 operating system:
A virtual environment is highly recommended to keep all of the Superset python requirements contained. Use the following commands to create your Superset virtual environment, activate it, then upgrade pip:
Install Superset with the following in your virtual environment. The command superset fab create-admin sets the admin user password, which will be used to login and update administrative level Superset settings:
exportFLASK_APP=superset
pip install apache-superset
superset db upgrade
superset fab create-admin
superset load_examples
superset init
Install the ClickHouse SQLAlchemy - this allows Superset to communicate with ClickHouse. There are two drivers currently in development. As of this time, we recommend the clickhouse-sqlalchemy driver. To install clickhouse-sqlalchemy, use the pip command:
pip install clickhouse-sqlalchemy
For those who want to enable TLS communications with services like Altinity.Cloud, verify the versions:
The clickhouse-driver version should be greater than 0.2.0.
The clickhouse-sqlalchemy driver should be 0.1.6 or greater.
Once Superset is installed, start it with the following command:
superset run -p 8088 --with-threads --reload --debugger
Access the Superset web interface with a browser at the host name, port 8088. For example: http://localhost:8088. The default administrative account will be admin, with the password set from the command superset fab create-admin as listed above.
Installation References
Details of the most common ways to install and run Superset are available on the
Superset Introduction page.
Docker Based Installation
For organizations that prefer Docker based installations, or want to add Superset to a Kubernetes environment along with ClickHouse on Kubernetes, Superset can be installed with a few Docker commands.
The following instructions use the existing Apache Superset docker-compose file from the Github repository.
Docker Prerequisites
docker 19 and above, with either docker-compose version 1.29 and above, or the built in docker compose command that’s part of Docker 20.10 and above.
Docker Based Installation Instructions
To install Superset with a Docker Container:
Download the Superset configuration files from the GitHub repository:
git clone https://github.com/apache/superset
Enter the superset directory and set the clickhouse-driver and the clickhouse-sqlalchemy version requirements:
cd superset
touch ./docker/requirements-local.txt
echo"clickhouse-driver>=0.2.0" >> ./docker/requirements-local.txt
echo"clickhouse-sqlalchemy>=0.1.6" >> ./docker/requirements-local.txt
Run either docker-compose or docker compose to download the required images and start the Superset Docker containers:
docker-compose -f docker-compose-non-dev.yml up
Starting Superset From Docker
Installing and starting Superset from Docker is the same docker-compose or docker compose installation command:
docker-compose -f docker-compose-non-dev.yml up
Access the Superset web interface with a browser at the server’s host name or IP address on port 8088. For example: http://localhost:8088. The default administrative account will be admin, with the password admin.
Preset Cloud
For organizations that prefer managed services, Preset Cloud offers Superset with with clickhouse-sqlalchemy. This can then be connected to an Altinity.Cloud account.
Production Installation Tips
The examples provided above are useful for development and testing environments. For full production environments installation and deployments, refer to the Superset Documentation site.
Some recommendations for organizations that want to install Superset in a production environment:
Replace the default SQLite database used to store the Superset settings with something more robust like PostgreSQL or MySQL. For an example of the process, see the article Migrating Superset to Postgres.
After Superset has been setup and the ClickHouse SQLAlchemy drivers installed, the two systems can be connected together. The following details how to connect Superset to an existing ClickHouse database.
The SQLAlchemy format uses the following elements:
SQLAlchemy Connection Type: Sets the driver to use to connect.
username: The database account to use for authentication.
password: The password for the database account being used.
url: The full hostname to the database. This does not include tags such as HTTP or HTTPS - just the host name.
options: Any additional options. For example, if the database connection is encrypted, then the option secure=true will be required. For more information on setting up ClickHouse network encryption, see the Network Hardening section in the ClickHouse Operations Guide.
Select Test Connection to verify the connection.
If the connection works, then click Add.
Once finished, the new database connection to ClickHouse will be available for use.
Connection Options
The clickhouse-driver supports different connection options. For a full list, see the clickhouse-driver Connection site. The following are recommended settings:
secure: Required if the connection uses encryption.
port: Used if the connection uses a non-standard port.
verify: Default to true. If true, then the certificate used for encryption must be validated. Set to false if using a self-signed certificate. For more information on ClickHouse certificates, see the Network Hardening section in the ClickHouse Operations Guide.
Connection FAQ
What ports are used for the Superset to ClickHouse Connection?
The Superset connection to ClickHouse uses the TCP connection over the following ports:
Encrypted: 9440
Unencrypted: 9000
If using the encrypted connection, then the option secure=yes is required.
7.1.3 - Create Charts from ClickHouse® Data
Build stunning dashboards populated by ClickHouse® data.
Once Superset has been installed and connected to ClickHouse, new charts can be created that draw their visualizations from the ClickHouse data.
The following procedures demonstrate two methods of adding charts connected to ClickHouse data:
From a physical dataset tied to a specific database table.
From a virtual dataset tied to a query saved in SQL Lab.
Create a Chart from a Physical Dataset
Physical Dataset Chart Prerequisites
Before adding a new chart in Superset from ClickHouse data, Superset must be connected to ClickHouse. See Connect Superset to ClickHouse for more information.
Add a Physical Dataset Steps
To add a new Physical Dataset:
From the top menu, select Data->Datasets.
Select + Dataset.
Set the following:
Datasource: The connected ClickHouse database server to use.
Schema: The database to use on the ClickHouse server.
Table: The table to be queried.
Once complete, the physical dataset will be available for building new charts.
Chart from Standard Dataset Steps
To create a chart from a physical dataset:
Select Charts from the top menu.
Select + Chart.
Set the following:
Dataset: Select the dataset to be used. In this case, a dataset tied to a specific table.
Visualization Type: Select the chart type, such as line chart, time series, etc.
When ready, select Create New Chart.
Depending on the chart created, the following options may be set to improve the chart’s display:
Group By: Select a column to group data by. This is highly useful when dealing with multiple rows of the same unique source.
Time Grain: Set the interval of time to measure when dealing with time series or similar charts.
Time Range: Select the period of time of interest for the chart to cover.
After each setting change, select Run to view the updated chart (A).
Set the name by selecting the section above the chart, titled “- untitled” by default (B).
When finished, select + Save to save the chart.
Provide the chart name.
Select a Dashboard to add the chart to, or enter a new Dashboard name and a title.
Select Save when finished, or Save and Go To Dashboard to view the new chart.
Create a Chart from a Virtual Dataset
A Virtual Dataset is created from a query that is saved in the Superset SQL Labs. This allows for charts that are build from specific queries that include joins, specific filters, and other criteria.
Virtual Dataset Chart Prerequisites
Before adding a new chart in Superset from ClickHouse data, Superset must be connected to ClickHouse. See Connect Superset to ClickHouse for more information.
Create a Virtual Dataset Steps
To create a chart from a Virtual Dataset:
From the top menu, select + -> SQL Query.
Enter the following:
Database: Select the ClickHouse database connected to Superset.
Schema: Typically this will be default.
Table: Select a table or table type. If building from just the query, this can be left blank.
In the Query field, enter the ClickHouse SQL query to use. Select Run to verify the results.
Select Save or Save As to save the query into SQL Lab.
To save the query as a Virtual Dataset, select Explore.
Set the name of the Virtual Dataset, then select Save & Explore.
To change the Virtual Dataset to use, select the … in the upper right under the Dataset heading, then select Change Dataset.
Select the Virtual Dataset to use, then click Proceed to acknowledge that changing the chart’s dataset may break the chart.
Set the following required options:
Visualization Type: How the data will be displayed in the chart (A).
Name: This is above the chart. Select it once, then set the name (B).
Depending on the Visualization Type selected, complete the other options.
When finished, select + Save to save the chart.
Provide the chart name.
Select a Dashboard to add the chart to, or enter a new Dashboard name and a title.
Select Save when finished, or Save and Go To Dashboard to view the new chart.
Adding Charts FAQ
When I Add a Deck.gl Chart, I Get the Message ‘No Token Warning’. How do I fix it?
The NO_TOKEN_WARNING when using charts such as deck.gl Arc occurs when there is no API token to a map service for generating the map used with the geographic data. In this example, the geographic information provides flight information, but there is no token for the mapbox service to retrieve the map data.
A token can be retrieved from mapbox after completing their registration process. After obtaining the token, place it in the file superset_config.py with the variable MAPBOX_API_KEY. For example:
MAPBOX_API_KEY='mytoken'
For Docker based installations, this is in the directory docker/pythonpath_dev. Once added, restart Superset:
7.2 - Integrating Tableau with ClickHouse®
How to connect Tableau with ClickHouse®
Tableau Desktop allows users to draw data from multiple sources, including spreadsheets and databases. The following steps detail how to add the ClickHouse Connector to Tableau Desktop. Examples are provided for using specific tables and SQL based queries with a Tableau workbook.
Installation
Prerequisites
Before installing the ClickHouse connector with Tableau Desktop, the following prerequisites must be installed:
The ClickHouse ODBC Driver. Note that an ODBC DSN is not required to be generated, just the ClickHouse ODBC Driver installed.
Tableau Desktop installed for Microsoft Windows or Apple OS X. Version 2020.2 or above is required.
A Tableau account to access their Extension gallery.
ClickHouse Connector Installation
The following steps use the Windows version of Tableau Desktop as a basis for the examples. For more information on installing a Tableau Connector, see the Tableau documentation article Run Your Connector.
The following process will install the ClickHouse Connector for Tableau Desktop for Microsoft Windows.
There are three methods of installing the ClickHouse Connector for Tableau Desktop:
The clickhouse-tableau-connector-odbc allows users to manually install an ODBC compliant driver that connect Tableau Desktop or Tableau Server to a ClickHouse server.
The installation steps below are geared towards a Windows 10 based installation of Tableau Desktop. For full details of installing a ODBC compliant Tableau connector, see the Tableau Run Your Connector site.
The instructions assume that Tableau Desktop is installed in C:\Program Files\Tableau\Tableau 2021.1. Please adjust these instructions based on your installation of Tableau Desktop.
To manually install the ODBC version of the ClickHouse connector:
Create a directory for Tableau connectors. If these are only to be used by the logged in user, then the directory should be in your local user directory [username]\Documents\TableauConnectors directory. For example, if your username is jhummel, then this would be located under c:\Users\jhummel\Documents\TableauConnectors directory.
From the clickhouse-tableau-connector-odbc folder, copy the folder tableau_odbc_connector to the Tableau connectors folder created in the previous step.
For example: If the username is jhummel, and the Tableau connectors directory is in c:\Users\jhummel\Documents\TableauConnectors, then the clickhouse-tableau-connector-odbc would be placed in C:\Users\jhummel\Documents\TableauConnectors\tableau_odbc_connector.
Run the Tableau Desktop with either of following options:
From the Command Line: Run tableau.exe with the following options, replacing {Your Connector Directory} with the directory for your custom Tableau Connectors as created in the steps above:
From a Windows Shortcut: To create a customized Windows shortcut, copy the Tableau Desktop shortcut, and add the custom Tableau Connectors directory option after the tableau.exe path. For example:
After the ClickHouse connector has been installed, Tableau Desktop can be connected to a ClickHouse server.
To connect Tableau Desktop to a ClickHouse server:
Launch Tableau Desktop.
From the Connect menu, select To a Server -> More.
Select ClickHouse by Altinity Inc.
Enter the following:
Server: The name of the ClickHouse database server, either by hostname or IP address.
Port: The HTTP (8123) or HTTPS port (8443).
Database: The name of the ClickHouse database to use.
Username: The ClickHouse user used to authenticate to the database.
Password (Optional): The ClickHouse user password.
Require SSL (Optional): Select if the connection uses SSL.
Tableau with ClickHouse Connection Examples
Tableau supports multiple methods of data extraction, from single tables, to selecting multiple tables and connecting fields, to creating a virtual table from a SQL query.
The following examples demonstrate using a ClickHouse database connected to Tableau. The first uses a single ClickHouse table, while the second uses a SQL query.
For this example, we will be using data from a publicly available ClickHouse database server hosted on Altinity.Cloud. This allows new ClickHouse users to test queries and connection methods. Use the following settings for this sample ClickHouse database:
Server: github.demo.trial.altinity.cloud
Port: 8443
Database: default
Username: demo
Password: demo
Require SSL: Enabled
Single ClickHouse Table Example
To create a sheet populated with data from a ClickHouse database table:
Verify that the ClickHouse Connector for Tableau is installed and the connection is working. For more information, see ClickHouse Connector Installation.
Select File -> New.
Select Connect to Data.
Verify the connection information, then select Sign In.
Drag the table that will be used for the Tableau sheet. Verify that Live is selected - this determines that Tableau will connect to the ClickHouse server upon request, rather than trying to download the data locally.
Select the sheet at the bottom - typically this will be Sheet 1 for a new workbook.
For this example, we will be using the table ontime, which stores United States flight data.
Select the rows and columns to be used by dragging and dropping them into the Columns and Rows fields. Mouse hover over the chart that you want to use to determine what parameters it requires.
For example, for the Line Chart, 1 data type must be Date, with one or more Dimensions and one or more Measures.
For this example:
Select Flight Date as the Column. Click the arrow and select Year, then the + icon and set the next Flight Date column to Month.
Select Carrier as the Row. Click the arrow and select Measure -> Count to convert this value to a Measure.
Select Line Chart as the type of chart to use.
When finished, select the save icon and name the workbook.
SQL Based Query Example
Tableau can use a SQL query generate the data for its tables and charts. To use a SQL query from Tableau Desktop connected to a ClickHouse server:
Verify that the ClickHouse Connector for Tableau is installed and the connection is working. For more information, see ClickHouse Connector Installation.
Select File -> New.
Select Connect to Data.
Verify the connection information, then select Sign In.
Select “New Custom SQL”.
Enter the new ClickHouse SQL Query in the text field, then select OK.
Select the sheet at the bottom - typically this will be Sheet 1 for a new workbook.
Select the rows and columns to be used by dragging and dropping them into the Columns and Rows fields. Check on the chart that is to be used to determine how many values and what values will be applied.
For example, set Origin_Longitude as a Column, and Origin_Latitude as the Row. Select the arrow and verify they are Dimensions. Select the Symbol Map chart. This will display a map with all of the originating flight locations pinned.
When finished, select the save icon and name the workbook.
7.3 - ClickHouse® ODBC Driver
Installing and configuring the ClickHouse® ODBC Driver
The ClickHouse Open Database Connectivity (ODBC) driver allows users to connect different applications to ClickHouse, such as connecting Microsoft Excel, Tableau Desktop, and other platforms.
The official ODBC Driver for ClickHouse is available in binary versions for Microsoft Windows and Linux distributions. It can also be installed by compiling the source code for other operating systems. For complete details, see the the installation documentation on the project’s repo.
8 - Altinity® 24/7 support
How to get support for Altinity.Cloud®, Altinity.Cloud Anywhere, and ClickHouse® itself.
We know your business runs on data. Whether you’re using Altinity.Cloud®, Altinity.Cloud Anywhere, or open-source ClickHouse® itself, Altinity 24/7 Support is here for you if something goes wrong.
Our Team
Our support organization is a long-term, stable team composed of some of the world’s foremost experts on ClickHouse, Kubernetes, networking, and storage. They’ll work with you to make sure your problem is resolved as quickly, safely, and elegantly as possible.
Support We Offer
We offer the service levels and response times you need.
SLA for medium- and low-priority support requests (P3 and P4)
🗓️ next business day
🗓️ next business day
Joining bridge calls with screen sharing to resolve problems
✅
Application design and orientation meetings with Altinity experts
✅
Regular system audit by Altinity experts
✅
Open-ended technical assistance requests
✅
Service Levels
Whether you have Enterprise or Premium support, we have you covered at every level of service:
Service Level
Definition
Level 0
We have online materials that can help you solve problems quickly, including an extensive knowledge base that has been built up over years of helping customers solve problems. See the Online Support Resources section below for a complete list.
Level 1
We use the Altinity Support Services web portal and dedicated Slack channels for ticket submission. Our response time SLA is supported by automated notifications to live, on-call support engineers.
Level 2
Provided by our team of support engineers.
Level 3
Expands Level 2 by including members of the technical or executive leadership teams as needed.
Priorities
Here’s how we define priorities:
Priority
Definition
P1 - Highest
A production environment is severely impacted or non-functional.
P2 - High
A production environment is functioning, but its capabilities are severely reduced.
P3 - Medium
A problem that involves a partial, non-critical loss of use of a production environment or development environment.
P4 - Low
A general usage question, reporting of a documentation error, or recommendation for a future enhancement or modification of an Altinity product or service.
If you’re not sure how to classify the problem you’re having, worry not; use the category that seems like the best fit. You can change it later if necessary.
Altinity Support covers P0-P1 bugs encountered by customers and critical security issues regardless of audience. Fixes are best effort and may not be possible in every circumstance. Altinity makes every effort to ensure a fix, workaround, or upgrade path for covered issues.
Once a bug fix is accepted and merged in the upstream branch, customers can request a backport to a specific ClickHouse version. The backport is released in the next scheduled Altinity Stable Build.
For fixes that require expedited delivery, customers may opt for a hotfix release, which is independent of the upstream merge. Note the following limitations of such releases:
Hotfix release is based on the last available Altinity Stable Build and does not include any additional changes other than the requested bug fix.
The QA process for hotfix releases is more streamlined and might not cover all of the corner cases.
The bug fix will not be available in the new Altinity Stable Build until it is merged in the upstream.
For custom feature requests, Support customers can engage Altinity Development team on a non-recurring engineering (NRE) basis. Please reach out to your Account Manager for pricing information.
Online Support Resources
There are a number of useful resources here and elsewhere on the web to help with less urgent issues:
You can open a ticket in two different ways; choose whichever is convenient for you. As you create or escalate a ticket, you can give it one of the four priorities defined above.
Using Altinity Help Center
Our support portal lets you create a ticket instantly and track it going forward.
Log a request
After logging in to the portal, select the Technical Support link in order to log a request with Altinity Support Services.
Escalate the issue - Add a note explaining the escalation.
Close the issue - Add a note explaining why you’re closing the request.
Using Slack
You can use your dedicated Altinity Slack channel to log issues and have conversations with Altinity engineers. We use the Jira Service Management Slack plugin to track your conversations as help tickets. (If you don’t have a dedicated Slack channel, contact us). To turn a Slack conversation into a ticket, tag the relevant thread with the :ticket: emoji:
When the :ticket: reaction is added, a support ticket will be created in our Jira Service Management system with a default priority of P4. You will see the ticket reference linked in the message thread in the format of SUP-xxxx.
If you need to raise a ticket’s priority after it’s created, you can escalate it directly from Slack.
Escalating a Ticket
If your issue needs a more urgent response, you can raise its priority. You can also ask for executive involvement if you feel you need additional resources. Feel free to reach out to our CEO, Robert Hodges (@Robert Hodges (Altinity) on Slack) or our CTO, Alexander Zaitsev (@alz on Slack).
Using the Altinity Support Services portal
When viewing an active ticket, click Escalate this issue in the right navigation. Be sure to explain the escalation when prompted.
Using Slack
To escalate a ticket created by Slack, tag the message with the appropriate emoji. (Note that you can only escalate the ticket after it is created, so make sure your issue is in the Jira Service Management tool first.)
P1 - Highest - Add :bangbang:
P2 - High - Add :exclamation:
P3 - Medium - Add :placard:
P4 - Low - To de-escalate an issue, simply remove everything but the original :ticket: emoji:
Let Us Hear from You!
If you have feedback for us, feel free to reach out to our CEO, Robert Hodges (@Robert Hodges (Altinity) on Slack) or our CTO, Alexander Zaitsev (@alz on Slack).


 button. You’ll see this dialog:


 button to enter your payment details:


 button.


 button to see your ClickHouse clusters. You won’t have any, of course, so see
  button to create a new environment; click it. In the Environment Setup dialog, give your environment a name, choose AWS as your cloud vendor, select a region, then choose Bring your own cloud account:


 button will be active; click it to start provisioning. Click VIEW LOG to see status messages as the ACM finishes configuring your environment:
 button to create one. See


 button to add new node pools, or click the
  button to restore the original settings. NOTE: You can add more node pools later if you need them.

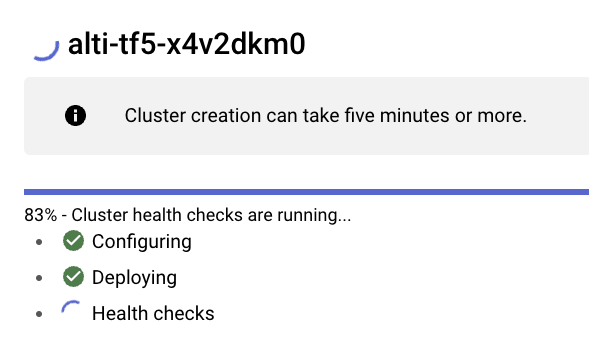


 button to define additional AZs.
 button to add other storage classes.


 button should give you the green box seen at the bottom of Figure 1. See


 button to go to the Clusters view:


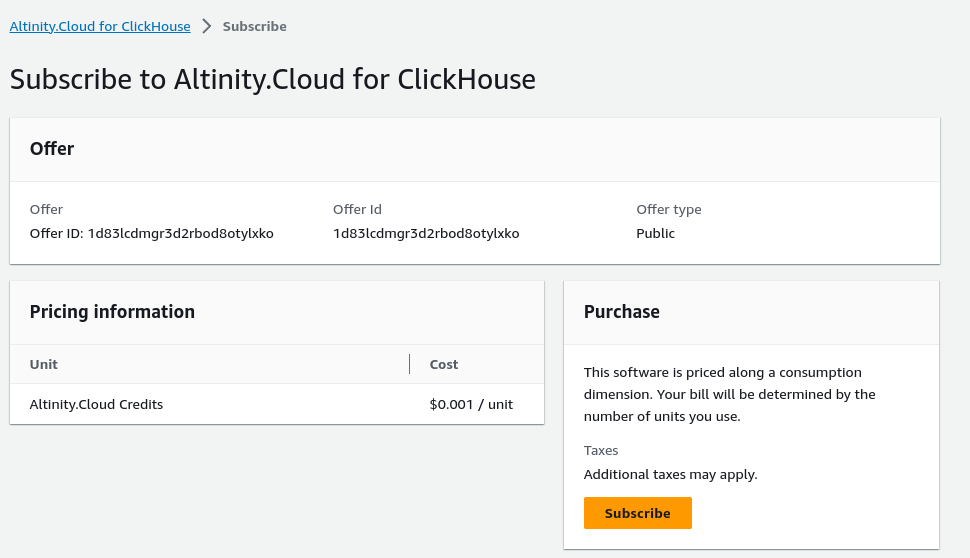

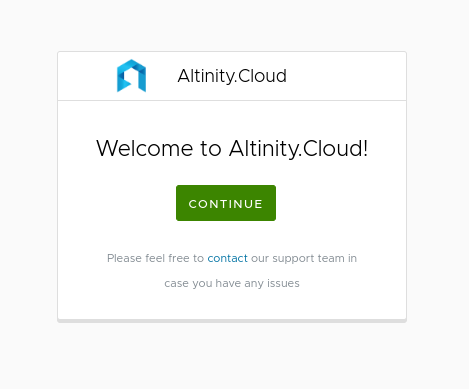


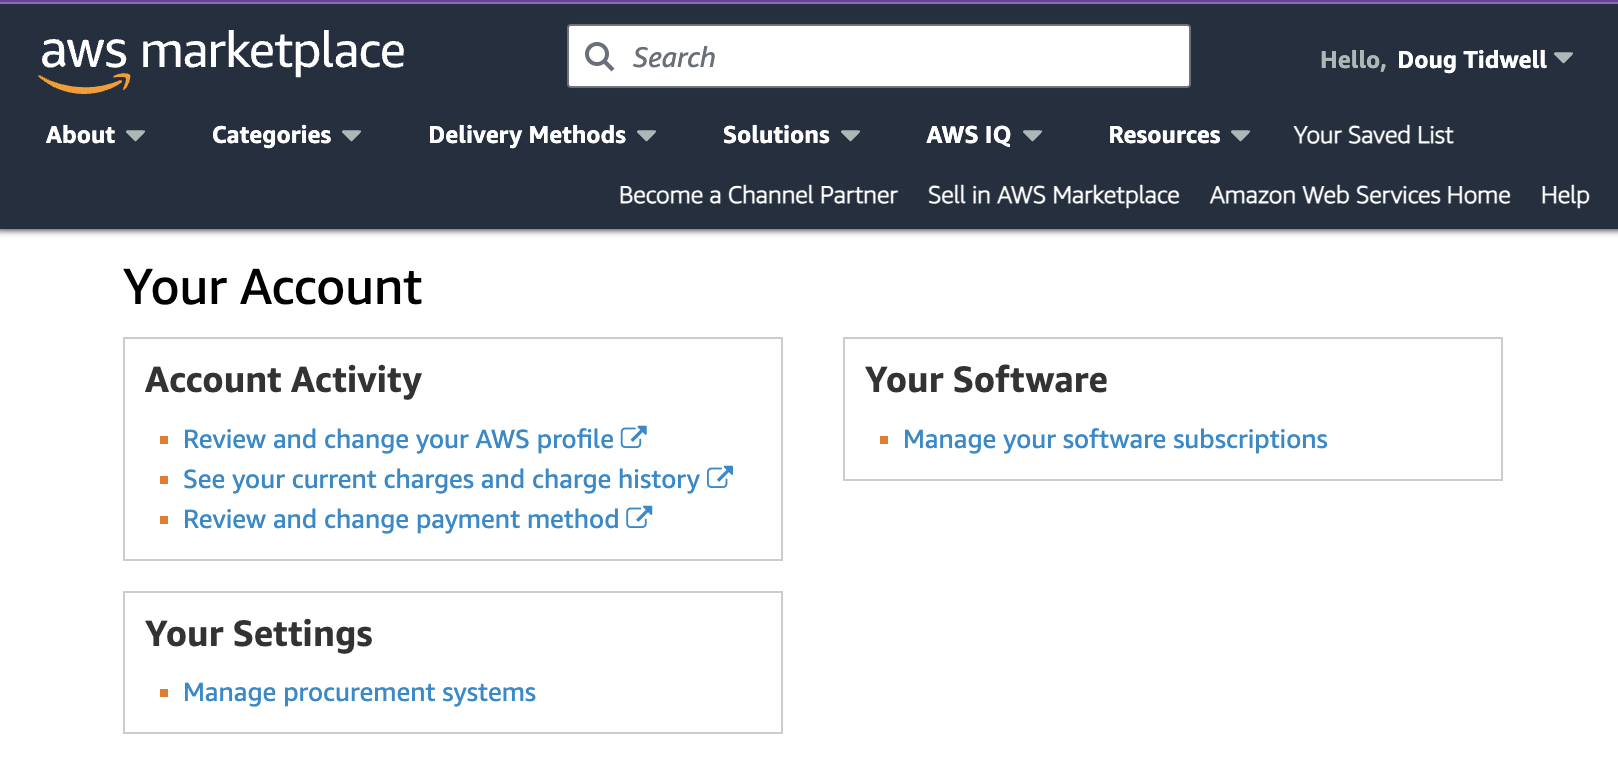
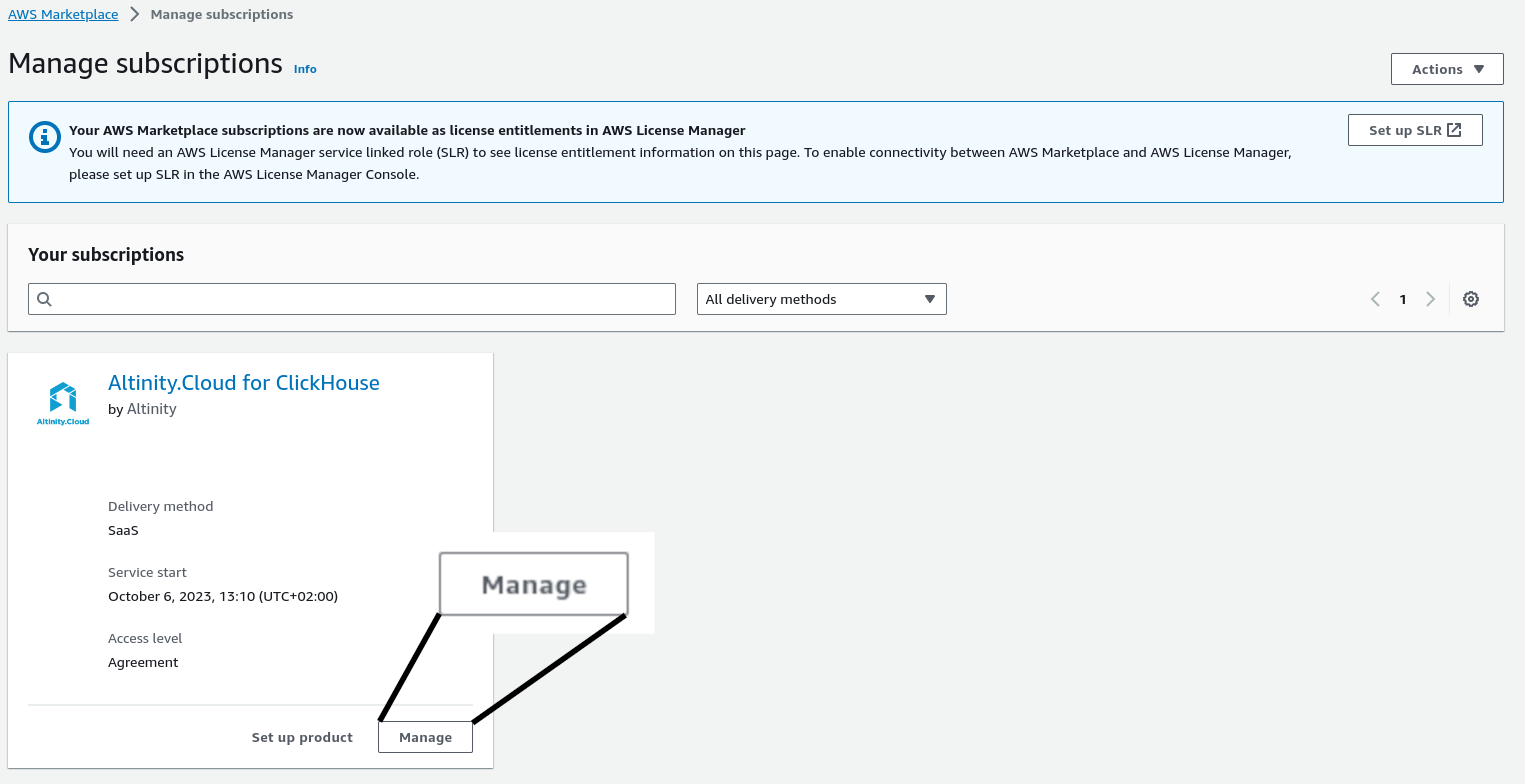
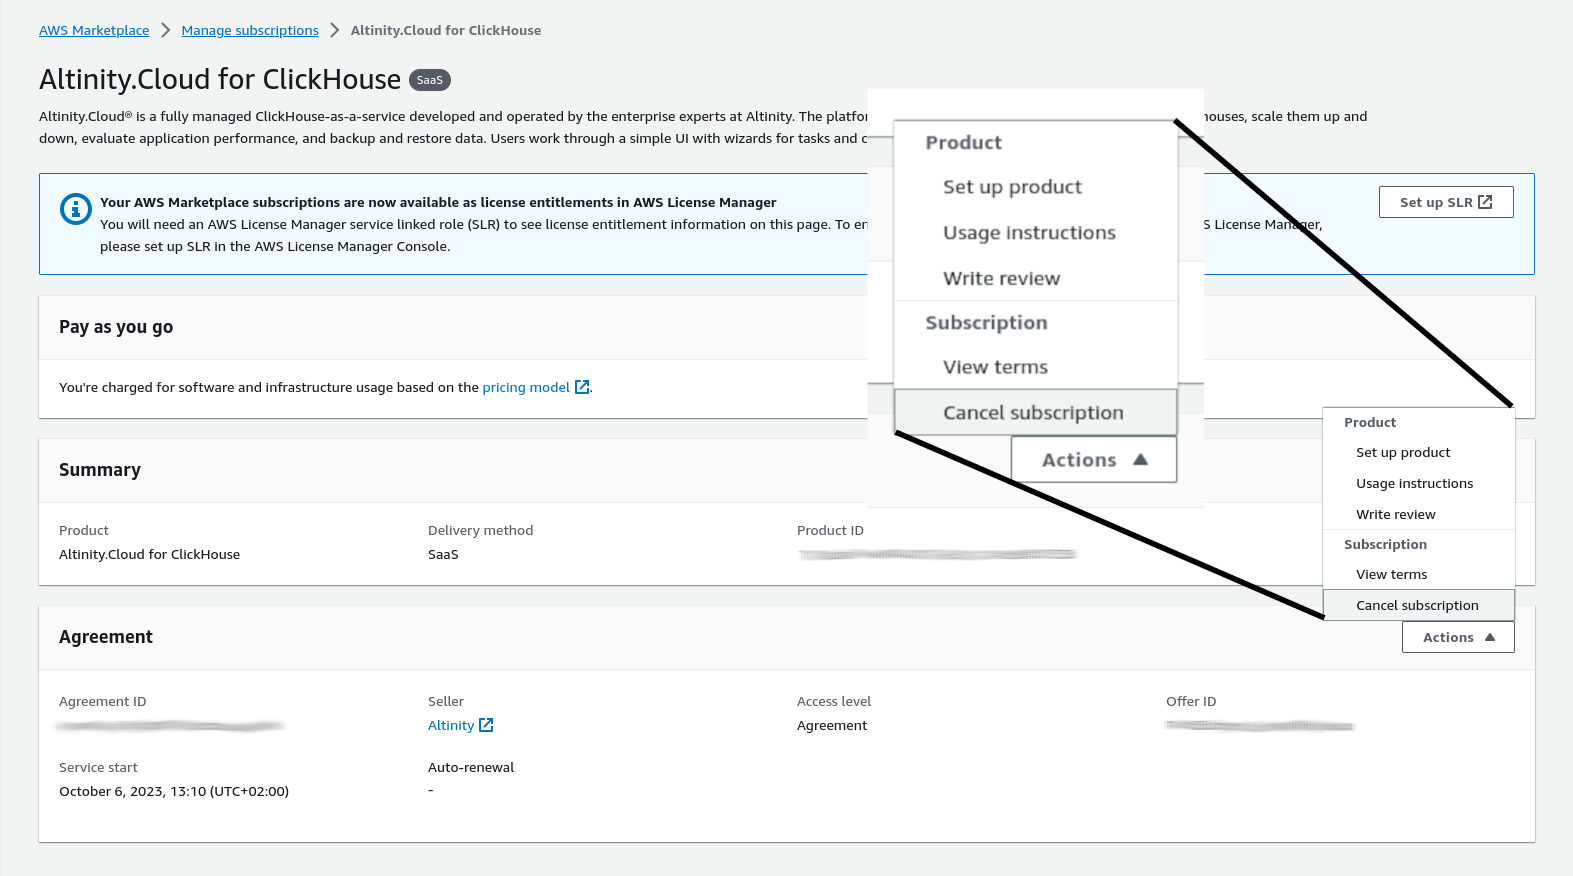
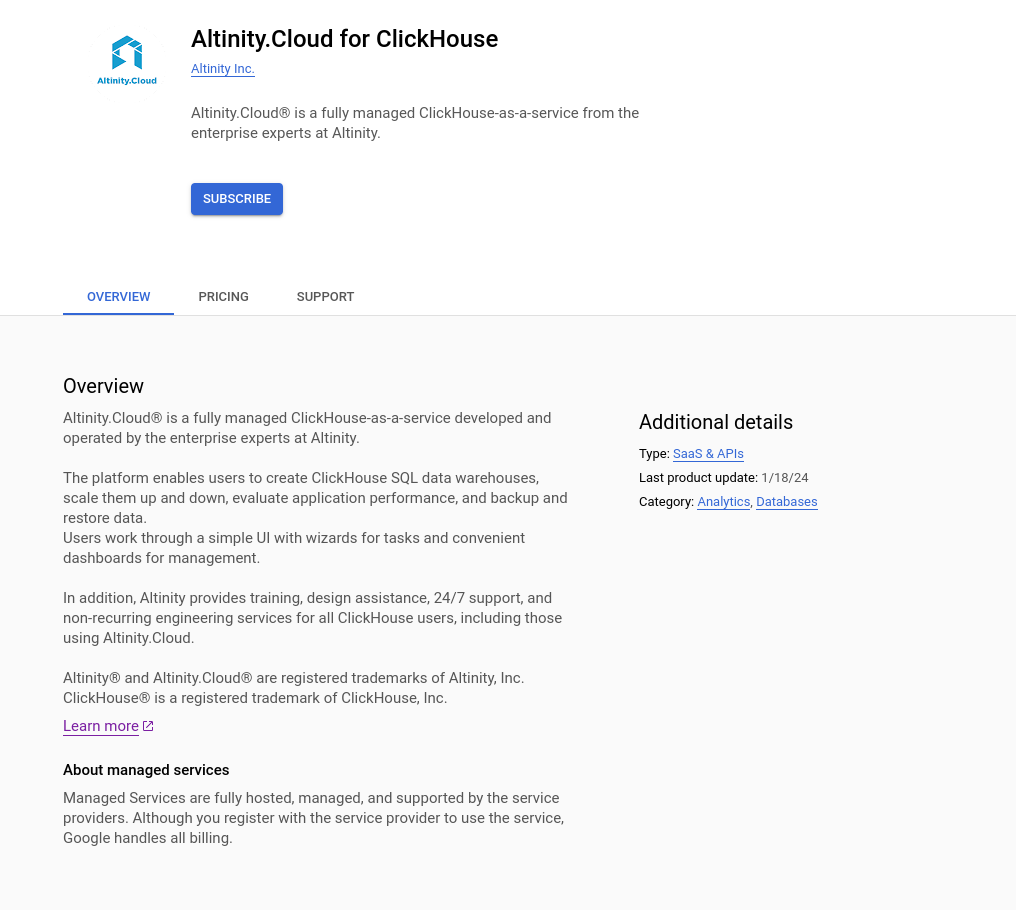
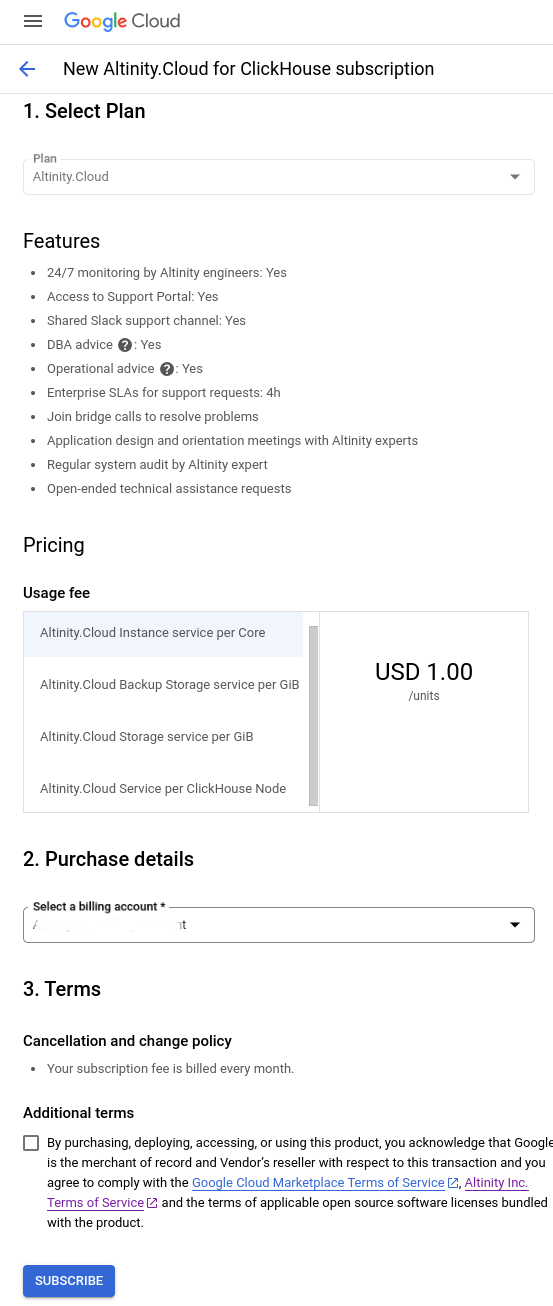
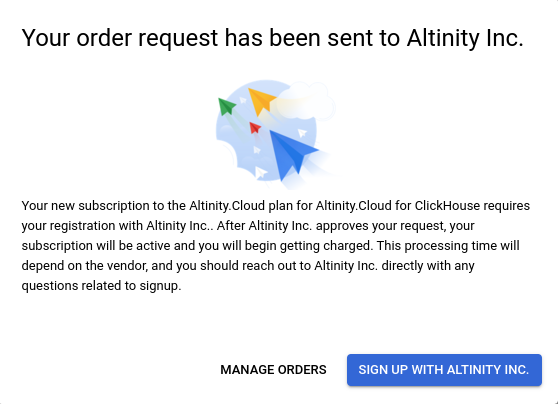
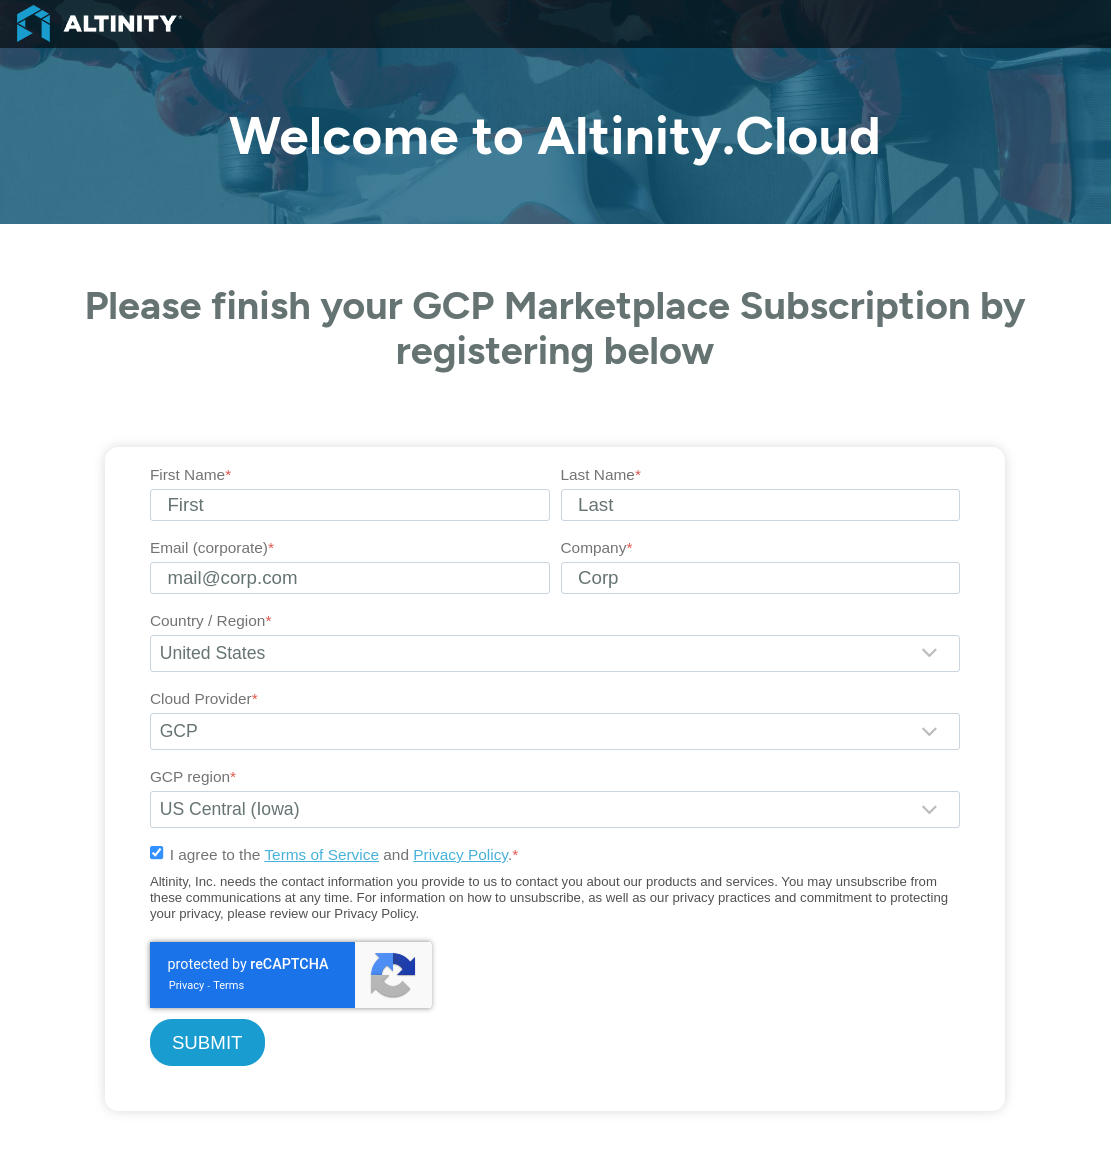
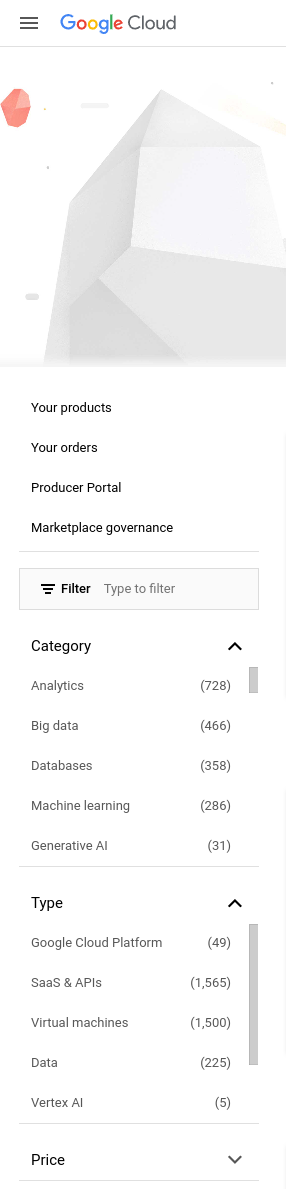


 Panel view icon is selected in the upper right. Click the
  List view icon to switch to the more compact List view:


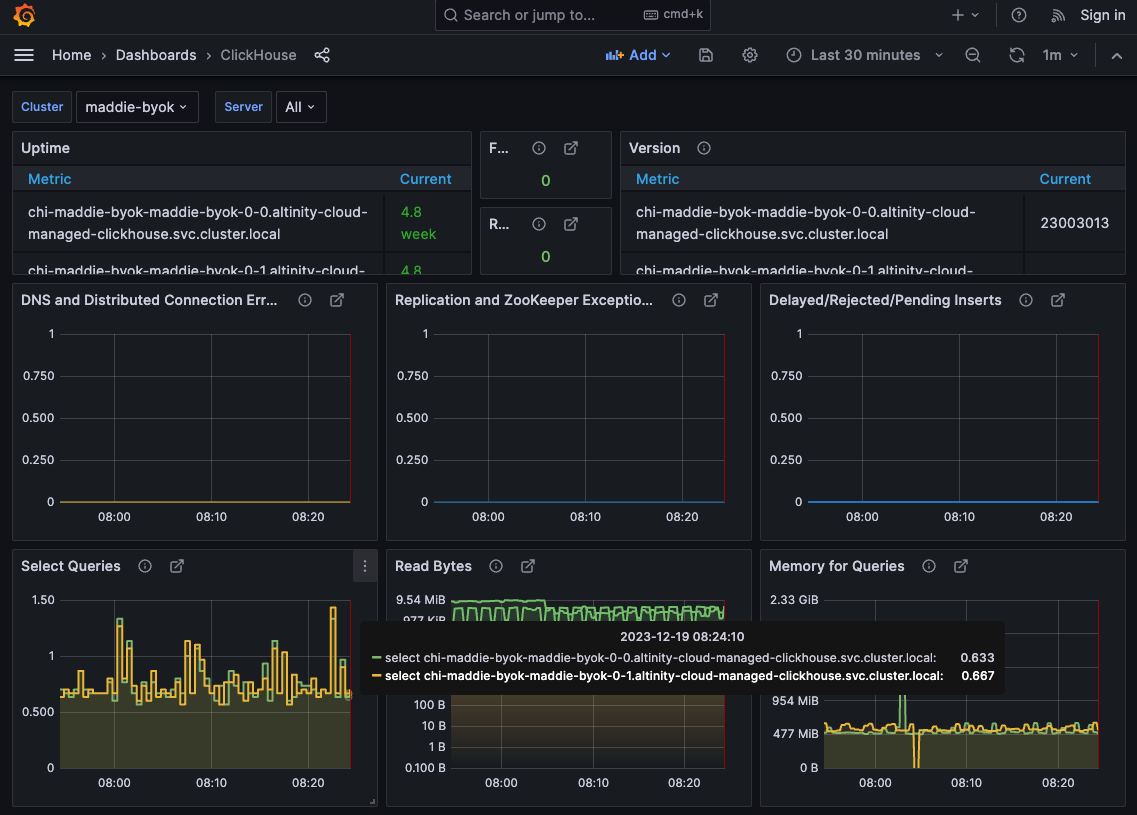
 button displays the Query tab in the Cluster Explorer. This lets you run SQL queries against the data in your ClickHouse cluster.
 buttons are at the top of the Clusters view:

 button. You can change any configuration values later except the cluster name and the availability zones your cluster uses.


 button lets you define multiple schedules. For example, if you only want backups to occur on Friday and Saturday, create two Weekly schedules, one for Friday and one for Saturday. You can define up to three schedules.


 button creates a new annotation, and clicking the


 : Updates for general information
 : Notifications of general news and updates in Altinity.Cloud
 : Notifications of possible issues that are less than critical
 : Critical notifications that can effect your clusters or account


 - All nodes in the ClickHouse cluster are active. See
  - TLS is enabled.
 - IP restrictions are enabled, so only certain IP addresses can access the cluster directly. If IP restrictions are not enabled, you’ll see the
 - All the health checks for this ClickHouse cluster passed. See


 - The refresh button. Refreshes the display, as you would expect.

 panel view of the nodes. If you like, you can choose the
 button (in the panel view) or the name of the node (in the list view) takes you to the view of a single node.

 - Takes you to the previous view


 - lets you import a sample dataset into your ClickHouse cluster. The


 left and right arrows let you move through the queries you’ve executed.
 button brings up the Select User dialog:


 button. Be aware that not all queries can be killed; if you’d like to know more, see


 button.


 button rebalances the cluster’s disks. You should only rebalance your disks if you’ve gotten an alert that one of your disks is nearly full and you have at least one disk with plenty of space. Note that the ACM will not rebalance your disks if none of them have significant free space, and it will not rebalance the disks unless a significant amount of storage is involved.
 button.

 button creates a new report. Clicking the
  button downloads an HTML file to your machine. The report format is straightforward:

 button.
 button to delete them.


 button to create your own endpoints, or you can use the
  button to import a JSON file of endpoint definitions.
 button to save the endpoint. You’ll be taken back to the main API Endpoints panel:

 button to run the query and see the results:


 trash can icon to delete it. Click SAVE ALL to save your changes. Your changes aren’t saved until you click SAVE ALL, so you can always click CANCEL to leave your API endpoints as they were.
 Import Endpoints button brings up this dialog:
 button to upload a file, or even paste JSON into the text area. Once you’ve set up the endpoints you want to import, click the
  button to import the endpoints.
 Export Endpoints button downloads a file named


 button:
  button restores the original schema.

 menu in the Clusters (plural) view:


 button to rescale the cluster with the new values. As you would expect, the rescaling time varies with the size of the cluster, as each node is rescaled individually.


 button lets you change the properties of the selected volume. At a minimum, this allows you to change the type of disk and its size:


 button lets you add another volume to your cluster:

 button cordons the volume, which means no new data will be written to that volume. Clicking the button changes its text to UNCORDON VOLUME, which reverses the operation. A cordoned volume can be freed, which moves all data from the volume to non-cordoned volumes in the cluster.
 button moves all data from the selected volume to non-cordoned volumes in the cluster. You must first cordon the volume for the FREE VOLUME button to be enabled. You’ll be asked to confirm that you want to free the volume:
 button will be active. To remove a volume, you must cordon it, which means no new data will be written to it, then free the volume, which moves any data on the volume to non-cordoned volumes. As you would expect, clicking the button gives you a confirmation message:


 button to add a new endpoint. The name of the alternate endpoint can contain lowercase letters, numbers, and hyphens. It must start with a letter, and it cannot end with a hyphen.
 button to upload a text or CSV file, or you can drag and drop a
  button lets you configure Altinity Shield:


 button enables the property, although it may take a short while:
 button until support is enabled. Then you’ll see this dialog:
 button to create your new database. After the connection is created, you’ll get a message listing the data the ACM found in your data lake catalog:


 button at the top of the panel lets you add a setting. There are three types of settings:


 button at the top of the view opens the Environment Variable Details dialog:


 button to set the startup time parameter. Note: this button only, uh, applies to the startup time parameter. It does not apply any changes you’ve made to settings or environment variables.
 button takes you to the Profile Details dialog:


 button displays a dropdown list of all your profiles:
 slider to see only the settings you’ve changed or click the


 button or clicking the


 button to get more details:


 button creates a new action, a clicking the
  button takes you to a dialog that lets you enter details for the action:


 button adds a new annotation, and clicking the


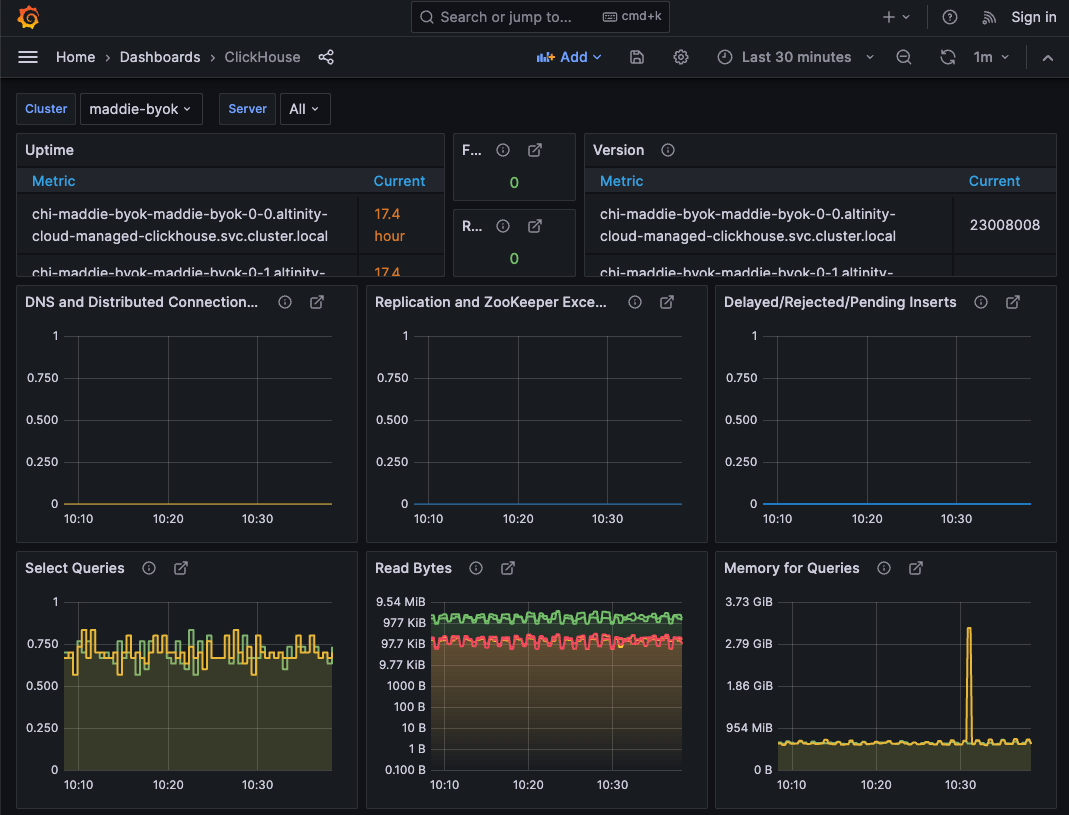

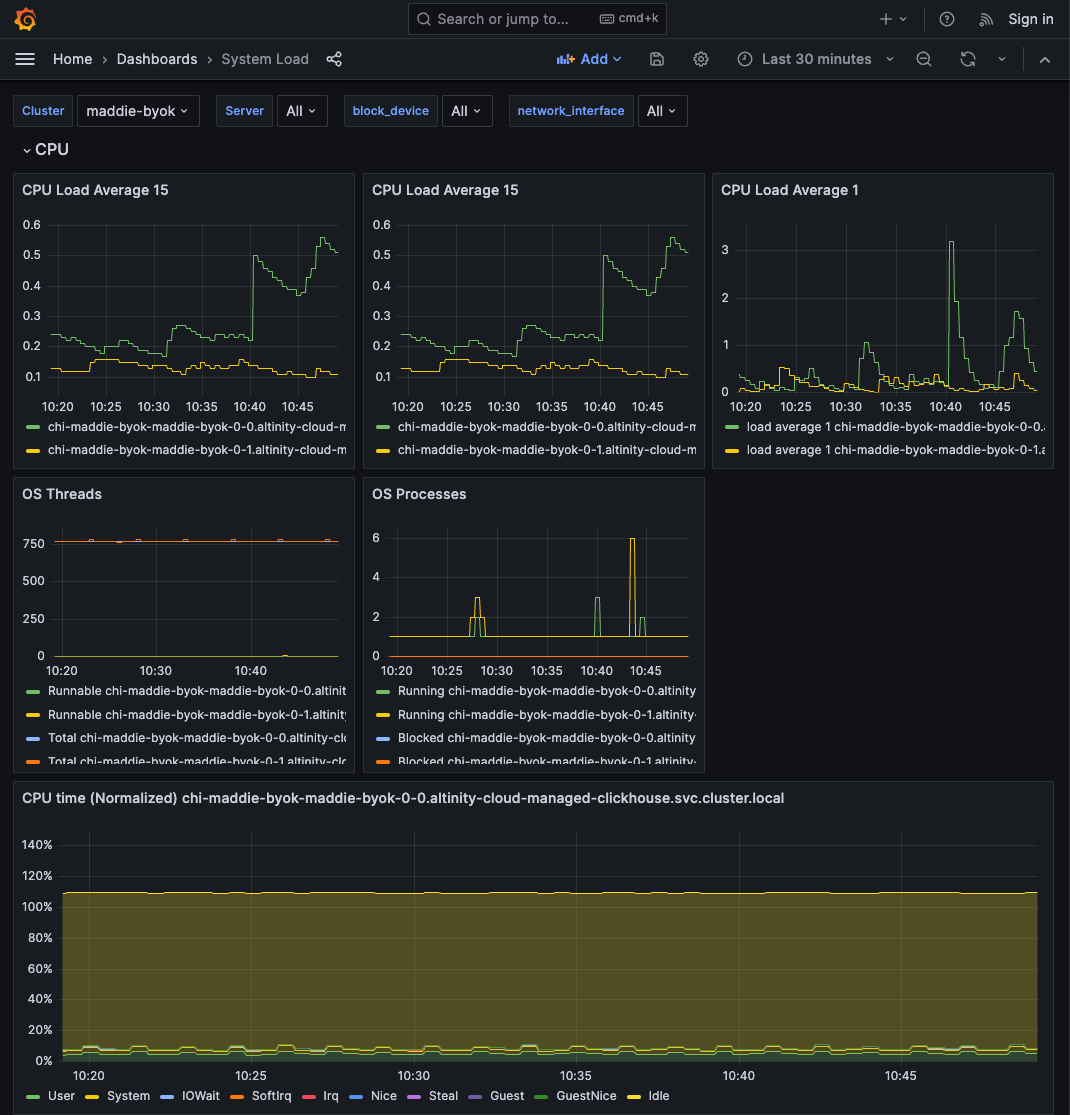

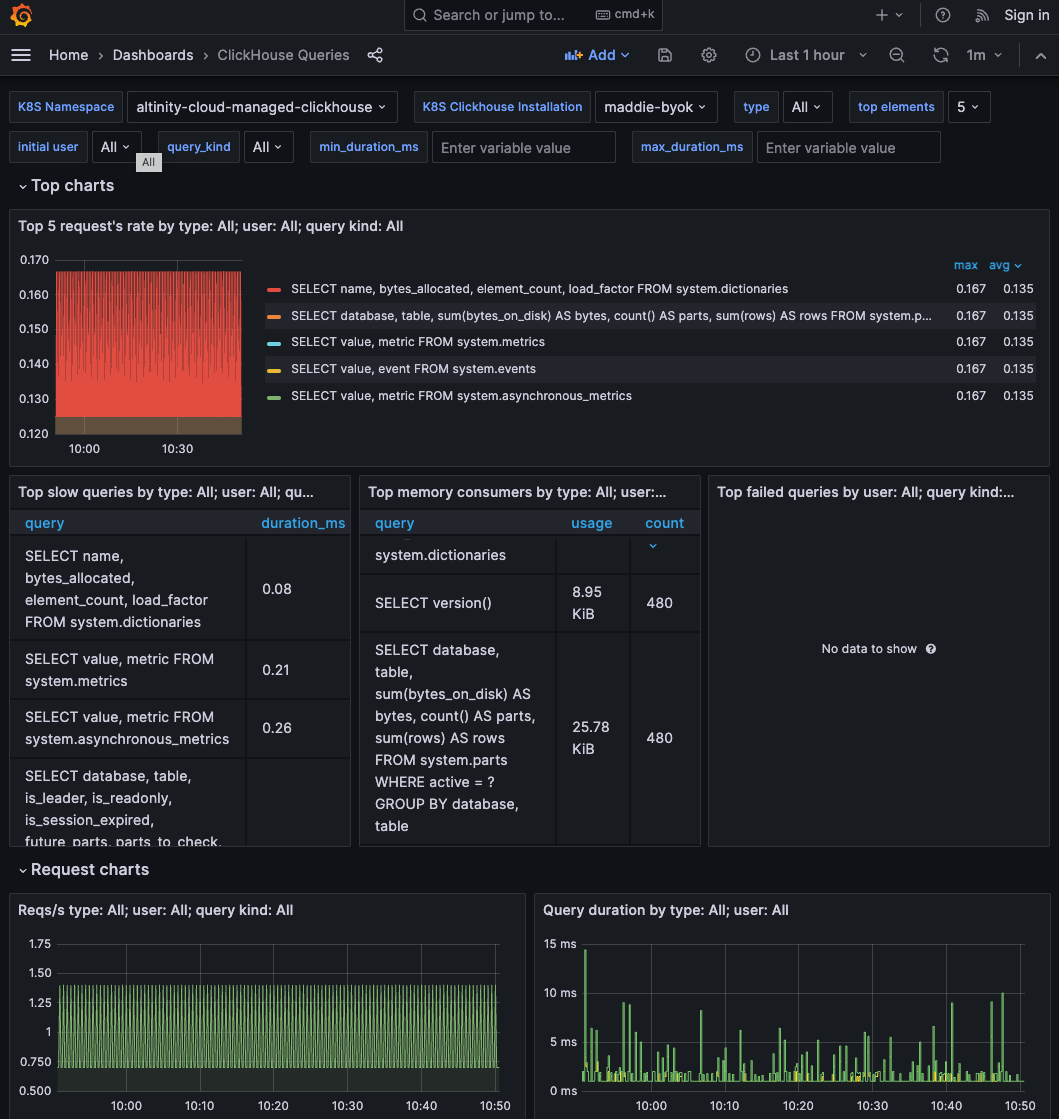

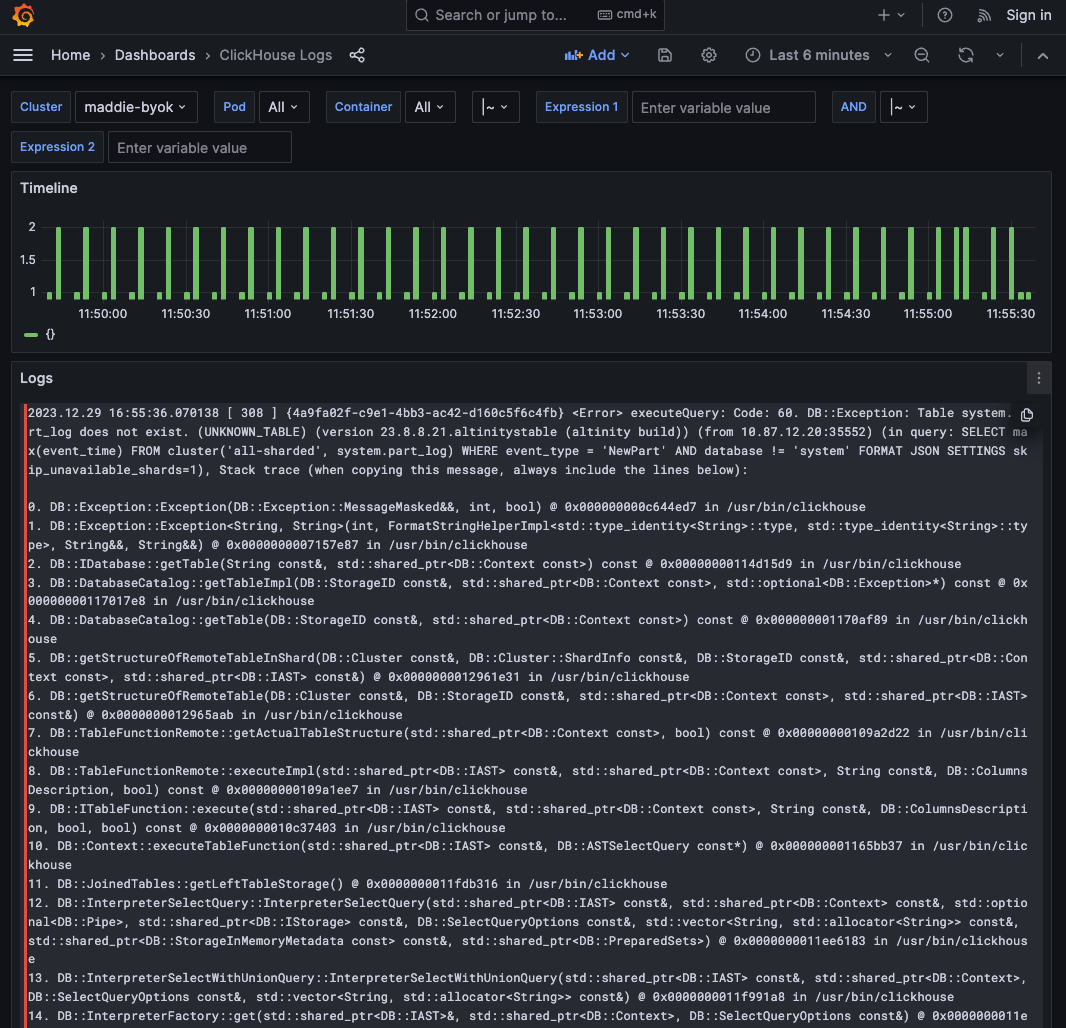


 button:


 button displays the Pending Cluster Updates dialog:


 button to start copying data.

 - click this button to connect to an existing environment.
 - click this button to import an environment definition. See
  - Lets you select an Environment for operations and includes the
  is what we’re looking for here.
 link - Clicking this takes you to
 - takes you to the Environment configuration dialog. See
  - lets you export your environment to a file that can be imported later. For more information about exporting an environment, including what data formats are available, see
  - synchronizes the view with its current state in the ACM. It’s unlikely that you’ll ever need this button, fwiw.
 - deletes the environment. There are a number of considerations for deleting (or disconnecting) an environment; see


 , where


 button to add a new node type.


 button. You’ll see this dialog:


 button lets you add an existing Zookeeper node to a Zookeeper cluster. You’ll see this dialog when you click it:
 button and the
  button lets you launch a new Zookeeper cluster. You’ll see this dialog:


 button to create a new configuration. Finally, you can delete a configuration by clicking the
  button to save your changes.
 button to apply the template.
 button to add a new schedule. Each schedule must include at least two days. In the figure above, there is a single maintenance window that runs on Saturday and Sunday starting at 23:00 UTC for four hours. Note that all starting times are in UTC.

 button creates a new tag, and the


 button appears next to the environment name and the list of nodes at the bottom of the display is empty.


 button. You’ll see the Account Details dialog, which has three tabs (or maybe four):


 button in Figure 1 to set login properties for all accounts in your organization. You’ll see this dialog, opened to the General tab:


 button lets you add a new role pair, and clicking the


 SQL Editor button and paste in this query:
 Run Query button. You’ll see a graph of the data. Click the Stacked Lines button above the graph and you’ll see something like this:


 button. You’ll see something like this:


 button to explore a new set of metrics. When you do, you’ll see a list of all your Prometheus data sources:
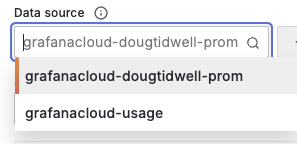

 button to add a label to the query. When you click the button, you’ll see a dropdown list of labels from all the metrics sent to this server:
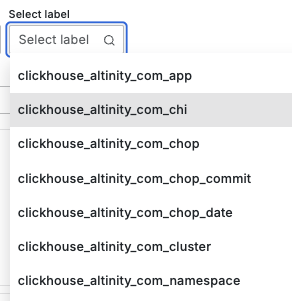
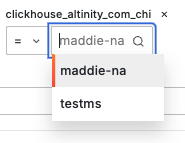


 button to open the data source.

 button. You’ll see all the matching messages from the Loki server:


 button to add an Altinity.Cloud API key.
 button. Click OK in the confirmation dialog to confirm that you want to create a new key. After creating the token, you’ll see it in an entry field on the screen:


 button to change your payment method::
 button to update your address:


 button is at the top of the page:


 in the upper right takes you to the list of roles:
 button to add a new role, or you can click the

 link in the login panel to invoke the SSO provider. The SSO provider returns an Auth0 access token that logs the user into Altinity.Cloud. (Or not, depending on the user’s permissions.)


 button lets you request temporary credentials that you can give to Altinity support. If you don’t have the appropriate access, you’ll see this message:


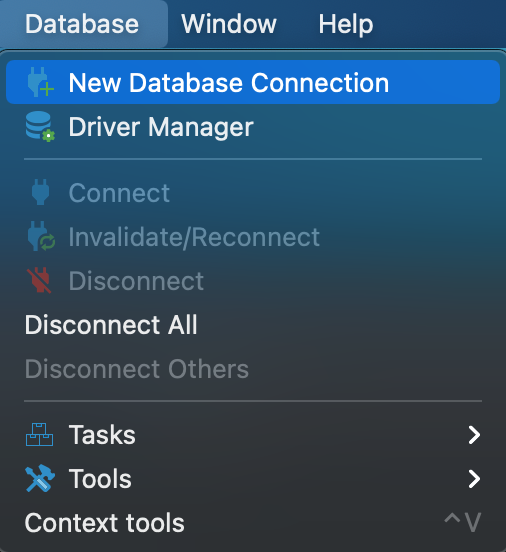
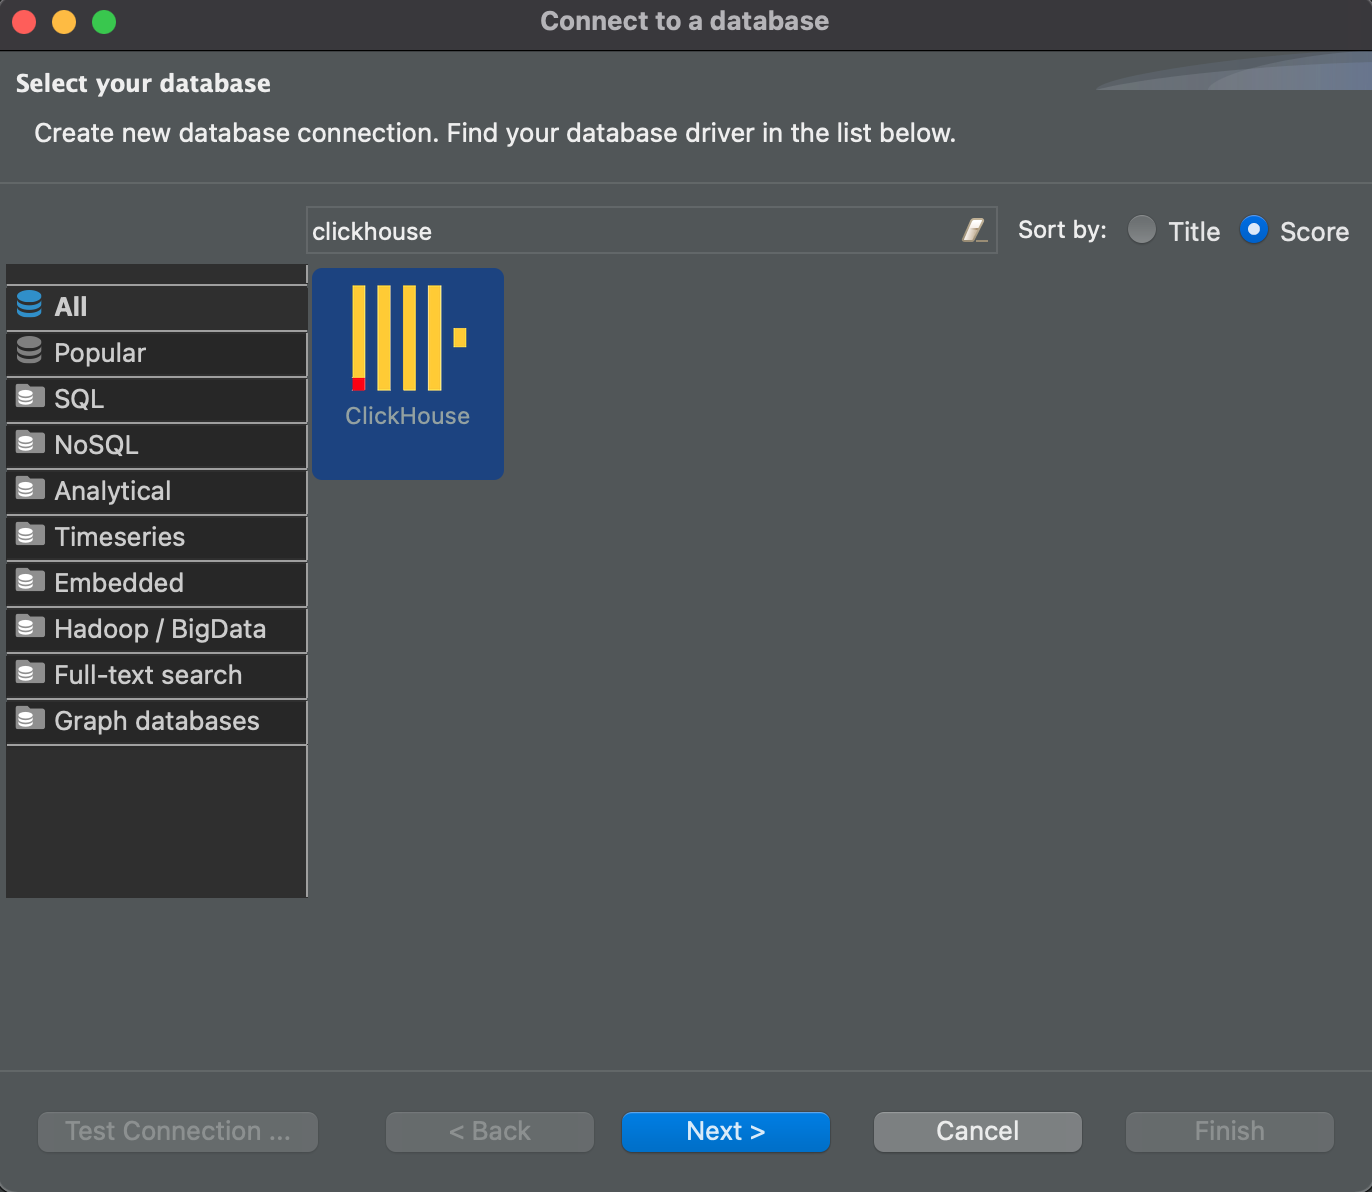
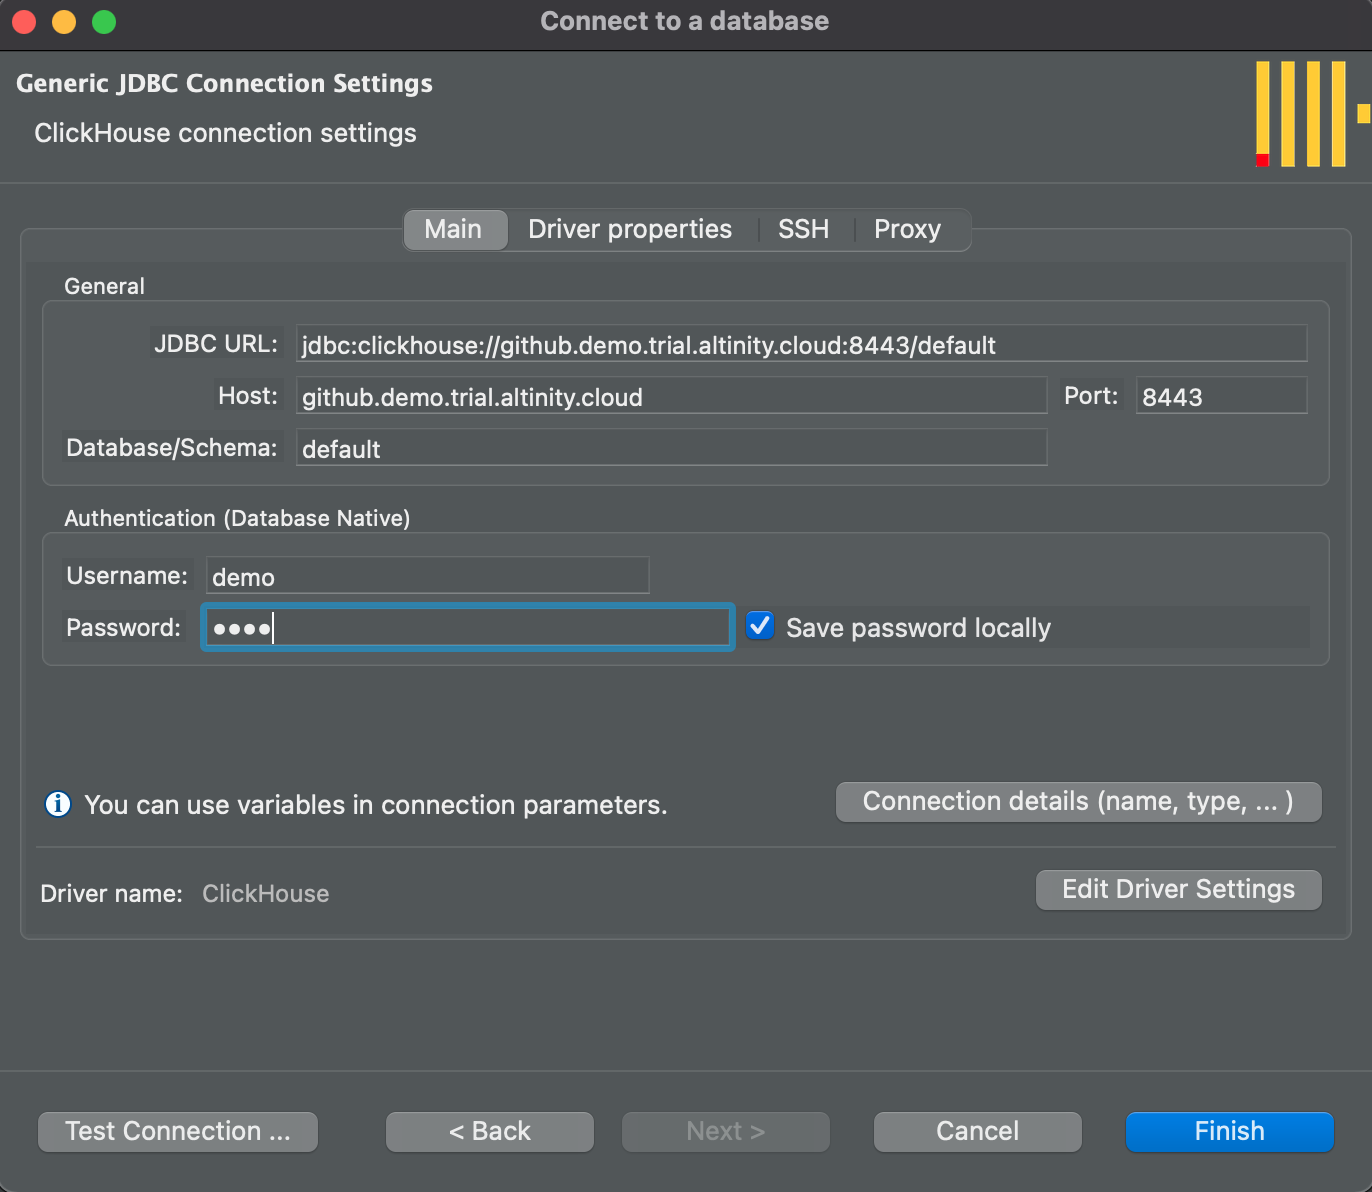

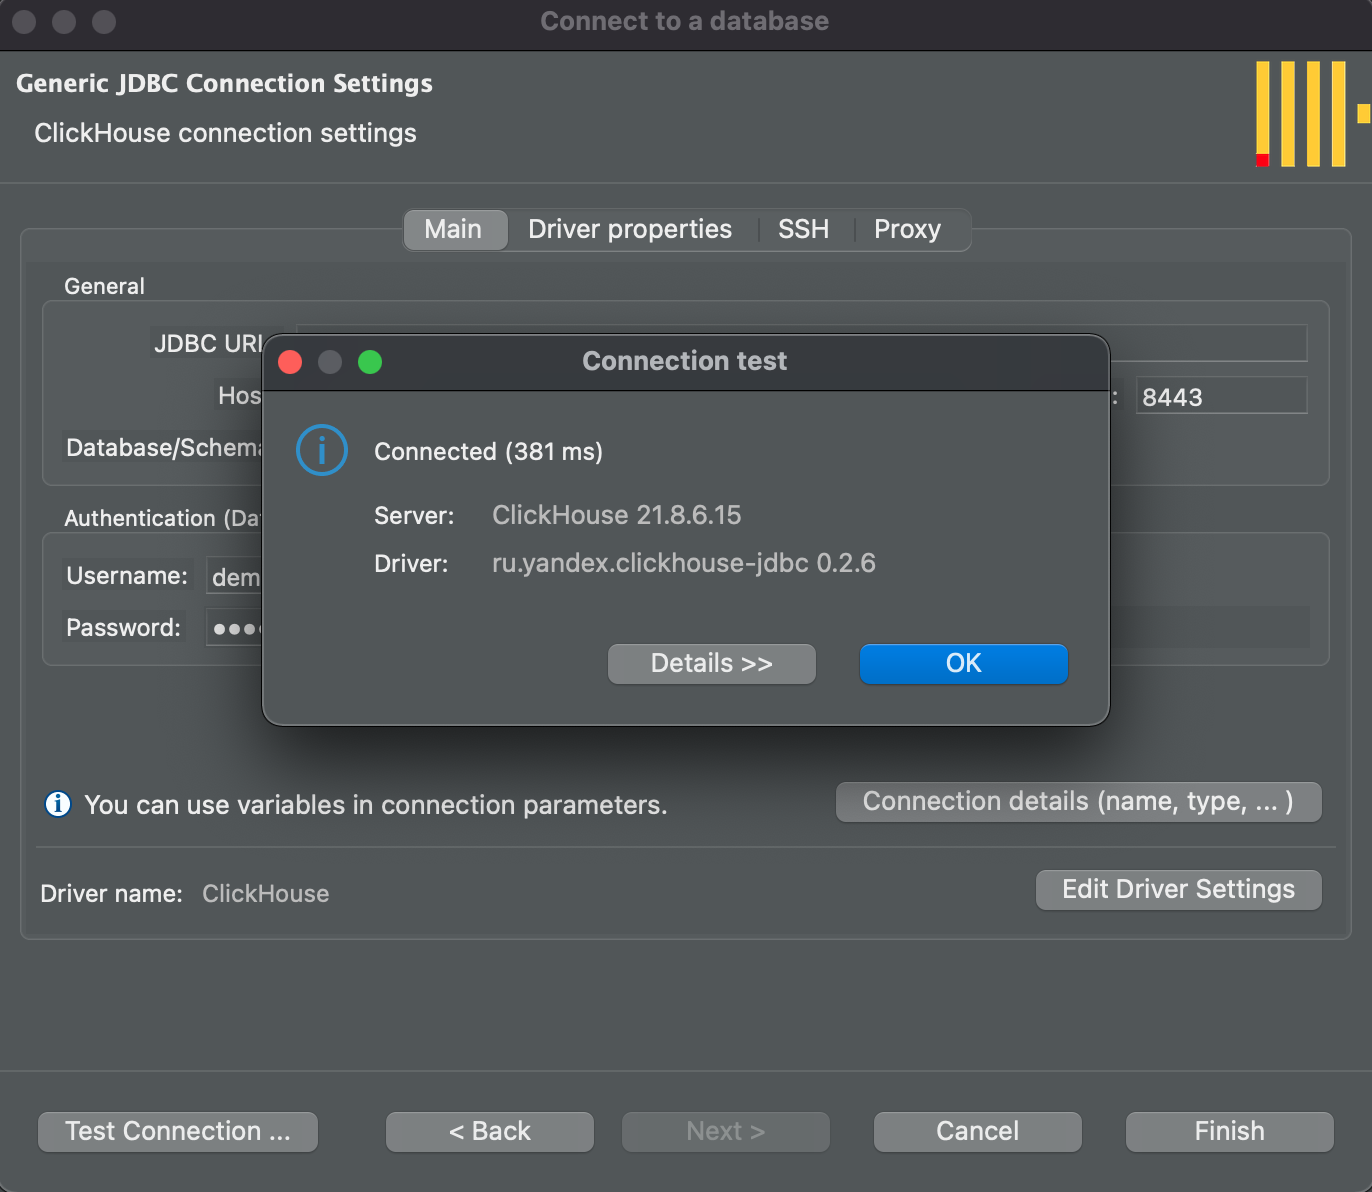

 button to create one. That takes you to this dialog:

 button to save these settings into the Kafka settings file. You’ll see your new settings file and its one configuration:
 button to edit a given configuration or click the
  button to delete one. You’ll be asked to confirm your choice if you ask to delete a configuration. And as you would expect, the
  button lets you create a new configuration in the current settings file and the
  button lets you create a new settings file altogether.


 Figure 1 - Creating a certificate file in the


 button:

 button. You should see a green box as in Figure 3 above. If the service name is valid, select a VPC from the dropdown list in the VPC section of the panel. You can also add a name tag for the endpoint at the top of the panel if you want.


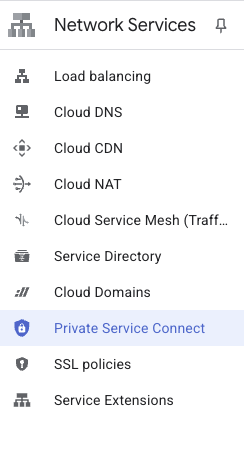


 button to create the endpoint.

 button. Select a data format from the dropdown list and click Download: