The methods to make your ClickHouse environment successful.
This is the multi-page printable view of this section. Click here to print.
ClickHouse Operations Guide
Recommended practices and procedures for running ClickHouse in your Production environments.
- 1: ClickHouse Cluster with Zookeeper Production Configuration Guide
- 2: Security
- 3: Care and Feeding of Zookeeper with ClickHouse
- 4: High Availability and Disaster Recovery
1 - ClickHouse Cluster with Zookeeper Production Configuration Guide
Best practices on a ClickHouse on Kubernetes Production configuration.
Moving from a single ClickHouse server to a clustered format provides several benefits:
- Replication guarantees data integrity.
- Provides redundancy.
- Failover by being able to restart half of the nodes without encountering downtime.
Moving from an unsharded ClickHouse environment to a sharded cluster requires redesign of schema and queries. Starting with sharding from the beginning makes it easier in the future to scale the cluster up.
Setting up a ClickHouse cluster for a production environment requires the following stages:
- Hardware Requirements
- Network Configuration
- Create Host Names
- Monitoring Considerations
- Configuration Steps
- Setting Up Backups
- Staging Plans
- Upgrading The Cluster
Hardware Requirements
ClickHouse
ClickHouse will take everything from your hardware. So the more hardware - the better. As of this publication, the hardware requirements are:
- Minimum Hardware: 4-core CPU with support of SSE4.2, 16 Gb RAM, 1Tb HDD.
- Recommended for development and staging environments.
- SSE4.2 is required, and going below 4 Gb of RAM is not recommended.
- Recommended Hardware: =16-cores, >=64Gb RAM, HDD-raid or SSD.
- For processing up to hundreds of millions of rows.
Zookeeper
Zookeeper requires separate servers from those used for ClickHouse. Zookeeper has poor performance when installed on the same node as ClickHouse.
Hardware Requirements for Zookeeper:
- Fast disk speed (ideally NVMe, 128Gb should be enough).
- Any modern CPU.
- 8Gb of RAM
The number of Zookeeper instances depends on the environment:
- Production: 3 is an optimal number of zookeeper instances.
- Development and Staging: 1 zookeeper instance is sufficient.
As a reference, see Running Zookeeper in Production.
Hardware Configuration
Configure the servers accoring to those recommendations the ClickHouse Usage Recommendations.
Test Your Hardware
Be sure to test the following:
- RAM speed.
- Network speed.
- Storage speed.
It’s better to find any performance issues before installing ClickHouse.
Network Configuration
Networking And Server Room Planning
It is recommended to use a fast network, ideally 10 Gbit. ClickHouse nodes generate a lot of traffic along with the Zookeeper connections and inter-Zookeeper communications.
Low latency is more important than bandwidth.
Keep the replicas isolated on hardware level. This allows for cluster failover from possible outages.
- For Physical Environments: Avoid placing 2 ClickHouse replicas to the same server rack. Ideally they should be on isolated network switches and an isolated power supply.
- For Clouds Environments: Use different availability zones between the CLickHouse replicas.
These settings are the same as the Zookeeper nodes.
For example:
| Rack | Server | Server | Server | Server |
|---|---|---|---|---|
| Rack 1 | CH_SHARD1_R1 | CH_SHARD2_R1 | CH_SHARD3_R1 | ZOO_1 |
| Rack 2 | CH_SHARD1_R2 | CH_SHARD2_R2 | CH_SHARD3_R2 | ZOO_2 |
| Rack 3 | ZOO3 |
Network Ports And Firewall
ClickHouse listens the following ports:
- 9000:
clickhouse-client, native clients, other clickhouse-servers connect to here. - 8123: HTTP clients
- 9009: Other replicas will connect here to download data.
For more information, see CLICKHOUSE NETWORKING, PART 1.
Zookeeper listens the following ports:
- 2181: Client connections.
- 2888: Inter-ensemble connections.
- 3888: Leader election.
Outbound traffic from ClickHouse connects to the following ports:
- ZooKeeper: On port 2181.
- Other CH nodes in the cluster: On port 9000 and 9009.
- Dictionary sources: Depending on what was configured such as HTTP, MySQL, Mongo, etc.
- Kafka or Hadoop: If those integrations were enabled.
SSL
For non-trusted networks enable SSL/HTTPS. If possible, it is better to keep interserver communications unencrypted for performance reasons.
Create Host Names
The best time to start creating a naming schema for the servers is before they’re created and configured.
There are a few features based on good server naming in clickhouse:
- clickhouse-client prompts: Allows a different prompt for
clickhouse-clientper server hostname. - Nearest hostname load balancing: For more information, see Nearest Hostname.
A good option is to use the following:
{datacenter}-{serverroom}-{rack identifier}-{clickhouse cluster identifier}-{shard number or server number}.
Other examples:
-
rxv-olap-ch-master-sh01-r01:- rxv - location (rack#15)
- olap - product name
- ch = clickhouse
- master = stage
- sh01 = shard 1
- r01 = replica 1
-
hetnzerde1-ch-prod-01.local:- hetnzerde1 - location (also replica id)
- ch = clickhouse
- prod = stage
- 01 - server number / shard number in that DC
-
sh01.ch-front.dev.aws-east1a.example.com:- sh01 - shard 01
- ch-front - cluster name
- dev = stage
- aws = cloud provider
- east1a = region and availability zone
Host Name References
- What are the best practice for domain names (dev, staging, production)?
- 9 Best Practices and Examples for Working with Kubernetes Labels
- Thoughts On Hostname Nomenclature
Additional Host Name Tips
- Host names configured on the server should not change. If you do need to change the host name, one reference to use is How to Change Hostname on Ubuntu 18.04.
- The server should be accessible to other servers in the cluster via it’s hostname. Otherwise you will need to configure interserver_hostname in your config.
Monitoring Considerations
External Monitoring
For external monitoring:
- Graphite: Use the embedded exporter. See
config.xml. - InfluxDB: Use the embedded exporter, plus Telegraf. For more information, see Graphite protocol support in InfluxDB.
- For Prometheus you can use the clickhouse-exporter
To enable external monitoring, enable system.metric_log in config.xml.
For dashboard system:
- Grafana is recommended for graphs, reports, alerts, dashboard, etc.
- Other options are Nagios or Zabbix.
The following metrics should be collected:
- For Host Machine:
- CPU
- Memory
- Network (bytes/packets)
- Storage (iops)
- Disk Space (free / used)
- For ClickHouse:
- Connections (count)
- RWLocks
- Read / Write / Return (bytes)
- Read / Write / Return (rows)
- Zookeeper operations (count)
- Absolute delay
- Query duration (optional)
- Replication parts and queue (count)
- For Zookeeper:
The following queries should be recommended:
SELECT * FROM system.replicas- For more information, see the ClickHouse guide on System Tables
SELECT * FROM system.merges- Checks on the speed and progress of currently executed merges.
SELECT * FROM system.mutations- This is the source of information on the speed and progress of currently executed merges.
Monitor and Alerts
Configure the notifications for events and thresholds based on the following table:
Health Checks
The following health checks should be monitored:
| Check Name | Shell or SQL command | Severity |
|---|---|---|
| ClickHouse status | $ curl 'http://localhost:8123/'Ok. | Critical |
| Too many simultaneous queries. Maximum: 100 | select value from system.metrics where metric='Query' | Critical |
| Replication status | $ curl 'http://localhost:8123/replicas_status'Ok. | High |
| Read only replicas (reflected by replicas_status as well) | select value from system.metrics where metric='ReadonlyReplica’ | High |
| ReplicaPartialShutdown (not reflected by replicas_status, but seems to correlate with ZooKeeperHardwareExceptions) | select value from system.events where event='ReplicaPartialShutdown' | HighI turned this one off. It almost always correlates with ZooKeeperHardwareExceptions, and when it’s not, then there is nothing bad happening… |
| Some replication tasks are stuck | select count()from system.replication_queuewhere num_tries > 100 | High |
| ZooKeeper is available | select count() from system.zookeeper where path='/' | Critical for writes |
| ZooKeeper exceptions | select value from system.events where event='ZooKeeperHardwareExceptions' | Medium |
| Other CH nodes are available | $ for node in `echo "select distinct host_address from system.clusters where host_name !='localhost'" | curl 'http://localhost:8123/' –silent –data-binary @-`; do curl "http://$node:8123/" –silent ; done |
| All CH clusters are available (i.e. every configured cluster has enough replicas to serve queries) | for cluster in `echo "select distinct cluster from system.clusters where host_name !='localhost'" | curl 'http://localhost:8123/' –silent –data-binary @-` ; do clickhouse-client –query="select '$cluster', 'OK' from cluster('$cluster', system, one)" ; done |
| There are files in 'detached' folders | $ find /var/lib/clickhouse/data///detached/* -type d | wc -l; 19.8+select count() from system.detached_parts |
| Too many parts: Number of parts is growing; Inserts are being delayed; Inserts are being rejected |
select value from system.asynchronous_metrics where metric='MaxPartCountForPartition';select value from system.events/system.metrics where event/metric='DelayedInserts'; select value from system.events where event='RejectedInserts' |
Critical |
| Dictionaries: exception | select concat(name,': ',last_exception) from system.dictionarieswhere last_exception != '' | Medium |
| ClickHouse has been restarted | select uptime();select value from system.asynchronous_metrics where metric='Uptime' | |
| DistributedFilesToInsert should not be always increasing | select value from system.metrics where metric='DistributedFilesToInsert' | Medium |
| A data part was lost | select value from system.events where event='ReplicatedDataLoss' | High |
| Data parts are not the same on different replicas | select value from system.events where event='DataAfterMergeDiffersFromReplica'; select value from system.events where event='DataAfterMutationDiffersFromReplica' |
Medium |
External Monitoring References
Configuration steps
Use ansible/puppet/salt or other system to control servers configuration.
-
Configure ClickHouse access to zookeeper by putting file
zookeeper.xmlin/etc/clickhouse-server/config.d/folder. This file must be placed on all ClickHouse servers.<yandex> <zookeeper> <node> <host>zookeeper1</host> <port>2181</port> </node> <node> <host>zookeeper2</host> <port>2181</port> </node> <node> <host>zookeeper3</host> <port>2181</port> </node> </zookeeper> </yandex> -
On each server put the file
macros.xmlin/etc/clickhouse-server/config.d/folder.<yandex> <!-- That macros are defined per server, and they can be used in DDL, to make the DB schema cluster/server neutral --> <macros> <cluster>prod_cluster</cluster> <shard>01</shard> <replica>clickhouse-sh1r1</replica> <!-- better - use the same as hostname --> </macros> </yandex> -
On each server place the file
cluster.xmlin/etc/clickhouse-server/config.d/folder.</yandex> <remote_servers> <prod_cluster> <!-- you need to give a some name for a cluster --> <shard> <internal_replication>true</internal_replication> <replica> <host>clickhouse-sh1r1</host> <port>9000</port> </replica> <replica> <host>clickhouse-sh1r2</host> <port>9000</port> </replica> </shard> <shard> <internal_replication>true</internal_replication> <replica> <host>clickhouse-sh2r1</host> <port>9000</port> </replica> <replica> <host>clickhouse-sh2r2</host> <port>9000</port> </replica> </shard> <shard> <internal_replication>true</internal_replication> <replica> <host>clickhouse-sh3r1</host> <port>9000</port> </replica> <replica> <host>clickhouse-sh3r2</host> <port>9000</port> </replica> </shard> </prod_cluster> </remote_servers> <yandex> -
Create 2 extra cluster configurations with the following modified SQL query:
- cluster
- cluster_all_nodes_as_shards
- clusters_all_nodes_as_replicas
Once this is complete, other queries that span nodes can be performed. For example:
CREATE TABLE test_table ON CLUSTER '{cluster}' (id UInt8) Engine=ReplicatedMergeTree('/clickhouse/tables/{database}/{shard}/{table}', '{replica}') ORDER BY (id);
That will create a table on all servers in the cluster. You can insert data into this table and it will be replicated automatically to the other shards.
To store the data or read the data from all shards at the same time, create a Distributed table that links to the replicatedMergeTree table.
Users
Disable or add password for the default users default and readonly if your server is accessible from non-trusted networks.
If you will add password to the default user, you will need to adjust cluster configuration, since the other servers need to know the default user’s should know the default user’s to connect to each other.
If you’re inside a trusted network, you can leave default user set to nothing to allow the ClickHouse nodes to communicate with each other.
Engines & ClickHouse building blocks
For general explanations of roles of different engines - check the post Distributed vs Shard vs Replicated ahhh, help me!!!.
Zookeeper Paths
Warning
Looks like this was a planned section but we don’t have any detail yet?Use some convention for zookeeper paths. …
SELECT * FROM system.zookeeper WHERE path='/ ...';
Configuration Best Practices
Attribution
Modified by a post on GitHub by Mikhail Filimonov .The following are recommended Best Practices when it comes to setting up a ClickHouse Cluster with Zookeeper:
-
Don’t edit/overwrite default configuration files. Sometimes a newer version of ClickHouse introduces some new settings or changes the defaults in
config.xmlandusers.xml.-
Set configurations via the extra files in
conf.ddirectory. For example, to overwrite the interface save the fileconf.d/listen.xml, with the following:<?xml version="1.0"?> <yandex> <listen_host replace="replace">::</listen_host> </yandex> -
The same is true for users. For example, change the default profile by putting the file in
users.d/profile_default.xml:
<?xml version="1.0"?> <yandex> <profiles> <default replace="replace"> <max_memory_usage>15000000000</max_memory_usage> <max_bytes_before_external_group_by>12000000000</max_bytes_before_external_group_by> <max_bytes_before_external_sort>12000000000</max_bytes_before_external_sort> <distributed_aggregation_memory_efficient>1</distributed_aggregation_memory_efficient> <use_uncompressed_cache>0</use_uncompressed_cache> <load_balancing>random</load_balancing> <log_queries>1</log_queries> <max_execution_time>600</max_execution_time> </default> </profiles> </yandex>- Or you can create a user by putting a file
users.d/user_xxx.xml:
<?xml version="1.0"?> <yandex> <users> <xxx> <!-- PASSWORD=$(base64 < /dev/urandom | head -c8); echo "$PASSWORD"; echo -n "$PASSWORD" | sha256sum | tr -d '-' --> <password_sha256_hex>...</password_sha256_hex> <networks incl="networks" /> <profile>readonly</profile> <quota>default</quota> <allow_databases incl="allowed_databases" /> </xxx> </users> </yandex>-
Some parts of configuratuion will contain repeated elements (like allowed ips for all the users). To avoid repeating that - use substitutions file. By default its /etc/metrika.xml, but you can change it for example to /etc/clickhouse-server/substitutions.xml (<include_from> section of main config). Put that repeated parts into substitutions file, like this:
<?xml version="1.0"?>
<yandex>
    <networks>
        <ip>::1</ip>
        <ip>127.0.0.1</ip>
        <ip>10.42.0.0/16</ip>
        <ip>192.168.0.0/24</ip>
    </networks>

<clickhouse_remote_servers>
<!-- cluster definition -->
    </clickhouse_remote_servers>

    <zookeeper-servers>
        <node>
            <host>zookeeper1</host>
            <port>2181</port>
        </node>
        <node>
            <host>zookeeper2</host>
            <port>2181</port>
        </node>
        <node>
            <host>zookeeper3</host>
            <port>2181</port>
        </node>
    </zookeeper-servers>

    <clickhouse_compression></clickhouse_compression>
</yandex>
-
These files can be common for all the servers inside the cluster or can be individualized per server. If you choose to use one substitutions file per cluster, not per node, you will also need to generate the file with macros, if macros are used.
This way you have full flexibility; you’re not limited to the settings described in template. You can change any settings per server or data center just by assigning files with some settings to that server or server group. It becomes easy to navigate, edit, and assign files.
Other Configuration Recommendations
Other configurations that should be evaluated:
<listen>inconfig.xml: Determines which IP addresses and ports the ClickHouse servers listen for incoming communications.<max_memory_..>and<max_bytes_before_external_...>inusers.xml. These are part of the profile<default>.<max_execution_time><log_queries>
The following extra debug logs should be considered:
- part_log
- text_log
Understanding The Configuration
ClickHouse configuration stores most of its information in two files:
config.xml: Stores Server configuration parameters. They are server wide, some are hierarchial , and most of them can’t be changed in runtime. Only 3 sections will be applied w/o restart:- macros
- remote_servers
- logging level
users.xml: Configure users, and user level / session level settings.- Each user can change these during their session by:
- Using parameter in http query
- By using parameter for
clickhouse-client - Sending query like
set allow_experimental_data_skipping_indices=1.
- Those settings and their current values are visible in
system.settings. You can make some settings global by editing default profile inusers.xml, which does not need restart. - You can forbid users to change their settings by using
readonly=2for that user, or using setting constraints. - Changes in
users.xmlare applied w/o restart.
- Each user can change these during their session by:
For both config.xml and users.xml, it’s preferable to put adjustments in the config.d and users.d subfolders instead of editing config.xml and users.xml directly.
Warning
Reread by what? By what I’m confused!You can check if config file was reread by
Backups
ClickHouse is currently at the design stage of creating some universal backup solution. Some custom backup strategies are:
-
Each shard is backed up separately.
-
FREEZE the table/partition. For more information, see Alter Freeze Partition.
- This creates hard links in shadow subdirectory.
-
rsyncthat directory to a backup location, then remove that subfolder from shadow.- Cloud users are recommended to use Rclone.
-
Always add the full contents of metadata subfolder contain the current DB schema and clickhouse configs to your backup.
-
For a second replica, it’s enough to copy metadata & config.
This implementation follows a similar approach by clickhouse-backup.
We have not used this tool on production systems, and can make no recommendations for or against it. As of this time
clickhouse-backupis not a complete backup solution, but it does simply some parts of the backup process. -
Don’t try to compress backups; the data is already compressed in ClickHouse.
-
One other option is an extra passive replica. This is not recommended in the cases of power user issues.
Staging
Warning
Nothing really here - recommend we leave it out.Setup a staging environment.
Version Upgrades
Update itself is simple: update packages, restart clickhouse-server service afterwards.
- Check if the version you want to upgrade to is stable. We highly recommend the Altinity ClickHouse Stable Releases.
- Review the changelog to ensure that no configuration changes are needed.
- Update staging and test to verify all systems are working.
- Prepare and test downgrade procedures so the server can be returned to the previous version if necessary.
- Start with a “canary” update. This is one replica with one shard that is upgraded to make sure that the procedure works.
- Test and verify that everything works properly. Check for any errors in the log files.
- If everything is working well, update rest of the cluster.
For small clusters, the BlueGreenDeployment technique is also a good option.
FAQ
How Do I Restrict Memory Usage?
See max_memory_usage for more information.
ClickHouse died during big query execution
Warning
???oomkiller
How Do I Limit Memory Usage On Group By?
See max_bytes_before_external_group_by.
Data returned in blocks in clickhouse-client
Warning
???format PrettyCompact + multithreading & streaming.
Either other format PrettyCompactMonoBlock either finish with one stream (for example by adding order by).
I Can’t Connect From Other Hosts
Check the <listen> settings in config.xml. Verify that the connection can connect on both IPV4 and IPV6.
Does clickhouse have stored procedures / UDF?
Not as of this time. PR can be sent with needed functionality.
How do I Store IPv4 and IPv6 Address In One Field?
There is a clean and simple solution for that. Any IPv4 has it’s unique IPv6 mapping:
- IPv4 IP address: 191.239.213.197
- IPv4-mapped IPv6 address: ::ffff:191.239.213.197
Eventual consistency & atomic insert
Warning
???sequential = insert_quorum (no concurrent inserts currently :\ ) + select_sequential_consistency
How Do I Simulate Window Functions Using Arrays?
- Group with
groupArray. - Calculate the needed metrics.
- Ungroup back using array
join.
How to avoid bugs
ClickHouse is quite young product, but has already thousands of features and development process goes in a very high pace. All core features are well tested, and very stable.
Historically for all projects, new features can be less stable. Usually these are adopted by the community and stabilize quickly. And And of course all possible combinations of features just physically can’t be tested.
We recommend the following practices:
- Check all the changes on the staging first, especially if some new features are used.
- Check latest stable or test versions of ClickHouse on your staging environment regularly and pass the feedback to us or on the official ClickHouse github.
- Ask for known issues report before updating production.
- For production, versions with the 3rd digit should be as high as possible indicating they are the most recent big fix Release ID. For example, version 20.3.5:
20is the year of release.3indicates a Feature Release. This is an increment where features are delivered.5is the bug fix Release Id. New Feature Releases typically have a 1 in the Release Id section and potentially more undiscovered bugs.
2 - Security
Security settings and best practices for ClickHouse
ClickHouse is known for its ability to scale with clusters, handle terabytes to petabytes of data, and return query results fast. It also has a plethora of built in security options and features that help keep that data safe from unauthorized users.
Hardening your individual ClickHouse system will depend on the situation, but the following processes are generally applicable in any environment. Each of these can be handled separately, and do not require being performed in any particular order.
Here are our recommended hardening procedures for your ClickHouse cluster:
- Network Hardening - Secure network communications with ClickHouse
- Storage Hardening - Secure data stored for ClickHouse
- User Hardening - User hardening security procedures
Network Hardening
Hardening the network communications for your ClickHouse environment is about reducing exposure of someone listening in on traffic and using that against you. Network hardening falls under the following major steps:
IMPORTANT NOTE: Configuration settings can be stored in the default /etc/clickhouse-server/config.xml file. However, this file can be overwritten during vendor upgrades. To preserve configuration settings it is recommended to store them in /etc/clickhouse-server/config.d as separate XML files with the same root element, typically <yandex>. For this guide, we will only refer to the configuration files in /etc/clickhouse-server/config.d for configuration settings.
Reduce Exposure
It’s easier to prevent entry into your system when there’s less points of access, so unused ports should be disabled.
ClickHouse has native support for MySQL client, PostgreSQL clients, and others. The enabled ports are set in the /etc/clickhouse-server/config.d files.
To reduce exposure to your ClickHouse environment:
-
Review which ports are required for communication. A complete list of the ports and configurations can be found on the ClickHouse documentation site for Server Settings.
-
Comment out any ports not required in the configuration files. For example, if there’s no need for the MySQL client port, then it can be commented out:
<!-- <mysql_port>9004</mysql_port> -->
Enable TLS
ClickHouse allows for both encrypted and unencrypted network communications. To harden network communications, unencrypted ports should be disabled and TLS enabled.
TLS encryption required a Certificate, and whether to use a public or private Certificate Authority (CA) is based on your needs.
- Public CA: Recommended for external services or connections where you can not control where they will be connecting from.
- Private CA: Best used when the ClickHouse services are internal only and you can control where hosts are connecting from.
- Self-signed certificate: Only recommended for testing environments.
Whichever method is used, the following files will be required to enable TLS with CLickHouse:
- Server X509 Certificate: Default name
server.crt - Private Key: Default name
server.key - Diffie-Hellman parameters: Default name
dhparam.pem
Generate Files
No matter which approach is used, the Private Key and the Diffie-Hellman parameters file will be required. These instructions may need to be modified based on the Certificate Authority used to match its requirements. The instructions below require the use of openssl, and was tested against version OpenSSL 1.1.1j.
-
Generate the private key, and enter the pass phrase when required:
openssl genrsa -aes256 -out server.key 2048 -
Generate
dhparam.pemto create a 4096 encrypted file. This will take some time but only has to be done once:openssl dhparam -out dhparam.pem 4096 -
Create the Certificate Signing Request (CSR) from the generated private key. Complete the requested information such as Country, etc.
openssl req -new -key server.key -out server.csr -
Store the files
server.key,server.csr, anddhparam.pemin a secure location, typically/etc/clickhouse-server/.
Public CA
Retrieving the certificates from a Public CA or Internal CA performed by registering with a Public CA such as Let’s Encrypt or Verisign or with an internal organizational CA service. This process involves:
- Submit the CSR to the CA. The CA will sign the certificate and return it, typically as the file
server.crt. - Store the file
server.crtin a secure location, typically/etc/clickhouse-server/.
Create a Private CA
If you do not have an internal CA or do not need a Public CA, a private CA can be generated through the following process:
-
Create the Certificate Private Key:
openssl genrsa -aes256 -out internalCA.key 2048 -
Create the self-signed root certificate from the certificate key:
openssl req -new -x509 -days 3650 -key internalCA.key \ -sha256 -extensions v3_ca -out internalCA.crt -
Store the Certificate Private Key and the self-signed root certificate in a secure location.
-
Sign the
server.csrfile with the self-signed root certificate:openssl x509 -sha256 -req -in server.csr -CA internalCA.crt \ -CAkey internalCA.key -CAcreateserial -out server.crt -days 365 -
Store the file
server.crt, typically/etc/clickhouse-server/.
Self Signed Certificate
To skip right to making a self-signed certificate, follow these instructions.
- IMPORTANT NOTE: This is not recommended for production systems, only for testing environments.
-
With the
server.keyfile from previous steps, create the self-signed certificate. Replacemy.host.namewith the actual host name used:openssl req -subj "/CN=my.host.name" -new -key server.key -out server.crt -
Store the file
server.crt, typically/etc/clickhouse-server/. -
Each
clickhouse-clientuser that connects to the server with the self-signed certificate will have to allowinvalidCertificateHandlerby updating theirclickhouse-clientconfiguration files at/etc/clickhouse-server/config.d:<config> <openSSL> <client> ... <invalidCertificateHandler> <name>AcceptCertificateHandler</name> </invalidCertificateHandler> </client> </openSSL>
Enable TLS in ClickHouse
Once the files server.crt, server.crt, and dhparam.dem have been generated and stored appropriately, update the ClickHouse Server configuration files located at /etc/clickhouse-server/config.d.
To enable TLS and disable unencrypted ports:
-
Review the
/etc/clickhouse-server/config.dfiles. Comment out unencrypted ports, includinghttp_portandtcp_port:<!-- <http_port>8123</http_port> --> <!-- <tcp_port>9000</tcp_port> --> -
Enable encrypted ports. A complete list of ports and settings is available on the ClickHouse documentation site for Server Settings. For example:
<https_port>8443</https_port> <tcp_port_secure>9440</tcp_port_secure> -
Specify the certificate files to use:
<openSSL>
    <server>
        <!-- Used for https server AND secure tcp port -->
        <certificateFile>/etc/clickhouse-server/server.crt</certificateFile>
        <privateKeyFile>/etc/clickhouse-server/server.key</privateKeyFile>
        <dhParamsFile>/etc/clickhouse-server/dhparams.pem</dhParamsFile>
        ...
    </server>
...
</openSSL>
Encrypt Cluster Communications
If your organization runs ClickHouse as a cluster, then cluster-to-cluster communications should be encrypted. This includes distributed queries and interservice replication. To harden cluster communications:
-
Create a user for distributed queries. This user should only be able to connect within the cluster, so restrict it’s IP access to only the subnet or host names used for the network. For example, if the cluster is entirely contained in a subdomain named
logos1,logos2, etc. This internal user be set with or without a password:CREATE USER IF NOT EXISTS internal ON CLUSTER 'my_cluster' IDENTIFIED WITH NO_PASSWORD HOST REGEXP '^logos[1234]$' -
Enable TLS for interservice replication and comment out the unencrypted interserver port by updating the
/etc/clickhouse-server/config.dfiles:<!-- <interserver_http_port>9009</interserver_http_port> --> <interserver_https_port>9010</interserver_https_port> --> -
Set an the
interserver_http_credentialsin the/etc/clickhouse-server/config.dfiles, and include the internal username and password:<interserver_http_credentials> <user>internal</user> <password></password> </interserver_http_credentials> -
Enable TLS for distributed queries by editing the file
/etc/clickhouse-server/config.d/remote_servers.xml- For ClickHouse 20.10 and later versions, set a shared secret text and setting the port to secure for each shard:
<remote_servers> <my_cluster> <secret>shared secret text</secret> <!-- Update here --> <shard> <internal_replication>true</internal_replication> <replica> <host>logos1</host> <!-- Update here --> <port>9440</port> <!-- Secure Port --> <secure>1</secure> <!-- Update here, sets port to secure --> </replica> </shard> ...- For previous versions of ClickHouse, set the internal user and enable secure communication:
<remote_servers>
    <my_cluster>
        <shard>
            <internal_replication>true</internal_replication>
            <replica>
                <host>logos1</host> <!-- Update here -->
                <port>9440</port> <!-- Secure Port -->
                <secure>1</secure> <!-- Update here -->
                <user>internal</port> <!-- Update here -->
            </replica>
        ...
        </shard>
...
Storage Hardening
ClickHouse data is ultimately stored on file systems. Keeping that data protected when it is being used or “at rest” is necessary to prevent unauthorized entities from accessing your organization’s private information.
Hardening stored ClickHouse data is split into the following categories:
IMPORTANT NOTE: Configuration settings can be stored in the default /etc/clickhouse-server/config.xml file. However, this file can be overwritten during vendor upgrades. To preserve configuration settings it is recommended to store them in /etc/clickhouse-server/config.d as separate XML files with the same root element, typically <yandex>. For this guide, we will only refer to the configuration files in /etc/clickhouse-server/config.d for configuration settings.
Host-Level Security
The file level security for the files that ClickHouse uses to run should be restricted as much as possible.
- ClickHouse does not require
rootaccess to the file system, and runs by default as the userclickhouse. - The following directories should be restricted to the minimum number of users:
/etc/clickhouse-server: Used for ClickHouse settings and account credentials created by default./var/lib/clickhouse: Used for ClickHouse data and new credentials./var/log/clickhouse-server: Log files that may display privileged information through queries. See Log File Protection for more information.
Volume Level Encryption
Encrypting data on the file system prevents unauthorized users who may have gained access to the file system that your ClickHouse database is stored on from being able to access the data itself. Depending on your environment, different encryption options may be required.
Cloud Storage
If your ClickHouse database is stored in a cloud service such as AWS or Azure, verify that the cloud supports encrypting the volume. For example, Amazon AWS provides a method to encrypt new Amazon EBS volumes by default.
The Altinity.Cloud service provides the ability to set the Volume Type to gp2-encrypted.
Local Storage
Organizations that host ClickHouse clusters on their own managed systems, LUKS is a recommended solution. Instructions for Linux distributions including Red Hat and Ubuntu are available. Check with the distribution your organization for instructions on how to encrypt those volumes.
Kubernetes Encryption
If your ClickHouse cluster is managed by Kubernetes, the StorageClass used may be encrypted. For more information, see the Kubernetes Storage Class documentation.
Column Level Encryption
Organizations running ClickHouse 20.11 or later can encrypt individual columns with AES functions. For full information, see the ClickHouse.tech Encryption functions documentation.
Applications are responsible for their own keys. Before enabling column level encryption, test to verify that encryption does not negatively impact performance.
The following functions are available:
| Function | MySQL AES Compatible |
|---|---|
| encrypt(mode, plaintext, key, [iv, aad]) | |
| decrypt(mode, ciphertext, key, [iv, aad]) | |
| aes_encrypt_mysql(mode, plaintext, key, [iv]) | * |
| aes_decrypt_mysql(mode, ciphertext, key, [iv]) | * |
Encryption function arguments:
| Argument | Description | Type |
|---|---|---|
| mode | Encryption mode. | String |
| plaintext | Text that need to be encrypted. | String |
| key | Encryption key. | String |
| iv | Initialization vector. Required for -gcm modes, optional for others. | String |
| aad | Additional authenticated data. It isn’t encrypted, but it affects decryption. Works only in -gcm modes, for others would throw an exception | String |
Column Encryption Examples
This example displays how to encrypt information using a hashed key.
- Takes a hex value, unhexes it and stores it as
key. - Select the value and encrypt it with the
key, then displays the encrypted value.
 WITH unhex('658bb26de6f8a069a3520293a572078f') AS key
SELECT hex(encrypt('aes-128-cbc', 'Hello world', key)) AS encrypted
┌─encrypted────────────────────────┐
│ 46924AC12F4915F2EEF3170B81A1167E │
└──────────────────────────────────┘
This shows how to decrypt encrypted data:
- Takes a hex value, unhexes it and stores it as
key. - Decrypts the selected value with the
keyas text.
WITH unhex('658bb26de6f8a069a3520293a572078f') AS key SELECT decrypt('aes-128-cbc',
  unhex('46924AC12F4915F2EEF3170B81A1167E'), key) AS plaintext
┌─plaintext───┐
│ Hello world │
└─────────────┘
Log File Protection
The great thing about log files is they show what happened. The problem is when they show what happened, like the encryption key used to encrypt or decrypt data:
2021.01.26 19:11:23.526691 [ 1652 ] {4e196dfa-dd65-4cba-983b-d6bb2c3df7c8}
<Debug> executeQuery: (from [::ffff:127.0.0.1]:54536, using production
parser) WITH unhex('658bb26de6f8a069a3520293a572078f') AS key SELECT
decrypt(???), key) AS plaintext
These queries can be hidden through query masking rules, applying regular expressions to replace commands as required. For more information, see the ClickHouse.tech Server Settings documentation.
To prevent certain queries from appearing in log files or to hide sensitive information:
- Update the configuration files, located by default in
/etc/clickhouse-server/config.d. - Add the element
query_masking_rules. 3/ Set eachrulewith the following:name: The name of the rule.regexp: The regular expression to search for.replace: The replacement value that matches the rule’s regular expression.
For example, the following will hide encryption and decryption functions in the log file:
 <query_masking_rules>
    <rule>
        <name>hide encrypt/decrypt arguments</name>
        <regexp>
           ((?:aes_)?(?:encrypt|decrypt)(?:_mysql)?)\s*\(\s*(?:'(?:\\'|.)+'|.*?)\s*\)
        </regexp>
        <!-- or more secure, but also more invasive:
            (aes_\w+)\s*\(.*\)
        -->
        <replace>\1(???)</replace>
    </rule>
</query_masking_rules>
User Hardening
Increasing ClickHouse security at the user level involves the following major steps:
- User Configuration: Setup secure default users, roles and permissions through configuration or SQL.
- User Network Settings: Limit communications by hostname or IP address
- Secure Password: Store user information as hashed values.
- Set Quotas: Limit how many resources users can use in given intervals.
- Use Profiles: Use profiles to set common security settings across multiple accounts.
- Database Restrictions: Narrow the databases, tables and rows that a user can access.
- Enable Remote Authentication: Enable LDAP authentication or Kerberos authentication to prevent storing hashed password information, and enforce password standards.
IMPORTANT NOTE: Configuration settings can be stored in the default /etc/clickhouse-server/config.xml file. However, this file can be overwritten during vendor upgrades. To preserve configuration settings it is recommended to store them in /etc/clickhouse-server/config.d as separate XML files.
User Configuration
The hardening steps to apply to users are:
- Restrict user access only to the specific host names or IP addresses when possible.
- Store all passwords in SHA256 format.
- Set quotas on user resources for users when possible.
- Use profiles to set similar properties across multiple users, and restrict user to the lowest resources required.
- Offload user authentication through LDAP or Kerberos.
Users can be configured through the XML based settings files, or through SQL based commands.
Detailed information on ClickHouse user configurations can be found on the ClickHouse.Tech documentation site for User Settings.
User XML Settings
Users are listed under the user.xml file under the users element. Each element under users is created as a separate user.
It is recommended that when creating users, rather than lumping them all into the user.xml file is to place them as separate XML files under the directory users.d, typically located in /etc/clickhouse-server/users.d/.
Note that if your ClickHouse environment is to be run as a cluster, then user configuration files must be replicated on each node with the relevant users information. We will discuss how to offload some settings into other systems such as LDAP later in the document.
Also note that ClickHouse user names are case sensitive: John is different than john. See the ClickHouse.tech documentation site for full details.
- IMPORTANT NOTE: If no user name is specified when a user attempts to login, then the account named
defaultwill be used.
For example, the following section will create two users:
- clickhouse_operator: This user has the password
clickhouse_operator_passwordstored in a sha256 hash, is assigned the profileclickhouse_operator, and can access the ClickHouse database from any network host. - John: This user can only access the database from
localhost, has a basic password ofJohnand is assigned to thedefaultprofile.
<users>
    <clickhouse_operator>
        <networks>
            <ip>127.0.0.1</ip>
            <ip>0.0.0.0/0</ip>
            <ip>::/0</ip>
        </networks>
        <password_sha256_hex>716b36073a90c6fe1d445ac1af85f4777c5b7a155cea359961826a030513e448</password_sha256_hex>
        <profile>clickhouse_operator</profile>
        <quota>default</quota>
    </clickhouse_operator>
    <John>
        <networks>
            <ip>127.0.0.1</ip>
        </networks>
        <password_sha456_hex>73d1b1b1bc1dabfb97f216d897b7968e44b06457920f00f2dc6c1ed3be25ad4c</password_sha256_hex>
        <profile>default</profile>
    </John>
</users>
User SQL Settings
ClickHouse users can be managed by SQL commands from within ClickHouse. For complete details, see the Clickhouse.tech User Account page.
Access management must be enabled at the user level with the access_management setting. In this example, Access Management is enabled for the user John:
<users>
    <John>
       <access_management>1</access_management>
    </John>
</users>
The typical process for DCL(Data Control Language) queries is to have one user enabled with access_management, then have the other accounts generated through queries. See the ClickHouse.tech Access Control and Account Management page for more details.
Once enabled, Access Management settings can be managed through SQL queries. For example, to create a new user called newJohn with their password set as a sha256 hash and restricted to a specific IP address subnet, the following SQL command can be used:
CREATE USER IF NOT EXISTS newJohn
  IDENTIFIED WITH SHA256_PASSWORD BY 'secret'
  HOST IP '192.168.128.1/24' SETTINGS readonly=1;
Access Management through SQL commands includes the ability to:
- Set roles
- Apply policies to users
- Set user quotas
- Restrict user access to databases, tables, or specific rows within tables.
User Network Settings
Users can have their access to the ClickHouse environment restricted by the network they are accessing the network from. Users can be restricted to only connect from:
- IP: IP address or netmask.
- For all IP addresses, use
0.0.0.0/0for IPv4,::/0for IPv6
- For all IP addresses, use
- Host: The DNS resolved hostname the user is connecting from.
- Host Regexp (Regular Expression): A regular expression of the hostname.
Accounts should be restricted to the networks that they connect from when possible.
User Network SQL Settings
User access from specific networks can be set through SQL commands. For complete details, see the Clickhouse.tech Create User page.
Network access is controlled through the HOST option when creating or altering users. Host options include:
- ANY (default): Users can connect from any location
- LOCAL: Users can only connect locally.
- IP: A specific IP address or subnet.
- NAME: A specific FQDN (Fully Qualified Domain Name)
- REGEX: Filters hosts that match a regular expression.
- LIKE: Filters hosts by the LIKE operator.
For example, to restrict the user john to only connect from the local subnet of ‘192.168.0.0/16’:
ALTER USER john
  HOST IP '192.168.0.0/16';
Or to restrict this user to only connecting from the specific host names awesomeplace1.com, awesomeplace2.com, etc:
ALTER USER john
  HOST REGEXP 'awesomeplace[12345].com';
User Network XML Settings
User network settings are stored under the user configuration files /etc/clickhouse-server/config.d with the <networks> element controlling the sources that the user can connect from through the following settings:
<ip>: IP Address or subnet mask.<host>: Hostname.<host_regexp>: Regular expression of the host name.
For example, the following will allow only from localhost:
<networks>
    <ip>127.0.0.1</ip>
</networks>
The following will restrict the user only to the site example.com or from supercool1.com, supercool2.com, etc:
<networks>
    <host>example.com</host>
    <host_regexp>supercool[1234].com</host_regexp>
</networks>
If there are hosts or other settings that are applied across multiple accounts, one option is to use the Substitution feature as detailed in the ClickHouse.tech Configuration Files page. For example, in the /etc/metrika.xml. file used for substitutions, a local_networks element can be made:
<local_networks>
    <ip>192.168.1.0/24</ip>
</local_networks>
This can then be applied to a one or more users with the incl attribute when specifying their network access:
<networks incl="local_networks" replace="replace">
</networks>
Secure Password
Passwords can be stored in plaintext or SHA256 (hex format).
SHA256 format passwords are labeled with the <password_sha256_hex> element. SHA256 password can be generated through the following command:
echo -n "secret" | sha256sum | tr -d '-'
OR:
echo -n "secret" | shasum -a 256 | tr -d '-'
- IMPORTANT NOTE: The -n option removes the newline from the output.
For example:
echo -n "clickhouse_operator_password" | shasum -a 256 | tr -d '-'
716b36073a90c6fe1d445ac1af85f4777c5b7a155cea359961826a030513e448
Secure Password SQL Settings
Passwords can be set when using the CREATE USER OR ALTER USER with the IDENTIFIED WITH option. For complete details, see the ClickHouse.tech Create User page. The following secure password options are available:
- sha256password BY ‘STRING’: Converts the submitted STRING value to sha256 hash.
- sha256_hash BY ‘HASH’ (best option): Stores the submitted HASH directly as the sha256 hash password value.
- double_sha1_password BY ‘STRING’ (only used when allowing logins through mysql_port): Converts the submitted STRING value to double sha256 hash.
- double_sha1_hash BY ‘HASH’(only used when allowing logins through mysql_port): Stores the submitted HASH directly as the double sha256 hash password value.
For example, to store the sha256 hashed value of “password” for the user John:
ALTER USER John IDENTIFIED WITH sha256_hash BY '5e884898da28047151d0e56f8dc6292773603d0d6aabbdd62a11ef721d1542d8';
Secure Password XML Settings
Passwords can be set as part of the user’s settings in the user configuration files in /etc/clickhouse-server/config.d. For complete details, see the Clickhouse.tech User Settings.
To set a user’s password with a sha256 hash, use the password_sha256_hex branch for the user. For example, to set the sha256 hashed value of “password” for the user John:
<users>
    <John>
        <password_sha256_hex>5e884898da28047151d0e56f8dc6292773603d0d6aabbdd62a11ef721d1542d8</password_sha256_hex>
    </John>
</users>
Set Quotas
Quotas set how many resources can be accessed in a given time, limiting a user’s ability to tie up resources in the system. More details can be found on the ClickHouse.tech Quotas page.
Quota SQL Settings
Quotas can be created or altered through SQL queries, then applied to users.
For more information on ClickHouse quotas, see the ClickHouse.tech Access Control page on Quotas.
Quota XML Settings
These are defined in the users.xml file under the element quotas. Each branch of the quota element is the name of the quota being defined.
Quotas are set by intervals, which can be set to different restrictions. For example, this quota named limited has one interval that sets maximum queries at 1000, and another interval that allows a total of 10000 queries over a 24 hour period.
<quotas>
    <limited>
        <interval>
            <duration>3600</duration>
            <queries>1000</queries>
        </interval>
        <interval>
            <duration>86400</duration>
            <queries>10000</queries>
    </limited>
</quotas>
Use Profiles
Profiles allow settings that can be applied to multiple uses applied with the same name. More details on Settings Profiles are available on the ClickHouse.tech site.
Profile XML Settings
Profiles are applied to a user with the profile element. For example, this assigns the restricted profile to the user John:
<users>
    <John>
        <networks>
            <ip>127.0.0.1</ip>
            <ip>0.0.0.0/0</ip>
            <ip>::/0</ip>
        </networks>
        <password_sha256_hex>716b36073a90c6fe1d445ac1af85f4777c5b7a155cea359961826a030513e448</password_sha256_hex>
        <profile>restricted</profile>
Profiles are set in the users.xml file under the profiles element. Each branch of this element is the name of a profile. The profile restricted shown here only allows for eight threads to be used at a time for users with this profile:
<profiles>
    <restricted>
        <!-- The maximum number of threads when running a single query. -->
        <max_threads>8</max_threads>
    </restricted>
</profiles>
Recommended profile settings include the following:
readonly: This sets the profile to be applied to users but not to be changed.max_execution_time: Limits the amount of time a process will run before being forced to time out.max_bytes_before_external_group_by: Maximum RAM allocated for a singleGROUP BYsort.max_bytes_before_external_sort: Maximum RAM allocated for sort commands.
Database Restrictions
Restrict users to the databases they need, and when possible only the tables or rows within tables that they require access to.
Full details are found on the ClickHouse.tech User Settings documentation.
Database Restrictions XML Settings
To restrict a user’s access by data in the XML file:
- Update user configuration files in
/etc/clickhouse-server/config.dor update their permissions through SQL queries. - For each user to update:
- Add the
<databases>element with the following branches:- The name of the database to allow access to.
- Within the database, the table names allowed to the user.
- Within the table, add a
<filter>to match rows that fit the filter.
- Add the
Database Restrictions XML Settings Example
The following restricts the user John to only access the database sales, and from there only the table marked clients where salesman = 'John':
<John>
    <databases>
        <sales>
            <clients>
                <filter>salesman = 'John'</filter>
            </clients>
        </sales>
    </databases>
</John>
Enable Remote Authentication
One issue with user settings is that in a cluster environment, each node requires a separate copy of the user configuration files, which includes a copy of the sha256 encrypted password.
One method of reducing the exposure of user passwords, even in a hashed format in a restricted section of the file system, it to use external authentication sources. This prevents password data from being stored in local file systems and allows changes to user authentication to be managed from one source.
Enable LDAP
LDAP servers are defined in the ClickHouse configuration settings such as /etc/clickhouse-server/config.d/ldap.xml. For more details, see the ClickHouse.tech site on Server Configuration settings.
Enabling LDAP server support in ClickHouse allows you to have one authority on login credentials, set password policies, and other essential security considerations through your LDAP server. It also prevents password information being stored on your ClickHouse servers or cluster nodes, even in a SHA256 hashed form.
To add one or more LDAP servers to your ClickHouse environment, each node will require the ldap settings:
<ldap>
    <server>ldapserver_hostname</server>
        <roles>
            <my_local_role1 />
            <my_local_role2 />
        </roles>
</ldap>
When creating users, specify the ldap server for the user:
create user if not exists newUser
    identified with ldap by 'ldapserver_hostname'
    host any;
When the user attempts to authenticate to ClickHouse, their credentials will be verified against the LDAP server specified from the configuration files.
3 - Care and Feeding of Zookeeper with ClickHouse
Installing, configuring, and recovering Zookeeper
ZooKeeper is required for ClickHouse cluster replication. Keeping ZooKeeper properly maintained and fed provides the best performance and reduces the likelihood that your ZooKeeper nodes will become “sick”.
Elements of this guide can also be found on the ClickHouse on Kubernetes Quick Start guide, which details how to use Kubernetes and ZooKeeper with the clickhouse-operator.
3.1 - ZooKeeper Installation and Configuration
How to configure Zookeeper to work best with ClickHouse
Prepare and Start ZooKeeper
Preparation
Before beginning, determine whether ZooKeeper will run in standalone or replicated mode.
- Standalone mode: One zookeeper server to service the entire ClickHouse cluster. Best for evaluation, development, and testing.
- Should never be used for production environments.
- Replicated mode: Multiple zookeeper servers in a group called an ensemble. Replicated mode is recommended for production systems.
- A minimum of 3 zookeeper servers are required.
- 3 servers is the optimal setup that functions even with heavily loaded systems with proper tuning.
- 5 servers is less likely to lose quorum entirely, but also results in longer quorum acquisition times.
- Additional servers can be added, but should always be an odd number of servers.
Precautions
The following practices should be avoided:
- Never deploy even numbers of ZooKeeper servers in an ensemble.
- Do not install ZooKeeper on ClickHouse nodes.
- Do not share ZooKeeper with other applications like Kafka.
- Place the ZooKeeper
dataDirandlogDiron fast storage that will not be used for anything else.
Applications to Install
Install the following applications in your servers:
zookeeper(3.4.9 or later)netcat
Configure ZooKeeper
-
/etc/zookeeper/conf/myidThe
myidfile consists of a single line containing only the text of that machine’s id. Somyidof server 1 would contain the text “1” and nothing else. The id must be unique within the ensemble and should have a value between 1 and 255. -
/etc/zookeeper/conf/zoo.cfgEvery machine that is part of the ZooKeeper ensemble should know about every other machine in the ensemble. You accomplish this with a series of lines of the form server.id=host:port:port
# specify all zookeeper servers
# The first port is used by followers to connect to the leader
# The second one is used for leader election
server.1=zookeeper1:2888:3888
server.2=zookeeper2:2888:3888
server.3=zookeeper3:2888:3888
These lines must be the same on every ZooKeeper node
-
/etc/zookeeper/conf/zoo.cfgThis setting MUST be added on every ZooKeeper node:
# The time interval in hours for which the purge task has to be triggered.
# Set to a positive integer (1 and above) to enable the auto purging. Defaults to 0.
autopurge.purgeInterval=1
autopurge.snapRetainCount=5
Install Zookeeper
Depending on your environment, follow the Apache Zookeeper Getting Started guide, or the Zookeeper Administrator's Guide.
Start ZooKeeper
Depending on your installation, start ZooKeeper with the following command:
sudo -u zookeeper /usr/share/zookeeper/bin/zkServer.sh
Verify ZooKeeper is Running
Use the following commands to verify ZooKeeper is available:
echo ruok | nc localhost 2181
echo mntr | nc localhost 2181
echo stat | nc localhost 2181
Check the following files and directories to verify ZooKeeper is running and making updates:
- Logs:
/var/log/zookeeper/zookeeper.log - Snapshots:
/var/lib/zookeeper/version-2/
Connect to ZooKeeper
From the localhost, connect to ZooKeeper with the following command to verify access (replace the IP address with your Zookeeper server):
bin/zkCli.sh -server 127.0.0.1:2181
Tune ZooKeeper
The following optional settings can be used depending on your requirements.
Improve Node Communication Reliability
The following settings can be used to improve node communication reliability:
/etc/zookeeper/conf/zoo.cfg
# The number of ticks that the initial synchronization phase can take
initLimit=10
# The number of ticks that can pass between sending a request and getting an acknowledgement
syncLimit=5
Reduce Snapshots
The following settings will create fewer snapshots which may reduce system requirements.
/etc/zookeeper/conf/zoo.cfg
# To avoid seeks ZooKeeper allocates space in the transaction log file in blocks of preAllocSize kilobytes.
# The default block size is 64M. One reason for changing the size of the blocks is to reduce the block size
# if snapshots are taken more often. (Also, see snapCount).
preAllocSize=65536
# ZooKeeper logs transactions to a transaction log. After snapCount transactions are written to a log file a
# snapshot is started and a new transaction log file is started. The default snapCount is 10,000.
snapCount=10000
Documentation
- ZooKeeper Getting Started Guide
- ClickHouse Zookeeper Recommendations
- Running ZooKeeper in Production
Configuring ClickHouse to use ZooKeeper
Once ZooKeeper has been installed and configured, ClickHouse can be modified to use ZooKeeper. After the following steps are completed, a restart of ClickHouse will be required.
To configure ClickHouse to use ZooKeeper, follow the steps shown below. The recommended settings are located on ClickHouse.tech zookeeper server settings.
-
Create a configuration file with the list of ZooKeeper nodes. Best practice is to put the file in
/etc/clickhouse-server/config.d/zookeeper.xml.<yandex> <zookeeper> <node> <host>example1</host> <port>2181</port> </node> <node> <host>example2</host> <port>2181</port> </node> <session_timeout_ms>30000</session_timeout_ms> <operation_timeout_ms>10000</operation_timeout_ms> <!-- Optional. Chroot suffix. Should exist. --> <root>/path/to/zookeeper/node</root> <!-- Optional. ZooKeeper digest ACL string. --> <identity>user:password</identity> </zookeeper> </yandex> -
Check the
distributed_ddlparameter inconfig.xml. This parameter can be defined in another configuration file, and can change the path to any value that you like. If you have several ClickHouse clusters using the same zookeeper,distributed_ddlpath should be unique for every ClickHouse cluster setup.<!-- Allow to execute distributed DDL queries (CREATE, DROP, ALTER, RENAME) on cluster. --> <!-- Works only if ZooKeeper is enabled. Comment it out if such functionality isn't required. --> <distributed_ddl> <!-- Path in ZooKeeper to queue with DDL queries --> <path>/clickhouse/task_queue/ddl</path> <!-- Settings from this profile will be used to execute DDL queries --> <!-- <profile>default</profile> --> </distributed_ddl> -
Check
/etc/clickhouse-server/preprocessed/config.xml. You should see your changes there. -
Restart ClickHouse. Check ClickHouse connection to ZooKeeper detailed in ZooKeeper Monitoring.
Converting Tables to Replicated Tables
Creating a replicated table
Replicated tables use a replicated table engine, for example ReplicatedMergeTree. The following example shows how to create a simple replicated table.
This example assumes that you have defined appropriate macro values for cluster, shard, and replica in macros.xml to enable cluster replication using zookeeper. For details consult the ClickHouse.tech Data Replication guide.
CREATE TABLE test ON CLUSTER '{cluster}'
(
    timestamp DateTime,
    contractid UInt32,
    userid UInt32
) ENGINE = ReplicatedMergeTree('/clickhouse/tables/{cluster}/{shard}/default/test', '{replica}')
PARTITION BY toYYYYMM(timestamp)
ORDER BY (contractid, toDate(timestamp), userid)
SAMPLE BY userid;
The ON CLUSTER clause ensures the table will be created on the nodes of {cluster} (a macro value). This example automatically creates a ZooKeeper path for each replica table that looks like the following:
/clickhouse/tables/{cluster}/{replica}/default/test
becomes:
/clickhouse/tables/c1/0/default/test
You can see ZooKeeper replication data for this node with the following query (updating the path based on your environment):
SELECT *
  FROM system.zookeeper
  WHERE path = '/clickhouse/tables/c1/0/default/test'
Removing a replicated table
To remove a replicated table, use DROP TABLE as shown in the following example. The ON CLUSTER clause ensures the table will be deleted on all nodes. Omit it to delete the table on only a single node.
DROP TABLE test ON CLUSTER '{cluster}';
As each table is deleted the node is removed from replication and the information for the replica is cleaned up. When no more replicas exist, all ZooKeeper data for the table will be cleared.
Cleaning up ZooKeeper data for replicated tables
- IMPORTANT NOTE: Cleaning up ZooKeeper data manually can corrupt replication if you make a mistake. Raise a support ticket and ask for help if you have any doubt concerning the procedure.
New ClickHouse versions now support SYSTEM DROP REPLICA which is an easier command.
For example:
SYSTEM DROP REPLICA 'replica_name' FROM ZKPATH '/path/to/table/in/zk';
ZooKeeper data for the table might not be cleared fully if there is an error when deleting the table, or the table becomes corrupted, or the replica is lost. You can clean up ZooKeeper data in this case manually using the ZooKeeper rmr command. Here is the procedure:
- Login to ZooKeeper server.
- Run
zkCli.shcommand to connect to the server. - Locate the path to be deleted, e.g.:
ls /clickhouse/tables/c1/0/default/test - Remove the path recursively, e.g.,
rmr /clickhouse/tables/c1/0/default/test
3.2 - ZooKeeper Monitoring
Verifying Zookeeper and ClickHouse are working together.
ZooKeeper Monitoring
For organizations that already have Apache ZooKeeper configured either manually, or with a Kubernetes operator such as the clickhouse-operator for Kubernetes, monitoring your ZooKeeper nodes will help you recover from issues before they happen.
Checking ClickHouse connection to ZooKeeper
To check connectivity between ClickHouse and ZooKeeper.
-
Confirm that ClickHouse can connect to ZooKeeper. You should be able to query the
system.zookeepertable, and see the path for distributed DDL created in ZooKeeper through that table. If something went wrong, check the ClickHouse logs.$ clickhouse-client -q "select * from system.zookeeper where path='/clickhouse/task_queue/'" ddl 17183334544 17183334544 2019-02-21 21:18:16 2019-02-21 21:18:16 0 8 0 0 0 8 17183370142 /clickhouse/task_queue/ -
Confirm ZooKeeper accepts connections from ClickHouse. You can also see on ZooKeeper nodes if a connection was established and the IP address of the ClickHouse server in the list of clients:
$ echo stat | nc localhost 2181
ZooKeeper version: 3.4.9-3--1, built on Wed, 23 May 2018 22:34:43 +0200
Clients:
 /10.25.171.52:37384[1](queued=0,recved=1589379,sent=1597897)
 /127.0.0.1:35110[0](queued=0,recved=1,sent=0)
ZooKeeper Monitoring Quick List
The following commands are available to verify ZooKeeper availability and highlight potential issues:
| Check Name | Shell or SQL command | Severity |
|---|---|---|
| ZooKeeper is available | select count() from system.zookeeper where path=’/’ |
Critical for writes |
| ZooKeeper exceptions | select value from system.events where event=‘ZooKeeperHardwareExceptions’ |
Medium |
| Read only tables are unavailable for writes | select value from system.metrics where metric=‘ReadonlyReplica’ |
High |
| A data part was lost | select value from system.events where event=‘ReplicatedDataLoss’ |
High |
| Data parts are not the same on different replicas | select value from system.events where event=‘DataAfterMergeDiffersFromReplica’; |
Medium |
3.3 - ZooKeeper Recovery
How to recover when Zookeeper has issues.
If there are issues with your ZooKeeper environment managing your ClickHouse clusters, the following steps can resolve them. If there are still issues, support is available to current Altinity customers.
Raising a Support Ticket
Altinity accepts support cases from its support partners via the Altinity Zendesk Portal, email, or Slack.
To log a ticket in the support portal:
- Login to https://altinity.zendesk.com using your email address.
- Press the “Add +” button to open a case.
- Enter case topic and details. Please include relevant information such as:
- ClickHouse version
- Error messages
- How to recreate the problem if you know
You can log a ticket by sending the above information to support@altinity.com using your registered email address or to the shared Slack channel if available.
Fault Diagnosis and Remediation
The following procedures can resolve issues.
- IMPORTANT NOTE: Some procedures shown below may have a degree of risk depending on the underlying problem. These procedures are marked with Call Support and include raising a support ticket as the first step.
Restarting a crashed ClickHouse server
ClickHouse servers are managed by systemd and normally restart following a crash. If a server does not restart automatically, follow these steps:
- Access the ClickHouse error log for the failed server at
/var/lib/clickhouse-server/clickhouse-server.err.log. - Examine the last log entry and look for a stack trace showing the cause of the failure.
- If there is a stack trace:
- If the problem is obvious, fix the problem and run
systemctl restart clickhouse-serverto restart. Confirm that the server restarts. - If the problem is not obvious, open an Altinity Support Ticket and provide the error log message.
- If the problem is obvious, fix the problem and run
- If there is no stack trace, ClickHouse may have been terminated by the OOM-killer due to excessive memory usage:
- Open the most recent syslog file at
/var/log/syslog. - Look for OOM-killer messages.
- If found, see Handling out-of-memory errors below.
- If the problem is not obvious, raise a support ticket and provide a description of the problem.
- Open the most recent syslog file at
Replacing a failed cluster node
-
Ensure the old node is truly offline and will not return.
-
Create a new node with the same
macros.xmldefinitions as the previous node. -
If possible use the same hostname as the failed node.
-
Copy the metadata folder from a healthy replica.
-
Set the force_restore_data so that ClickHouse wipes out existing ZooKeeper information for the node and replicates all data:
sudo -u clickhouse touch /var/lib/clickhouse/flags/force_restore_data -
Start ClickHouse.
-
Wait until all tables are replicated. You can check progress using:
SELECT count(*) FROM system.replication_queue
Replacing a failed zookeeper node
- Configure ZooKeeper on a new server.
- Use the same hostname and
myidas the failed node if possible. - Start ZooKeeper on the new node.
- Verify the new node can connect to the ensemble.
- If the ZooKeeper environment does not support dynamic confirmation changes:
- If the new node has a different hostname or
myid, modifyzoo.cfgon the other nodes of the ensemble and restart them. - ClickHouse’s sessions will be interrupted during this process.
- If the new node has a different hostname or
- Make changes in ClickHouse configuration files if needed. A restart might be required for the changes to take effect.
Recovering from complete ZooKeeper loss (Call Support)
Complete loss of ZooKeeper is a serious event and should be avoided at all costs by proper ZooKeeper management. Follow this procedure only if you have lost all data in ZooKeeper as it is time-intensive and will cause affected tables to be unavailable.
- Raise a support ticket before taking any steps.
- Ensure that ZooKeeper is empty and working properly.
- Follow the instructions from Recovering from complete metadata loss in ZooKeeper or from the blog post A New Way to Restore ClickHouse After ZooKeeper Metadata Is Lost.
- ClickHouse will sync from the healthy table to all other tables.
Read-only tables
Read-only tables occur when ClickHouse cannot access ZooKeeper to record inserts on a replicated table.
-
Login with
clickhouse-client. -
Execute the following query to confirm that ClickHouse can connect to ZooKeeper:
$ clickhouse-client -q "select * from system.zookeeper where path='/'" -
This query should return one or more ZNode directories.
-
Execute the following query to check the state of the table.
SELECT * from system.replicas where table='table_name' -
If there are connectivity problems, check the following.
- Ensure the
<zookeeper>tag in ClickHouse configuration has the correct ZooKeeper host names and ports. - Ensure that ZooKeeper is running.
- Ensure that ZooKeeper is accepting connections. Login to the ZooKeeper host and try to connect using
zkClient.sh.
- Ensure the
4 - High Availability and Disaster Recovery
Best Practices recovering a disaster and keeping ClickHouse available.
Analytic systems are the eyes and ears of data-driven enterprises. It is critical to ensure they continue to work at all times despite failures small and large or users will be deprived of the ability to analyze and react to changes in the real world. Let’s start by defining two key terms.
- High Availability: (HA) includes the mechanisms that allow computer systems to continue operating following the failure of individual components.
- Disaster Recovery: (DR) includes the tools and procedures to enable computer systems to resume operation following a major catastrophe that affects many or all parts of a site.
These problems are closely related and depend on a small set of fungible technologies that include off-site backups and data replication..
The High Availability and Disaster Recovery guide provides an overview of the standard HA architecture for ClickHouse and a draft design for DR.
4.1 - Classes of Failures
The types of failures that can occur.
Failures come in many shapes and sizes. HA and DR focuses on protecting against the following:
- Loss of data due to human error or deliberate attack.
- Example: Deleting a table by accident.
- Failure of an individual server.
- Example: Host goes down/becomes unavailable due to a power supply failure or loss of network connectivity in the top-of-rack switch.
- Large-scale failure extending to an entire site or even a geographic region.
- Example: Severe weather or widespread outages of underlying services like Amazon Elastic Block Storage (EBS).
Database systems manage these failures using a relatively small number of procedures that have proven themselves over time. ClickHouse supports these.
- Replication: Create live replicas of data on different servers. If one server fails, applications can switch to another replica. ClickHouse supports asynchronous, multi-master replication. It is flexible and works even on networks with high latency.
- Backup: Create static snapshots of data that can be restored at will. Deleted tables, for instance, can be recovered from snapshots. ClickHouse has clickhouse-backup, an ecosystem project that handles static and incremental backups. It does not support point-in-time recovery.
- Distance: It is important to separate copies of data by distance so that a failure cannot affect all of them. Placing replicas in different geographic regions protects against large scale failures. Both replication and backups work cross-region.
Regardless of the approach to protection, it is important to recover from failures as quickly as possible with minimum data loss. ClickHouse solutions meet these requirements to varying degrees. ClickHouse replicas are typically immediately accessible and fully up-to-date.
Backups, on the other hand may run only at intervals such as once a day, which means potential data loss since the last backup. They also can take hours or even days to restore fully.
4.2 - High Availability Architecture
The best practices to keep ClickHouse available.
The standard approach to ClickHouse high availability combines replication, backup, and astute service placement to maximize protection against failure of single components and accidental deletion of data.
Best Practices for ClickHouse HA
Highly available ClickHouse clusters observe a number of standard practices to ensure the best possible resilience.
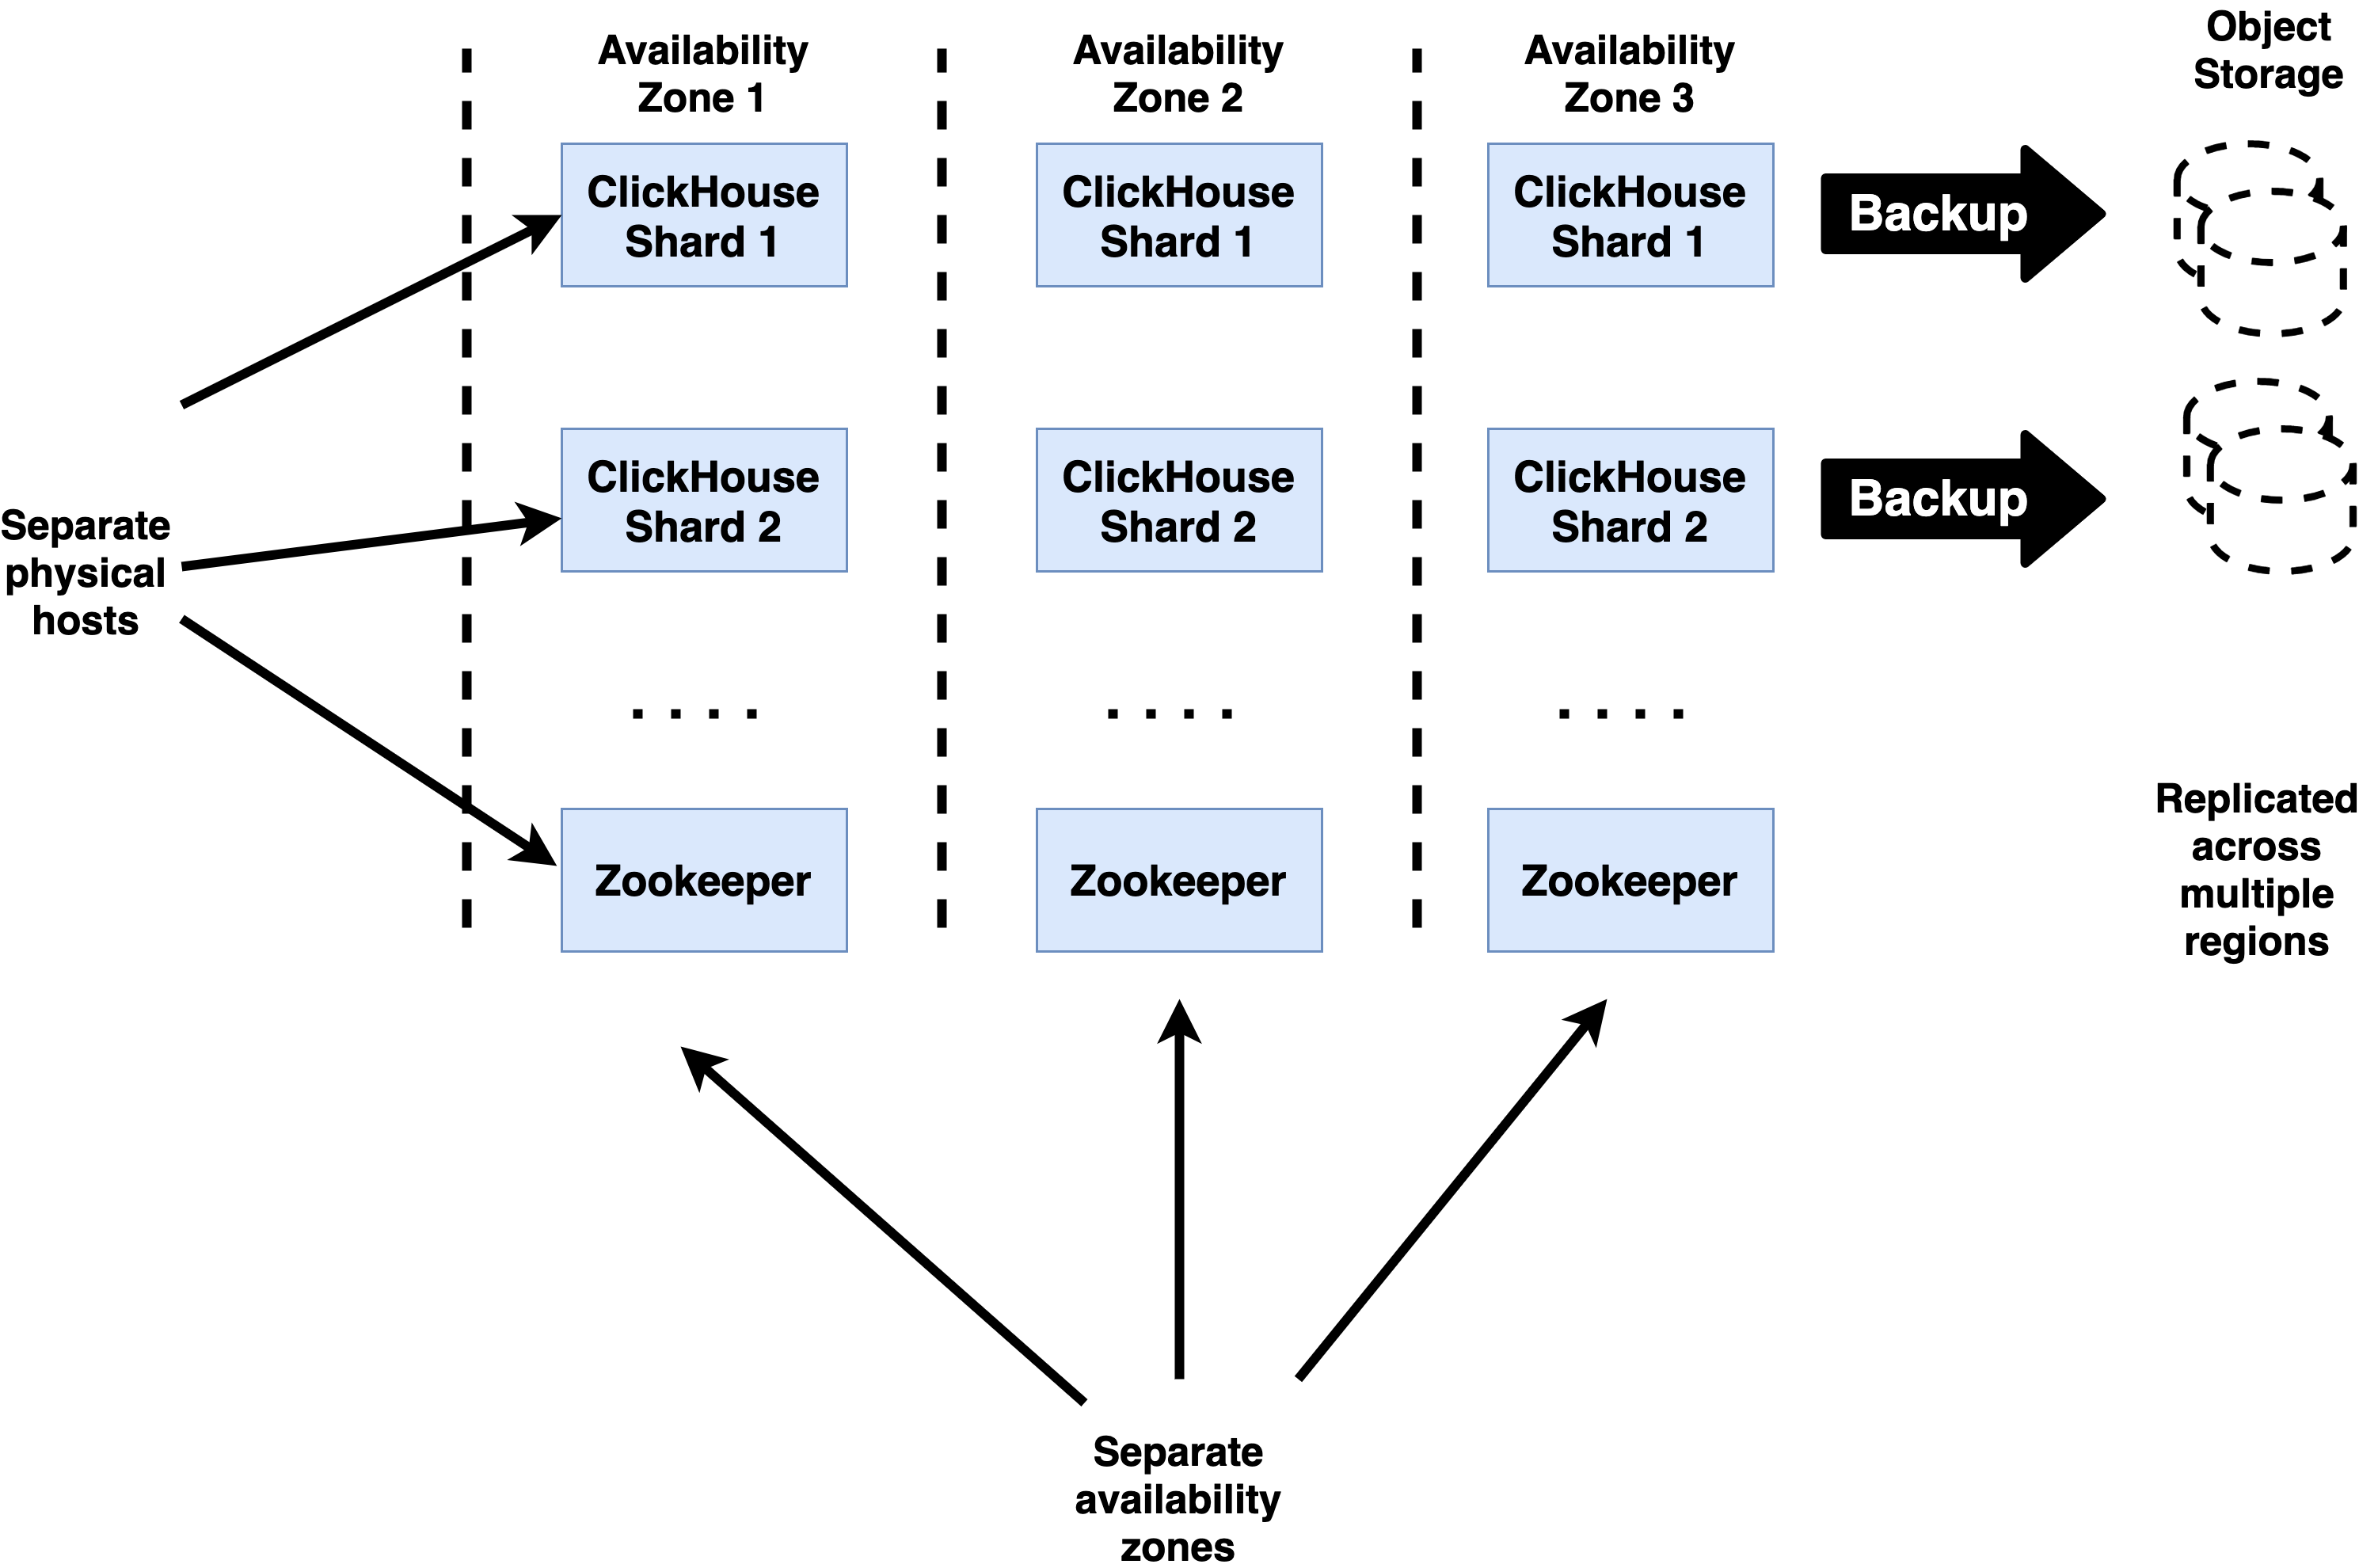
Keep at least 3 replicas for each shard
ClickHouse tables should always be replicated to ensure high availability. This means that you should use ReplicatedMergeTree or a similar engine for any table that contains data you want to persist. Cluster definitions for these tables should include at least three hosts per shard.
Having 3 replicas for each ClickHouse shard allows shards to continue processing queries after a replica failure while still maintaining capacity for recovery. When a new replica is attached to the shard it will need to fetch data from the remaining replicas, which adds load.
Use 3 replicas for Zookeeper
Zookeeper ensembles must have an odd number of replicas, and production deployments should always have at least three to avoid losing quorum if a Zookeeper server fails. Losing quorum can cause ClickHouse replicate tables to go into readonly mode, hence should be avoided at all costs. 3 is the most common number of replicas used.
It is possible to use 5 replicas but any additional availability benefit is typically canceled by higher latency to reach consensus on operations (3 vs. 2 servers). We do not recommend this unless there are extenuating circumstances specific to a particular site and the way it manages or uses Zookeeper.
Disperse replicas over availability zones connected by low-latency networks
ClickHouse replicas used for writes and Zookeeper nodes should run in separate availability zones. These are operating environments with separate power, Internet access, physical premises, and infrastructure services like storage arrays. (Most pubic clouds offer them as a feature.) Availability zones should be connected by highly reliable networking offering consistent round-trip latency of 20 milliseconds or less between all nodes. Higher values are likely to delay writes.
It is fine to locate read-only replicas at latencies greater than 20ms. It is important not to send writes to these replicas during normal operation, or they may experience performance problems due to the latency to Zookeeper as well as other ClickHouse replicas.
Locate servers on separate physical hardware
Within a single availability zone ClickHouse and Zookeeper servers should be located on separate physical hosts to avoid losing multiple servers from a single failure. Where practical the servers should also avoid sharing other hardware such as rack power supplies, top-of-rack switches, or other resources that might create a single point of failure.
Use clickhouse-backup to guard against data deletion and corruption
ClickHouse supports backup of tables using the clickhouse-backup utility, which can do both full and incremental backups of servers. Storage in S3 buckets is a popular option as it is relatively low cost and has options to replicate files automatically to buckets located in other regions.
Test regularly
HA procedures should be tested regularly to ensure they work and that you can perform them efficiently and without disturbing the operating environment. Try them out in a staging environment and automate as much as you can.
References for ClickHouse HA
The following links detail important procedures required to implement ClickHouse HA and recovery from failures.
- ClickHouse Data Replication – Overview of ClickHouse replication.
- ClickHouse Recovery After Complete Data Loss – Replace a ClickHouse server that has failed and lost all data.
- Zookeeper Cluster Setup – Describes how to set up a multi-node Zookeeper ensemble. Replacing a failed node is relatively straightforward and similar to initial installation.
- Clickhouse-backup – Instructions for performing backup and restore operations on ClickHouse.
4.3 - Disaster Recovery Architecture
How to make ClickHouse more resilient
An optimal approach to disaster recovery builds on the resiliency conferred by the HA best practices detailed in the previous section. To increase the chance of surviving a large scale event that takes out multiple data centers or an entire region, we increase the distance between replicas for ClickHouse and Zookeeper.
The DR architecture for ClickHouse accomplishes this goal with a primary/warm standby design with two independent clusters. Writes go to a single cluster (the primary site), while the other cluster receives replicated data and at most is used for reads (the warm standby site). The following diagram shows this design.
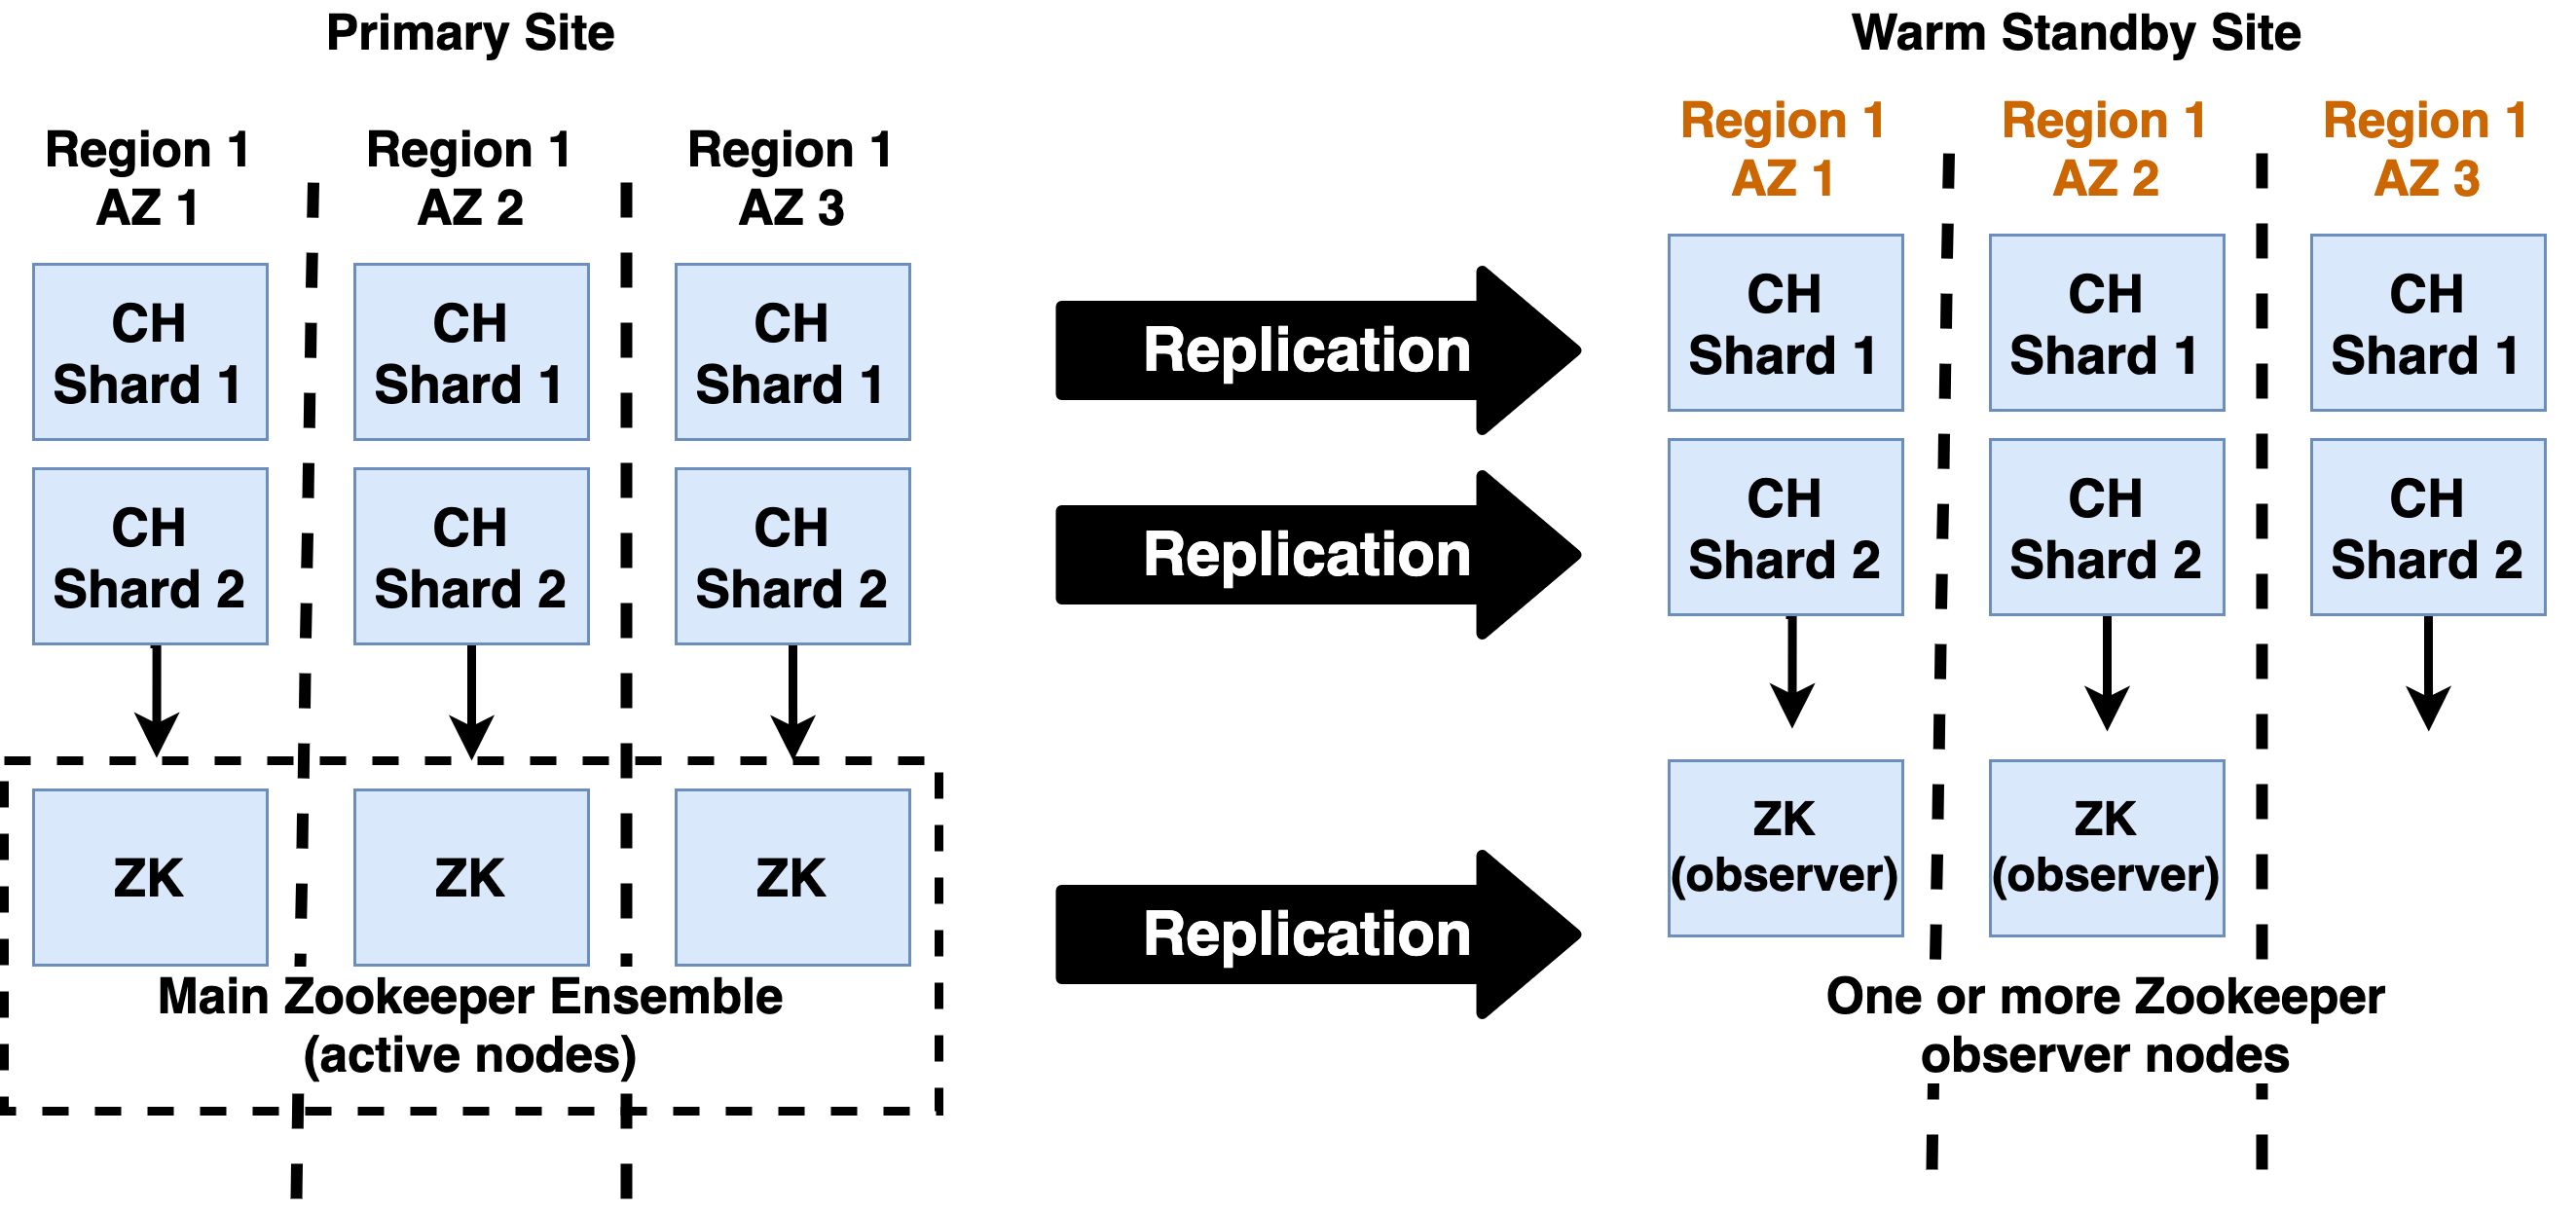
Best Practices for ClickHouse DR
Point all replicas to main Zookeeper ensemble
ClickHouse replicas on both the primary and warm standby sites should point to the main Zookeeper ensemble. Replicas in both locations can initiate merges. This is generally preferable to using cross-region transfer which can be costly and consumes bandwidth.
Send writes only to primary replicas
Applications should write data only to primary replicas, i.e., replicas with a latency of less than 20ms to the main Zookeeper ensemble. This is necessary to ensure good write performance, as it is dependent on Zookeeper latency.
Reads may be sent to any replica on any site. This is a good practice to ensure warm standby replicas are in good condition and ready in the event of a failover.
Run Zookeeper observers on the warm standby
Zookeeper observers receive events from the main Zookeeper ensemble but do not participate in quorum decisions. The observers ensure that Zookeeper state is available to create a new ensemble on the warm standby. Meanwhile they do not affect quorum on the primary site. ClickHouse replicas should connect to the main ensemble, not the observers, as this is more performant.
Depending on your appetite for risk, a single observer is sufficient for DR purposes. You can expand it to a cluster in the event of a failover..
Use independent cluster definitions for each site
Each site should use independent cluster definitions that share the cluster name and number of shards but use separate hosts from each site. Here is an example of the cluster definitions in remote_servers.xml on separate sites in Chicago and Dallas. First, the Chicago cluster definition, which refers to Chicago hosts only .
<!-- Chicago Cluster Definition -->
<yandex>
  <remote_servers>
    <cluster1>
      <shard>
        <replica>
          <host>chi-prod-01</host>
          <port>9000</port>
        </replica>
        <replica>
          . . .
      </shard>
      <shard>
        . . .
      </shard>
    </cluster1>
  </remote_servers>
</yandex>
Next, we have the Dallas cluster definition. As you can see here the definitions are identical except for host names.
<!-- Dallas Cluster Definition -->
<yandex>
  <remote_servers>
    <cluster1>
      <shard>
        <replica>
          <host>dfw-prod-01</host>
          <port>9000</port>
        </replica>
        <replica>
          . . .
      </shard>
      <shard>
        . . .
      </shard>
    </cluster1>
  </remote_servers>
</yandex
This definition ensures that distributed tables will only refer to tables within a single site. This avoids extra latency if subqueries go across sites. It also means the cluster definition does not require alteration in the event of a failover..
Use “Umbrella” cluster for DDL operations
For convenience to perform DDL operations against all nodes you can add one more cluster and include all Clickhouse nodes into this cluster. Run ON CLUSTER commands against this cluster. The following “all” cluster is used for DDL.
<!-- All Cluster Definition -->
<yandex>
  <remote_servers>
    <all>
      <shard>
        <replica>
          <host>dfw-prod-01</host>
          <port>9000</port>
        </replica>
        <replica>
          <host>chi-prod-01</host>
          <port>9000</port>
        </replica>
      </shard>
      <shard>
        . . .
      </shard>
    </all>
  </remote_servers>
</yandex>
Assuming the ‘all’ cluster is present on all sites you can now issue DDL commands like the following.
CREATE TABLE IF NOT EXISTS events_local ON CLUSTER all
...
;
Use macros to enable replication across sites
It is a best practice to use macro definitions when defining tables to ensure consistent paths for replicated as distributed tables. Macros are conventionally defined in file macros.xml. The macro definitions should appear as shown in the following example. (Names may vary of course.)
<yandex>
    <macros>
        <!-- Shared across sites -->
        <cluster>cluster1</cluster>
        <!-- Shared across sites -->
        <shard>0</shard>
        <!-- Replica names are unique for each node on both sites. -->
        <replica>chi-prod-01</replica>
    </macros>
</yandex>
The following example illustrates usage of DDL commands with the previous macros. Note that the ON CLUSTER clause uses the ‘all’ umbrella cluster definition to ensure propagation of commands across all sites.
-- Use 'all' cluster for DDL.
CREATE TABLE IF NOT EXISTS events_local ON CLUSTER 'all' (
    event_date  Date,
    event_type  Int32,
    article_id  Int32,
    title       String
.
ENGINE = ReplicatedMergeTree('/clickhouse/{cluster}/tables/{shard}/{database}/events_local', '{replica}')
PARTITION BY toYYYYMM(event_date)
ORDER BY (event_type, article_id);

CREATE TABLE events ON CLUSTER 'all' AS events_local
    ENGINE = Distributed('{cluster}', default, events_local, rand())
Using this pattern, tables will replicate across sites but distributed queries will be restricted to a single site due to the definitions for cluster1 being different on different sites.
Test regularly
It is critical to test that warm standby sites work fully. Here are three recommendations.
- Maintain a constant, light application load on the warm standby cluster including a small number of writes and a larger number of reads. This ensures that all components work correctly and will be able to handle transactions if there is a failover.
- Partition networks between sites regularly to ensure that the primary works properly.
- Test failover on a regular basis to ensure that it works well and can be applied efficiently when needed.
Monitoring
Replication Lag
Monitor ClickHouse replication lag/state using HTTP REST commands.
*curl http://ch_host:8123/replicas_status.
Also, check the absolute_delay from **system.replication_status **table.
Zookeeper Status
You can monitor the ZK ensemble and observers using: **echo stat | nc <zookeeper ip> 2181
Ensure that servers have the expected leader/follower and observer roles. Further commands can be found in the Zookeeper administrative docs.
Heartbeat Table
Add a service heartbeat table and make inserts at one site and select at another. It gives an additional check of replication status / lag across systems.
create table heart_beat(
site_id String,
	updated_at DateTime .
Engine = ReplicatedReplacingMergeTree(updated_at.
order by site_id;

-- insert local heartbeat
insert into heart_beat values('chicago', now()); .

-- check lag for other sites
select site_id.
       now() - max(updated_at) lag_seconds
from heart_beat
where site_id <> 'chicago'
group by site_id
References for ClickHouse DR
The following links detail important information required to implement ClickHouse DR designs and implement disaster recovery procedures..
- Zookeeper Observers – Procedure to set up and manage a Zookeeper observer.
- Zookeeper Dynamic Reconfiguration – Procedures to modify ensembles, promote observers, etc.
Failover and Recovery from Disasters
Failures in a DR event are different from HA. Switching to the warm standby site typically requires an explicit decision for the following reasons:
- Moving applications to the standby site requires changes across the entire application stack from public facing DNS and load balancing downwards..
- Disasters do not always affect all parts of the stack equally, so switching involves a cost-benefit decision. Depending on the circumstances, it may make sense to limp along on the primary.
It is generally a bad practice to try to automate the decision to switch sites due to the many factors that go into the decision as well as the chance of accidental failover. The actual steps to carry out disaster recovery should of course be automated, thoroughly documented, and tested.
Failover
Failover is the procedure for activating the warm standby site. For the ClickHouse DR architecture, this includes the following steps.
- Ensure no writes are currently being processed by standby nodes.
- Stop each Zookeeper server on the standby site and change the configuration to make them active members in the ensemble..
- Restart Zookeeper servers.
- Start additional Zookeeper servers as necessary to create a 3 node ensemble.
- Configure ClickHouse servers to point to new Zookeeper ensemble.
- Check monitoring to ensure ClickHouse is functioning properly and applications are able to connect.
Recovering the Primary
Recovery restores the primary site to a condition that allows it to receive load again. The following steps initiate recovery.
- Configure the primary site Zookeepers as observers and add server addresses back into the configuration on the warm standby site.
- Restart Zookeepers as needed to bring up the observer nodes. Ensure they are healthy and receiving transactions from the ensemble on the warm standby site.
- Replace any failed ClickHouse servers and start them using the procedure for recovering a failed ClickHouse node after full data loss.
- Check monitoring to ensure ClickHouse is functioning properly and applications are able to connect. Ensure replication is caught up for all tables on all replicas.
- Add load (if possible) to test the primary site and ensure it is functioning fully.
Failback
Failback is the procedure for returning processing to the primary site. Use the failover procedure in reverse, followed by recovery on the warm standby to reverse replication.
Cost Considerations for DR
Disasters are rare, so many organizations balance the cost of maintaining a warm standby site with parameters like the time to recover or capacity of the warm standby site itself to bear transaction load. Here are suggestions to help cut costs.
Use fewer servers in the ClickHouse cluster
It is possible to reduce the number of replicas per shard to save on operating costs. This of course raises the chance that some part of the DR site may also fail during a failover, resulting in data loss.
Use cheaper hardware
Using less performant hardware is a time-honored way to reduce DR costs. ClickHouse operates perfectly well on slow disk, so storage is a good place to look for savings, followed by the hosts themselves.
Host DR in the public cloud
ClickHouse and Zookeeper both run well on VMs so this avoids costs associated with physical installations (assuming you have them). Another advantage of public clouds is that they have more options to run with low-capacity hardware, e.g., by choosing smaller VMs.
Use network attached storage to enable vertical scaling from minimal base
ClickHouse and Zookeeper run well on network attached storage, for example Amazon EBS. You can run the warm standby site using minimum-sized VMs that are sufficient to handle replication and keep storage updated. Upon failover you can allocate more powerful VMs and re-attach the storage..
Caveat: In a large-scale catastrophe it is quite possible many others will be trying to do the same thing, so the more powerful VMs may not be available when you need them.
Discussion of Alternative DR Architectures
Primary/warm standby is the recommended approach for ClickHouse DR. There are other approaches of course, so here is a short discussion.
Active-active DR architectures make both sites peers of each other and have them both running applications and full load. As a practical matter this means that you would extend the Zookeeper ensemble to multiple sites. The catch is that ClickHouse writes intensively to Zookeeper on insert, which would result in high insert latency as Zookeeper writes across sites. Products that take this approach put Zookeeper nodes in 3 locations, rather than just two. (See an illustration of this design from the Confluent documentation.)
Another option is storage-only replication. This approach replicates data across sites but does not activate database instances on the warm standby site until a disaster occurs. Unlike Oracle or PostgreSQL, ClickHouse does not have a built-in log that can be shipped to a remote location. It is possible to use file system replication, such as Linux DRBD, but this approach has not been tested. It looks feasible for single ClickHouse instances but does not seem practical for large clusters.